Notice: this Wiki will be going read only early in 2024 and edits will no longer be possible. Please see: https://gitlab.eclipse.org/eclipsefdn/helpdesk/-/wikis/Wiki-shutdown-plan for the plan.
Difference between revisions of "Android Selector 1.1"
m (→End User Perspective) |
m (→End User Perspective) |
||
| Line 10: | Line 10: | ||
Although we call this solution a selector it does NOT currently support the IMI protocol, only un/pw form filling. The Username/password data is persisted on (non-IMI-compliant) cards on a hosted [[I-Card Service]].--> | Although we call this solution a selector it does NOT currently support the IMI protocol, only un/pw form filling. The Username/password data is persisted on (non-IMI-compliant) cards on a hosted [[I-Card Service]].--> | ||
| − | == End User Perspective == | + | == End User Perspective == |
| − | + | ||
| − | + | The Android I-Card Selector allows users to use their I-Cards at relying parties. | |
| − | + | Download [http://www.sitrusllc.com/files_sitrus/get_android-icardselector-windows.php Android I-Card Selector] | |
| − | + | ||
| − | + | ||
| − | + | ||
| − | + | ||
| − | + | ||
| − | + | ||
| − | + | ||
| − | + | This archive contains following files: | |
| − | + | {| width="60%" border="0" cellpadding="1" cellspacing="1" | |
| − | + | |- | |
| + | | * install_apk.bat | ||
| + | | install file | ||
| + | |- | ||
| + | | * install_plugin.bat | ||
| + | | install file | ||
| + | |- | ||
| + | | * org.eclipse.higgins.android.icard.selector.apk | ||
| + | | Android I-Card Selector | ||
| + | |- | ||
| + | | * org.eclipse.higgins.android.icard.service.apk | ||
| + | | Android I-Card Service | ||
| + | |- | ||
| + | | * pwm.so | ||
| + | | Android I-Card web browser plugin file | ||
| + | |- | ||
| + | | * pwm-android.jar | ||
| + | | Android I-Card web browser plugin file | ||
| + | |- | ||
| + | | * readme.tx | ||
| + | | read me file | ||
| + | |} | ||
| − | + | '''This component only works at relying parties that explicitly support it.''' | |
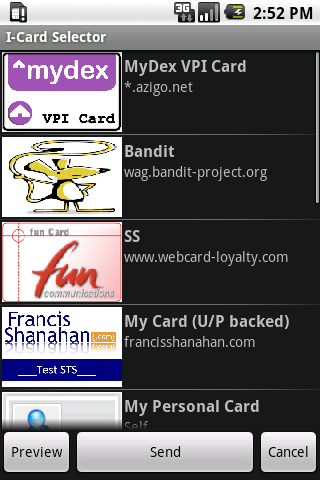
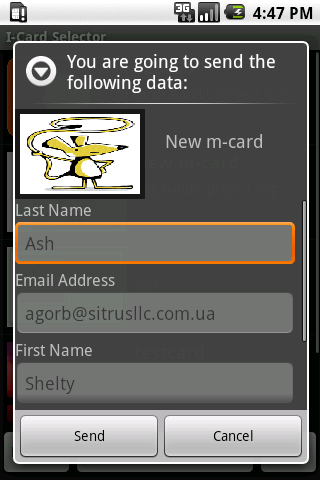
| − | + | [[Image:AndroidSelectorScreenshot3.png]] [[Image:AndroidSelectorScreenshot4.png]] | |
| − | + | === Installation === | |
| − | + | ==== Installation on Windows ==== | |
| − | + | ||
| − | + | ||
| − | + | Download and install Android SDK (at now 1.6 version) from http://developer.android.com/sdk/index.html (at now 1.6 version). | |
| − | + | Set environment variables: | |
| − | + | *set ANDROID_SDK variable with value of path to Android SDK; | |
| + | *update PATH variable with you ANDROID_SDK variable (PATH=%PATH%;%ANDROID_SDK%\tools). | ||
| − | + | After that (it is possible, reboot will be needed), connect you device (or run emulator with Android 1.6) to PC. | |
| − | + | '''Important!''' Next steps should be executed with ''connected'' device or emulator. | |
| − | + | ||
| − | + | Unpack archive and go to directory with unpacked files. | |
| − | Execute "install_plugin.bat" file or run in command-line: | + | ===== Install apk files ===== |
| + | |||
| + | Execute "install_apk.bat" or run in command-line: | ||
| + | |||
| + | for /r %i in (*.apk) do adb install %i | ||
| + | |||
| + | ===== Install plugin files ===== | ||
| + | |||
| + | Execute "install_plugin.bat" file or run in command-line: | ||
set MODULE=pwm | set MODULE=pwm | ||
| Line 67: | Line 86: | ||
echo Create directories on the target. | echo Create directories on the target. | ||
| − | adb shell mkdir %ANDROID_DEVICE_BROWSER_DIR% | + | adb shell mkdir %ANDROID_DEVICE_BROWSER_DIR% >/dev/null |
| − | adb shell mkdir %ANDROID_DEVICE_INSTALL_DIR% | + | adb shell mkdir %ANDROID_DEVICE_INSTALL_DIR% >/dev/null |
| − | adb shell mkdir %PLUGIN_RESOURCES_DIR% | + | adb shell mkdir %PLUGIN_RESOURCES_DIR% >/dev/null |
echo copy so files | echo copy so files | ||
| − | adb push %PWM_SO% %ANDROID_DEVICE_INSTALL_DIR%/%PWM_SO% | + | adb push %PWM_SO% %ANDROID_DEVICE_INSTALL_DIR%/%PWM_SO% |
| − | adb push %PWM_ANDROID_JAR% %PLUGIN_RESOURCES_DIR%/%PWM_ANDROID_JAR% | + | adb push %PWM_ANDROID_JAR% %PLUGIN_RESOURCES_DIR%/%PWM_ANDROID_JAR% |
echo create cache file | echo create cache file | ||
| − | adb shell " | + | adb shell ">/data/dalvik-cache/data@data@com.android.browser@app_plugins@%MODULE%-%VERSION%@%PWM_ANDROID_JAR%@classes.dex" |
| + | |||
| + | Restart Android and launch I-Card Selector. | ||
| − | + | === Configuration === | |
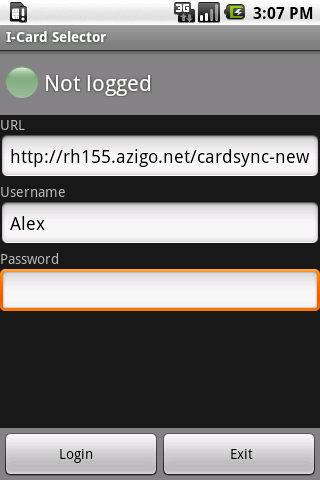
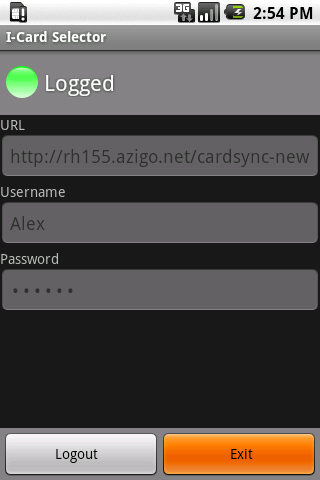
| − | + | The Android I-Card Selector uses the following settings: | |
| − | + | *[[CardSync Service]] endpoint | |
| − | * [[CardSync Service]] endpoint | + | *username and password of existing account |
| − | * username and password of existing account | + | |
| − | [[Image:AndroidSelectorScreenshot1.png]] | + | [[Image:AndroidSelectorScreenshot1.png]] [[Image:AndroidSelectorScreenshot2.png]] |
| − | [[Image:AndroidSelectorScreenshot2.png]] | + | |
== Deployer Perspective == | == Deployer Perspective == | ||
Revision as of 07:31, 2 July 2010
{{#eclipseproject:technology.higgins|eclipse_custom_style.css}}
Contents
Version
This page describes the Android solution being developed for Higgins 1.1.
Introduction
This is a standalone Android application that can be launched automatically from a relying party website. For more information about Information Cards and Selectors visit http://informationcard.net
End User Perspective
The Android I-Card Selector allows users to use their I-Cards at relying parties.
Download Android I-Card Selector
This archive contains following files:
| * install_apk.bat | install file |
| * install_plugin.bat | install file |
| * org.eclipse.higgins.android.icard.selector.apk | Android I-Card Selector |
| * org.eclipse.higgins.android.icard.service.apk | Android I-Card Service |
| * pwm.so | Android I-Card web browser plugin file |
| * pwm-android.jar | Android I-Card web browser plugin file |
| * readme.tx | read me file |
This component only works at relying parties that explicitly support it.
Installation
Installation on Windows
Download and install Android SDK (at now 1.6 version) from http://developer.android.com/sdk/index.html (at now 1.6 version).
Set environment variables:
- set ANDROID_SDK variable with value of path to Android SDK;
- update PATH variable with you ANDROID_SDK variable (PATH=%PATH%;%ANDROID_SDK%\tools).
After that (it is possible, reboot will be needed), connect you device (or run emulator with Android 1.6) to PC.
Important! Next steps should be executed with connected device or emulator.
Unpack archive and go to directory with unpacked files.
Install apk files
Execute "install_apk.bat" or run in command-line:
for /r %i in (*.apk) do adb install %i
Install plugin files
Execute "install_plugin.bat" file or run in command-line:
set MODULE=pwm
set VERSION=0.1.0.0

set ANDROID_DEVICE_BROWSER_DIR=/data/data/com.android.browser
set ANDROID_DEVICE_INSTALL_DIR=%ANDROID_DEVICE_BROWSER_DIR%/app_plugins
set PLUGIN_NAME=%MODULE%.so
set PLUGIN_RESOURCES_DIR=%ANDROID_DEVICE_INSTALL_DIR%/%MODULE%-%VERSION%

rem filenames for copying
set PWM_ANDROID_JAR="pwm-android.jar"
set PWM_SO="pwm.so"

echo Create directories on the target.
adb shell mkdir %ANDROID_DEVICE_BROWSER_DIR% >/dev/null
adb shell mkdir %ANDROID_DEVICE_INSTALL_DIR% >/dev/null
adb shell mkdir %PLUGIN_RESOURCES_DIR% >/dev/null

echo copy so files
adb push %PWM_SO% %ANDROID_DEVICE_INSTALL_DIR%/%PWM_SO%
adb push %PWM_ANDROID_JAR% %PLUGIN_RESOURCES_DIR%/%PWM_ANDROID_JAR%

echo create cache file
adb shell ">/data/dalvik-cache/data@data@com.android.browser@app_plugins@%MODULE%-%VERSION%@%PWM_ANDROID_JAR%@classes.dex"
Restart Android and launch I-Card Selector.
Configuration
The Android I-Card Selector uses the following settings:
- CardSync Service endpoint
- username and password of existing account
Deployer Perspective
Building
The projects are:
- app/org.eclipse.higgins.android.icard.npapi
- app/org.eclipse.higgins.android.icard.selector
- app/org.eclipse.higgins.android.icard.service
- app/org.eclipse.higgins.android.icard.service.test
These projects can be checked out from the Eclipse repository at the following SVN URIs:
In order to build the Android I-Card Selector, you need the following:
- The latest version of Android SDK.
- The latest version of Android source code.
- The Apache Ant or Eclipse with ADT (Android Development Tools).
- GNU Make 3.81 (or later) or Eclipse with CDT.
To build all in Eclipse you need the following steps:
- Check out all these projects from SVN (you can do it with Subversive plug-in).
- Add ksoap2-android library into the classpath of service project.
- Build Selector and Service.
- Set up ANDROID_BUILD_TOP and ANDROID_SDK variables in the properties of NPAPI (Properties -> C/C++ Build -> Environment).
- Build NPAPI (with run Android emulator or device).
Developer Perspective
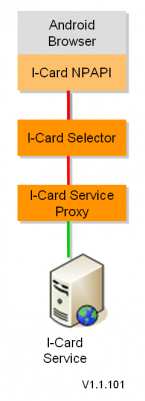
Architecture
(Diagram Key)Components, Packages & Services
Components:
- I-Card NPAPI plugin - This is a native NPAPI Android browser plugin. It processes objects with MIME type "application/x-informationcard".
- I-Card Selector - This is an Android application.
- I-Card Service Proxy (formerly Local I-Card Service) - This is the Android service that communicates with the remote I-Card Service 1.1. It caches cards, synchronizes them and implements simple ISS (I-Card Selector Service) logic.
Services:


