Notice: This Wiki is now read only and edits are no longer possible. Please see: https://gitlab.eclipse.org/eclipsefdn/helpdesk/-/wikis/Wiki-shutdown-plan for the plan.
Mihini/Run Mihini on an Open Hardware platform
This page describes a scenario for illustrating the use of Mihini on an Open Hardware Linux-based platform such as BeagleBoard or RaspberryPi.
The goal would be for someone to be able to be only one hour away from taking a bare development board and have it configured to collect data out of the GPIO sensors.
Contents
Step 1 - Build Mihini
So far, all the work is being done directly on your remote system. For the following sample, pi user is being used on a RaspberryPi running Raspbian Wheezy. Connect to you device using ssh and follow the steps.
Compilation prerequisites
First of all, you will need some compilation tools:
$ sudo apt-get install git build-essential cmake
Sources to compile
Get the sources
$ cd /tmp/
$ git clone ssh://host/mihini.git
Run the compilation
Lets move into the repository you just cloned. Make sure you have all prerequisites mentioned above installed. Now, simply run the following in the repository you just cloned, here called mihini/.
# Compile Mihini
$ cd mihini/bin
$ ./build.sh

# Compile Lua
$ cd build.default/
$ make lua
Configure Mihini
Then there will be some configuration on bin/build.default/runtime/lua/agent/defaultconfig.lua.
- Enable the application container
-
appcon.activate = true
-
- Enable the update manager
-
update.activate = true
-
OPTIONAL (but useful :))
- Enable Lua shell on all network interfaces by adding
-
shell.address = "*"
-
- Disable colors while logging , in order to not clutter your syslog.
log.enablecolors = false
It should be easier
What is explained above is just a beginning. We are about to provide material which will speed up previous steps, such as:
- How to cross compile Mihini from your Desktop machine
- A
defaultconfig.luawith the right default settings - A Linux package, to avoid any kind of compilation or configuration ( It is hypothetical )
Step 2 - Start Mihini on your device
One of the features of Mihini is to manage the life cycle of your application. In order to do so, applications are run from another program: the Appmon. We need to start it.
Manually
On your device, here a RaspberryPi with user pi.
$ cd mihini/bin/
$ sudo ./appmon_daemon -a /home/pi/mihini/start.sh -w /home/pi/mihini -u pi -g pi -n 5 2>&1 | logger -t Mihini&
Notice: we launched appmon_daemon with user pi in order to benefit from valid user rights.
As a service
Soon :)
Step 3 - Setup Koneki environment
- Download Lua Development Tools
- Install Remote Development Support for LDT
- Configure the remote target in the Koneki environment
- Define your device and configure its "SSH Lua" paths like this
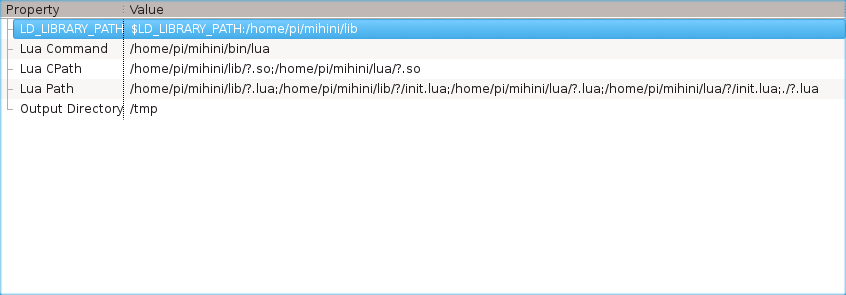
- If you want the text version
- Define your device and configure its "SSH Lua" paths like this

LUA_PATH: /home/pi/mihini/lib/?.lua;/home/pi/mihini/lib/?/init.lua;/home/pi/mihini/lua/?.lua;/home/pi/mihini/lua/?/init.lua;./?.lua
LUA_CPATH: /home/pi/mihini/lib/?.so;/home/pi/mihini/lua/?.so
LD_LIBRARY_PATH: $LD_LIBRARY_PATH:/home/pi/mihini/lib
- Configure the "Mihini execution environment" (coming soon, will provide nice autocompletion...)
- Create a launch/debug configuration and test your script.
Step 4 - Create your first application
You could blink a LED, use a touch sensor, measure the temperature and available RAM of the board... I decided to keep it simple in this tutorial, my application will simply log :). The file is main.lua.
local log   = require "log"
local sched = require "sched"
local function main()
    log("GENERAL", "INFO", "My first Mihini app is alive :)")
end

sched.run(main)
sched.loop()
Step 5 - Install your application
Manually
All you a have to do in order to enable Mihini to handle you application is:
- Create a launcher
- Provide sources
Create a launcher
Mihini Application container runs executables. To run a Lua application, we need to set some variables beforehand and then lauch your application. In order to do so lets create the proper launcher. In the Mihini world, it is an executable file called run. Here is its content:
#!/bin/sh

# Setting up paths
export LUA_PATH="/home/pi/mihini/lib/?.lua;/home/pi/mihini/lib/?/init.lua;/home/pi/mihini/lua/?.lua;/home/pi/mihini/lua/?/init.lua;./?.lua"
export LUA_CPATH="/home/pi/mihini/lib/?.so;/home/pi/mihini/lua/?.so"
export LD_LIBRARY_PATH="$LD_LIBRARY_PATH:/home/pi/mihini/lib"

# Running app
/home/pi/mihini/bin/lua main.lua
Now the my application folder looks like
$ find raspapp/
raspapp/
raspapp/run
raspapp/main.lua
Install application
First of all, I presume you already have an Appmon Daemon running. You may wonder which way you can interact with Mihini. While starting, Mihini opens a Telnet server on port 2000, it enables you communicate with its runtime. We are about to use it to install an app available at '/tmp/raspapp', which will be named 'sample', this application will benefit from autostart ( the last true parameter ).
$ telnet localhost 2000
Trying 127.0.0.1...
Connected to localhost.
Escape character is '^]'.
Lua interactive shell
> appcon = require 'agent.appcon'
> = appcon.install('sample', '/tmp/raspapp', true )
= ok
We can check that the application is properly installed
> for app, t in pairs(appcon.list()) do
+     print( app )
+     for field, data in pairs(t) do
+         print('\t', field, data)
+     end
+ end
sample
                autostart       true
                runnable        true
Over the air
One day, it will be possible to install application to your remote system Mihini just from its IP, and even more:
- Use the Koneki tools to create an application package
- Deploy the package on a publically available web server
- Connect to the Mihini console and for a connection to the testing server
MISC. TIP & TRICKS
- You may want to have udev rules so as your USB devices (typically the 3G stick) does not end up having an always changing /dev/ttyUSB<something> file descriptor...
- For a Sierra 3G stick, create a 99-aircard.rules in /etc/udev/rules.d, with the following rules (your ID_VENDOR_ID and ID_MODEL_ID may be different):
SUBSYSTEM=="tty", SUBSYSTEMS=="usb", ENV{ID_VENDOR_ID}=="1199", ENV{ID_MODEL_ID}=="68a3", ENV{ID_USB_INTERFACE_NUM}=="03", SYMLINK+="ttyATConsole0"
SUBSYSTEM=="tty", SUBSYSTEMS=="usb", ENV{ID_VENDOR_ID}=="1199", ENV{ID_MODEL_ID}=="68a3", ENV{ID_USB_INTERFACE_NUM}=="04", SYMLINK+="ttyATConsole1"
- For a serial-USB adapter: http://hintshop.ludvig.co.nz/show/persistent-names-usb-serial-devices/
- Below is a template of the defaultconfig.lua that you should use to have most of the important features (appmon, updatemanager, ...) of Mihini enabled
TODO