Notice: This Wiki is now read only and edits are no longer possible. Please see: https://gitlab.eclipse.org/eclipsefdn/helpdesk/-/wikis/Wiki-shutdown-plan for the plan.
Difference between revisions of "Scout/Tutorial/3.8/webservices/Create Scout Project"
| Line 6: | Line 6: | ||
[[Image:org.eclipse.scout.tutorial.jaxws.ChooseNewScoutProject.png|200px|Choose new Scout Project]] | [[Image:org.eclipse.scout.tutorial.jaxws.ChooseNewScoutProject.png|200px|Choose new Scout Project]] | ||
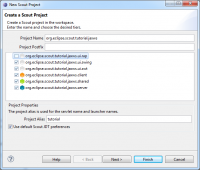
| − | [[Image:org.eclipse.scout.tutorial.jaxws.CreateScoutProject 1.png|200px|Step 1]] | + | [[Image:org.eclipse.scout.tutorial.jaxws.CreateScoutProject 1.png|200px|Step 1: Enter project name]] |
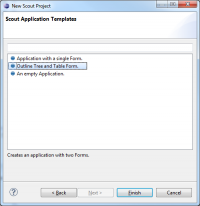
| − | [[Image:org.eclipse.scout.tutorial.jaxws.CreateScoutProject 2.png|200px|Step 2]] | + | [[Image:org.eclipse.scout.tutorial.jaxws.CreateScoutProject 2.png|200px|Step 2: Choose application template]] |
| − | [[Image:org.eclipse.scout.tutorial.jaxws.CreateScoutProject 3.png|200px|Step 3]] | + | [[Image:org.eclipse.scout.tutorial.jaxws.CreateScoutProject 3.png|200px|Step 3: Skip RAP]] |
Revision as of 11:19, 8 November 2011
If you have not done yet, change to the Scout Perspective. ![]()
- In Scout Explorer, right-click on the folder Scout Projects and choose 'New Scout Project...'.
- Use
org.eclipse.scout.tutorial.jaxwsas the project name in the first step, click next. - In the second step, choose
Outline Tree and Table Form, click next. - In the last step, simply choose
I'll do later...because we do not want to create a RAP project. Click finish.


