Notice: This Wiki is now read only and edits are no longer possible. Please see: https://gitlab.eclipse.org/eclipsefdn/helpdesk/-/wikis/Wiki-shutdown-plan for the plan.
Difference between revisions of "Jetty WTP Plugin/Jetty WTP Create Server"
m |
(→Creating a Jetty Server) |
||
| (26 intermediate revisions by the same user not shown) | |||
| Line 1: | Line 1: | ||
{{Jetty}} | {{Jetty}} | ||
| + | |||
| + | ==Creating a Jetty Server == | ||
To create a Jetty Server entry, complete the following steps. | To create a Jetty Server entry, complete the following steps. | ||
| + | <ol> | ||
| + | <li>From the main Eclipse window, select '''File -> New -> Other'''. The ''Select a Wizard'' dialog box opens. | ||
| + | </li> | ||
| − | |||
| − | |||
| − | |||
| − | [[Image:Jetty-wtp-create1.jpg]] | + | </li>[[Image:Jetty-wtp-create1.jpg]] |
| − | |||
| − | |||
| − | |||
| − | + | <li>In the ''Wizards'' list box, scroll down to select '''Server -> Server'''. | |
| − | + | <li>Click '''Next'''. The ''Define a New Server'' dialog box opens. | |
| + | </li> | ||
| − | |||
| + | </li>[[Image:Jetty-wtp-create2.jpg]] | ||
| − | |||
| − | + | <li>In the ''Select the server type'' field, scroll down to select '''Jetty -> Jetty 7.x''' or '''Jetty 8.x Server'''. This document uses the Jetty 7.x Server. | |
| + | <li>Click '''Next'''. The ''Jetty Server'' dialog box opens. | ||
| + | </li> | ||
| − | |||
| − | |||
| − | + | </li>[[Image:Jetty-wtp-create3.jpg]] | |
| − | |||
| − | + | <li>To specify the installation directory for Jetty, use the '''Browse''' button. Navigate to a local installation of jetty7 or jetty8 and click select. | |
| + | </li> | ||
| − | |||
| − | + | <li>Click '''Next'''. The ''Add and Remove'' dialog boxopens. | |
| + | </li> | ||
| − | + | </li>[[Image:Jetty-wtp-create7.jpg]] | |
| − | + | ||
| − | * A Server Project is created in the workspace | + | |
| + | Here you can select an existing Dynamic Web project from your workspace. In this example, there are no WTP Dynamic WebProjects. | ||
| + | |||
| + | |||
| + | |||
| + | <li>Click '''Finish'''. | ||
| + | </ol> | ||
| + | |||
| + | |||
| + | * A Server Project is created in the workspace. | ||
* if you go to WTP Server View , you see the option to launch Jetty v7.0 Server at localhost, which you can use to start/stop/debug the installed Jetty server. | * if you go to WTP Server View , you see the option to launch Jetty v7.0 Server at localhost, which you can use to start/stop/debug the installed Jetty server. | ||
| + | |||
| + | |||
[[Image:Jetty-wtp-create8.jpg]] | [[Image:Jetty-wtp-create8.jpg]] | ||
| − | Servers | + | |
| − | * start.ini | + | |
| − | * start.config | + | The Servers folder includes the Jetty v7.0 Server at localhost-config folder, which contains: |
| − | * the jetty*.xml files which are declared in the original start.ini. Jetty*.xml files are preprocessed too to transform <Property to <SystemProperty. | + | * <tt>start.ini</tt> from the Jetty install (D:\Servers\jetty-distribution-7.2.x). |
| − | * webdefault.xml is modified to avoid locking HTML files under Windows when Jetty is started and HTML files are modified (published) with the option : | + | * <tt>start.config</tt> from the JAR <tt>start.jar</tt> from the Jetty install. Notice that <tt>Server/start.config</tt> is not the same as Jetty <tt>install/start.jar</tt>. Jetty Home is not the Jetty Install server but a WTP folder (created in the .metadata of your workspace). |
| + | * the <tt>jetty*.xml</tt> files, which are declared in the original <tt>start.ini. Jetty*.xml</tt> files are preprocessed too to transform <Property to <SystemProperty. | ||
| + | * <tt>webdefault.xml</tt> is modified to avoid locking HTML files under Windows when Jetty is started and HTML files are modified (published) with the following option: | ||
| + | |||
<source lang="xml"> | <source lang="xml"> | ||
| Line 61: | Line 73: | ||
</source> | </source> | ||
| − | When Jetty server is called it uses: | + | When the Jetty server is called it uses: |
| − | * -Djetty.home | + | * <tt>-Djetty.home</tt>, which is the WTP folder. |
| − | * -Dinstall.jetty.home | + | * <tt>-Dinstall.jetty.home</tt>, which is the Jetty install folder. |
Latest revision as of 14:46, 22 December 2010
Creating a Jetty Server
To create a Jetty Server entry, complete the following steps.
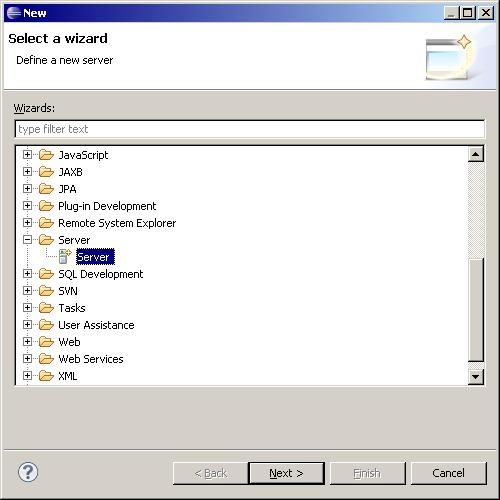
- From the main Eclipse window, select File -> New -> Other. The Select a Wizard dialog box opens.
- In the Wizards list box, scroll down to select Server -> Server.
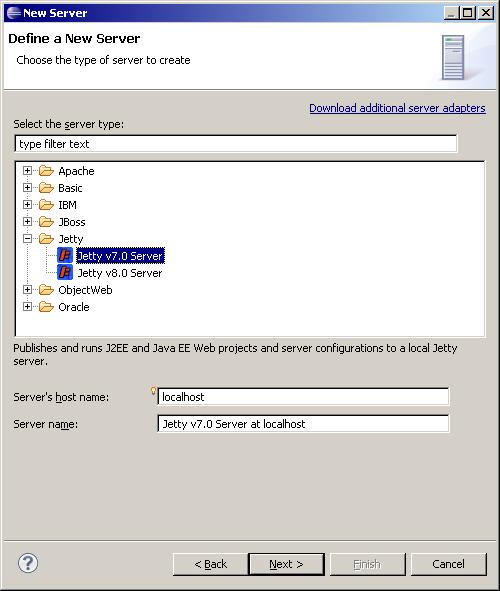
- Click Next. The Define a New Server dialog box opens.
- In the Select the server type field, scroll down to select Jetty -> Jetty 7.x or Jetty 8.x Server. This document uses the Jetty 7.x Server.
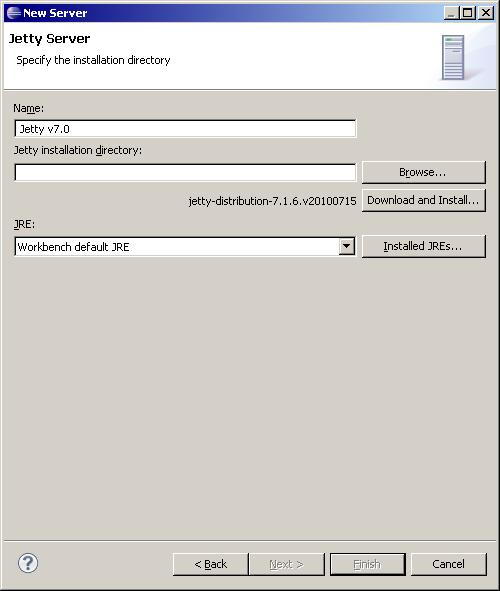
- Click Next. The Jetty Server dialog box opens.
- To specify the installation directory for Jetty, use the Browse button. Navigate to a local installation of jetty7 or jetty8 and click select.
- Click Next. The Add and Remove dialog boxopens.
- Click Finish.
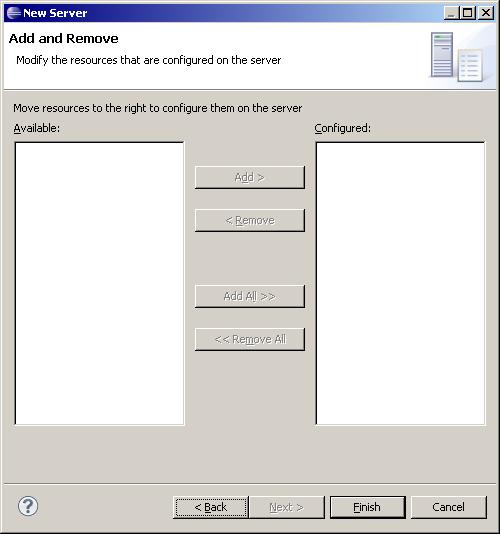
Here you can select an existing Dynamic Web project from your workspace. In this example, there are no WTP Dynamic WebProjects.
- A Server Project is created in the workspace.
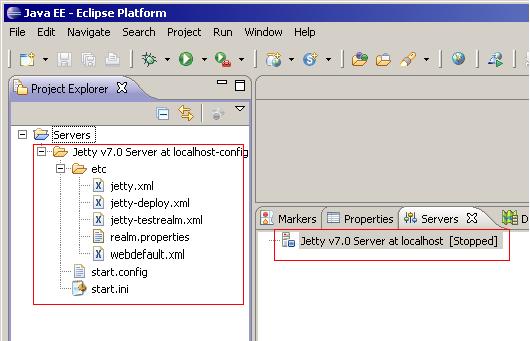
- if you go to WTP Server View , you see the option to launch Jetty v7.0 Server at localhost, which you can use to start/stop/debug the installed Jetty server.
The Servers folder includes the Jetty v7.0 Server at localhost-config folder, which contains:
- start.ini from the Jetty install (D:\Servers\jetty-distribution-7.2.x).
- start.config from the JAR start.jar from the Jetty install. Notice that Server/start.config is not the same as Jetty install/start.jar. Jetty Home is not the Jetty Install server but a WTP folder (created in the .metadata of your workspace).
- the jetty*.xml files, which are declared in the original start.ini. Jetty*.xml files are preprocessed too to transform <Property to <SystemProperty.
- webdefault.xml is modified to avoid locking HTML files under Windows when Jetty is started and HTML files are modified (published) with the following option:
  <init-param>
    <param-name>useFileMappedBuffer</param-name>
    <param-value>false</param-value>
  </init-param>
When the Jetty server is called it uses:
- -Djetty.home, which is the WTP folder.
- -Dinstall.jetty.home, which is the Jetty install folder.

