Notice: This Wiki is now read only and edits are no longer possible. Please see: https://gitlab.eclipse.org/eclipsefdn/helpdesk/-/wikis/Wiki-shutdown-plan for the plan.
Difference between revisions of "HackingSystemTapWithEclipse"
(→Import) |
|||
| Line 56: | Line 56: | ||
Keep in mind that if you want to take full advantage of SystemTap's power, you'll need to install kernel debuginfo, as well as run the command: <code>make -C /usr/local/share/systemtap/runtime/uprobes</code>. | Keep in mind that if you want to take full advantage of SystemTap's power, you'll need to install kernel debuginfo, as well as run the command: <code>make -C /usr/local/share/systemtap/runtime/uprobes</code>. | ||
| + | |||
| + | |||
| + | ==Testing== | ||
| + | |||
| + | SystemTap uses DejaGnu to run a series of tests. These tests can be triggered from within Eclipse. | ||
| + | |||
| + | In the Project Explorer view, right click on the testsuite folder and select Make Targets --> Build and then installcheck or check as your build targets. To run specific tests (e.g. strlen.exp), edit the make target to run <code>make (check/installcheck) RUNTESTFLAGS=strlen.exp</code>. | ||
Revision as of 15:05, 3 February 2010
Hacking SystemTap with Eclipse
This is a page about how to hack on SystemTap source code using Eclipse's CDT. For information on building SystemTap scripts using Eclipse, see SystemTapGUI.
Contents
Requirements
You need the following:
- Eclipse-CDT (Available from the Eclipse Update Site)
- Eclipse C/C++ Autotools plugin (Installation Instructions)
- Git or EGit
Need help?
Need something that isn't covered by this guide? Find charley on #eclipse on irc.freenode.net, and he will be happy to assist.
Getting started
Git
In command line, go to the directory where you would like SystemTap to be installed and perform a git clone on the SystemTap source:
git clone git://sources.redhat.com/git/systemtap.git
EGit
Please note that at the time of writing EGit is in Beta, so there are some features (i.e. an integrated git clone + project import) that are not available.
Go to File --> Import --> Git --> EGit
In the EGit dialogue, paste the following line into the URI box:
git://sources.redhat.com/git/systemtap.git
The rest of the details will be filled in automatically. Click Next.
Deselect all branches and select the master branch. Click Next and EGit will fetch all the relevant files.
At the current time there is no way to create a project after this git clone, so hit Cancel. When prompted to delete the clone, choose No.
Import
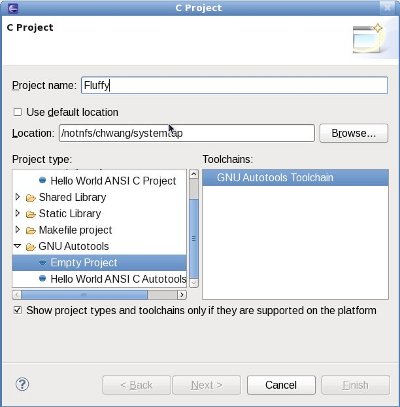
Open up Eclipse and select File -> New Project -> C Project -> GNU Autotools. Choose Empty Project and the Gnu Autotools toolchain. At the top of the New Project box, specify the location to which you cloned the SystemTap source, and name the project (I named it Fluffy). Click Next, and then Finish.
Eclipse will now import the SystemTap project. During this process, the SystemTap configuration may throw a few errors about missing packages - please download these. The configuration output can be found in the Configuration console.
Congratulations! You're good to start hacking. Make sure to read the HACKING document in the SystemTap root folder for standard practices and additional tips.
Building
Autotools should be able to automatically make the project for you whenever you select Build. However, if this does not seem to be working, you can add a make target by right clicking the project and selecting Make Targets --> Create and creating a new target called all.
Because SystemTap is made to be installed on the kernel, in order to actually install your newly made version of SystemTap, you'll have to run sudo make install -- it is suggested that you do this from the command line, since it involves root access.
Running
Running is good for your health! If you want to run SystemTap in Eclipse, just right click the project and choose Run As --> C/C++ Application. Then select the binary that you want to run (it is probably the 'stap' binary). You can send program arguments through the Run Configurations option. If asked for a further binary selection, choose gdb/Debugger.
Keep in mind that if you want to take full advantage of SystemTap's power, you'll need to install kernel debuginfo, as well as run the command: make -C /usr/local/share/systemtap/runtime/uprobes.
Testing
SystemTap uses DejaGnu to run a series of tests. These tests can be triggered from within Eclipse.
In the Project Explorer view, right click on the testsuite folder and select Make Targets --> Build and then installcheck or check as your build targets. To run specific tests (e.g. strlen.exp), edit the make target to run make (check/installcheck) RUNTESTFLAGS=strlen.exp.

