Notice: this Wiki will be going read only early in 2024 and edits will no longer be possible. Please see: https://gitlab.eclipse.org/eclipsefdn/helpdesk/-/wikis/Wiki-shutdown-plan for the plan.
Difference between revisions of "Zest"
(Update links, reference GEF4) |
(Adjusted link to documentation that is provided with the Zest 1.x plug-in.) |
||
| Line 5: | Line 5: | ||
= Zest 1.x = | = Zest 1.x = | ||
| − | Documentation on getting started with Zest 1.x, the latest released version of Zest, can be found | + | Documentation on getting started with Zest 1.x, the latest released version of Zest, can be found in the [[GEF/Reference_Documentation|GEF Reference Documentation]]. |
= Zest 2.x = | = Zest 2.x = | ||
Revision as of 09:59, 17 October 2013
Note to non-wiki readers: This documentation is generated from the Eclipse wiki - if you have corrections or additions it would be awesome if you added them in the original wiki page.
Documentation on Zest - The Eclipse Visualization Framework. For general information visit the Zest home page.
Contents
Zest 1.x
Documentation on getting started with Zest 1.x, the latest released version of Zest, can be found in the GEF Reference Documentation.
Zest 2.x
This is a collection of documentation on Zest 2.0, the latest development version of Zest. Zest 2 is part of GEF4 and can be installed from the GEF4 Update Sites. Additional information can also be found here:
Contribute
The Zest 2 source code is available from the GEF4 Git repository. It is also mirrored on GitHub. There are example snippets in org.eclipse.gef4.zest.examples and tests in org.eclipse.gef4.zest.tests. For instructions on contributing, see the GEF Contributor Guide. You can search for existing bugs, or file a new one.
New subgraph rendering
In Zest 2, subgraphs can hide their contained nodes or add different types of additional information about pruned elements:
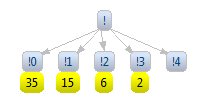
LabelSubgraph
Each subgraph is represented as a separate graph item: a label showing the number of nodes contained within it. It can be subclassed to show other kinds of information.
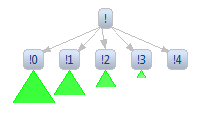
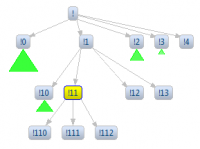
TriangleSubgraph
Each subgraph is represented as a triangle. It's designed specifically to work with SpaceTreeLayoutAlgorithm (see below) and assumes that nodes pruned inside it form a tree structure. Properties of this structure are visualized by properties of the triangle. The height of the triangle corresponds to the height of the tree, the length of the triangle's base corresponds to the total number of leaves in the tree and the luminance of the triangle's color corresponds to the average number of children for each node in the tree (which can be understood as the density).
PrunedSuccessorsSubgraph
Each subgraph is represented as a little label showing how many direct successors are pruned.
New layout algorithms
SpaceTreeLayoutAlgorithm
SpaceTreeLayoutAlgorithm keeps track of node positions all the time, always trying to form a nice tree structure. This means movement of nodes with the mouse is somehow restricted (you can move a node within its current layer, but only if it doesn't cause nodes to be pushed out of the graph area. When an expand operation is requested on a node, the node is centered and its subtree is shown, as long as there's enough space (other parts of the tree can be collapsed to extend available space).
DirectedGraphLayoutAlgorithm
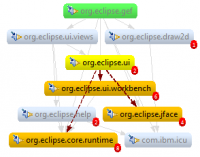
DirectedGraphLayoutAlgorithm was designed with the PDE Dependency Visualization in mind and is based on its layout algorithm. Initially only nodes without predecessors are expanded. Other nodes become visible if they have at least one direct predecessor which is visible and expanded. Collapsed nodes can have outcoming connections if the target node is visible because of a predecessor. There's an option to hide such connections.
Graphviz DOT support
UI
In Zest 2, graphs can be created from DOT input. For instance, for the following DOT input, the Zest graph below is drawn, see also the complete documentation. The Zest graph view can be used with the included DOT editor to visualize a DOT file or to display embedded DOT in other files, e.g. in source code comments or in wiki markup.
digraph simple {
 n1[label="Node 1"]
 n2[label="Node 2"]
 n1 -> n2[style=dotted label="A dotted edge"]
}
Subgraphs
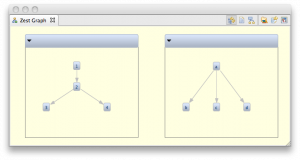
Cluster subgraphs in DOT input are rendered as Zest graph containers, e.g.:
digraph subgraphs {
  subgraph cluster1 { 1 -> 2; 2 -> 3; 2 -> 4 }
  subgraph cluster2 { a -> b; a -> c; a -> d }
}
API
Using the API, DOT can be imported to Zest graphs, and Zest graphs can be exported to DOT (see below). To use the API, create a new Plug-in project and add org.eclipse.zest.dot.core to the MANIFEST.MF dependencies.
DotGraph graph = new DotGraph("digraph{ 1->2 }", shell, SWT.NONE);
graph.add("2->3").add("2->4");
graph.add("node[label=zested]; edge[style=dashed]; 3->5; 4->6");
System.out.println(graph.toDot());
The complete sample usage is available in the repository, as well as DOT input samples.
Migration from Zest 1.x to Zest 2.x
In Zest 2, the layout API has been reworked. Most code should keep working just fine. See the Javadoc of the deprecated API for documentation on migrating to the new API. In a few cases however, code changes are required.
Layout Filters
Instead of org.eclipse.zest.layouts.Filter use org.eclipse.zest.core.widgets.LayoutFilter (see example below and full code in GraphSnippet8.java in the examples bundle).
LayoutFilter filter = new LayoutFilter() {
  public boolean isObjectFiltered(GraphItem item) {
    if (item instanceof GraphConnection) {
      GraphConnection connection = (GraphConnection) item;
      Object data = connection.getData();
      if (data != null && data instanceof Boolean) {
        return ((Boolean) data).booleanValue();
      }
      return true;
    }
    return false;
  }
};
Custom Layouts
To define custom layouts, instead of extending AbstractLayoutAlgorithm implement LayoutAlgorithm (see example below and full code in CustomLayout.java in the examples bundle).
LayoutAlgorithm layoutAlgorithm = new LayoutAlgorithm() {
  private LayoutContext context;
  public void setLayoutContext(LayoutContext context) {
    this.context = context;
  }
  public void applyLayout(boolean clean) {
    EntityLayout[] entitiesToLayout = context.getEntities();
    int totalSteps = entitiesToLayout.length;
    double distance = context.getBounds().width / totalSteps;
    int xLocation = 0;
    for (int currentStep = 0; currentStep < entitiesToLayout.length; currentStep++) {
      EntityLayout layoutEntity = entitiesToLayout[currentStep];
      layoutEntity.setLocation(xLocation,
      layoutEntity.getLocation().y);
      xLocation += distance;
    }
  }
};
Connection Style Providers
The IConnectionStyleProvider and IEntityConnectionStyleProvider interfaces now contain getRouter methods returning an org.eclipse.draw2d.ConnectionRouter. Return null for the default router. See ManhattanLayoutJFaceSnippet.java in the examples bundle.

