Notice: this Wiki will be going read only early in 2024 and edits will no longer be possible. Please see: https://gitlab.eclipse.org/eclipsefdn/helpdesk/-/wikis/Wiki-shutdown-plan for the plan.
Difference between revisions of "XST Project/UserGuide/Signing"
(New page: = XML Signature Wizard = right Category:Eclipse Web Tools Platform Project Category:XML Security Tools Category:Draft Documentation) |
|||
| (2 intermediate revisions by the same user not shown) | |||
| Line 2: | Line 2: | ||
[[Image:Egg-incubation.png|right]] | [[Image:Egg-incubation.png|right]] | ||
| + | |||
| + | The '''XML Signature Wizard''' consists of three pages, with a variable second page depending on the chosen keystore/ key option. To launch the wizard you either have to select an XML document in one of the supported views in the XML perspective or open an XML document in the WTP XML editor (in any perspective). Open the context menu, choose '''XML Security''' and click on '''New Signature...'''. In order to sign a selected XML fragment select the desired document part in the editor and launch the wizard as described before. The selection has to exist before launching the wizard, and it has to be well-formed: in case a start-tag is selected the end-tag must be selected too. Signing only text-content of an element is possible too. | ||
| + | |||
| + | == Resource and Signature Type == | ||
| + | |||
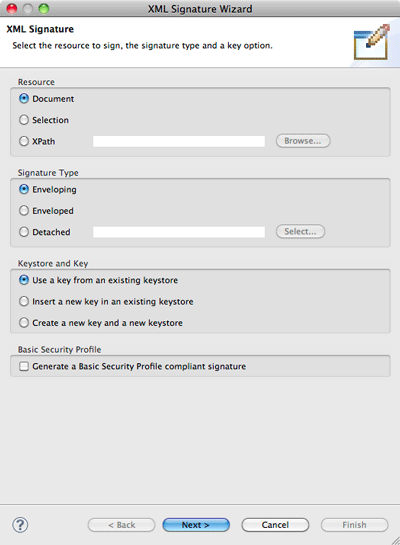
| + | This is the first page of the XML Signature Wizard. You'll have to select the resource you want to sign, the signature type, the keystore/ key option and the Basic Security Profile option. | ||
| + | |||
| + | [[Image:Xst_sig_wiz_page_1.png|XML Signature Wizard page 1|center]] | ||
| + | |||
| + | '''Resource''' | ||
| + | |||
| + | It is possible to sign the complete document, the selected text or a document fragment specified by an XPath expression. The complete document is always possible. For a text selection this selection has to exist before launching the wizard and it has to be well-formed. XPath is always possible too. You can either enter an XPath expression in the textfield or you can select one in the dialog after clicking on the '''Browse...''' button. The XPath expression has to return exactly one element or element content. Signing attributes is not supported. | ||
| + | |||
| + | '''Signature Type''' | ||
| + | |||
| + | There are three different signature types available. The difference between them is the position of the signed data and the signature itself.An ''enveloped'' and an ''enveloping'' signature are relatively equal. Both types to store the signed data (and possibly some unsigned data as well) together with the signature in the same XML document. With the '''XML Security Tools''' the signature will be placed in the XML document you have chosen to sign.So, the difference between an enveloped and an enveloping signature is, that with an enveloping signature the signed content is moved inside the XML signature element (into an ''object'' element). With an enveloped signature, the signature is a child element of the signed data. A detached signature may be something completely different. The normal detached signature consists of two documents: one containing the signature and one containing the signed data. To make it more complicated you can create a detached signature within one document too (but not with the '''XML Security Tools'''). With the XML Signature Wizard you do have to select a file to sign when selecting to create a detached signature. | ||
| + | |||
| + | Confused about all the possibilities? Well, there are quite some, and the differences are not often that clear. Simply give it a try and sign your XML documents with the different signature types. | ||
| + | |||
| + | '''Keystore and Key''' | ||
| + | |||
| + | The chosen option here sets the following wizard page. You can either select to [[XST_Project/UserGuide/Signing#Use a Key from an existing Keystore | Use a Key from an existing Keystore]], to [[XST_Project/UserGuide/Signing#Insert a new Key in an existing Keystore | Insert a new Key in an existing Keystore]] or to [[XST_Project/UserGuide/Signing#Create a new Key and a new Keystore | Create a new Key and a new Keystore]]. | ||
| + | |||
| + | '''Basic Security Profile''' | ||
| + | |||
| + | A Basic Security Profile compliant XML Signature has some restrictions in comparison to a regular XML Signature. By activating this checkbox all options in the XML Signature Wizard will be limited to options that are compliant to this profile. In case of the XML Signature Wizard this only limits the available algorithms on the [[XST_Project/UserGuide/Signing#Algorithms and Signature Properties | Algorithms and Signature Properties]] page. | ||
| + | |||
| + | == Keystore and Key == | ||
| + | |||
| + | The second page of the '''XML Signature Wizard''' depends on your '''Keystore and Key''' selection on the first wizard page. You can select to [[XST_Project/UserGuide/Signing#Use a Key from an existing Keystore | Use a Key from an existing Keystore]], [[XST_Project/UserGuide/Signing#Insert a new Key in an existing Keystore | Insert a new Key in an existing Keystore]] or to [[XST_Project/UserGuide/Signing#Create a new Key and a new Keystore | Create a new Key and a new Keystore]]. | ||
| + | |||
| + | === Use a Key from an existing Keystore === | ||
| + | |||
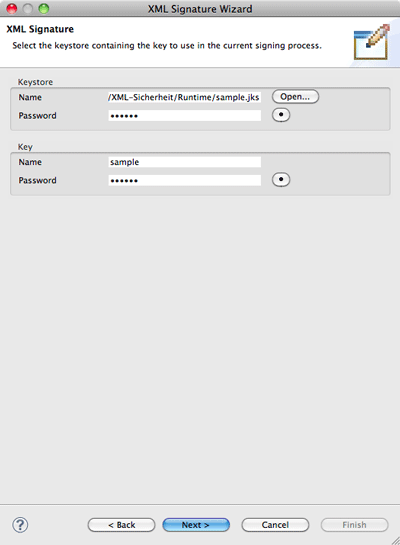
| + | '''Use a Key from an existing Keystore''' is one of the alternatives as the second wizard page. Simply select the keystore containing the key you want to use in the current signature process. All data is verified, you can only switch to the next case with a correct keystore and key password as well as an existing key alias. | ||
| + | |||
| + | [[Image:Xst_sig_wiz_page_2a.png|XML Signature Wizard page 2|center]] | ||
| + | |||
| + | The wizard automatically stores the entered data for the keystore name and the key name between sessions. Passwords are never stored and have to be entered every time. | ||
| + | |||
| + | === Insert a new Key in an existing Keystore === | ||
| + | |||
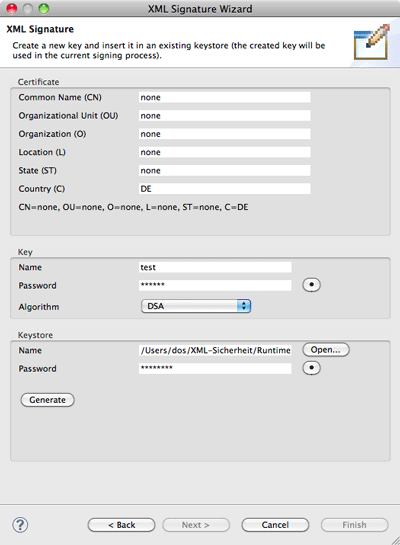
| + | '''Insert a new Key in an existing Keystore''' is one of the alternatives as the second wizard page. Select an existing keystore (probably one you created before with the help of the [[XST_Project/UserGuide/Signing#Create a new Key and a new Keystore | Create a new Key and a new Keystore]] wizard) and enter the keystore password. After that simply select the desired algorithm and the algorithm size for the new key and enter a name and a password for it. Click the '''Generate''' button when you are done to create the new key. A short message informs you about the generation result and the '''Next''' button will be enabled. The key generated here will be used in the active signature process. | ||
| + | |||
| + | [[Image:Xst_sig_wiz_page_2b.png|XML Signature Wizard page 2|center]] | ||
| + | |||
| + | Keys must be unique inside a keystore, so the wizard verifies that the entered key name does not exist in the selected keystore. | ||
| + | |||
| + | The wizard automatically stores the entered data for the keystore path and name between sessions. Passwords are never stored and have to be entered every time. | ||
| + | |||
| + | === Create a new Key and a new Keystore === | ||
| + | |||
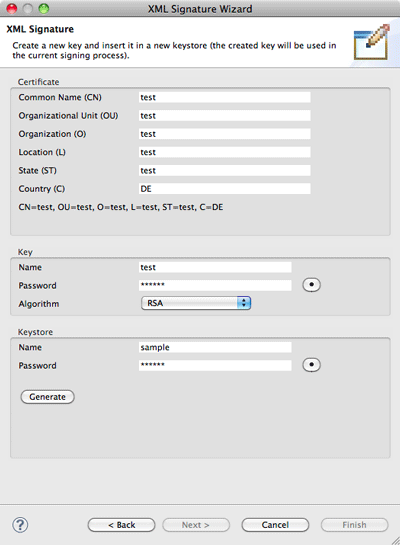
| + | '''Create a new Key and a new Keystore''' is one of the alternatives as the second wizard page. This page lets you create a new keystore together with a new key. Enter the name for the keystore and the password to protect it. After that choose an algorithm and its size and enter an alias name together with a password for the key. The keystore password is used to protect the whole keystore, the key password to protect the key. Both passwords are required. | ||
| + | |||
| + | Click the '''Generate''' button when you are done to create the new keystore together with the key. A short message informs you about the generation result and the '''Next''' button will be enabled. The keystore is stored with the entered name in the active folder (normally the active project). The key generated here will be used in the active signature process. | ||
| + | |||
| + | [[Image:Xst_sig_wiz_page_2c.png|XML Signature Wizard page 2|center]] | ||
| + | |||
| + | == Algorithms and Signature Properties == | ||
| + | |||
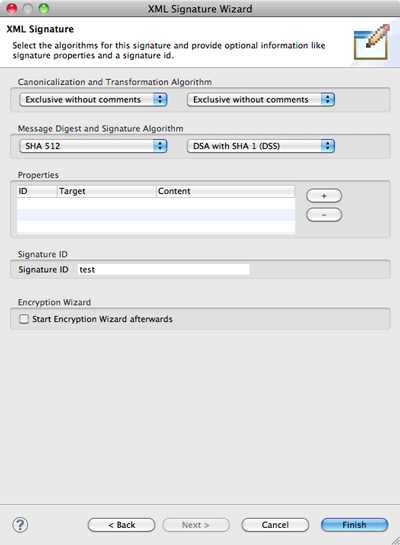
| + | This is the last page of the XML Signature Wizard. You must select algorithms for the message digest and the signature as well as a canonicalization and transformation algorithm. Optional, you can define some signature properties and you can enter a signature ID (strongly recommended). The '''Start Encryption Wizard afterwards''' checkbox enables you to start the encryption wizard after successfully signing the selected XML document. | ||
| + | |||
| + | [[Image:Xst_sig_wiz_page_3.png|XML Signature Wizard page 3|center]] | ||
| + | |||
| + | '''Canonicalization and Transformation Algorithm''' | ||
| + | |||
| + | Choose the algorithms you want to use for canonicalization and transformation. Whereas canonicalization is required, the transformation algorithm can be set to ''none''. | ||
| + | |||
| + | '''Message Digest and Signature Algorithm''' | ||
| + | |||
| + | Choose the algorithms you want to use for the message digest and for the signature itself. Both algorithms are required and must be compatible with the selected key on the previous wizard page. | ||
| + | |||
| + | '''Properties''' | ||
| + | |||
| + | There is only one property available: Keep root element as plain text. This creates an encrypted XML document (fragment) with a root element in plain text. In case you selected to encrypt the whole document the documents root element will be kept as plain text. In case you selected to encrypt a document fragment only (via a text selection or an XPath expression) this will result in a plain text root element of this document fragment. | ||
| + | |||
| + | '''Signature ID''' | ||
| + | |||
| + | The signature ID is optional, but it is strongly required to enter one. This ID must be unique in the whole document and may not contain <, >, &, ' or " characters. Without a signature ID it might get difficult to verify multiple signatures in one document and it is impossible to use '''Quick Verification'''. | ||
| + | |||
| + | '''Encryption Wizard''' | ||
| + | |||
| + | Select the checkbox in case you want to start the [[XST_Project/UserGuide/Encryption | XML Encryption Wizard]] directly after the signature process was successfully finished. | ||
[[Category:Eclipse Web Tools Platform Project]] | [[Category:Eclipse Web Tools Platform Project]] | ||
[[Category:XML Security Tools]] | [[Category:XML Security Tools]] | ||
[[Category:Draft Documentation]] | [[Category:Draft Documentation]] | ||
Latest revision as of 03:10, 24 January 2010
Contents
XML Signature Wizard
The XML Signature Wizard consists of three pages, with a variable second page depending on the chosen keystore/ key option. To launch the wizard you either have to select an XML document in one of the supported views in the XML perspective or open an XML document in the WTP XML editor (in any perspective). Open the context menu, choose XML Security and click on New Signature.... In order to sign a selected XML fragment select the desired document part in the editor and launch the wizard as described before. The selection has to exist before launching the wizard, and it has to be well-formed: in case a start-tag is selected the end-tag must be selected too. Signing only text-content of an element is possible too.
Resource and Signature Type
This is the first page of the XML Signature Wizard. You'll have to select the resource you want to sign, the signature type, the keystore/ key option and the Basic Security Profile option.
Resource
It is possible to sign the complete document, the selected text or a document fragment specified by an XPath expression. The complete document is always possible. For a text selection this selection has to exist before launching the wizard and it has to be well-formed. XPath is always possible too. You can either enter an XPath expression in the textfield or you can select one in the dialog after clicking on the Browse... button. The XPath expression has to return exactly one element or element content. Signing attributes is not supported.
Signature Type
There are three different signature types available. The difference between them is the position of the signed data and the signature itself.An enveloped and an enveloping signature are relatively equal. Both types to store the signed data (and possibly some unsigned data as well) together with the signature in the same XML document. With the XML Security Tools the signature will be placed in the XML document you have chosen to sign.So, the difference between an enveloped and an enveloping signature is, that with an enveloping signature the signed content is moved inside the XML signature element (into an object element). With an enveloped signature, the signature is a child element of the signed data. A detached signature may be something completely different. The normal detached signature consists of two documents: one containing the signature and one containing the signed data. To make it more complicated you can create a detached signature within one document too (but not with the XML Security Tools). With the XML Signature Wizard you do have to select a file to sign when selecting to create a detached signature.
Confused about all the possibilities? Well, there are quite some, and the differences are not often that clear. Simply give it a try and sign your XML documents with the different signature types.
Keystore and Key
The chosen option here sets the following wizard page. You can either select to Use a Key from an existing Keystore, to Insert a new Key in an existing Keystore or to Create a new Key and a new Keystore.
Basic Security Profile
A Basic Security Profile compliant XML Signature has some restrictions in comparison to a regular XML Signature. By activating this checkbox all options in the XML Signature Wizard will be limited to options that are compliant to this profile. In case of the XML Signature Wizard this only limits the available algorithms on the Algorithms and Signature Properties page.
Keystore and Key
The second page of the XML Signature Wizard depends on your Keystore and Key selection on the first wizard page. You can select to Use a Key from an existing Keystore, Insert a new Key in an existing Keystore or to Create a new Key and a new Keystore.
Use a Key from an existing Keystore
Use a Key from an existing Keystore is one of the alternatives as the second wizard page. Simply select the keystore containing the key you want to use in the current signature process. All data is verified, you can only switch to the next case with a correct keystore and key password as well as an existing key alias.
The wizard automatically stores the entered data for the keystore name and the key name between sessions. Passwords are never stored and have to be entered every time.
Insert a new Key in an existing Keystore
Insert a new Key in an existing Keystore is one of the alternatives as the second wizard page. Select an existing keystore (probably one you created before with the help of the Create a new Key and a new Keystore wizard) and enter the keystore password. After that simply select the desired algorithm and the algorithm size for the new key and enter a name and a password for it. Click the Generate button when you are done to create the new key. A short message informs you about the generation result and the Next button will be enabled. The key generated here will be used in the active signature process.
Keys must be unique inside a keystore, so the wizard verifies that the entered key name does not exist in the selected keystore.
The wizard automatically stores the entered data for the keystore path and name between sessions. Passwords are never stored and have to be entered every time.
Create a new Key and a new Keystore
Create a new Key and a new Keystore is one of the alternatives as the second wizard page. This page lets you create a new keystore together with a new key. Enter the name for the keystore and the password to protect it. After that choose an algorithm and its size and enter an alias name together with a password for the key. The keystore password is used to protect the whole keystore, the key password to protect the key. Both passwords are required.
Click the Generate button when you are done to create the new keystore together with the key. A short message informs you about the generation result and the Next button will be enabled. The keystore is stored with the entered name in the active folder (normally the active project). The key generated here will be used in the active signature process.
Algorithms and Signature Properties
This is the last page of the XML Signature Wizard. You must select algorithms for the message digest and the signature as well as a canonicalization and transformation algorithm. Optional, you can define some signature properties and you can enter a signature ID (strongly recommended). The Start Encryption Wizard afterwards checkbox enables you to start the encryption wizard after successfully signing the selected XML document.
Canonicalization and Transformation Algorithm
Choose the algorithms you want to use for canonicalization and transformation. Whereas canonicalization is required, the transformation algorithm can be set to none.
Message Digest and Signature Algorithm
Choose the algorithms you want to use for the message digest and for the signature itself. Both algorithms are required and must be compatible with the selected key on the previous wizard page.
Properties
There is only one property available: Keep root element as plain text. This creates an encrypted XML document (fragment) with a root element in plain text. In case you selected to encrypt the whole document the documents root element will be kept as plain text. In case you selected to encrypt a document fragment only (via a text selection or an XPath expression) this will result in a plain text root element of this document fragment.
Signature ID
The signature ID is optional, but it is strongly required to enter one. This ID must be unique in the whole document and may not contain <, >, &, ' or " characters. Without a signature ID it might get difficult to verify multiple signatures in one document and it is impossible to use Quick Verification.
Encryption Wizard
Select the checkbox in case you want to start the XML Encryption Wizard directly after the signature process was successfully finished.


