Notice: this Wiki will be going read only early in 2024 and edits will no longer be possible. Please see: https://gitlab.eclipse.org/eclipsefdn/helpdesk/-/wikis/Wiki-shutdown-plan for the plan.
WTP JEE5 Test Scenarios
Contents
WTP 2.0 JEE 5 Use Cases
These scenarios are created to test the basic functionality that we would expect from WTP 2.0 to support JEE5. Please note that NO wizards are used other than the ones needed to create the servers, projects and add the necessary facets to these projects. The idea is if we are provided with valid JEE5 module and components (such as EJBs, JPA, Servlets, JSPs, etc), WTP 2.0 should support it. This includes Web, EJB, and EAR and Run As> Run on Server support. Of course this involves basic models for deployment descriptors (sans Annotation injections). Annotation support will only include that provided by JDT.
If you have questions, comments, etc., about these use cases, send a note to the WTP Dev List or contact me, Naci Dai.
Test Plan
As we get close to releasing 2.0, we will report on the status of these use-cases with each I-Build. After an I-Build is declared (Typically on Thursdays), we will run the following use-cases using this build and report any problems via bugzilla. To facilitate easy reporting and searching of these bugs, we will use an indexing key called JEE5-UC in Status Whiteboard. You can use a search like JEE5-UC to list them. Use cases and steps are numbered to make it easy to refer to them.
Please try these use cases or similar ones yourselves and help us improve the quality of WTP tools for 2.0 release.
Prereqs
To try these use cases you will need the latest build of WTP, Apache Tomcat version 6, JDK 1.5 and up, JSF v1.1 Reference Implementation or Apache MyFaces1.1.5, TOPLink Essentials, and Apache Derby. Follow their instructions to install these software. Additionally, EJB/Ear use cases require Glassfish or a similar JEE 5 compatible application server and a WTP server adapter that supports JEE5 features. There is an example server adapter I and John Lanuti have created during the eclipse con tutorial, which can be used with Glassfish.
UC-1 SIMPLE WEB APPLICATION USE CASE
This use case is the most basic Web application scenario that involves creating the Web module, targeting it to a JEE5 runtime, and testing it using Run As> Run on Server
- Step 1 - Go to Installed Runtimes and add Tomcat 6 as a runtime.
    EJB 3.0, and all other WTP JEE5 support should work with any server runtime
    that has JEE 5  capability such as JBoss, IBM WAS, BEA WebLogic Server,
    Oracle AS, JOnAS, Apache Geronimo among many others, although there maybe
    some delays in providing server adapters for all.
- Step 2 - Create a new Dynamic Web Project named HelloWorldWeb, select Tomcat 6 as the target runtime
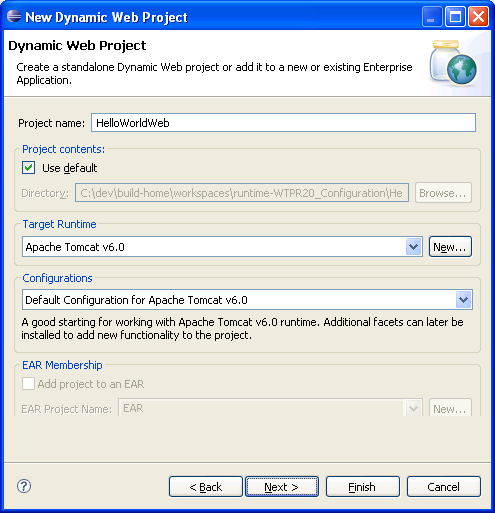

- Step 3 - Select Dynamic Web Module 2.5, and Java 5 as facets, click next to accept defaults. A new Web 2.5 project is created.


- Step 4 - In the WebContents/Web-Inf folder you will find the DD for jst.web version 2.5 named web.xml:
    <?xml version="1.0" encoding="UTF-8"?>
    <web-app xmlns="http://java.sun.com/xml/ns/javaee" version="2.5"
     metadata-complete="true">

     <display-name>MyJEE5Web</display-name>
     <welcome-file-list>
      <welcome-file>index.html</welcome-file>
      <welcome-file>index.htm</welcome-file>
      <welcome-file>index.jsp</welcome-file>
      <welcome-file>default.html</welcome-file>
      <welcome-file>default.htm</welcome-file>
      <welcome-file>default.jsp</welcome-file>
     </welcome-file-list>
    </web-app>
- Step 5 - Add a new JSP file called test.jsp with the following content:
    <%@ page language="java" contentType="text/html; charset=ISO-8859-1"
        pageEncoding="ISO-8859-1"%>
    <!DOCTYPE html PUBLIC "-//W3C//DTD HTML 4.01 Transitional//EN"
      "http://www.w3.org/TR/html4/loose.dtd">
    <html>
    <head>
    <meta http-equiv="Content-Type" content="text/html; charset=ISO-8859-1">
    <title>Insert title here</title>
    </head>
    <body>
       Hello World!
    </body>
    </html>
- Step 6 - Right click test.jsp, Choose Run As: Run on Server, select Tomcat 6 as the server
- Step 7 - Tomcat 6 starts and results are correctly displayed (using current code in CVS, 3/28)
UC-2 Web Application with using JSF 1.1 and JPA 1.0
This use case is and adaptation of the Dali Tutorial. This use case is about building and deploying dynamic web application for an order-entry system using JPA 1.0 and JSF 1.1. The complete application is packaged as a web application.
EJB/EAR SCENARIOS
The second set of scenarios are for EJB 3.0 and EAR 5. Since EJBs are meaningless without a client, this use case involves creating an EJB 3.0 stateless session bean, that uses JPA 1.0 to map a simple class. A web application using JSF is the EJB client. Whole application is packaged as an EAR.
UC-3 SIMPLE SESSION EJB 3.0/JPA 1.0
This use case is the most creates a simple POJO mapped using JPA 1.0. A stateless session references the entity manager to query the DB. The EJB jar is packaged in an EAR module
- Step 1 - Go to Installed Runtimes and add Glassfish as a runtime.
    EJB 3.0, and all other WTP JEE5 support should work with any server runtime
    that has JEE 5  capability such as JBoss, IBM WAS, BEA WebLogic Server,
    Oracle AS, JOnAS, Apache Geronimo among many others, although there maybe
    some delays in providing server adapters for all.
- Step 2 - Create a new EJB 3.0 Project, with JPA 1.0 facet named HelloWorldEJB, select Glassfish as the target runtime.
- Step 3 - Make sure that HelloWorldEJB is added to HelloWorldEAR.
- Step 4 - Use the data tools to create a connection to the new Derby database named myderbydb. (Note: Can the data tools steps be clarified for those unfamiliar w/ Dali and Derby? Or can we provide a link to a pre-configured Derby DB?)
- Step 5 - Create a connection to it and create a new table using the following script:
   CREATE TABLE HELLOWORLD (
     `ID` varchar(10) NOT NULL,
     `MESSAGE` varchar(50) NOT NULL,
     `LANGUAGE` varchar(50) NOT NULL,
      PRIMARY KEY  (`ID`)
   );
- Step 6 - Add a few rows of data such as
   1 Hello World! en
   2 Merhaba Dünya tr
- Step 7 - Create a package called demo and add the following class which is JPA mapped
   package demo;
   import java.io.Serializable;
   @Entity
   public class HelloWorld implements Serializable{
       private static final long serialVersionUID = 1L;
       @Id
       private String id;
       private String message;
       private String language;
       public HelloWorld() {
       }
       public String getId() {
         ...
(Note: We had to add an @Table(schema="APP", name="HELLOWORLD") in order to get this working.)
- Step 8 - Open your persistence.xml (create one if it does not exists in….) file, and make sure that it looks like:
       <persistence version="1.0"
        xmlns="http://java.sun.com/xml/ns/persistence"
        xmlns:xsi="http://www.w3.org/2001/XMLSchema-instance"
        xsi:schemaLocation="http://java.sun.com/xml/ns/persistence
          http://java.sun.com/xml/ns/persistence/persistence_1_0.xsd">
        <persistence-unit name="HelloWorldPU">
         <jta-data-source>jdbc/MyDataSource</jta-data-source>
         <class>demo.HelloWorld</class>
        </persistence-unit>
       </persistence>
- Step 9 - Refer to Application Server manuals to create a new DataSource to the Derby database with the JNDI name “jdbc/MyDataSource”.
(Note: We had to bring up the Admin Console for Glassfish by pointing to http://localhost:4848 and entering userid: admin password: adminadmin)
- Step 10 - Create a package called demo.session and create a class named HelloWorldSession, and make sure that it looks like the following:
       @Stateless(name="HelloWorldStateless")
       public class HelloWorldSession
          implements HelloBeanFacade
        {
          @PersistenceUnit(name = "HelloWorldPU")
          EntityManagerFactory emf;
          public HelloWorldSession() {
          }
          public HelloWorld hello(String language) {
            Query query = emf.createEntityManager().
              createQuery("select h from HelloWorld h where h.language = :lang ");
            query.setParameter("lang",language);
            List<HelloWorld> list = query.getResultList();
            if (list.size() == 0)
              return list.get(0);
            return null;
          }
        }
- Step 11 - Add the interfaces as usual:
          public interface HelloBeanFacade {
            public HelloWorld hello(String language);
          }
- Step 12 - You are done with creating an EJB 3.0 Module. Next you will create a client Web application.
JSF WEB Client for EJB
- Step 12 - Create a new Dynamic Web Project (Web 2.5, Java 5, JSF 1.1) named HelloWorldWeb, select GlassFish as the target runtime. Make sure that HelloWorldWeb is also added to the HelloWorldEAR.
- Step 13 - Select Dynamic Web Module 2.5, and Java 5, JSF 1.1 as facets, click next to accept defaults. A new Web 2.5 project is created.
- Step 14 - Go to module dependencies and add a dependency to HelloWorldEJB from HelloWorldWeb
- Step 15 - Add a JSF backing bean called HelloWorldBean as follows:
        public class HelloWorldBean
            implements Serializable {
          String language= “en”;
          HelloBeanFacade helloBean;
          public String hello(){
              if(helloBean == null)
                init();
              return helloBean.hello(getLanguage);
          }
          public void  setLanguage(..)
          public String getLanguage(..)
          private void init() {
              try {
                //JSF BEANS DO NOT SUPPORT INJECTION WITH
                // ANNOTATIONS so use Naming Context
                InitialContext ctx = new InitialContext();
                helloBean = (HelloBeanFacade)
                ctx.lookup("HelloWorldStateless");
              } catch (Exception e) {
                // Handle exception ...
              }
           }
        }
- Step 16 - Add the following managed bean to the faces-config.xml
        <faces-config>
          <managed-bean>
            <description>hello world</description>
            <managed-bean-name>helloBean</managed-bean-name>
            <managed-bean-class>
              demo.web.HelloWorldBean
            </managed-bean-class>
            <managed-bean-scope>request</managed-bean-scope>
          </managed-bean>
          ... ...
- Step 17 - Create a new file named hello.jsp. JSP file should look like:
        <%@taglib uri="http://java.sun.com/jsf/core" prefix="f"%>
        <%@taglib uri="http://java.sun.com/jsf/html" prefix="h"%>
        <%@ page language="java" contentType="text/html; charset=UTF-8" pageEncoding="UTF-8"%>
        <html>
        <head>
        <meta http-equiv="Content-Type" content="text/html; charset=ISO-8859-1">
        <title>Hello World</title>
        <head>
        <body>
        <f:view>
          <h:form>
                <h:outputText value="#{helloBean.hello}"/>
                <h:selectOneMenu onchange="submit()"
                  value="#{helloBean.language}" immediate="true">
                     <f:selectItem itemLabel="en" itemValue="en"/>
                     <f:selectItem itemLabel="tr" itemValue="tr"/>
                </h:selectOneMenu>
           </h:form>
        </f:view>
        </body>
        </html>
- Step 18 - Select hello.jsp, Run As > Run On Server, the ear should be packaged and deployed with EJB and WAR, page should display the message.