Notice: this Wiki will be going read only early in 2024 and edits will no longer be possible. Please see: https://gitlab.eclipse.org/eclipsefdn/helpdesk/-/wikis/Wiki-shutdown-plan for the plan.
Difference between revisions of "Visualizing and Editing Graphs"
(→Visualizing and Editing Graphs) |
(→Step 1. Open the Editor) |
||
| Line 7: | Line 7: | ||
When you right-click on an item of the type "Model" within a project of the STEM Explorer, you'll see a context-menu that offers you to display the canonical graph of all graphs that are contained in this model. In order to display a single graph you have to add it to an empty model. | When you right-click on an item of the type "Model" within a project of the STEM Explorer, you'll see a context-menu that offers you to display the canonical graph of all graphs that are contained in this model. In order to display a single graph you have to add it to an empty model. | ||
| − | + | <gallery widths="300px" heights="300px"> | |
| + | Image:StemOpenGraphEditor.png | Open Graph in Editor | ||
| + | Image:StemOpenGraphEditorModel.png | Open Model in Editor | ||
| + | </gallery> | ||
== Step 2. Editing the graph == | == Step 2. Editing the graph == | ||
Revision as of 07:41, 3 April 2012
Contents
Visualizing and Editing Graphs
STEM uses graphs as data structure to save information concerning population sizes, areas, spatial information, neighborhood of areas etc. When you start a scenario, you get the information of its appendent graphs in a visual form, e.g. when you see the outlines of the countries you included into you scenario. The Graph Editor offers the possibility to visualize graphs without starting a scenario. You can get a view of the data, edit titles, area sizes, add populations and adjust geographic information of a node. It also possible to create edges between existing nodes.
Step 1. Open the Editor
When you right-click on an item of the type "Model" within a project of the STEM Explorer, you'll see a context-menu that offers you to display the canonical graph of all graphs that are contained in this model. In order to display a single graph you have to add it to an empty model.
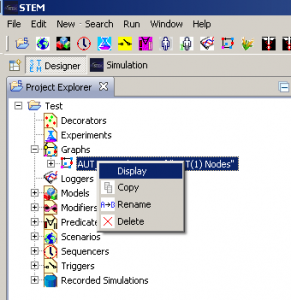
Open Graph in Editor
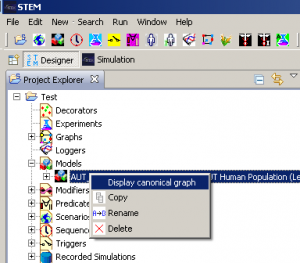
Open Model in Editor


Step 2. Editing the graph
The nodes of the graph are small circles, whose colors show the membership to a subgraph, i.e. when you have opened a canonical graph consisting of several countries, the country nodes will have different colors. When you click on a node you get information about its title, its URI and all labels that are assigned to this node. You can move a node by keeping the left mouse button pressed and dragging the node to the desired location. To add a label to a node (e.g. add information about population size or area of the node) you have to right-click on the node to open the context menu. You can then add a population or area label and edit the values in the bottom part of the editor.

Edges can also be selected to display its properties (type of the edge, ...). Some of the properties can also be edited. To add an edge between two, the origin node has to be selected and while holding the Ctrl key the user has to right-click on the destination node to open the context menu. Different types of edges can be created.

You can zoom in and out with the mouse wheel.
Step 3. Saving the graph
To save an edited graph, you can select "Save Graph and Quit" (the changes are saved into the same files) or you select "Save Graph As" where you have to select a folder and filename. When working on references to graphs in the STEM graph/model repository, local copies of the references including your changes will be saved to the workspace. If you were working on local copies already, your files will be overwritten, when "Save Graph" is selected.