Notice: this Wiki will be going read only early in 2024 and edits will no longer be possible. Please see: https://gitlab.eclipse.org/eclipsefdn/helpdesk/-/wikis/Wiki-shutdown-plan for the plan.
Difference between revisions of "Using the Reflectivity Model"
(Created page with "==Introduction== This is a tutorial for setting up and running Reflectivity simulations using the Reflectivity Model in ICE. This allows for the calculation of the scattering...") |
(→Materials Database) |
||
| Line 5: | Line 5: | ||
==Materials Database== | ==Materials Database== | ||
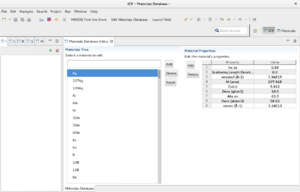
| − | The Materials Database allows a user in ICE to create any composite or molecule desired from the list of defined isotopes. These isotopes are editable and can have additional properties specified to the user's specifications. In ICE, click the 'Edit Materials Database' button in the toolbar at the top. This should bring up the Materials Database Editor view in the editor, as shown below. | + | The Materials Database allows a user in ICE to create any composite or molecule desired from the list of defined isotopes. These isotopes are editable and can have additional properties specified to the user's specifications. In ICE, click the 'Edit Materials Database' button in the toolbar at the top. This should bring up the Materials Database Editor view in the editor, as shown below. |
| + | |||
| + | [[File:MatDatabase1.png|center|thumb|The Materials Database Editor in ICE]] | ||
| − | |||
===Editing Properties=== | ===Editing Properties=== | ||
From this editor, you can add, edit, or delete the properties shown in the properties inspector on the right. Select the element or isotope desired, and simply click on the property you want to change. For adding and removing properties use the Add and Delete buttons just to the left of the inspector. | From this editor, you can add, edit, or delete the properties shown in the properties inspector on the right. Select the element or isotope desired, and simply click on the property you want to change. For adding and removing properties use the Add and Delete buttons just to the left of the inspector. | ||
| + | |||
| + | ===Adding Materials=== | ||
| + | |||
| + | [[File:AddMaterialWizard.png|center|thumb|The Wizard for adding new materials]] | ||
| + | |||
| + | To add a material, simply click the Add button to start the new material wizard (shown above). It should prompt you for a new name, density, and stoichiometry. Enter the name and density, and use the Add button for adding elements or isotopes to comprise the stoichiometry of the new material. It should bring up a new dialog for picking easily through the existing materials. The amount of each material can be changed by clicking on that cell in the table. Once all of your information is entered and correct, click Finish and the new material's properties (like scattering density and molecular mass) will be calculated and added to the database. These new materials are what should be used in the Reflectivity Model to run your simulations. | ||
| + | |||
| + | ==The Reflectivity Model== | ||
Revision as of 10:04, 18 June 2015
Contents
Introduction
This is a tutorial for setting up and running Reflectivity simulations using the Reflectivity Model in ICE. This allows for the calculation of the scattering density profile and the density profile for comparison.
Materials Database
The Materials Database allows a user in ICE to create any composite or molecule desired from the list of defined isotopes. These isotopes are editable and can have additional properties specified to the user's specifications. In ICE, click the 'Edit Materials Database' button in the toolbar at the top. This should bring up the Materials Database Editor view in the editor, as shown below.
Editing Properties
From this editor, you can add, edit, or delete the properties shown in the properties inspector on the right. Select the element or isotope desired, and simply click on the property you want to change. For adding and removing properties use the Add and Delete buttons just to the left of the inspector.
Adding Materials
To add a material, simply click the Add button to start the new material wizard (shown above). It should prompt you for a new name, density, and stoichiometry. Enter the name and density, and use the Add button for adding elements or isotopes to comprise the stoichiometry of the new material. It should bring up a new dialog for picking easily through the existing materials. The amount of each material can be changed by clicking on that cell in the table. Once all of your information is entered and correct, click Finish and the new material's properties (like scattering density and molecular mass) will be calculated and added to the database. These new materials are what should be used in the Reflectivity Model to run your simulations.


