Notice: this Wiki will be going read only early in 2024 and edits will no longer be possible. Please see: https://gitlab.eclipse.org/eclipsefdn/helpdesk/-/wikis/Wiki-shutdown-plan for the plan.
Difference between revisions of "Tigerstripe Simple Model Tutorial"
(→Create a New Tigerstripe Project) |
(→Document the new Project) |
||
| Line 41: | Line 41: | ||
Your newly created project should be empty and the descriptor for the project automatically opens. The '''[[Tigerstripe_Glossary#Tigerstripe Perspective|Tigerstripe Perspective]]''' displays. | Your newly created project should be empty and the descriptor for the project automatically opens. The '''[[Tigerstripe_Glossary#Tigerstripe Perspective|Tigerstripe Perspective]]''' displays. | ||
| − | [[Image: | + | [[Image:Tigerstripe_new_project_open.gif]] |
| Line 48: | Line 48: | ||
* The '''[[Tigerstripe_Glossary#Tigerstripe Explorer|Tigerstripe Explorer]]''' which displays the contents of displays of all '''[[Tigerstripe_Glossary#Tigerstripe project|Tigerstripe project]]s''' in the workspace. | * The '''[[Tigerstripe_Glossary#Tigerstripe Explorer|Tigerstripe Explorer]]''' which displays the contents of displays of all '''[[Tigerstripe_Glossary#Tigerstripe project|Tigerstripe project]]s''' in the workspace. | ||
* A multi-tab form. Contains details of your newly created project. | * A multi-tab form. Contains details of your newly created project. | ||
| − | * A | + | * A '''[[Tigerstripe_Glossary#Problems view|Problems view]]'''view. Any problems in the configuration of your project will be highlighted here. |
After you create a new project, you need to add some information about your project. This information is used when generating documentation for your project. | After you create a new project, you need to add some information about your project. This information is used when generating documentation for your project. | ||
| Line 57: | Line 57: | ||
# Enter the project version information in the '''Version''' text box. | # Enter the project version information in the '''Version''' text box. | ||
# Enter a project description in the '''Description''' text box. | # Enter a project description in the '''Description''' text box. | ||
| − | # Click Save. | + | # Click '''Save'''. |
=Create a Service End-point Model= | =Create a Service End-point Model= | ||
Revision as of 06:35, 10 January 2008
< To: Tigerstripe_Tutorials
Contents
Designing a simple Service Contract with Tigerstripe Workbench
NOTE THIS IS A DRAFT PAGE
NOTE - THESE THREE PAGES TO BE DELETED...
- Create a New Tigerstripe Project to contain the model.
- Document the new Project by editing the Project Descriptor.
- Create a Service End-point Model representing the integration point.
A Tigerstripe Project contains the details of a Service Contract Model. More specifically, it contains the following:
- A set of Artifacts that define an Information Model and the Behavior Model used in a Service Contract.
- A Project Descriptor (tigerstripe.xml), used to store additional properties about the project. Such properties can include the project version, description, but can also include properties that are used when generating code.
- A set of diagrams providing a graphical representation of the Service Contract.
This tutorial will guide you through the creating of a simple model and the generation of some simple output. (Creation of diagrams is covered in a subesquent tutorial).
To run the tutorial you will need to have installed Tigerstripe Workbench. See the installation tutorial here.
Create a New Tigerstripe Project
Start up Tigerstripe Workbench.
- From the File menu, select New and click Project. The New Project: Select a wizard dialog box opens.
- Select Tigerstripe Project and click Next. The New Tigerstripe Project dialog box displays.
- Alternatively, you can click the
 icon on the toolbar.
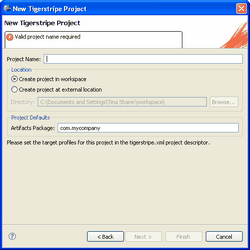
- Enter a name for your project.
- For this tutorial, the project name is SimpleProject.</ul>
- Click Finish to create your new project.

Note: Click Help and select Help Contents for more information about other options available.
Document the new Project
Your newly created project should be empty and the descriptor for the project automatically opens. The Tigerstripe Perspective displays.

The following items should be visible from the Tigerstripe Perspective:
- The Tigerstripe Explorer which displays the contents of displays of all Tigerstripe projects in the workspace.
- A multi-tab form. Contains details of your newly created project.
- A Problems viewview. Any problems in the configuration of your project will be highlighted here.
After you create a new project, you need to add some information about your project. This information is used when generating documentation for your project.
To edit project details:
- Enter the project name in the Name text box.
- Enter the project version information in the Version text box.
- Enter a project description in the Description text box.
- Click Save.
Create a Service End-point Model
In Tigerstripe Workbench, a Service Contract is modeled through a set of Artifacts stored in the project. A palette of service artifacts is available to you to model your Service Contract.
There are two main categories of Artifact:
- Information Model Artifacts. Allows you to capture details about the information model relevant to your Service Contract.
- Behavior Model Artifacts. Allows you to specify how information is made available through the Service Contract. This information can range from unsolicited notifications to query mechanisms.
In addition, an Integration Point or Session Facade Artifact models an end-point (For example, a Web Service). The first step of this tutorial is to create a simple end-point and generate a Web Service Definition (.wsdl).
To create an end-point and a Web Service Definition:
- Click the Integration Point icon
 . The New Session Artifact dialog box displays.
 - Enter the details about your new artifact and click Finish. The details of the newly created Integration Point or Session Facade Artifact display.
Note: Spaces and special characters are not allowed in an artifact name.
In the Tigerstripe Explorer, expand the src folder and you will see the newly created artifact in the model as shown below:

Adding a Method to your Session Facade Artifact.
A method represents an operation available on a Service. An example of a method would be if you wanted to build a Service related to order handling, and you wanted to offer an operation on the Service to process orders.
To add a method:
- Open your artifact perspective.
- Expand the Methods option and click Add.
- Enter a Name for your method.
- For this tutorial, name your method processOrder.
- Add a method argument by clicking Add next to the Method Argument section.
<uk>For this tutorial, name your method argument orderNumber.</ul>
- Click Save to save your changes.
Generate the service definition
in Tigerstripe Workbench, project generation is handled through Tigerstripe plug-ins. Although advanced users can create their own plug-ins (see another tutorial on that topic), by default Tigerstripe Workbench ships with three basic plug-ins:
- A Java profile plug-in. Allows you to generate a Java-specific definition for your Service Contract Model.
- A JMS/XML profile plug-in. Allows you to generate a series of XML Schemas that define a message-based implementation for your Service Contract Model.
- A WSDL profile plug-in. Allows you to generate a Web Service definition (.wsdl) for your Service Contract Model.
So far, you have created a basic model for a Service Contract and you have identified one single integration point with a single operation. In this tutorial, you will generate a Web Service definition.
To generate a Web Service definition:
- Double click the project descriptor (tigerstripe.xml) in the Tigerstripe Explorer. This opens your Tigerstripe project perspective.
- Navigate to the Generation tab and enable the plug-ins so they are triggered once you generate your project.
- Click Save to save your changes.
- Click the Generate icon
 on the toolbar. The Generate Tigerstripe Project dialog box displays.
 - Accept the default Source Folder or click Browse to navigate to a new location and click Finish.
Review the generated code
WSDL, XSD and Java files.
In the previous procedure, you generated a service definition. After completing that procedure, a new directory appeared in the Tigerstripe Explorer, called target. This directory is the default directory where all generated code and files are placed after running the Tigerstripe generation engine. You will notice the following:
- a .wsdl file that provides a Web Service representation of the modeled Service Contract. In particular, the file contains the definition of the processOrder definition defined.
- a .xsd file that contains message definitions and their payload for a message-based implementation of the Service Contract.
- a set of Java files that contain the interface for an Enterprise Java Bean (EJB) representing the integration point for your Service Contract. This EJB contains one operation that corresponds to the processOrder operation that you defined in the model.
Simply stated, you generated a technology specific implementation for three different technologies and maintained a semantic equivalence between them. You used the factory plug-ins for Java, XSD, and WSDL.
Note: To further refine your generated code, please refer to the corresponding tutorial that discusses the Tigerstripe plug-in definitions.
Enhance your model
Adding patterns to further model the behavior of your Service Contract.
In this tutorial, you created a very simplistic view of a Service Contract with:
- a single integration point
- a single operation
Tigerstripe Workbench allows you to enhance your information model and behaviour related to a service through model artifacts called Entity Artifacts. An entity represents a unique item that exists either logically or physically in the context of a Service. That is, the Entity Artifact is stored with a unique key in a database. An Entity Artifact is represented by the Entity icon (![]() ).
).
In this procedure, you will define an entity that models orders as they are handled and stored in an Order processing system. You will further define a relationship between your Integration Point (or Service Facade) and your Order entity to define how orders are processed through your service.
To create an Order entity:
- Click the Entity Artifact icon (
 ). The New Entity Artifact dialog box appears.
- Enter a name for your new entity artifact.
- For this tutorial, name your entity artifact Order.
- Add an attribute for your entity artifact in the Attributes text box. Attributes outline the details of an entity. The newly created entity appears in your project.
- After you create your entity artifact, you need to create a new Integration Point (or Service Facade).
- Name your Integration Point OrderFacade.
- Navigate to the Details tab and define the specific details about your Integration Point.
- For this tutorial, add the Order entity you created as a Managed Entity. As a result, the Order entity will be managed through your service and consumers of your Service Facade can act upon orders; such as creating orders or deleting orders.
- Click Save to save your changes.
- Click the Generate icon () and review your generated code. You will notice a new .wsdl file for your new Service Facade and this file contains the operations to create, read, updated, and delete order.
Making the Order entity as a Managed Entity of the OrderFacade Service Facade, the Tigerstripe plug-ins created create, read, update, and delete operations on the resulting web service. This is by default.
To further control the operations for managed entities:
- Navigate to the Order entity.
- Add a process method on the Details tab of the Entity Artifact. On the Details tab, you can control whether create, read, update, and delete operations are enabled or not, and whether additional operations should be generated on your Service Facade.
managedEntityViewOnSession
- Click Save to save your changes.
- Click the Generate icon and review your generated code.
Congratulations! You've completed your first Tigerstripe Workbench tutorial!