Notice: this Wiki will be going read only early in 2024 and edits will no longer be possible. Please see: https://gitlab.eclipse.org/eclipsefdn/helpdesk/-/wikis/Wiki-shutdown-plan for the plan.
Difference between revisions of "Teneo/EclipseLink"
m (→Running AllTests) |
m (→Obtaining the Example) |
||
| Line 27: | Line 27: | ||
* tests/org.eclipse.emf.teneo.eclipselink.examples.library.orm.tests | * tests/org.eclipse.emf.teneo.eclipselink.examples.library.orm.tests | ||
| − | This example is configured to use Apache Derby which you can download from [http://download.eclipse.org/tools/orbit/downloads/drops/S20090307012903/bundles/org.apache.derby_10.1.2.1_v200803061811.jar Orbit]. Download the Derby plugin and place it in your ECLIPSE_HOME/dropins folder | + | This example is configured to use Apache Derby which you can download from [http://download.eclipse.org/tools/orbit/downloads/drops/S20090307012903/bundles/org.apache.derby_10.1.2.1_v200803061811.jar Orbit]. Download the Derby plugin and place it in your ECLIPSE_HOME/dropins folder alongside the EclipseLink jars. If you have the Eclipse IDE open you'll need to Reload your target platform or restart. |
=== Running AllTests === | === Running AllTests === | ||
Revision as of 17:01, 8 April 2009
Contents
Introduction
Teneo provides integration with EclipseLink JPA to support persistence of arbitrary EMF models with JPA. The original goal of this integration was to allow developers to manually map EMF generated classes with standard JPA to existing databases (so called 'meet-in-the-middle' mapping). This is an important feature if you're building an application on an existing database. However Teneo also supports a full model driven development approach that supports generating the classes, JPA mappings, and database schema from an EMF model.
Under Construction
Getting Started with Teneo-EclipseLink in Eclipse 3.4 (Ganymede)
Configuring your Development Environment
1. Download a build of Eclipse 3.4 that includes EMF and PDE, e.g. Eclipse Modeling Tools, Eclipse Classic, or Eclipse IDE for Java EE Developers.
2. Download EclipseLink packaged as OSGi Bundles and place all the bundles into <ECLIPSE_HOME>/dropins. Be sure that your target platform includes the dropins folder by opening Window>Preferences>Plugin-Developement>Target Platform and checking the box labeled "Build target platform based on target's installed plug-ins". If check this box you should then use the "Reload" button to refresh your target.
3. Download Teneo EclipseLink Runtime and extract it into your Eclipse install.
You now have all the necessary components installed to begin developing with Teneo EclipseLink.
Running the Example
A greatly expanded version of the classic EMF Library example was built during the development of Teneo EclipseLink for testing purposes. The expanded Library provides a rich example that you can serve as a reference as you develop your own Teneo EclipseLink applications.
Obtaining the Example
The Library example will be made available for download as a zip (real soon now) but for now you'll have to check it out from the Teneo CVS respository. The CVS How To page describes how to connect to each of the top level project CVS repositories. Teneo is part of EMF so you'll want to connect to the Modeling CVS repository. The projects you'll want to check out to try out the example are in /cvsroot/modeling/org.eclipse.emf/org.eclipse.emf.teneo.
- examples/org.eclipse.emf.teneo.eclipselink.examples.library
- tests/org.eclipse.emf.teneo.eclipselink.examples.library.orm.tests
This example is configured to use Apache Derby which you can download from Orbit. Download the Derby plugin and place it in your ECLIPSE_HOME/dropins folder alongside the EclipseLink jars. If you have the Eclipse IDE open you'll need to Reload your target platform or restart.
Running AllTests
A launch configuration that runs org.eclipse.emf.teneo.eclipselink.examples.library.orm.tests.AllTests is included in the tests project but you'll probably need to update it so that it is adjusted for your environment.
Open the run configurations dialog, choose the JUnit Plug-ins Test "AllTest", select the "Plug-ins" tab. Make sure the "Include optional dependencies when computing required plug-ins" option is checked and click "Add Required Plug-Ins". Once your list is updated, click the "Validate Plug-ins" button to make you have no problems.
Once you have no problems run AllTests. You should see EclipseLink log messages about JPA mapping defaults, SQL to create the database schema from the mappings, and then the individual tests will run and you'll see even more SQL. You should see 54 of 54 tests run green.
Understanding JPA Mapping for EMF
UNDER CONSTRUCTION
Generating the orm.xml from the model (top-to-bottom mapping)
To support a top-to-bottom mapping approach Teneo makes it possible to generate the orm.xml from the ecore model. There are two ways to generate the orm.xml:
- By right-clicking the ecore file and selecting the submenu Teneo > Generate orm. See below for a full description.
- Programmatically by instantiating the org.eclipse.emf.teneo.jpa.convert.ORMGenerator class and calling a specific method on the class.
Each of these methods is discussed separately.
JPA Annotated Model
The input for both methods is a JPA annotated model. Teneo will automatically annotate the model with JPA annotations. So manual annotations are only required if certain default behavior needs to be overridden.
More documentation on how to annotate an Ecore model with annotations can be found here:
Note that for EclipseLink practically all standard JPA annotations are supported.
For more information see this presentation on EclipseLink - Teneo which was done at EclipseCon 2009.
To generate the orm.xml through the menu the following steps have to be setup/done:
- generate the model code (standard EMF action), the generated model code will be present in a specific Java project, called the model project
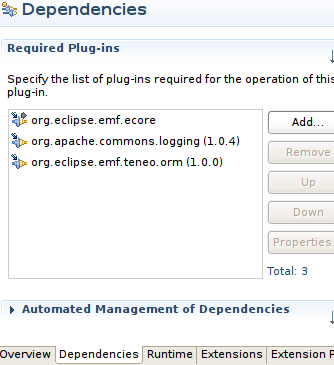
- add the following two dependencies to the model project: open the MANIFEST.MF file in the model project's META-INF directory and go to the dependency tab. Then add the following two dependencies:
- org.apache.commons.logging
- org.eclipse.emf.teneo.orm
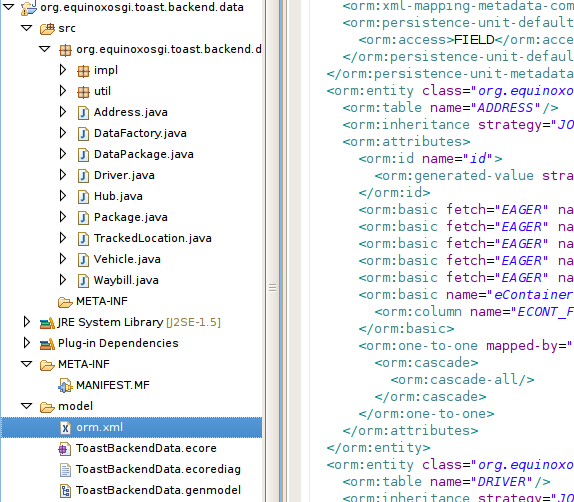
- right-click on the ecore file and choose the Teneo > Generate orm submenu. The system now generates an orm.xml file in the same folder as the ecore file.
Note: the above logic assumes that the ecore file is present in the same Java project as the generated model code.
Generating the orm.xml through the menu is quick. The main disadvantage is that you can not pass specific persistence options to control the mapping behavior. The available persistence options are described here
Generating the orm.xml programmatically
Generating the orm.xml in a programmatic way has as main advantage that the mapping logic can be influenced by passing | Persistence Options. For more details on the PersistenceOptions check out the PersistenceOptions source code and javadoc.
To generate programmatically the class ORMGenerator (org.eclipse.emf.teneo.jpa.convert.ORMGenerator) class is used. The source code below gives an example of a possible use:
final Properties props = new Properties();
props.setProperty(PersistenceOptions.SQL_TABLE_NAME_PREFIX, "EMFLIB_");
final ORMGenerator converter = new ORMGenerator();
final String orm = converter.generateORM(
		new EPackage[] { DataPackage.eINSTANCE }, converter
				.getDefaultPersistenceOptions(props));
System.err.println(orm);
To walk you through the code. As the orm.xml is generated programmatically,there is the opportunity to set specific persistence options. In this case the table name prefix is set. Then a new instance of the ORMGenerator is created. In the generate call: converter.generateORM two arguments are passed:
- the array of EPackages for which an orm is generated
- the properties, note the specific way to get the default persistence options from the GenerateORM instance itself. This is required if you want to make use of default settings which make sense for EclipseLink. The default Persistence Options are shown below.
The generateORM method returns the orm.xml as a String. This String can be saved to a file system.
The default persistenceoptions which are common in the ORMGenerator:
props.setProperty(PersistenceOptions.SQL_NAME_ESCAPE_CHARACTER, "");
props.setProperty(PersistenceOptions.EMAP_AS_TRUE_MAP, "false");
props.setProperty(PersistenceOptions.SET_DEFAULT_CASCADE_ON_NON_CONTAINMENT,"true");
props.setProperty(PersistenceOptions.CASCADE_POLICY_ON_NON_CONTAINMENT, "REFRESH,PERSIST,MERGE");
props.setProperty(PersistenceOptions.ID_FEATURE_AS_PRIMARY_KEY, "false");
props.setProperty(PersistenceOptions.SQL_CASE_STRATEGY, "uppercase");


