Notice: this Wiki will be going read only early in 2024 and edits will no longer be possible. Please see: https://gitlab.eclipse.org/eclipsefdn/helpdesk/-/wikis/Wiki-shutdown-plan for the plan.
Difference between revisions of "Swordfish Documentation: Running Target Platform"
(→Setting up Target Platform) |
(→Prerequisites) |
||
| Line 4: | Line 4: | ||
==Prerequisites== | ==Prerequisites== | ||
| − | Eclipse Galileo | + | Eclipse Galileo (Eclipse 3.5) build or later. The examples described here are based on Eclipse 3.5. |
| − | The examples described here are based on Eclipse | + | |
==Setting up Target Platform== | ==Setting up Target Platform== | ||
Revision as of 05:12, 29 July 2009
Contents
Running Swordfish Target Platform
This section contains instructions on setting up the Swordfish Target Platform produced by the headless build.
For more information about Swordfish headless builds, see Creating a headless build.
Prerequisites
Eclipse Galileo (Eclipse 3.5) build or later. The examples described here are based on Eclipse 3.5.
Setting up Target Platform
To run Swordfish Target Platform do the following:
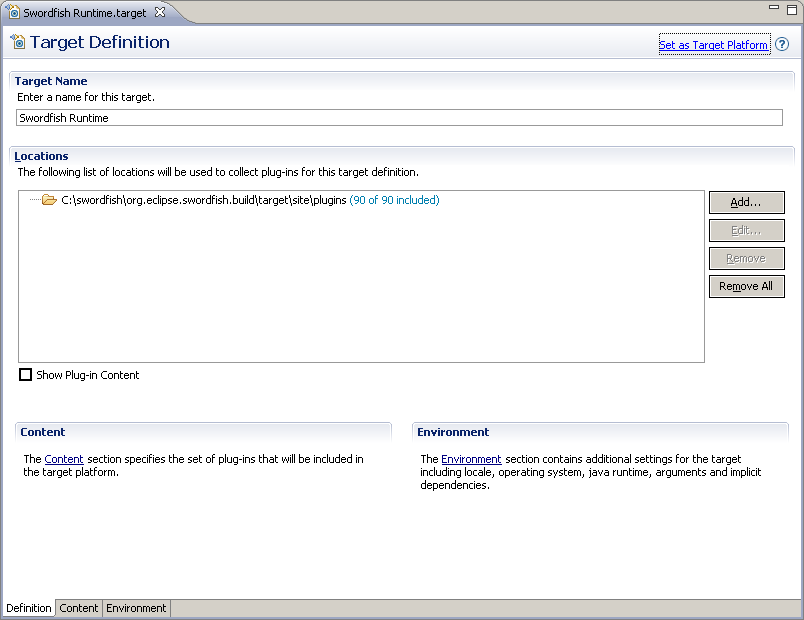
- Create a new Target Platform definition. Click File > New > Other... > Target Definition
or go to Preferences > Plug-in Development > Target Platform and click Add... - Add the location (path) of the built Swordfish plug-ins to the list of locations presented in the definition.
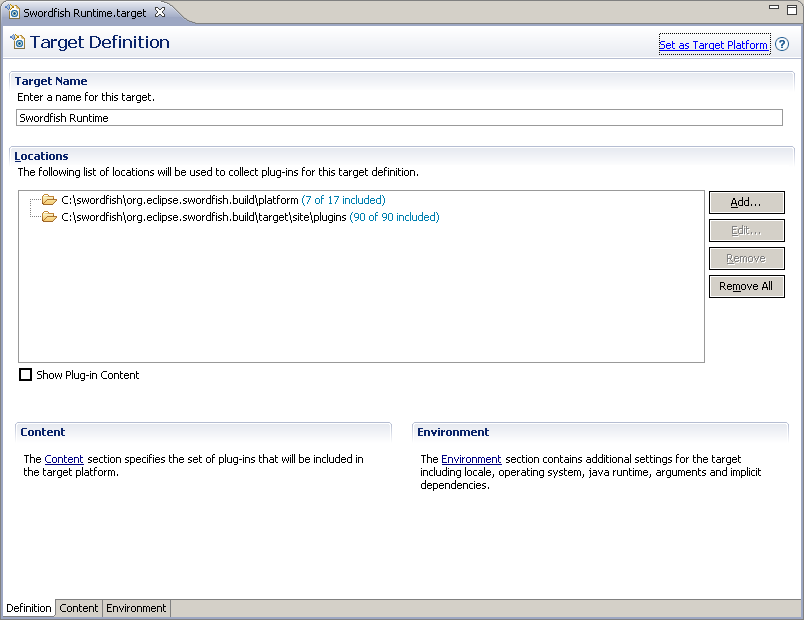
- Add to the platform definition location of Equinox the bundles that are necessary to run the target platform.
When the build process successfully ends, you can find these bundles in the platform directory of org.eclipse.swordfish.build project.
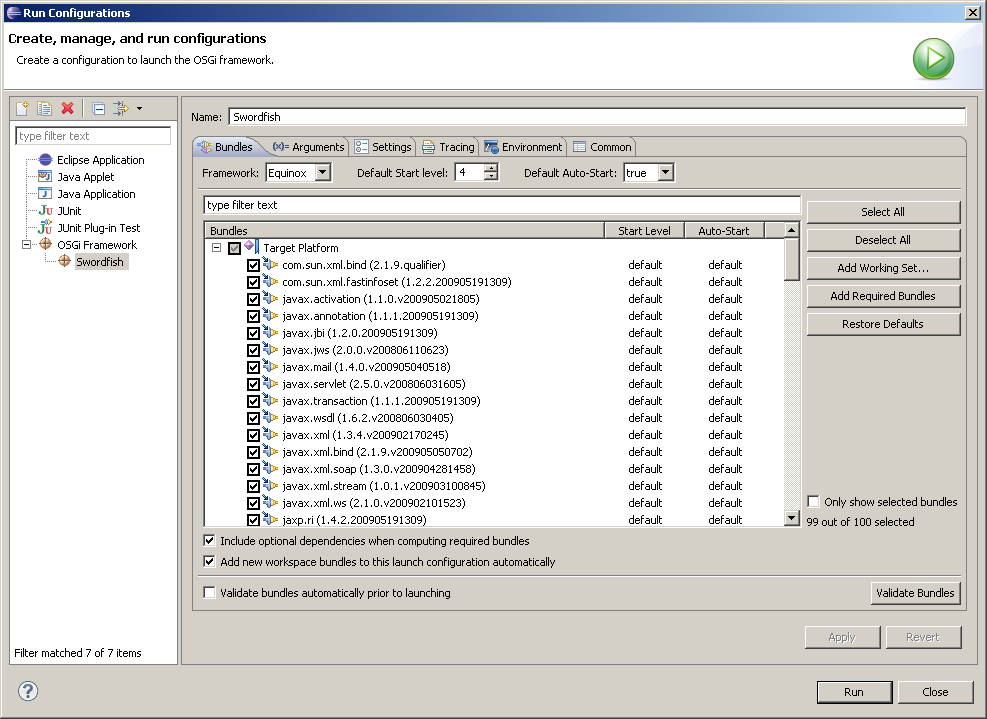
Go to the Content tab and select the bundles listed in c: as shown in this figure.
This means that all bundles from the target platform as well as the Eclipse Equinox bundles must be selected.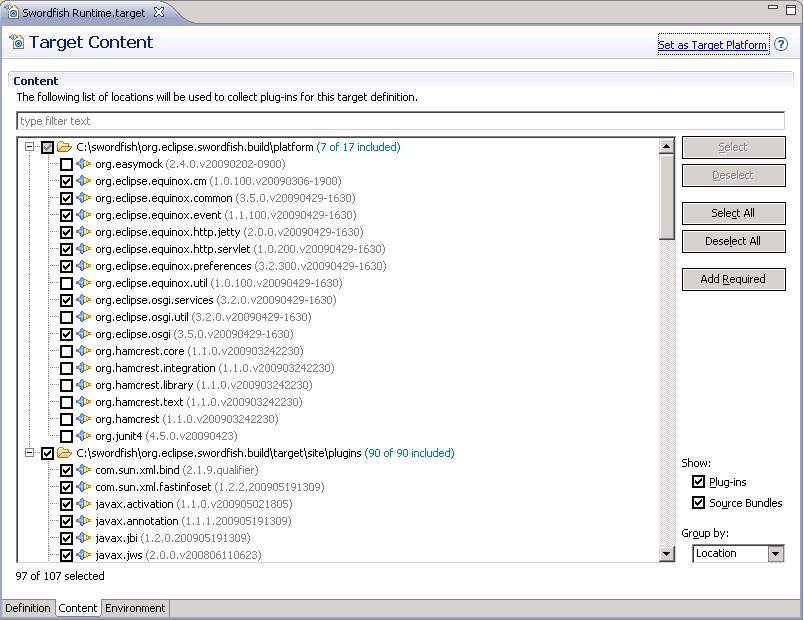
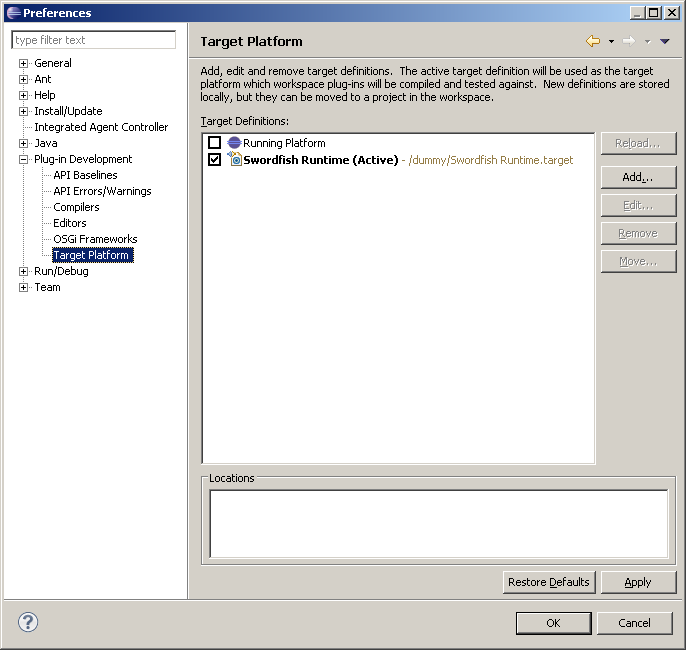
- Configure Eclipse to use the Swordfish target platform.
- Click Window > Preferences > Target Platform and set the newly created definition as active target platform.
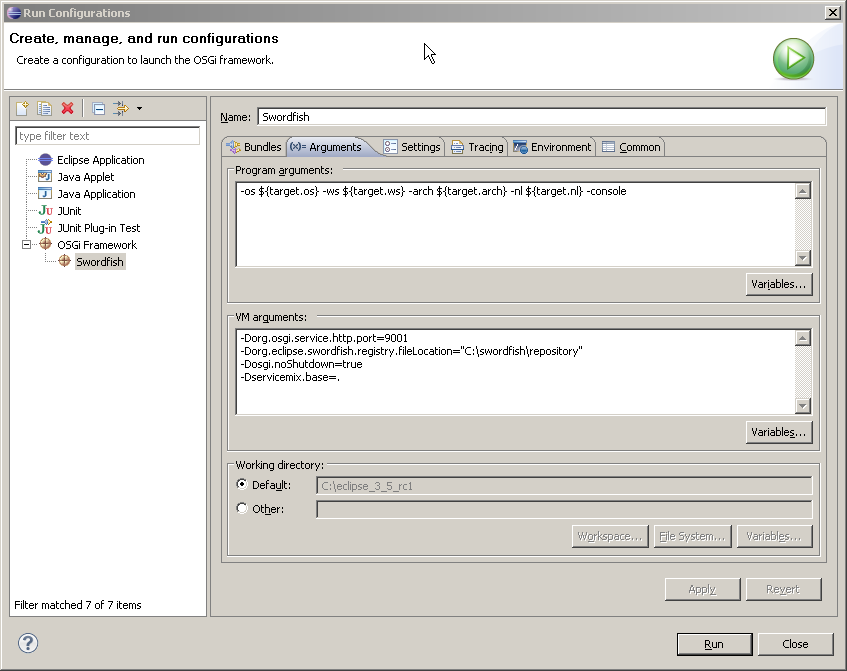
- In the Run Configurations... dialog create a new OSGi configuration based on Swordfish target platform.
- Switch to the Arguments tab and type the following VM arguments:
-Dorg.osgi.service.http.port=9001
-Dorg.eclipse.swordfish.registry.fileLocation="C:\swordfish\repository"
-Dosgi.noShutdown=true
-Dservicemix.base=.
-Dorg.osgi.framework.system.packages="com.sun.jimi.core,com.sun.net.ssl,com.sun.net.ssl.internal.ssl,
com.sun.org.apache.xalan.internal,com.sun.org.apache.xalan.internal.res,com.sun.org.apache.xalan.internal.xsltc.trax,
com.sun.org.apache.xerces.internal.dom,com.sun.org.apache.xerces.internal.jaxp,com.sun.org.apache.xerces.internal.xni,
com.sun.org.apache.xml.internal,com.sun.org.apache.xml.internal.utils,com.sun.org.apache.xpath.internal,
com.sun.org.apache.xpath.internal.jaxp,com.sun.org.apache.xpath.internal.objects,com.sun.xml.fastinfoset.dom,
com.sun.xml.fastinfoset.sax,com.sun.xml.fastinfoset.stax,javax.annotation,javax.annotation.security,javax.crypto,
javax.crypto.interfaces,javax.crypto.spec,javax.imageio,javax.imageio.metadata,javax.imageio.stream,javax.jms,
javax.management,javax.management.loading,javax.management.modelmbean,javax.management.remote,javax.naming,
javax.naming.directory,javax.naming.spi,javax.net,javax.net.ssl,javax.rmi,javax.security.auth,
javax.security.auth.callback,javax.security.auth.login,javax.security.auth.spi,javax.security.auth.x500,
javax.security.cert,javax.security.sasl,javax.sql,javax.swing,javax.swing.event,javax.xml.datatype,javax.xml.parsers,
javax.xml.namespace,javax.xml.transform,javax.xml.transform.dom,javax.xml.transform.sax,javax.xml.transform.stream,
javax.xml.validation,javax.xml.xpath,org.jvnet.fastinfoset,org.jvnet.staxex,org.omg.CORBA,org.omg.CosNaming,
org.w3c.dom,org.w3c.dom.bootstrap,org.w3c.dom.ls,org.w3c.dom.traversal,org.xml.sax,org.xml.sax.ext,org.xml.sax.helpers,
sun.misc,sun.security.provider,javax.activation,org.omg.CORBA.TypeCodePackage,org.omg.CORBA.portable,
org.omg.PortableServer,org.omg.PortableServer.POAPackage,javax.swing.border,org.w3c.dom.events,org.w3c.dom.html,org.w3c.dom.ranges"
- The value of org.osgi.service.http.port must be set to 9001 - the default port that the remote resolver uses to connect to the Swordfish registry.
- The next property org.eclipse.swordfish.registry.fileLocation must point to the directory where all the WSDL files that need to be loaded by the registry are placed.
- The property osgi.noShutdown is the Eclipse Equinox (OSGI) specific container. Its value must be set to true because Equinox shuts down by default after starting up if it does not find an Eclipse application. For details on this issue, see [Quick Start].
The optional property org.eclipse.swordfish.registry.url can be used to point to the running Swordfish Registry instance e.g.
-Dorg.eclipse.swordfish.registry.url=http://localhost:9002/anotherRegistry
For more information about Swordfish Registry properties, see Launching the Service Registry.


Starting the Target Platform
You may use Swordfish samples to check if the Swordfish target platform can be successfully started.
To check if the target platform starts successfully:
- Launch the target platform.
- Start a Web browser
- Enter the following URL: http://localhost:8192/cxfsample/?wsdl
If the platform successfully starts, you see a WSDL file containing a description of the sample BookingService.