Notice: this Wiki will be going read only early in 2024 and edits will no longer be possible. Please see: https://gitlab.eclipse.org/eclipsefdn/helpdesk/-/wikis/Wiki-shutdown-plan for the plan.
Difference between revisions of "Swordfish Documentation: Designing BPEL Eclipse BPEL Designer"
(→Assign-type elements initialization) |
|||
| (14 intermediate revisions by the same user not shown) | |||
| Line 1: | Line 1: | ||
== Creating BPEL Process Skeleton == | == Creating BPEL Process Skeleton == | ||
| − | # Select '''File > New Wizard >BPEL 2.0>BPEL project''' to create a new BPEL project and name it, <tt>FlightBooking</tt>. | + | # Select '''File > New Wizard > BPEL 2.0 > BPEL project''' to create a new BPEL project and name it, <tt>FlightBooking</tt>. |
| − | # Next, create a BPEL file '''New Wizard >BPEL 2.0 >New BPEL Process File'''. In the BPEL file wizard window enter: | + | # Next, create a BPEL file by selecting '''New Wizard >BPEL 2.0 >New BPEL Process File'''. In the BPEL file wizard window enter: |
#* BPEL Process Name: FlightBookingProcess | #* BPEL Process Name: FlightBookingProcess | ||
#* Namespace: http://www.eclipse.org/swordfish/samples/FlightBooking | #* Namespace: http://www.eclipse.org/swordfish/samples/FlightBooking | ||
#* Template: Empty BPEL process | #* Template: Empty BPEL process | ||
| − | #* In the next wizard | + | #* In the next wizard window set the option to '''choose BPEL project I've created before'''. |
| − | #Open the newly created FlightBookingProcess.bpel with BPEL Designer by double | + | #Open the newly created FlightBookingProcess.bpel with BPEL Designer by double clicking it. You can now see a visual representation of an empty BPEL process as shown in this figure. |
#:[[Image:Empty-bpel.png]] | #:[[Image:Empty-bpel.png]] | ||
| − | # Expand BPEL elements | + | # Expand the BPEL elements palette by clicking the arrow icon highlighted in this figure: |
#:[[Image:Bpel-element-palette.png]] | #:[[Image:Bpel-element-palette.png]] | ||
| − | # Using Element Palette create initial BPEL Process Skeleton as displayed | + | # Using the Element Palette, create an initial BPEL Process Skeleton as displayed in this image: |
#:[[Image:Bpel-process-skeleton.png]] | #:[[Image:Bpel-process-skeleton.png]] | ||
== Setting Up BPEL WSIL Browser == | == Setting Up BPEL WSIL Browser == | ||
| − | To create Partner Link to external | + | To create a Partner Link to an external Web service and expose the BPEL process as a Web service we need a set of corresponding WSDL files. In the current tutorial, those files can be accessed from the Swordfish Registry. |
| − | # Start Swordfish Service Registry, [[http://wiki.eclipse.org/images/8/8b/Flight_booking_demo_wslds.zip download]]) and install | + | # Start Swordfish Service Registry, [[http://wiki.eclipse.org/images/8/8b/Flight_booking_demo_wslds.zip download]]) and install the 3 WSDL files:FlightBooking.wsdl, FlightReservation.wsdl, and PaymentProcessing.wsdl. The Service Registry automatically provides a WSIL file for the installed WSDLs. The default URL is http://localhost:9001/registry/wsil, as shown in this figure. |
#:[[Image:Wsil.png]] | #:[[Image:Wsil.png]] | ||
| − | # | + | # In order to access and import the above mentioned WSDL files initialize BPEL WSIL Browser. To do this select '''Preference > BPEL > WSIL Brower''' and set "Document URL" field as http://localhost:9001/registry/wsil. |
| + | # Click <b>OK</b>. | ||
#:[[Image:Init-wsil-browser.png]] | #:[[Image:Init-wsil-browser.png]] | ||
| − | # IMPORTANT: Service Registry should be up and running | + | # IMPORTANT: Service Registry should be up and running in the next phase, that is, the design and process execution phase. |
== Creating Partner Links == | == Creating Partner Links == | ||
| − | + | In the newly created process diagram we have one receive-type element (with same name "Receive") and two invoke-type elements ("processReservation" and "paimentProcessing"). For the Receive-type element we need InBound endpoints and for the invoke-type we need to create OutBound endpoints. To create Partner Links we need to import the corresponding WSDL file to the BPEL process. | |
| − | === Creating Receive InBound Partner Link === | + | === Creating Receive-InBound Partner Link === |
| − | # | + | # Click on the '''Receive''' element in the BPEL diagram. Open the'''Properties''' view and click the '''Details''' tab. You should see an empty '''Partner Link''' and '''Operation Fields''' item. Expand the Partner Link drop down list and choose the '''Create Global Partner Link''' item: |
#:[[Image:Parnter-link-field.png]] | #:[[Image:Parnter-link-field.png]] | ||
| − | # In '''New | + | # In the '''New Partner Link''' window, type ''FlightBooking''. |
| − | # | + | # In the next window, the option <b>Choose Partner Link Type</b> will be empty by default. To see the available types we need to import the corresponding WSDL files. Click on '''Add WSDL'''. |
#: [[Image:Empty-choose-partner-link-window.png]] | #: [[Image:Empty-choose-partner-link-window.png]] | ||
| − | # In the '''Browse for a WSDL to Import''' | + | # In the '''Browse for a WSDL to Import''' check the WSIL button. If your Swordfish Registry is up and running, and the BPEL WSIL Browser is set up correctly, you should see the Inspection tree including all 3 WSDL files. For this step you need to click on 'FlightBooking.wsdl' and click <b>OK</b>. |
#:[[Image:Choose-flight-booking-wsdl.png]] | #:[[Image:Choose-flight-booking-wsdl.png]] | ||
| − | # | + | # Repeat the previous step for the 'FlightReservation.wsdl' and 'PaymentProcessing.wsdl' files. |
| − | # | + | # Now your '''New Partner Link''' window should look similar to the image shown next. |
| + | # Click the 'FlightBooking' item in the '''Matches''' area and click '''OK'''. | ||
#: [[Image:Choose-partner-link-fool.png]] | #: [[Image:Choose-partner-link-fool.png]] | ||
| − | # | + | # In the next window set '''Partner Link Type Name''' with the same value as '''Partner Link Name''': 'FlightBooking'. |
| − | # | + | # Click '''OK''' to go to the next step of partner link type creation window. |
| + | # In the next window, enter 'InBound' for the '''Role Name''' field and select FlightBooking port type from list below(see image). | ||
| + | # Click '''Finish'''. | ||
#: [[Image:Create-parther-link-type.png]] | #: [[Image:Create-parther-link-type.png]] | ||
| − | # | + | # Leave the options in the'''Set Namespace Prefix''' window fields as it is. |
| − | # After partner link | + | # After you finish creating the partner link go back to BPEL diagram and check your changes: |
| − | ## new Partner Link 'FlightBooking' now visible | + | ## The new Partner Link 'FlightBooking' is now visible in the BPEL process sidebar |
| − | ## | + | ## In the properties pane 'Receive' element '''Partner Link''' should become initialized with just the created partner link name. |
| − | ## | + | ## In the properties pane for 'Receive' element, '''Operation''' link is still empty. |
#:[[Image:Properties-and-new-partner-link.png]] | #:[[Image:Properties-and-new-partner-link.png]] | ||
| − | # We still need to set '''Operation''' field for 'Receive' element | + | # We still need to set '''Operation''' field for 'Receive' element. The easiest way do to this is to click on the '''flightBooking''' operation icon within the '''Quick Pick''' element tree. Now, you can also see that the new process variable 'FlightBookingRequest' that has been automatically created and assigned to a current partner link: |
#:[[Image:Set-operation-and-new-variable.png]] | #:[[Image:Set-operation-and-new-variable.png]] | ||
| − | == Creating | + | == Creating flightReservation OutBound Partner Link == |
| − | Select | + | Select the flightReservation element in the BPEL Designer to edit its properties and repeat the same set of steps as described |
| + | in the previous section. | ||
| − | + | Note: | |
| − | * '''Partner Link Name''' and '''Partner Link Type Name''' should be | + | * '''Partner Link Name''' and '''Partner Link Type Name''' should be <tt>FlightReservation</tt> |
| − | * Partner Link '''Role Name''' should be | + | * Partner Link '''Role Name''' should be set to 'OutBound' |
| − | * Operation name for | + | * Operation name for <tt>FlightReservation</tt> partner link is <tt>reserveFlight</tt>. |
== Creating paymentProcessing OutBoing Partner Link == | == Creating paymentProcessing OutBoing Partner Link == | ||
Select paymentProcessing element in BPEL designer to edit its' properties and make same set of action as above. | Select paymentProcessing element in BPEL designer to edit its' properties and make same set of action as above. | ||
| − | + | Note: | |
* '''Partner Link Name''' and '''Partner Link Type Name''' should be 'PaymentProcessing' | * '''Partner Link Name''' and '''Partner Link Type Name''' should be 'PaymentProcessing' | ||
| − | * Partner Link Type '''Role Name''' should be | + | * The Partner Link Type '''Role Name''' should be set to 'OutBound' |
| − | * | + | * The operation name for PaymentProcessing partner link is paymentProcessing |
== Creating Reply Partner Link == | == Creating Reply Partner Link == | ||
| Line 70: | Line 75: | ||
Set '''Properties''' pane values as on image below. | Set '''Properties''' pane values as on image below. | ||
| − | + | NOTE: After you set the operation value, a new variable 'FlightBookingResponse' should be automatically created. | |
:[[Image:Reply-partner-link.png]] | :[[Image:Reply-partner-link.png]] | ||
== Assign-type elements initialization == | == Assign-type elements initialization == | ||
| − | Assign elements using | + | Assign elements using the transit data from one BPEL logic element to the next. |
| − | In our case we | + | In our case we have the following scenario: |
* pass initial request data from Receive element to flightRecervation element (Assign) | * pass initial request data from Receive element to flightRecervation element (Assign) | ||
| − | * pass | + | * pass flightReservation element's response to paymentProcessing element (Assign1) |
* pass paymentData element's response to Rely element (Assign2) | * pass paymentData element's response to Rely element (Assign2) | ||
=== Initialization of the first Assign Element(element name: 'Assign') === | === Initialization of the first Assign Element(element name: 'Assign') === | ||
| − | # | + | # Click on the Assign element on the top of the BPEL diagram and open '''Properties >Details''' tab. It will be empty by default. |
#:[[Image:Assign-properties-empty.png]] | #:[[Image:Assign-properties-empty.png]] | ||
| − | # click on '''New''' | + | # click on '''New''' to create a new assign statement. This will populate '''From''' and '''To''' variables trees. |
| − | ## | + | ## Expand the 'FlightBookingRequest' item from '''From''' list (left side) and select '''parameters: bookFlight > flightData: FlightData''' item. |
| − | ## | + | ## Expand the 'FlightReservationRequest' item in the'''To''' list (right side) and select '''parameters: reserveFlight > flightData: FlightData''' item |
#:[[Image:Assign-variable-to-variable.png]] | #:[[Image:Assign-variable-to-variable.png]] | ||
| − | #: We just created Variable to Variable assignment. It | + | #: We have now just created a Variable to Variable assignment. It passes the initial request to the FlightReservation service. But FlightReservationRequest variable need additional initialization before assignment execution can be completed. The BPEL Designer is responsible for generating this initialization part automatically. However, there are some prerequisite steps to be done before this can work. |
| − | #Click on some empty area | + | #Click on some empty area in the process diagram pane. You should then see this pop-up: |
#:[[Image:Assign-initialization-request.png]] | #:[[Image:Assign-initialization-request.png]] | ||
| − | #Click OK and | + | #Click '''OK''' and go back to Assign '''Properties >Details''' tab. You should see that there is a new "Fixed Value to Variable" assignment. |
#:[[Image:Assign-fixed-value-to-var.png]] | #:[[Image:Assign-fixed-value-to-var.png]] | ||
| − | # | + | # This statement assigns the XML-string to FlightReservationRequest before "Variable to Variable" assign statement execution starts. Wee need this to create a well-formed request to the Flight Reservation service. Now your first assign element initialization is done! |
=== Initialization of the second Assign Element(element name: 'Assign1') === | === Initialization of the second Assign Element(element name: 'Assign1') === | ||
| − | The same set of actions as for first assign elements | + | The same set of actions as for first assign elements must be performed but with different variables: |
* '''From''' FlightBookingRequest->paymentData | * '''From''' FlightBookingRequest->paymentData | ||
* ''' To''' PaymentProcessingRequest->paymentData | * ''' To''' PaymentProcessingRequest->paymentData | ||
*IMPORTANT: don't forget about additional initialization using 'Fixed Value to Variable' statement auto generation | *IMPORTANT: don't forget about additional initialization using 'Fixed Value to Variable' statement auto generation | ||
| − | + | [[Image:Assign1.png]] | |
=== Initialization of the third Assign Element(element name: 'Assign2') === | === Initialization of the third Assign Element(element name: 'Assign2') === | ||
| − | + | Now you need to do the same set of actions as for first assign elements. However, once again the variable are different: | |
* '''From''' PaymentProcessing->response | * '''From''' PaymentProcessing->response | ||
* ''' To''' FlightBookingResponse->response | * ''' To''' FlightBookingResponse->response | ||
| − | *IMPORTANT: | + | *IMPORTANT: Do not forget about the additional initialization using the 'Fixed Value to Variable' statement auto generation function. |
#:[[Image:Assign2.png]] | #:[[Image:Assign2.png]] | ||
| − | + | NOTE: You can now use this process. | |
| − | + | The resulting artifacts are: | |
*FlightBookingProcess.bpel | *FlightBookingProcess.bpel | ||
*FlightBookingProcess.bpelex | *FlightBookingProcess.bpelex | ||
Latest revision as of 10:20, 17 August 2009
Contents
Creating BPEL Process Skeleton
- Select File > New Wizard > BPEL 2.0 > BPEL project to create a new BPEL project and name it, FlightBooking.
- Next, create a BPEL file by selecting New Wizard >BPEL 2.0 >New BPEL Process File. In the BPEL file wizard window enter:
- BPEL Process Name: FlightBookingProcess
- Namespace: http://www.eclipse.org/swordfish/samples/FlightBooking
- Template: Empty BPEL process
- In the next wizard window set the option to choose BPEL project I've created before.
- Open the newly created FlightBookingProcess.bpel with BPEL Designer by double clicking it. You can now see a visual representation of an empty BPEL process as shown in this figure.
- Expand the BPEL elements palette by clicking the arrow icon highlighted in this figure:
- Using the Element Palette, create an initial BPEL Process Skeleton as displayed in this image:


Setting Up BPEL WSIL Browser
To create a Partner Link to an external Web service and expose the BPEL process as a Web service we need a set of corresponding WSDL files. In the current tutorial, those files can be accessed from the Swordfish Registry.
- Start Swordfish Service Registry, [download]) and install the 3 WSDL files:FlightBooking.wsdl, FlightReservation.wsdl, and PaymentProcessing.wsdl. The Service Registry automatically provides a WSIL file for the installed WSDLs. The default URL is http://localhost:9001/registry/wsil, as shown in this figure.
- In order to access and import the above mentioned WSDL files initialize BPEL WSIL Browser. To do this select Preference > BPEL > WSIL Brower and set "Document URL" field as http://localhost:9001/registry/wsil.
- Click OK.
- IMPORTANT: Service Registry should be up and running in the next phase, that is, the design and process execution phase.


Creating Partner Links
In the newly created process diagram we have one receive-type element (with same name "Receive") and two invoke-type elements ("processReservation" and "paimentProcessing"). For the Receive-type element we need InBound endpoints and for the invoke-type we need to create OutBound endpoints. To create Partner Links we need to import the corresponding WSDL file to the BPEL process.
Creating Receive-InBound Partner Link
- Click on the Receive element in the BPEL diagram. Open theProperties view and click the Details tab. You should see an empty Partner Link and Operation Fields item. Expand the Partner Link drop down list and choose the Create Global Partner Link item:
- In the New Partner Link window, type FlightBooking.
- In the next window, the option Choose Partner Link Type will be empty by default. To see the available types we need to import the corresponding WSDL files. Click on Add WSDL.
-
- In the Browse for a WSDL to Import check the WSIL button. If your Swordfish Registry is up and running, and the BPEL WSIL Browser is set up correctly, you should see the Inspection tree including all 3 WSDL files. For this step you need to click on 'FlightBooking.wsdl' and click OK.
- Repeat the previous step for the 'FlightReservation.wsdl' and 'PaymentProcessing.wsdl' files.
- Now your New Partner Link window should look similar to the image shown next.
- Click the 'FlightBooking' item in the Matches area and click OK.
-
- In the next window set Partner Link Type Name with the same value as Partner Link Name: 'FlightBooking'.
- Click OK to go to the next step of partner link type creation window.
- In the next window, enter 'InBound' for the Role Name field and select FlightBooking port type from list below(see image).
- Click Finish.
-
- Leave the options in theSet Namespace Prefix window fields as it is.
- After you finish creating the partner link go back to BPEL diagram and check your changes:
- The new Partner Link 'FlightBooking' is now visible in the BPEL process sidebar
- In the properties pane 'Receive' element Partner Link should become initialized with just the created partner link name.
- In the properties pane for 'Receive' element, Operation link is still empty.
- We still need to set Operation field for 'Receive' element. The easiest way do to this is to click on the flightBooking operation icon within the Quick Pick element tree. Now, you can also see that the new process variable 'FlightBookingRequest' that has been automatically created and assigned to a current partner link:


Creating flightReservation OutBound Partner Link
Select the flightReservation element in the BPEL Designer to edit its properties and repeat the same set of steps as described in the previous section.
Note:
- Partner Link Name and Partner Link Type Name should be FlightReservation
- Partner Link Role Name should be set to 'OutBound'
- Operation name for FlightReservation partner link is reserveFlight.
Creating paymentProcessing OutBoing Partner Link
Select paymentProcessing element in BPEL designer to edit its' properties and make same set of action as above.
Note:
- Partner Link Name and Partner Link Type Name should be 'PaymentProcessing'
- The Partner Link Type Role Name should be set to 'OutBound'
- The operation name for PaymentProcessing partner link is paymentProcessing
Creating Reply Partner Link
Select paymentProcessing element in BPEL designer to edit its' properties. No Partner Link creating needed this time, we will use existing FlightBooking partner link. Set Properties pane values as on image below.
NOTE: After you set the operation value, a new variable 'FlightBookingResponse' should be automatically created.

Assign-type elements initialization
Assign elements using the transit data from one BPEL logic element to the next.
In our case we have the following scenario:
- pass initial request data from Receive element to flightRecervation element (Assign)
- pass flightReservation element's response to paymentProcessing element (Assign1)
- pass paymentData element's response to Rely element (Assign2)
Initialization of the first Assign Element(element name: 'Assign')
- Click on the Assign element on the top of the BPEL diagram and open Properties >Details tab. It will be empty by default.
- click on New to create a new assign statement. This will populate From and To variables trees.
- Expand the 'FlightBookingRequest' item from From list (left side) and select parameters: bookFlight > flightData: FlightData item.
- Expand the 'FlightReservationRequest' item in theTo list (right side) and select parameters: reserveFlight > flightData: FlightData item
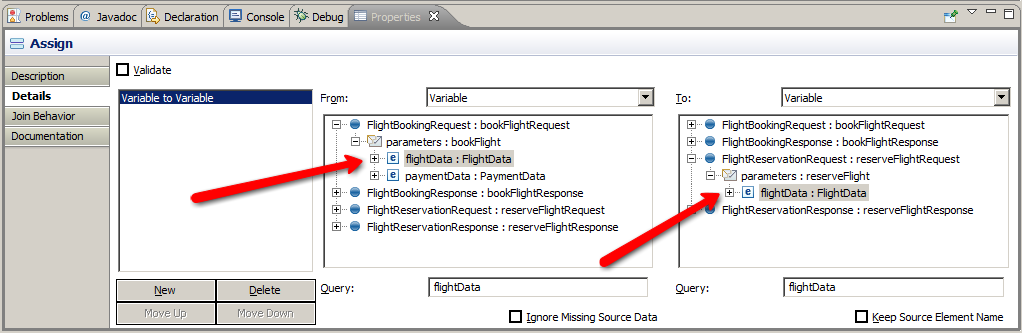
- We have now just created a Variable to Variable assignment. It passes the initial request to the FlightReservation service. But FlightReservationRequest variable need additional initialization before assignment execution can be completed. The BPEL Designer is responsible for generating this initialization part automatically. However, there are some prerequisite steps to be done before this can work.
- Click on some empty area in the process diagram pane. You should then see this pop-up:
- Click OK and go back to Assign Properties >Details tab. You should see that there is a new "Fixed Value to Variable" assignment.
- This statement assigns the XML-string to FlightReservationRequest before "Variable to Variable" assign statement execution starts. Wee need this to create a well-formed request to the Flight Reservation service. Now your first assign element initialization is done!


Initialization of the second Assign Element(element name: 'Assign1')
The same set of actions as for first assign elements must be performed but with different variables:
- From FlightBookingRequest->paymentData
- To PaymentProcessingRequest->paymentData
- IMPORTANT: don't forget about additional initialization using 'Fixed Value to Variable' statement auto generation

Initialization of the third Assign Element(element name: 'Assign2')
Now you need to do the same set of actions as for first assign elements. However, once again the variable are different:
- From PaymentProcessing->response
- To FlightBookingResponse->response
- IMPORTANT: Do not forget about the additional initialization using the 'Fixed Value to Variable' statement auto generation function.

NOTE: You can now use this process.
The resulting artifacts are:
- FlightBookingProcess.bpel
- FlightBookingProcess.bpelex
Now those files ready for packaging and deployment.