Notice: this Wiki will be going read only early in 2024 and edits will no longer be possible. Please see: https://gitlab.eclipse.org/eclipsefdn/helpdesk/-/wikis/Wiki-shutdown-plan for the plan.
Stardust/Knowledge Base/Customization/Portal/Completing Or Aborting Activities And Processes Using Custom Controls in a JSF Page
Introduction
The business case may sometimes require designing custom JSF pages rather than relying on the manual activities generated by Stardust. Additionally, it may be necessary to provide UI controls (like buttons) on the JSF page that will trigger custom processing and thereafter close the activity panel based on a success condition or failure (abort). It is quite easy to support such requirements in the Stardust portal. The present example illustrates a simple use case where the above feature is highlighted. All the artifacts discussed in this article may be downloaded from here.
Model
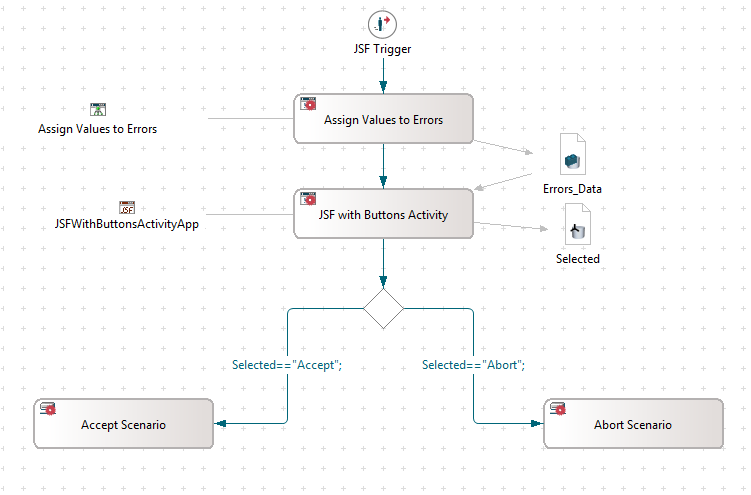
The above model highlights a process that is started with a simple manual trigger. The following message transformation activity is only used to populate the "Errors_Data" SDT (which is a collection of error strings) with initial values which will be displayed in the subsequent JSF activity. The user may of course use a POJO or other means to populate the data to be displayed on the JSF page. The "JSF with Buttons Activity" activity employs a custom JSF page and backing bean. A couple of custom controls (buttons) viz. "Accept" and "Abort" have been added to the page. On clicking either of these, the backing bean captures the action selected which then drives the subsequent process flow. Note here that this technique may be adopted for any kind of subsequent process action (for e.g. continuing with the current flow if the activity is completed normally, choosing to abort the root/current process if the abort button is clicked, etc.). Since the Activity panel is closed normally, no prompts are displayed on the screen after an action is selected (which may be a business requirement).
JSF Page
<ice:panelGrid id="data_mappings" columns="2" styleClass="table-form"
columnClasses="table-label-column,table-component-column">
<ice:commandButton id="Accept" value="Accept"
actionListener="#{JSFWithButtonsActivityBean.abortOrComplete}" onclick="confirmIppAiClosePanelCommand('complete');" />
<ice:commandButton id="Abort" value="Abort"
actionListener="#{JSFWithButtonsActivityBean.abortOrComplete}" onclick="confirmIppAiClosePanelCommand('complete');" />
</ice:panelGrid>
<script language="javascript">
   function validateAndComplete(){
      	confirmIppAiClosePanelCommand('complete');
   }
</script>
This function internally invokes the "confirmIPPAiClosePanelCommand" function with the argument "complete". This function is provided by Stardust and is included by a parent window of the JSF panel. This function results in a final call to the "complete" method of the backing bean.
Backing Bean
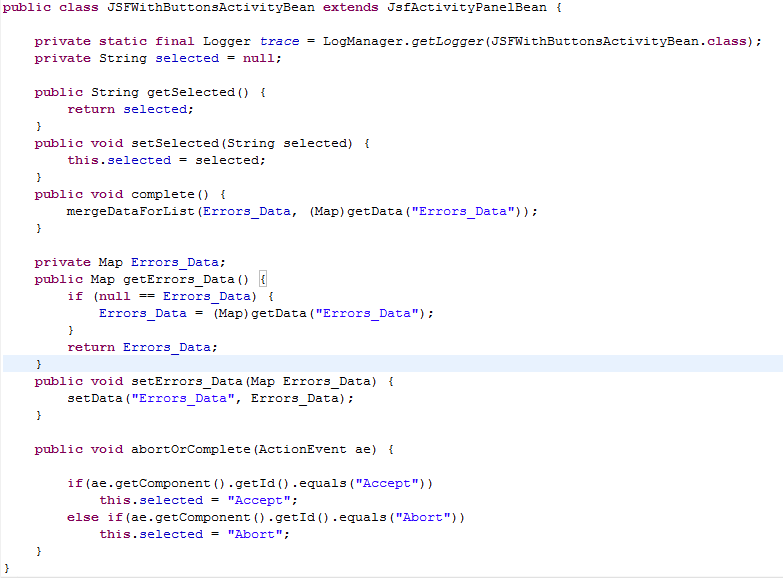
The actionListener method "abortOrComplete" is highlighted in the backing bean code shown above. This method is responsible for identifying the control (button) which triggered the action (click) and setting a property called "selected" in the bean. The value of this property is passed to the "Selected" data in the process model upon activity completion when the "getSelected" method is called by the Stardust engine while setting the out data mappings for this activity. The "complete" method in this example does not really have to do any processing relevant to action selection. The user may of course choose to add additional code to this method which should be invoked before the activity is completed.
Seeing it in action
- Deploy the process model and login in as administrator to start the process.
- Add a user to the "BO" role through the "Participant Management" screen of the "Administration" perspective in the portal.
- Log in as the new user and open the "JSF with Buttons Activity" in your worklist.
- Execute both the process flows in turn by first selecting the "Accept" button and subsequently starting another process and selecting the "Abort" button.
- Study the console output and the "Process History" in the portal to follow the sequence of activities executed. Note that the "Abort" action does not really trigger a process abortion. The current implementation simply calls a Route activity. It is left as an exercise for the user to add additional activities to the model and replace the current Route implementation with a POJO that will actually abort the process.
Notes
Ensure that the backing bean is in the correct package under your project source directory in Eclipse. Add the XHTML page to a folder called xhtml under the WebContent folder of your project.


