Notice: This Wiki is now read only and edits are no longer possible. Please see: https://gitlab.eclipse.org/eclipsefdn/helpdesk/-/wikis/Wiki-shutdown-plan for the plan.
Difference between revisions of "Scout/Tutorial/3.9/Minicrm/Get example database"
(→Getting the example database) |
|||
| Line 13: | Line 13: | ||
The password for the user '''minicrm''' is ''minicrm''. | The password for the user '''minicrm''' is ''minicrm''. | ||
| − | {{note|Location|We usually unzip the | + | {{note|Location|We usually unzip the sample database into C:\DerbyDB\ on Windows machines because at some point in the past the maximum path length was sometimes problematic. The tutorial is going to assume that you will do the same.}} |
==Modify the database== | ==Modify the database== | ||
The demo database is sufficient for the tutorial. Please refer to this how to: {{ScoutLink|HowTo/3.9|Modify a derby database}} if you want to add other columns to the existing tables. | The demo database is sufficient for the tutorial. Please refer to this how to: {{ScoutLink|HowTo/3.9|Modify a derby database}} if you want to add other columns to the existing tables. | ||
Latest revision as of 01:47, 27 June 2013
The Scout documentation has been moved to https://eclipsescout.github.io/.
Getting the example database
Download the Apache Derby example database and unzip it.
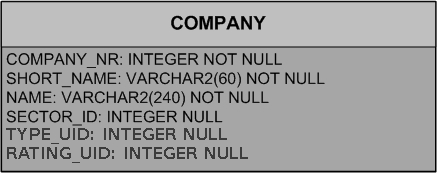
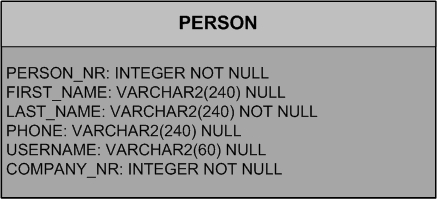
The DB you've downloaded contains the following two tables in tablespace minicrm:
The password for the user minicrm is minicrm.
Modify the database
The demo database is sufficient for the tutorial. Please refer to this how to: The Scout documentation has been moved to https://eclipsescout.github.io/. if you want to add other columns to the existing tables.


