Notice: this Wiki will be going read only early in 2024 and edits will no longer be possible. Please see: https://gitlab.eclipse.org/eclipsefdn/helpdesk/-/wikis/Wiki-shutdown-plan for the plan.
Difference between revisions of "Scout/Tutorial/3.8/webservices/Change WSDL file to return a list of companies"
m (Scout/Tutorial/3.8/Change WSDL file to return a list of companies moved to Scout/Tutorial/3.8/webservices/Change WSDL file to return a list of companies over redirect) |
|||
| (18 intermediate revisions by 3 users not shown) | |||
| Line 1: | Line 1: | ||
| − | Open the WSDL file in the built-in [http://wiki.eclipse.org/index.php/Introduction_to_the_WSDL_Editor Eclipse WSDL editor]. This editor is part of the WTP project of Eclipse. If not available on your IDE, update your Eclise IDE accordingly. | + | {{ScoutPage|cat=Tutorial 3.8}} |
| − | The WSDL file should look as following: | + | Open the WSDL file in the built-in [http://wiki.eclipse.org/index.php/Introduction_to_the_WSDL_Editor Eclipse WSDL editor]. This editor is part of the WTP project of Eclipse. If not available on your IDE, update your Eclise IDE accordingly.<br/>The WSDL file should look as following: |
[[Image:org.eclipse.scout.jaxws.tutorial.EditWsdl_10.png|400px]] | [[Image:org.eclipse.scout.jaxws.tutorial.EditWsdl_10.png|400px]] | ||
| + | What you see is your webservice, that has one service included which is bound to your CompanyWebServicePortType. For more information on that topic, please refer to [http://www.w3.org/TR/wsdl [http://www.w3.org/TR/wsdl]. | ||
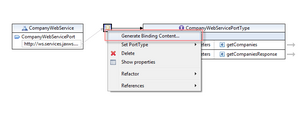
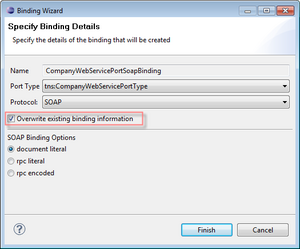
| − | + | {{note|Please note if removing or adding operations|It is crucial to generate the binding content anew. Right-Click on the binding box [http://wiki.eclipse.org/Image:org.eclipse.scout.jaxws.tutorial.EditWsdl_200.png] and choose 'Generate binding content...' [http://wiki.eclipse.org/Image:org.eclipse.scout.jaxws.tutorial.EditWsdl_210.png]. Afterwards, check 'Overwrite existing binding information' and press OK [http://wiki.eclipse.org/Image:org.eclipse.scout.jaxws.tutorial.EditWsdl_220.png].}} | |
| − | + | ||
| − | [[Image:org.eclipse.scout.jaxws.tutorial. | + | |
| − | + | == Change output parameter == | |
| − | + | To change the output parameter, click on the arrow-link on the very right side of the output parameter [http://wiki.eclipse.org/Image:org.eclipse.scout.jaxws.tutorial.EditWsdl_20.png]. That opens you the <code>getCompaniesResponse</code> element of that parameter [http://wiki.eclipse.org/Image:org.eclipse.scout.jaxws.tutorial.EditWsdl_30.png]. On the right side, you see the anonymous type <code>getCompaniesResponseType</code> associated with the response element. There you find the <code>out</code> element. Left-click on its datatype (string) and choose 'New' [http://wiki.eclipse.org/Image:org.eclipse.scout.jaxws.tutorial.EditWsdl_40.png]. Chose <code>Complex Type</code> and give it the name <code>Company</code> [http://wiki.eclipse.org/Image:org.eclipse.scout.jaxws.tutorial.EditWsdl_50.png]. Right-click on the <code>out</code> element and change the multiplicity to <code>0..*</code> [http://wiki.eclipse.org/Image:org.eclipse.scout.jaxws.tutorial.EditWsdl_60.png]. That allows you to return zero or more company objects [http://wiki.eclipse.org/Image:org.eclipse.scout.jaxws.tutorial.EditWsdl_70.png]. | |
| + | Open the 'Schema Index View' by clicking on the schema link on the very top-left corner [http://wiki.eclipse.org/Image:org.eclipse.scout.jaxws.tutorial.EditWsdl_80.png]. In type 'Types'-section you find the <code>Company</code> type which we created before. Double-click on the <code>Company</code> type to open it [http://wiki.eclipse.org/Image:org.eclipse.scout.jaxws.tutorial.EditWsdl_90.png]. What you see is an empty complex type. Right-click on the element's name to add the two child elements <code>name</code> and <code>symbol</code>[http://wiki.eclipse.org/Image:org.eclipse.scout.jaxws.tutorial.EditWsdl_100.png]. The element <code>Name</code> will hold the company name and the element <code>symbol</code> its stock symbol. It should look like this: [http://wiki.eclipse.org/Image:org.eclipse.scout.jaxws.tutorial.EditWsdl_110.png]. Save the WSDL. | ||
| − | + | == Remove input parameter== | |
| − | + | To remove the input parameter, click on the arrow-link on the very right side of the input parameter [http://wiki.eclipse.org/Image:org.eclipse.scout.jaxws.tutorial.EditWsdl_120.png]. There you see the anonymous <code>getCompaniesType</code> with <code>in</code> as its child element [http://wiki.eclipse.org/Image:org.eclipse.scout.jaxws.tutorial.EditWsdl_130.png]. To get rid of this, right-click on the <code>getCompanies</code> element and choose 'Set Type' | 'New' [http://wiki.eclipse.org/Image:org.eclipse.scout.jaxws.tutorial.EditWsdl_140.png]. A dialog will pop up to create the new type. Choose 'Create a local anonymous type' and click OK [http://wiki.eclipse.org/Image:org.eclipse.scout.jaxws.tutorial.EditWsdl_150.png]. As a result, the <code>getCompanies</code> element will look like this: [http://wiki.eclipse.org/Image:org.eclipse.scout.jaxws.tutorial.EditWsdl_160.png]. | |
| − | + | [[Image:org.eclipse.scout.jaxws.tutorial.EditWsdl_10.png|thumb]] | |
| − | [[Image:org.eclipse.scout.jaxws.tutorial.EditWsdl_10.png|thumb | + | [[Image:org.eclipse.scout.jaxws.tutorial.EditWsdl_20.png|thumb]] |
| − | [[Image:org.eclipse.scout.jaxws.tutorial.EditWsdl_20.png|thumb | + | [[Image:org.eclipse.scout.jaxws.tutorial.EditWsdl_30.png|thumb]] |
| − | [[Image:org.eclipse.scout.jaxws.tutorial.EditWsdl_30.png|thumb | + | [[Image:org.eclipse.scout.jaxws.tutorial.EditWsdl_40.png|thumb]] |
| − | [[Image:org.eclipse.scout.jaxws.tutorial.EditWsdl_40.png|thumb | + | [[Image:org.eclipse.scout.jaxws.tutorial.EditWsdl_50.png|thumb]] |
| − | [[Image:org.eclipse.scout.jaxws.tutorial.EditWsdl_50.png|thumb | + | [[Image:org.eclipse.scout.jaxws.tutorial.EditWsdl_60.png|thumb]] |
| − | [[Image:org.eclipse.scout.jaxws.tutorial.EditWsdl_60.png|thumb | + | [[Image:org.eclipse.scout.jaxws.tutorial.EditWsdl_70.png|thumb]] |
| − | [[Image:org.eclipse.scout.jaxws.tutorial.EditWsdl_70.png|thumb | + | [[Image:org.eclipse.scout.jaxws.tutorial.EditWsdl_80.png|thumb]] |
| − | [[Image:org.eclipse.scout.jaxws.tutorial.EditWsdl_80.png|thumb | + | [[Image:org.eclipse.scout.jaxws.tutorial.EditWsdl_90.png|thumb]] |
| − | [[Image:org.eclipse.scout.jaxws.tutorial.EditWsdl_90.png|thumb | + | [[Image:org.eclipse.scout.jaxws.tutorial.EditWsdl_100.png|thumb]] |
| − | [[Image:org.eclipse.scout.jaxws.tutorial.EditWsdl_100.png|thumb | + | [[Image:org.eclipse.scout.jaxws.tutorial.EditWsdl_110.png|thumb]] |
| − | [[Image:org.eclipse.scout.jaxws.tutorial.EditWsdl_110.png|thumb | + | [[Image:org.eclipse.scout.jaxws.tutorial.EditWsdl_120.png|thumb]] |
| − | [[Image:org.eclipse.scout.jaxws.tutorial.EditWsdl_120.png|thumb | + | [[Image:org.eclipse.scout.jaxws.tutorial.EditWsdl_130.png|thumb]] |
| − | [[Image:org.eclipse.scout.jaxws.tutorial.EditWsdl_130.png|thumb | + | [[Image:org.eclipse.scout.jaxws.tutorial.EditWsdl_140.png|thumb]] |
| − | [[Image:org.eclipse.scout.jaxws.tutorial.EditWsdl_140.png|thumb | + | [[Image:org.eclipse.scout.jaxws.tutorial.EditWsdl_150.png|thumb]] |
| − | [[Image:org.eclipse.scout.jaxws.tutorial.EditWsdl_150.png|thumb | + | [[Image:org.eclipse.scout.jaxws.tutorial.EditWsdl_160.png|thumb]] |
| − | [[Image:org.eclipse.scout.jaxws.tutorial.EditWsdl_160.png|thumb| | + | [[Image:org.eclipse.scout.jaxws.tutorial.EditWsdl_200.png|thumb]] |
| + | [[Image:org.eclipse.scout.jaxws.tutorial.EditWsdl_210.png|thumb]] | ||
| + | [[Image:org.eclipse.scout.jaxws.tutorial.EditWsdl_220.png|thumb]] | ||
Latest revision as of 18:17, 27 April 2012
The Scout documentation has been moved to https://eclipsescout.github.io/.
Open the WSDL file in the built-in Eclipse WSDL editor. This editor is part of the WTP project of Eclipse. If not available on your IDE, update your Eclise IDE accordingly.
The WSDL file should look as following:
What you see is your webservice, that has one service included which is bound to your CompanyWebServicePortType. For more information on that topic, please refer to [http://www.w3.org/TR/wsdl.
Change output parameter
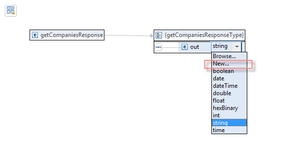
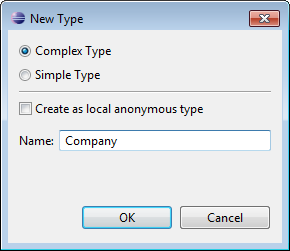
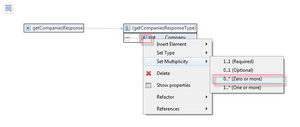
To change the output parameter, click on the arrow-link on the very right side of the output parameter [4]. That opens you the getCompaniesResponse element of that parameter [5]. On the right side, you see the anonymous type getCompaniesResponseType associated with the response element. There you find the out element. Left-click on its datatype (string) and choose 'New' [6]. Chose Complex Type and give it the name Company [7]. Right-click on the out element and change the multiplicity to 0..* [8]. That allows you to return zero or more company objects [9].
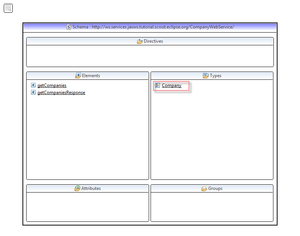
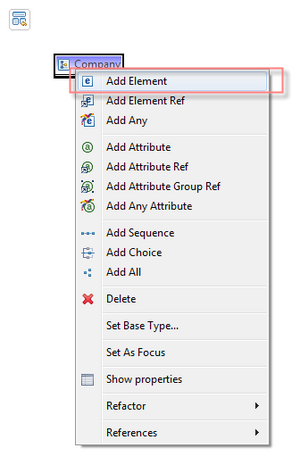
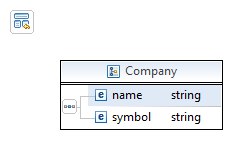
Open the 'Schema Index View' by clicking on the schema link on the very top-left corner [10]. In type 'Types'-section you find the Company type which we created before. Double-click on the Company type to open it [11]. What you see is an empty complex type. Right-click on the element's name to add the two child elements name and symbol[12]. The element Name will hold the company name and the element symbol its stock symbol. It should look like this: [13]. Save the WSDL.
Remove input parameter
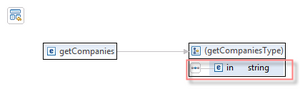
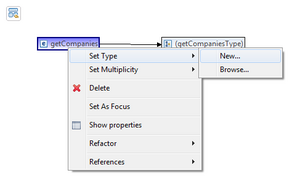
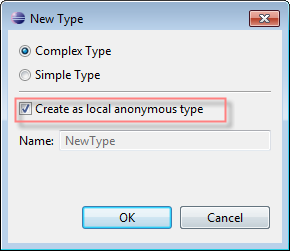
To remove the input parameter, click on the arrow-link on the very right side of the input parameter [14]. There you see the anonymous getCompaniesType with in as its child element [15]. To get rid of this, right-click on the getCompanies element and choose 'Set Type' | 'New' [16]. A dialog will pop up to create the new type. Choose 'Create a local anonymous type' and click OK [17]. As a result, the getCompanies element will look like this: [18].


