Notice: this Wiki will be going read only early in 2024 and edits will no longer be possible. Please see: https://gitlab.eclipse.org/eclipsefdn/helpdesk/-/wikis/Wiki-shutdown-plan for the plan.
Scout/Tutorial/3.8/SVG Field
The Scout documentation has been moved to https://eclipsescout.github.io/.
Introduction
With the upcoming Scout Release 3.8 a SVG field will be introduced as an additional UI component. The new SVG field enhances Eclipse Scout with the ability to display interactive diagrams and graphics that work on desktop as well as on web environment.
This tutorial demonstrate the use of the SVG field for a view only field as well as an interactive field.
Getting started
The AbstractSvgField comes as part of Scout Runtime Release 3.8 that will be integrated into Eclipse Juno builds. The latest nightly build of Scout Runtime 3.8 can be downloaded from http://download.eclipse.org/scout/nightly/update/.
Create a Scout Application with SVG Fields
Create a new Application
As a first step create a new Scout application in the Scout perspective. For this, choose one of the following options
- Use menu File, New, Project ..., Scout Project
- In the Scout Explorer on the top levle node use context menu New Scout Project ...
In the New Scout Project dialog
- Enter org.eclipse.scout.svgtest into field Project Name
- Untick node org.eclipse.scout.svgtest.ui.rap
- Click Finish
More details can be found The Scout documentation has been moved to https://eclipsescout.github.io/..
Add SVG support to the application
For this, do the following
- Go to the projects top level node in the Scout Explorer
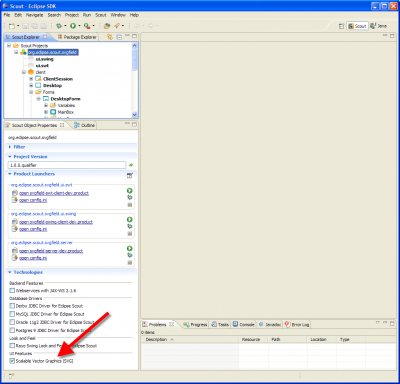
- Go to the Scout Property View and tick the check box Scalable Vector Graphics (SVG) as indicated by the red arrow.
Add a SVG field to the DesktopForm
To add a SVG field to the DesktopForm do the following
- Go to the Scout Explorer
- Open the node Client and the folder Forms
- Expand the DesktopForm and click on node MainBox as indicated by the red arrow
- Use context menu New Form Field ... on node MainBox
- Select SvgField as shown below, click Next > and enter Static SVG as class name for the field
Add static SVG to the Field
- In the Scout Explorer expand the MainBox and click on the newly created node StaticSvgField
- Go to the Scout Object Properties
- Enter 4 in filed Grid H to provide a decent height for the SVG field
- Click on the green cross next to operation ExecInitField to add the init method
- Add the following implementation for to method execInitField()
     @Override
     protected void execInitField() throws ProcessingException {
       String xml =
           "<?xml version=\"1.0\" encoding=\"UTF-8\" standalone=\"no\"?>\n" +
               "<svg width=\"400\" height=\"400\" viewBox=\"0 0 400 400\" \n" +
               "     xmlns=\"http://www.w3.org/2000/svg\" xmlns:xlink=\"http://www.w3.org/1999/xlink\" \n" +
               "     contentScriptType=\"text/ecmascript\" zoomAndPan=\"magnify\" \n" +
               "     contentStyleType=\"text/css\" version=\"1.1\" xml:space=\"preserve\" \n" +
               "     preserveAspectRatio=\"xMidYMid meet\"\n" +
               ">\n" +
               "  <a xlink:href=\"http://local/info-prev\">\n" +
               "    <polygon id=\"poly\" points=\"220,100 300,210 170,250 123,234\" \n" +
               "             style=\"fill:#cccccc;stroke:#000000;stroke-width:1\" />\n" +
               "  </a>\n" +
               "  <circle id=\"circle\" cx=\"100\" cy=\"50\" r=\"40\" \n" +
               "          stroke=\"black\" stroke-width=\"2\" fill=\"grey\" />\n" +
               "</svg>";
       SVGDocument doc = SVGUtility.readSVGDocument(new ByteArrayInputStream(xml.getBytes()));
       setSvgDocument(doc);
     }
Create a scalable vector graphics file
We create a graphic file that will be loaded into the SVG field later. The graphic file is named "SampleGraphic.svg". First we create a folder "svg" under svgfieldtutorial.client/resources, where the graphic file will be stored. The SVG graphic file contains a dark grey circle and a light grey polygon.
 <?xml version="1.0" encoding="UTF-8" standalone="no"?>
 <svg width="400" height="400" viewBox="0 0 400 400" xmlns="http://www.w3.org/2000/svg" xmlns:xlink="http://www.w3.org/1999/xlink" contentScriptType="text/ecmascript" zoomAndPan="magnify"
  contentStyleType="text/css" version="1.1" xml:space="preserve" preserveAspectRatio="xMidYMid meet">
  <a xlink:href="http://local/info-prev">
   <polygon id="poly" points="220,100 300,210 170,250 123,234" style="fill:#cccccc;stroke:#000000;stroke-width:1"/>
  </a>
  <circle id="circle" cx="100" cy="50" r="40" stroke="black" stroke-width="2" fill="grey" />
 </svg>
Create SampleSVGFieldNodePage
In the svgfieldltutorial sample application we will add a SampleSVGNodePage to the StandardOutline. This node page is able to hold a SampleSVGFieldForm that will be created next step.
Create SampleSVGFieldForm
We create a SampleSVGFieldForm and add a SVG field called "GraphicField" to the MainBox which subclasses AbstractSvgField. A close button that subclasses AbstractCloseButton is also added to the MainBox.


