Notice: this Wiki will be going read only early in 2024 and edits will no longer be possible. Please see: https://gitlab.eclipse.org/eclipsefdn/helpdesk/-/wikis/Wiki-shutdown-plan for the plan.
Difference between revisions of "Scout/Tutorial/3.8/Run Scout Server in Virgo"
(→Deploy Webapp) |
|||
| (6 intermediate revisions by one other user not shown) | |||
| Line 1: | Line 1: | ||
{{ScoutPage|cat=Tutorial 3.8}} | {{ScoutPage|cat=Tutorial 3.8}} | ||
| + | {{note|Under construction|This page is still under construction and is not released yet.}} | ||
| + | |||
== Abstract == | == Abstract == | ||
This tutorial describes how to deploy a simiple Scout server application to [http://www.eclipse.org/virgo/ Virgo Web Server]. The Virgo Web Server from EclipseRT is a completely module-based Java application server that is designed to run enterprise Java applications and Spring-powered applications with a high degree of flexibility and reliability. | This tutorial describes how to deploy a simiple Scout server application to [http://www.eclipse.org/virgo/ Virgo Web Server]. The Virgo Web Server from EclipseRT is a completely module-based Java application server that is designed to run enterprise Java applications and Spring-powered applications with a high degree of flexibility and reliability. | ||
| Line 22: | Line 24: | ||
Switch to the 'repository' directory below the ${VIRGO_HOME} directory and create a new folder named 'helloworld'. Open the WAR file that has been exported in the section above with a ZIP application of your choice and unpack the contents of WEB-INF/eclipse/plugins to the just created 'helloworld' folder [http://wiki.eclipse.org/Image:Org.eclipse.scout.tut.virgo.05.png]. | Switch to the 'repository' directory below the ${VIRGO_HOME} directory and create a new folder named 'helloworld'. Open the WAR file that has been exported in the section above with a ZIP application of your choice and unpack the contents of WEB-INF/eclipse/plugins to the just created 'helloworld' folder [http://wiki.eclipse.org/Image:Org.eclipse.scout.tut.virgo.05.png]. | ||
| − | Go to the | + | Go to the 'config' folder below the ${VIRGO_HOME} directory and open the file 'org.eclipse.virgo.repository.properties' in a text editor of your choice. Modify the file content as follows (please note the changes in bold font): |
ext.type=external | ext.type=external | ||
| Line 33: | Line 35: | ||
== Deploy Webapp == | == Deploy Webapp == | ||
| − | Download the [http://wiki.eclipse.org/images/e/e7/Org.eclipse.scout.helloworld-1.0.0.zip prepared webapplication] to the 'pickup' directory below ${VIRGO_HOME} and rename the file to 'org.eclipse.scout.helloworld-1.0.0.jar'. | + | Download the [http://wiki.eclipse.org/images/e/e7/Org.eclipse.scout.helloworld-1.0.0.zip prepared webapplication] to the 'pickup' directory below ${VIRGO_HOME} and rename the file to 'org.eclipse.scout.helloworld-1.0.0.jar'. This webapp only contains a manifest (OSGi), a web.xml (Tomcat) and an applicationContext.xml (Spring): |
| + | |||
| + | [[Image:Org.eclipse.scout.tut.virgo.09.png]] | ||
| + | |||
| + | |||
| + | Your setup looks now as follows and we are ready to start the virgo server. | ||
| + | |||
| + | [[Image:Org.eclipse.scout.tut.virgo.08.png]] | ||
Switch to the folder 'bin' below the ${VIRGO_HOME} directory and start Virgo using the startup.bat or startup.sh script. After some seconds you see something like that in the console output: | Switch to the folder 'bin' below the ${VIRGO_HOME} directory and start Virgo using the startup.bat or startup.sh script. After some seconds you see something like that in the console output: | ||
| Line 43: | Line 52: | ||
[2012-05-01 19:39:22.032] start-signalling-1 <WE0001I> Started web bundle 'org.eclipse.scout.helloworld' version '1.0.0' with context path '/helloworld'. | [2012-05-01 19:39:22.032] start-signalling-1 <WE0001I> Started web bundle 'org.eclipse.scout.helloworld' version '1.0.0' with context path '/helloworld'. | ||
... | ... | ||
| + | |||
| + | Now you can open a web browser and access the URL [http://localhost:8080/helloworld/process/ http://localhost:8080/helloworld/process/]. You should be prompted for username and password. Type 'admin' as username and 'springsource' as password. Now you should see the Eclipse Scout page [http://wiki.eclipse.org/Image:Org.eclipse.scout.tut.virgo.07.png]. | ||
| + | |||
| + | {{note|Security Configuration|Even we have removed the security filters at the beginning of this tutorial we still are prompted for a password. This is because we are running in the [http://en.wikipedia.org/wiki/Java_Authentication_and_Authorization_Service JAAS] context shipped with Virgo. This is enabled in the web.xml inside the org.eclipse.scout.helloworld-1.0.0.zip that has been downloaded to the pickup directory. | ||
| + | <br>The realm is defined in ${VIRGO_HOME}/config/tomcat-server.xml and configured in ${VIRGO_HOME}/config/org.eclipse.virgo.kernel.authentication.config. The allowed users and password combinations are configured in ${VIRGO_HOME}/config/org.eclipse.virgo.kernel.users.properties. You can read more about this topic [http://www.eclipse.org/virgo/documentation/virgo-documentation-3.0.3.RELEASE/docs/virgo-user-guide/htmlsingle/virgo-user-guide.html#configuring-authentication here], [http://tomcat.apache.org/tomcat-7.0-doc/realm-howto.html#JAASRealm here] and [http://docs.oracle.com/javase/6/docs/technotes/guides/security/jaas/JAASRefGuide.html here].}} | ||
| + | |||
| + | == Starting the Client == | ||
| + | When we exported the Scout project using Scout SDK we also ticked to export a client zip. Go to the export directory and unzip the created 'helloworldClient.zip' with a ZIP application of you choice. Start the client using the helloworld executable. When prompted for credentials use the same as before: 'admin' as username and 'springsource' as password. | ||
| + | |||
| + | Congratulations: The client is now running and accessing a Virgo backend. | ||
| + | |||
| + | You can now shutdown Virgo again. To do so go to the 'bin' folder below ${VIRGO_HOME} and run the shutdown.bat or shutdown.sh script. | ||
Latest revision as of 13:50, 8 May 2012
The Scout documentation has been moved to https://eclipsescout.github.io/.
Contents
Abstract
This tutorial describes how to deploy a simiple Scout server application to Virgo Web Server. The Virgo Web Server from EclipseRT is a completely module-based Java application server that is designed to run enterprise Java applications and Spring-powered applications with a high degree of flexibility and reliability.
Preparations
This section describes some preparations to have all necessary parts to use the application with Virgo.
Download Virgo
Please download Virgo Tomcat Server from the Eclipse download page. For this tutorial version 3.0.3 was used. When the download has been completed, extract Virgo to a directory of your choice. During this tutorial we will refer to this folder containing Virgo as ${VIRGO_HOME}.
Create Example Scout Project
We will deploy the backend from the 'Hello World' tutorial and then access the server using the Swing client. For this first complete the 'Hello World' tutorial (Please note: for this tutorial we only need the Swing client. So you can untick the others when creating the project [1]).
When the 'Hello World' tutorial is completed, select the project node in the Scout Explorer and scroll to the 'Technologies' section in the 'Scout Object Properties' view [2]. Uncheck all three ticked technologies and just confirm with OK for each change. We have now removed the support for webservices, SVG fields and database access for our project as we don't need it for this tutorial.
Then, switch to the 'Package Explorer' [3], open the server plugin and then the plugin.xml. Switch to the plugin.xml tab and remove the extension section for point 'org.eclipse.scout.http.servletfilter.filters'. We don't need these security filters because we will configure the security in the webapp we will deploy to the Virgo container.
Export Scout Project
With the selection still on the project node in the Scout Explorer choose 'Export Scout Project...' [4]. On the first page of the Wizard specify an export target directory and check 'Server Web Application' and 'Client Application (ZIP)' [5]. Press 'Finish'. The Scout SDK now exports a Server Application (bundled as WAR file) and a client application as ZIP file to the given directory.
Create Virgo Repository
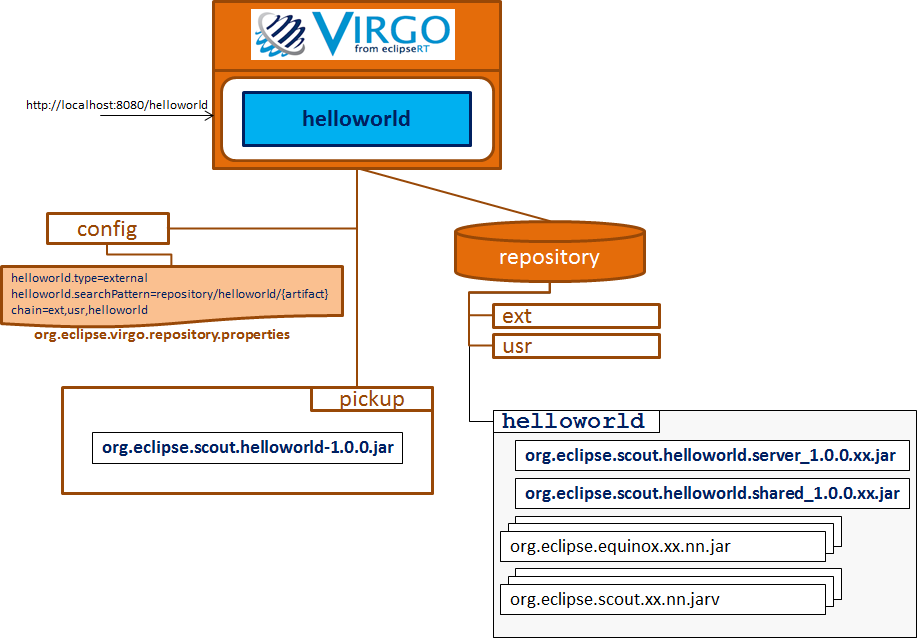
Switch to the 'repository' directory below the ${VIRGO_HOME} directory and create a new folder named 'helloworld'. Open the WAR file that has been exported in the section above with a ZIP application of your choice and unpack the contents of WEB-INF/eclipse/plugins to the just created 'helloworld' folder [6].
Go to the 'config' folder below the ${VIRGO_HOME} directory and open the file 'org.eclipse.virgo.repository.properties' in a text editor of your choice. Modify the file content as follows (please note the changes in bold font):
ext.type=external
ext.searchPattern=repository/ext/{artifact}
usr.type=watched
usr.watchDirectory=repository/usr
helloworld.type=external
helloworld.searchPattern=repository/helloworld/{artifact}
chain=ext,usr,helloworld
Deploy Webapp
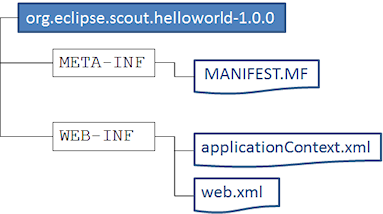
Download the prepared webapplication to the 'pickup' directory below ${VIRGO_HOME} and rename the file to 'org.eclipse.scout.helloworld-1.0.0.jar'. This webapp only contains a manifest (OSGi), a web.xml (Tomcat) and an applicationContext.xml (Spring):
Your setup looks now as follows and we are ready to start the virgo server.
Switch to the folder 'bin' below the ${VIRGO_HOME} directory and start Virgo using the startup.bat or startup.sh script. After some seconds you see something like that in the console output:
[2012-05-01 19:39:10.351] startup-tracker              <KE0001I> Kernel starting.
[2012-05-01 19:39:12.162] startup-tracker              <KE0002I> Kernel started.
...
[2012-05-01 19:39:18.611] sync Event Dispatcher Thread <UR0001I> User region ready.
...
[2012-05-01 19:39:22.032] start-signalling-1           <WE0001I> Started web bundle 'org.eclipse.scout.helloworld' version '1.0.0' with context path '/helloworld'.
...
Now you can open a web browser and access the URL http://localhost:8080/helloworld/process/. You should be prompted for username and password. Type 'admin' as username and 'springsource' as password. Now you should see the Eclipse Scout page [7].
Starting the Client
When we exported the Scout project using Scout SDK we also ticked to export a client zip. Go to the export directory and unzip the created 'helloworldClient.zip' with a ZIP application of you choice. Start the client using the helloworld executable. When prompted for credentials use the same as before: 'admin' as username and 'springsource' as password.
Congratulations: The client is now running and accessing a Virgo backend.
You can now shutdown Virgo again. To do so go to the 'bin' folder below ${VIRGO_HOME} and run the shutdown.bat or shutdown.sh script.


