Notice: this Wiki will be going read only early in 2024 and edits will no longer be possible. Please see: https://gitlab.eclipse.org/eclipsefdn/helpdesk/-/wikis/Wiki-shutdown-plan for the plan.
Scout/Tutorial/3.7/Minicrm Step-by-Step
< Scout | Tutorial | 3.7
Revision as of 20:14, 24 March 2010 by Nina.bugzilla.gmail.com (Talk | contribs)
Contents
Prerequisites
- Have a look at the EclipseScout Client Component Model: Main Concepts
Installation / Set Up
Create a new EclipseScout project
- If you haven't done so yet, change to the Scout perspective. On the folder Scout Projects, right click and choose New Scout Project in order to create a new Scout project.
As project name, enter eclipse.org.minicrm. - Start Server: Click on the server node and start the development server product by clicking on the green arrow.
- Test Server: To test if the server is running properly, go to http://localhost:8080/minicrm/process. To log in, use admin as username and manager as password. There you should see a page with information about the server. The login information is defined in the config.ini file of the server product, click on open product and then change to the configuration tab in order to open it.
- Start Client: Click on either the ui.swing or the ui.swt node and start the development client product by clicking on the green arrow. When asked for a login, enter the same login information as before, admin/manager (or any other user/password pair from the config.ini). An empty application window should appear.


Add the SqlService
- Go to the server node and open the tree, drill down until Sql Services below Common Services and right click in order to open the wizard to create a new SQL service.
Name your new service DerbySqlService and choose AbstractDerbySqlService from the combobox Super Type then click finish. - Adjust the default settings in your DerbySqlService by editing the Jdbc Mapping Name, this should point to the folder where you unzipped the DerbyDb to.


Create an Outline
- New Outline
- New Table
- Add Columns
- getConfiguredDisplayable vs. getConfiguredVisible
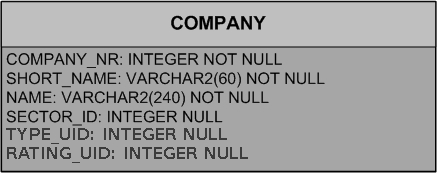
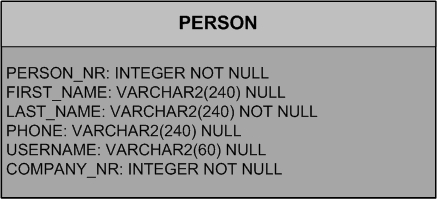
- The DB tables:
- Get Data for Table
- BindBases


Create a Form
- New Form
- FormHandler
- ProcessService
- FormData
- SQL.selectInto
Start the Form
- New Menu
- execAction
Modify the Form
- Validation
- Formatting
- Changing Background or Foreground
Extend the Form
- Smartfield
- HtmlField
- Button
Create a SearchForm
Expand the Tree
- NodePage
Bing Webservice
- Scope
- execLoad
- Add variables