Notice: this Wiki will be going read only early in 2024 and edits will no longer be possible. Please see: https://gitlab.eclipse.org/eclipsefdn/helpdesk/-/wikis/Wiki-shutdown-plan for the plan.
Difference between revisions of "Scout/Tutorial/3.10/UpdateWithF2"
(→Prepare Updatesite Web Application) |
(→Generate Updatesite) |
||
| Line 90: | Line 90: | ||
===Generate Updatesite=== | ===Generate Updatesite=== | ||
| − | Now the f2 updatesite can be created using the f2 jar. We do this using the comand line | + | Now the f2 updatesite can be created using the f2 jar. We do this using the comand line. First change to the tomcat webapps folder, e.g. |
| − | + | cd C:\tomcat-7\webapps | |
| − | + | Then call the f2 jar. (Replace [version] with the actual f2 version.) | |
| + | java -jar updatesite/WEB-INF/lib/org.eclipse.update.f2_[version].jar -create -site updatesite -os win32 -name example -verbose | ||
| + | |||
| + | Now the updatesite is ready for use and the f2.txt contains all zip and delta files length, crc and hash. | ||
===Build with Maven=== | ===Build with Maven=== | ||
Revision as of 01:07, 3 July 2013
The Scout documentation has been moved to https://eclipsescout.github.io/. F2 is a simple update manager created by BSI. In this tutorial you learn how to update a scout client application with f2.
Contents
Prerequisites
We assume that you already have The Scout documentation has been moved to https://eclipsescout.github.io/.. You also need to create a new Scout application that you will be updating with this tutorial. Create a new Scout Project called org.eclipse.scout.helloworld. You also need to deploy that application to tomcat.
Add F2 Support
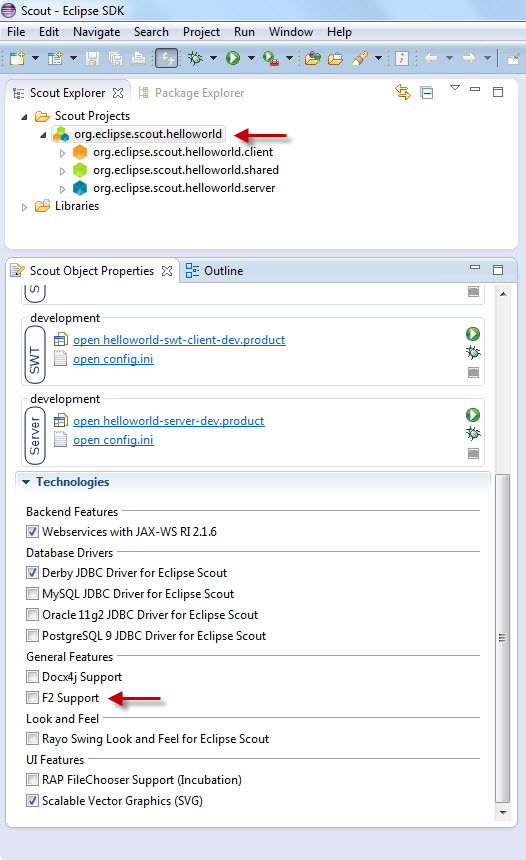
Adding F2 Support can be done by simply selecting the root node of the project in the Scout Explorer and checking the technology checkbox F2 Support:
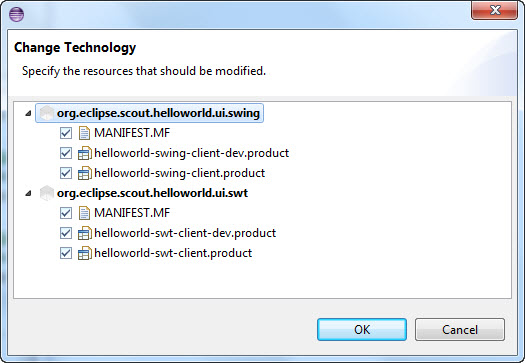
Check all checkboxes to add f2 as a dependency to your Manifest files and include it in the client product files. Accept the license, wait until the update is installed and restart eclipse when asked.
Add Automatic Update to Client
Now you can add the code to update your client application automatically after startup, if an update is needed. You can do that by simply calling F2Updater.update with update strategy DoUpdate and a new EclipseUserAgent. UpdateResult.UpdateSuccessful indicates that there was actually something updated and the update was successful. In development mode updating the application does not make sense. Therefore make sure there is never an update done in development mode.
Putting it all together leads to the following changes that need to be done in org.eclipse.scout.helloworld.ui.swing.SwingApplication.startSecure:
...
 private Object startSecure(IApplicationContext context) throws Exception {
   try {
     NetActivator.install();
   }
   catch (Throwable t) {
     // no net handler found
     logger.warn("NetActivator is not available", t);
   }
   if (Platform.inDevelopmentMode()) {
     if (logger.isInfoEnabled()) {
       logger.info("No F2 update in development mode");
     }
   }
   else {
     // use f2 to update application
     UpdateResult result = F2Updater.update(UpdateStrategy.DoUpdate, null, new EclipseUserAgent(getProgressMonitor(), null));
     if (result == UpdateResult.UpdateSuccessful) {
       return EXIT_RESTART;
     }
   }
   return super.start(context);
 }
...
Update your SwingApplication accordingly.
The update in for SWT in org.eclipse.scout.helloworld.ui.swt.application.Application is quite similar:
...
public class Application implements IApplication {
 private static IScoutLogger logger = ScoutLogManager.getLogger(Application.class);
...
  public Integer startSecure(final IApplicationContext context) throws Exception {
   Display display = PlatformUI.createDisplay();
   NetActivator.install();
   if (Platform.inDevelopmentMode()) {
     if (logger.isInfoEnabled()) {
       logger.info("No F2 update in development mode");
     }
   }
   else {
     // use f2 to update application
     UpdateResult result = F2Updater.update(UpdateStrategy.DoUpdate, null, new EclipseUserAgent(new NullProgressMonitor(), null));
     if (result == UpdateResult.UpdateSuccessful) {
       return EXIT_RESTART;
     }
   }
   if (PlatformUI.createAndRunWorkbench(display, new ApplicationWorkbenchAdvisor()) == PlatformUI.RETURN_RESTART) {
     return EXIT_RESTART;
   }
   return EXIT_OK;
 }
...
Creating the F2 Updatesite
In order to update a client you need to create an updatesite, which contains the information about what has to be updated. The updatesite needs to be accessed over an URL. Therefore the easiest way is usually to deploy it to your servlet container (e.g. tomcat) where your server is located as a separate web application. Deploy your application to Tomcat for this purpose.
Prepare Updatesite Web Application
For simplicity we only describe the win32 case here.
Now we create an initial upatesite for the version 1.0.0. For that purpuse we need to extract helloworldClient.zip again, rename it to helloworld_1.0.0 and zip it such that the folder helloworld_1.0.0 is included in the zip file. On Windows just right click helloworld_1.0.0 and choose Send to->Compressed (zipped) folder.
In the tomcat webapps folder create a new folder called updatesite. Copy the following files to the updatesite:
- The f2 plugin (/org.eclipse.update.f2_[version].jar) from the plugins folder in your eclipse installation to webapps/updatesite/WEB-INF/lib/org.eclipse.update.f2_[version].jar.
- The exported client application "helloworldClient.zip" to webapps/updatesite/win32/helloworld_1.0.0.zip
You end up with the following file structure:
/webapps/updatesite/WEB-INF/lib/org.eclipse.update.f2_1.0.0.20130702-0803.jar
/webapps/updatesite/win32/helloworld_1.0.0.zip
Generate Updatesite
Now the f2 updatesite can be created using the f2 jar. We do this using the comand line. First change to the tomcat webapps folder, e.g.
cd C:\tomcat-7\webapps
Then call the f2 jar. (Replace [version] with the actual f2 version.)
java -jar updatesite/WEB-INF/lib/org.eclipse.update.f2_[version].jar -create -site updatesite -os win32 -name example -verbose
Now the updatesite is ready for use and the f2.txt contains all zip and delta files length, crc and hash.
Build with Maven
To create the updatesite with maven you can use the exec-maven-plugin.
<plugin>
       <groupId>org.codehaus.mojo</groupId>
       <artifactId>exec-maven-plugin</artifactId>
       <version>1.2.1</version>
       <executions>
           <execution>
               <id>default-cli</id>
               <goals>
                   <goal>exec</goal>
               </goals>
               <configuration>
                   <executable>java</executable>
                   <workingDirectory>/tmp</workingDirectory>
                   <arguments>
                       <argument>-jar</argument>
                       <argument><path to f2>/org.eclipse.update.f2_[version].jar</argument>
                   </arguments>
               </configuration>
           </execution>
       </executions>
   </plugin>
Triggering the update in the client
Initial client installation
The distribution of the initial client is not part of the f2 update.
The simplest way is to take the latest zip of your client application, say example_1.0.0.zip and copy it to the clients install location (C:/Program Files/example/example_1.0.0.zip). Unpack the zip at its location, so that the root example.exe is extracted to C:/Program Files/example/example.exe
Automatic Client Update
From your plugin containing the eclipse IApplication add a dependency to org.eclipse.update.f2.
Somewhere in your application code where it best fits for you simply call: UpdateResult result = F2Updater.update();
Add the following entries to the config.ini of your product configuration f2.url=http://hostname:port/updatesite f2.name=example
Option: In order to use http basic auth add the config.ini parameters f2.http.user=[user] f2.http.pass=[pass]
Manual client update
It is also very simple to update the client manually (e.g. for testing). Copy the f2 plugin to some directory, say /temp/org.eclipse.update.f2_[version].jar and run the command
java -jar /temp/org.eclipse.update.f2_[version].jar -update -url http://hostname:port/updatesite -os win32 -arch x86 -name example -install "C:/Program Files/example" -verbose
-url is the url of the updatesite
-install is the root folder of the client installation
Option: In order to use http basic auth, add the command line parameters
-http.user [user]
-http.pass [pass]
Option: In order to log only errors, use -silent instead of -verbose Basically logging is done using java.util.logging, so all therefore concepts hold.


