Notice: this Wiki will be going read only early in 2024 and edits will no longer be possible. Please see: https://gitlab.eclipse.org/eclipsefdn/helpdesk/-/wikis/Wiki-shutdown-plan for the plan.
Difference between revisions of "Scout/HowTo/3.8/Branding the SWT Client"
(New page) |
m (Formatting, moved some text) |
||
| Line 1: | Line 1: | ||
{{ScoutPage|cat=HowTo 3.8}} | {{ScoutPage|cat=HowTo 3.8}} | ||
| − | This how-to describes how to brand the SWT client. | + | This how-to describes how to brand the SWT client. |
| − | + | ||
| − | + | ||
= Icons = | = Icons = | ||
| Line 9: | Line 7: | ||
=== Steps === | === Steps === | ||
| − | In order to customize the icon an application shows in its title bar and in the windows task bar, the following property below of the product must be modified in the org.eclipse.minicrm.ui.swt\plugin.xml file: | + | The icons that will be referenced must be placed in the SWT client's '''resources/icons''' directory (e.g. org.eclipse.minicrm.ui.swt/resources/icons)<br> |
| + | |||
| + | In order to customize the icon an application shows in its title bar and in the windows task bar, the following property below of the product must be modified in the org.eclipse.minicrm.ui.swt\'''plugin.xml''' file: | ||
<extension | <extension | ||
| − | + | id="product" | |
| − | + | name="" | |
| − | + | point="org.eclipse.core.runtime.products"> | |
| − | + | <product | |
| − | + | name="minicrm" | |
| − | + | application="org.eclipse.minicrm.ui.swt.application"> | |
| − | + | <property | |
| − | + | name="windowImages" | |
| − | + | value="resources/icons/Ora16.png,resources/icons/Ora32.png,resources/icons/Ora48.png,resources/icons/Ora64.png,resources/icons/Ora128.png"> | |
| − | + | </property> | |
| − | + | ... remaining properties ... | |
| − | + | </product> | |
| − | + | </extension> | |
| − | In addition, the icons must also be added to the product definition of the org.eclipse.minicrm.ui.swt\products\development\minicrm-swt-client-dev.product file: | + | In addition, the icons must also be added to the product definition of the org.eclipse.minicrm.ui.swt\products\development\'''minicrm-swt-client-dev.product''' file: |
<product name="minicrm" id="org.eclipse.minicrm.ui.swt.product" application="org.eclipse.minicrm.ui.swt.application" useFeatures="false" includeLaunchers="true"> | <product name="minicrm" id="org.eclipse.minicrm.ui.swt.product" application="org.eclipse.minicrm.ui.swt.application" useFeatures="false" includeLaunchers="true"> | ||
| − | + | ... other entries ... | |
| − | + | <windowImages | |
| − | + | i16="/org.eclipse.minicrm.ui.swt/resources/icons/Ora16.png" | |
| − | + | i32="/org.eclipse.minicrm.ui.swt/resources/icons/Ora32.png" | |
| − | + | i48="/org.eclipse.minicrm.ui.swt/resources/icons/Ora48.png" | |
| − | + | i64="/org.eclipse.minicrm.ui.swt/resources/icons/Ora64.png" | |
| − | + | i128="/org.eclipse.minicrm.ui.swt/resources/icons/Ora128.png"/> | |
| − | + | ... other entries ... | |
</product> | </product> | ||
| − | Alternatively, the icons can be defined in the visual product editor on the Branding tab: | + | Alternatively, the icons can be defined in the visual product editor on the '''Branding '''tab: |
| − | [[Image:Branding-Swt-Client-Icons-Branding.png]] | + | [[Image:Branding-Swt-Client-Icons-Branding.png]] |
=== Result === | === Result === | ||
| − | [[Image:Branding-Swt-Client-Icons.png]]<br> | + | [[Image:Branding-Swt-Client-Icons.png]]<br> |
| − | + | ||
| + | <br> | ||
= Splash screen = | = Splash screen = | ||
| Line 53: | Line 53: | ||
=== Steps === | === Steps === | ||
| − | Adding a splash screen for SWT is trivial. The file must be names Splash.bmp and be located in the root directory of the SWT client: org.eclipse.minicrm.ui.swt\Splash.bmp. | + | Adding a splash screen for SWT is trivial. The file must be names '''Splash.bmp''' and be located in the '''root directory''' of the SWT client: org.eclipse.minicrm.ui.swt\Splash.bmp. |
| − | If you want to add a progress bar and display a progress message you can do so in the Splash tab of the product editor: | + | If you want to add a progress bar and display a progress message you can do so in the '''Splash '''tab of the product editor: |
[[Image:Branding-Swt-Client-Splash.png]] | [[Image:Branding-Swt-Client-Splash.png]] | ||
Latest revision as of 04:16, 6 March 2013
The Scout documentation has been moved to https://eclipsescout.github.io/.
This how-to describes how to brand the SWT client.
Contents
Icons
Steps
The icons that will be referenced must be placed in the SWT client's resources/icons directory (e.g. org.eclipse.minicrm.ui.swt/resources/icons)
In order to customize the icon an application shows in its title bar and in the windows task bar, the following property below of the product must be modified in the org.eclipse.minicrm.ui.swt\plugin.xml file:
  <extension
      id="product"
      name=""
      point="org.eclipse.core.runtime.products">
   <product
         name="minicrm"
         application="org.eclipse.minicrm.ui.swt.application">
      <property
            name="windowImages"
            value="resources/icons/Ora16.png,resources/icons/Ora32.png,resources/icons/Ora48.png,resources/icons/Ora64.png,resources/icons/Ora128.png">
      </property>
      ... remaining properties ...
   </product>
</extension>
In addition, the icons must also be added to the product definition of the org.eclipse.minicrm.ui.swt\products\development\minicrm-swt-client-dev.product file:
 <product name="minicrm" id="org.eclipse.minicrm.ui.swt.product" application="org.eclipse.minicrm.ui.swt.application" useFeatures="false" includeLaunchers="true">
 ... other entries ...
 <windowImages
   i16="/org.eclipse.minicrm.ui.swt/resources/icons/Ora16.png"
   i32="/org.eclipse.minicrm.ui.swt/resources/icons/Ora32.png"
   i48="/org.eclipse.minicrm.ui.swt/resources/icons/Ora48.png"
   i64="/org.eclipse.minicrm.ui.swt/resources/icons/Ora64.png"
   i128="/org.eclipse.minicrm.ui.swt/resources/icons/Ora128.png"/>
 ... other entries ...
</product>
Alternatively, the icons can be defined in the visual product editor on the Branding tab:
Result
Splash screen
Steps
Adding a splash screen for SWT is trivial. The file must be names Splash.bmp and be located in the root directory of the SWT client: org.eclipse.minicrm.ui.swt\Splash.bmp.
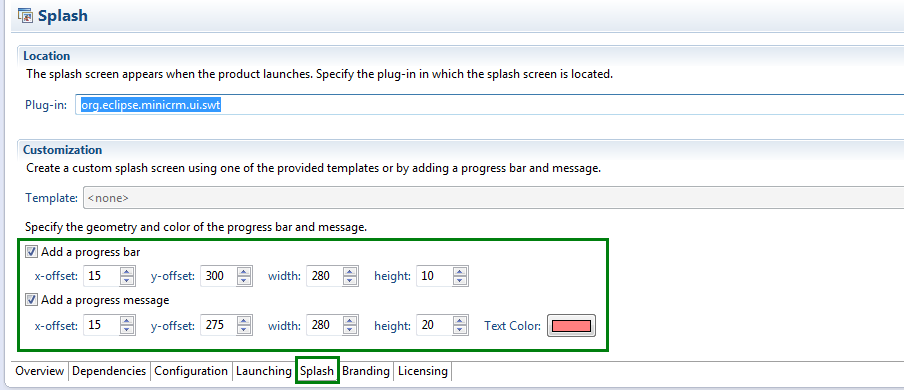
If you want to add a progress bar and display a progress message you can do so in the Splash tab of the product editor:

