Notice: this Wiki will be going read only early in 2024 and edits will no longer be possible. Please see: https://gitlab.eclipse.org/eclipsefdn/helpdesk/-/wikis/Wiki-shutdown-plan for the plan.
Difference between revisions of "STP/EID Component/YourFirstEidProject"
(New page: <h1>Your first Enterprise Integration Designer Diagram</h1> <p>At this point you have got the Ganymede update that contains the plugins you need to ...) |
|||
| Line 1: | Line 1: | ||
<h1>Your first Enterprise Integration Designer Diagram</h1> | <h1>Your first Enterprise Integration Designer Diagram</h1> | ||
| − | <p>At this point you have [[STP/EID_Component/GetGanymedeUpdate|got the Ganymede update]] that contains the plugins you need to get started. As of version 0.8.0, the EID allows you to draw Enterprise Integration Pattern diagrams, then produce configuration for the [[http://servicemix.apache.org/home.html | + | <p>At this point you have [[STP/EID_Component/GetGanymedeUpdate|got the Ganymede update]] that contains the plugins you need to get started. As of version 0.8.0, the EID allows you to draw Enterprise Integration Pattern diagrams, then produce configuration for the [[ServiceMix|http://servicemix.apache.org/home.html]] and [[Petals|http://petals.objectweb.org/]] ESBs, or any other software that repackages these ESBs.</p> |
<h2>Create a Project</h2> | <h2>Create a Project</h2> | ||
| Line 10: | Line 10: | ||
Next step, right-click on your <tt>patterns</tt> project and choose ''New > Other...'' from the context menu, then select the ''Cimero > Cimero diagram'' wizard. The code for the integration designer was originally called Cimero, so you will see the odd reference to it here and there. | Next step, right-click on your <tt>patterns</tt> project and choose ''New > Other...'' from the context menu, then select the ''Cimero > Cimero diagram'' wizard. The code for the integration designer was originally called Cimero, so you will see the odd reference to it here and there. | ||
</p> | </p> | ||
| + | <br/> | ||
[[Image:STP_EID_DiagramWizard.png]] | [[Image:STP_EID_DiagramWizard.png]] | ||
| + | <br/> | ||
<p>The wizard will ask you what ESB do you wish to use (we hope to have more choices as we go on, or change the architecture a bit). For this example, choose ServiceMix</p> | <p>The wizard will ask you what ESB do you wish to use (we hope to have more choices as we go on, or change the architecture a bit). For this example, choose ServiceMix</p> | ||
| + | <br/> | ||
[[Image:STP_EID_ChooseESB.png]] | [[Image:STP_EID_ChooseESB.png]] | ||
| + | <br/> | ||
<p>Then press ''Next''</p> | <p>Then press ''Next''</p> | ||
<p>Next step is to assign a name to the new diagram file that you are going to create.</p> | <p>Next step is to assign a name to the new diagram file that you are going to create.</p> | ||
| + | <br/> | ||
[[Image:Image:STP_EID_Name.png]] | [[Image:Image:STP_EID_Name.png]] | ||
| + | <br/> | ||
<p>Then press ''Finish''. The EIP diagram editor will appear.</p> | <p>Then press ''Finish''. The EIP diagram editor will appear.</p> | ||
| + | <br/> | ||
[[Image:STP_EID_Diagram.png]] | [[Image:STP_EID_Diagram.png]] | ||
| + | <br/> | ||
<h2>Create a New Pattern Assembly</h2> | <h2>Create a New Pattern Assembly</h2> | ||
<p>Ok, so now you are ready to go join EI patterns together. As you can see from the palette, there is a limited number of EIPs currently available. We'll grow this default set as time goes on, and we will make sure that there is a proper contribution architecture in place for them. Right now you do have the capability to add extra things to the palette, but that will be treated in a separate HOWTO. For now, we are just going to create a simple assembly of Enterprise Integration Patterns.</p> | <p>Ok, so now you are ready to go join EI patterns together. As you can see from the palette, there is a limited number of EIPs currently available. We'll grow this default set as time goes on, and we will make sure that there is a proper contribution architecture in place for them. Right now you do have the capability to add extra things to the palette, but that will be treated in a separate HOWTO. For now, we are just going to create a simple assembly of Enterprise Integration Patterns.</p> | ||
<p>To put a pattern on the canvas, select one in the palette, then mouse over and click the canvas. Try it with a <tt>wire-tap</tt> and a <tt>content-based-router</tt>.</p> | <p>To put a pattern on the canvas, select one in the palette, then mouse over and click the canvas. Try it with a <tt>wire-tap</tt> and a <tt>content-based-router</tt>.</p> | ||
| + | <br/> | ||
[[Image:STP_EID_wtcbr.png]] | [[Image:STP_EID_wtcbr.png]] | ||
| + | <br/> | ||
<p>You've probably noticed that the palette and canvas don't implement drag-and-drop yet. Patches are welcome! :)</p> | <p>You've probably noticed that the palette and canvas don't implement drag-and-drop yet. Patches are welcome! :)</p> | ||
<p>Rather than clutter this page with screenshots, I'm going to do two steps now. First one is to see how you can connect the two little green Gregorgrams you've just put on the canvas. Up at the top of the palette, there is a graphic of an arrow and the word ''Connection''. Select that arrow, then mouse over to the <tt>wire-tap</tt>. Click on the wire-tap, and keeping the mouse button down, mouse over to the <tt>content-based-router</tt> and release the mouse button. This will make a connection between those two patterns. No picture yet, our next step is to put in a very important part of an integration solution - the *endpoints*. These are the sources and sinks for data in the integration. </p> | <p>Rather than clutter this page with screenshots, I'm going to do two steps now. First one is to see how you can connect the two little green Gregorgrams you've just put on the canvas. Up at the top of the palette, there is a graphic of an arrow and the word ''Connection''. Select that arrow, then mouse over to the <tt>wire-tap</tt>. Click on the wire-tap, and keeping the mouse button down, mouse over to the <tt>content-based-router</tt> and release the mouse button. This will make a connection between those two patterns. No picture yet, our next step is to put in a very important part of an integration solution - the *endpoints*. These are the sources and sinks for data in the integration. </p> | ||
<p>Scroll down to the bottom of the palette. There you will see five *white* icons. They are not standard EIP icons, but instead represent endpoints that live at the edge of the integration. There are a number of different endpoint types, but for now we're not going to worry too much about each one. Take one <tt>HTTP</tt> endpoint and two <tt>JMS</tt> endpoints and connect them like so:</p> | <p>Scroll down to the bottom of the palette. There you will see five *white* icons. They are not standard EIP icons, but instead represent endpoints that live at the edge of the integration. There are a number of different endpoint types, but for now we're not going to worry too much about each one. Take one <tt>HTTP</tt> endpoint and two <tt>JMS</tt> endpoints and connect them like so:</p> | ||
| + | <br/> | ||
[[Image:STP_EID_Assembly.png]] | [[Image:STP_EID_Assembly.png]] | ||
| − | <p>Nice! You've made your first EIP diagram with this tool. It would be good to be able to put some documentation on the canvas too, and there's a way that you can do that, although it's not obvious. With the mouse, hover over the <tt>content-based-router</tt>. You will see two small arrows appear below or beside the icon and each arrow will have a little box at the end. These arrows appear but fleetingly, and will disappear unless you can grab one of the boxes. Click on a box to grab it and, keeping the mouse button down, pull it out into the blank space of the canvas. A grey line will follow the mouse pointer, and when you release the mouse button you will get a little menu:</p> | + | <br/> |
| + | <p>Nice! You've made your first EIP diagram with this tool. It would be good to be able to put some documentation on the canvas too, and there's a way that you can do that, although it's not obvious. With the mouse, hover over the <tt>content-based-router</tt>. You will see two small arrows appear below or beside the icon and each arrow will have a little box at the end. These arrows appear but fleetingly, and will disappear unless you can grab one of the boxes. Click on a box to grab it and, keeping the mouse button down, pull it out into the blank space of the canvas. A grey line will follow the mouse pointer, and when you release the mouse button you will get a little menu:</p><br/> | ||
[[Image:STP_EID_NotePull.png]] | [[Image:STP_EID_NotePull.png]] | ||
| − | <p>If you then select the single option on the menu, you can add a little note that will be connected to the pattern icon, where you can add some text explaining things:</p> | + | <br/> |
| + | <p>If you then select the single option on the menu, you can add a little note that will be connected to the pattern icon, where you can add some text explaining things:</p><br/> | ||
[[Image:STP_EID_Note.png]] | [[Image:STP_EID_Note.png]] | ||
| + | <br/> | ||
| + | <h2>Configure Pattern Properties</h2> | ||
| + | <p>Now you have a complete diagram, the next thing is to configure the ESB-specific properties for each pattern. Right-click on the canvas and you will see the context menu below. Select ''Show Properties view'' from this menu. | ||
| + | [[Image:STP_EID_GenerateMenu.png]] | ||
Revision as of 13:54, 22 February 2008
Contents
Your first Enterprise Integration Designer Diagram
At this point you have got the Ganymede update that contains the plugins you need to get started. As of version 0.8.0, the EID allows you to draw Enterprise Integration Pattern diagrams, then produce configuration for the http://servicemix.apache.org/home.html and http://petals.objectweb.org/ ESBs, or any other software that repackages these ESBs.
Create a Project
With EID, you are just going to create a diagram and configuration, so you don't really need a Java project. If you want to construct bean adapters, or other extensions, then you will need to use a Java project. For this example, you will create a plain ol' Eclipse project using File > New > Project... and then selecting the General > Project wizard. Call this project patterns.
Create a New Diagram
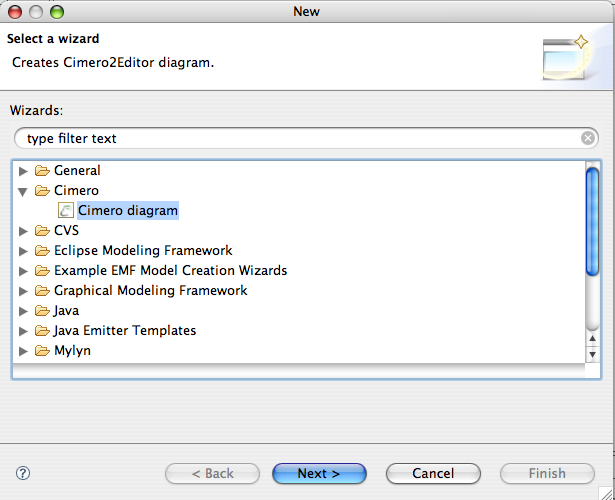
Next step, right-click on your patterns project and choose New > Other... from the context menu, then select the Cimero > Cimero diagram wizard. The code for the integration designer was originally called Cimero, so you will see the odd reference to it here and there.
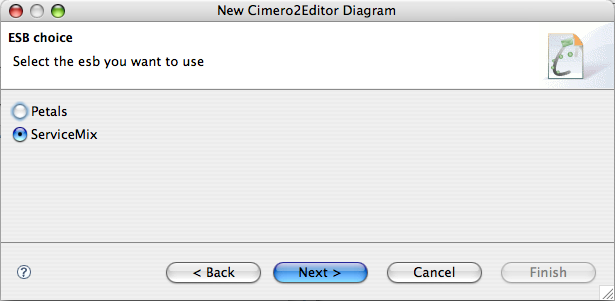
The wizard will ask you what ESB do you wish to use (we hope to have more choices as we go on, or change the architecture a bit). For this example, choose ServiceMix
Then press Next
Next step is to assign a name to the new diagram file that you are going to create.
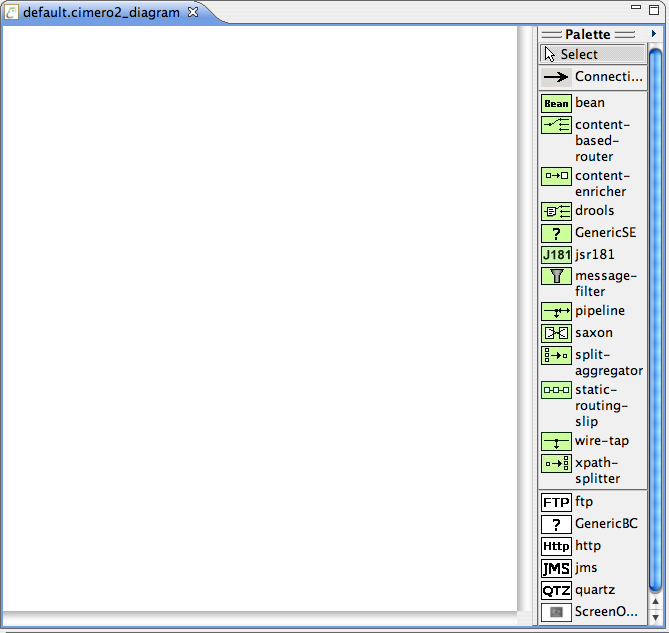
Then press Finish. The EIP diagram editor will appear.
Create a New Pattern Assembly
Ok, so now you are ready to go join EI patterns together. As you can see from the palette, there is a limited number of EIPs currently available. We'll grow this default set as time goes on, and we will make sure that there is a proper contribution architecture in place for them. Right now you do have the capability to add extra things to the palette, but that will be treated in a separate HOWTO. For now, we are just going to create a simple assembly of Enterprise Integration Patterns.
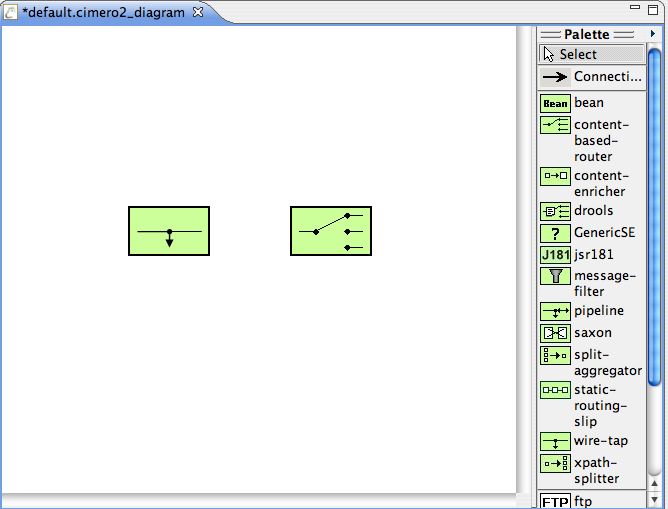
To put a pattern on the canvas, select one in the palette, then mouse over and click the canvas. Try it with a wire-tap and a content-based-router.
You've probably noticed that the palette and canvas don't implement drag-and-drop yet. Patches are welcome! :)
Rather than clutter this page with screenshots, I'm going to do two steps now. First one is to see how you can connect the two little green Gregorgrams you've just put on the canvas. Up at the top of the palette, there is a graphic of an arrow and the word Connection. Select that arrow, then mouse over to the wire-tap. Click on the wire-tap, and keeping the mouse button down, mouse over to the content-based-router and release the mouse button. This will make a connection between those two patterns. No picture yet, our next step is to put in a very important part of an integration solution - the *endpoints*. These are the sources and sinks for data in the integration.
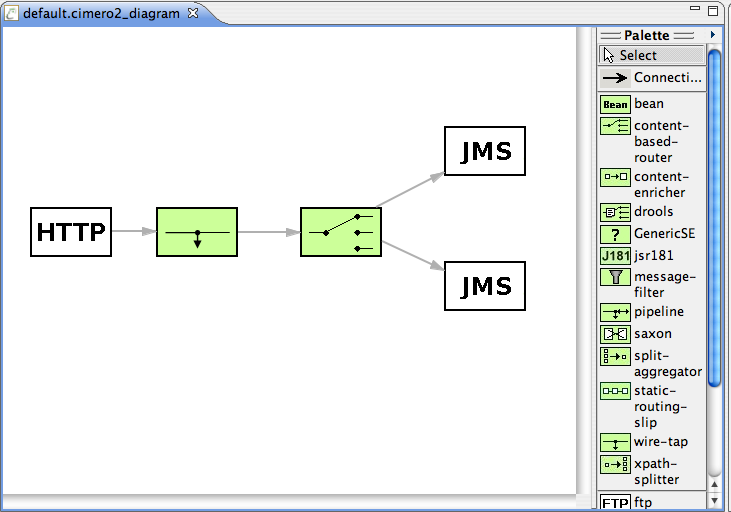
Scroll down to the bottom of the palette. There you will see five *white* icons. They are not standard EIP icons, but instead represent endpoints that live at the edge of the integration. There are a number of different endpoint types, but for now we're not going to worry too much about each one. Take one HTTP endpoint and two JMS endpoints and connect them like so:
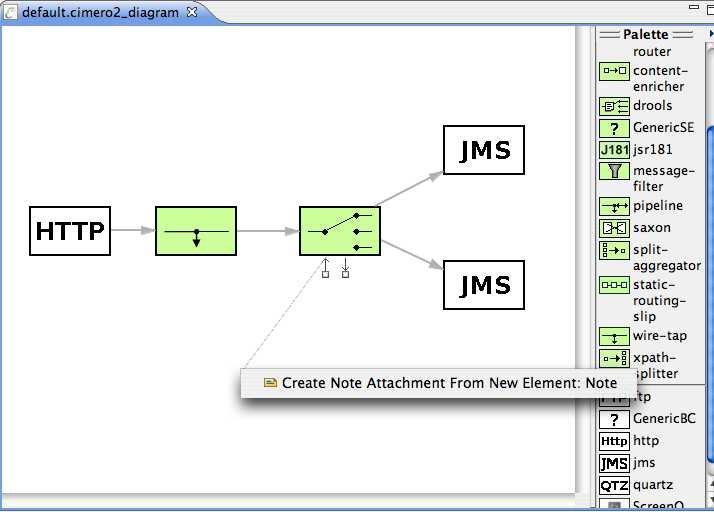
Nice! You've made your first EIP diagram with this tool. It would be good to be able to put some documentation on the canvas too, and there's a way that you can do that, although it's not obvious. With the mouse, hover over the content-based-router. You will see two small arrows appear below or beside the icon and each arrow will have a little box at the end. These arrows appear but fleetingly, and will disappear unless you can grab one of the boxes. Click on a box to grab it and, keeping the mouse button down, pull it out into the blank space of the canvas. A grey line will follow the mouse pointer, and when you release the mouse button you will get a little menu:
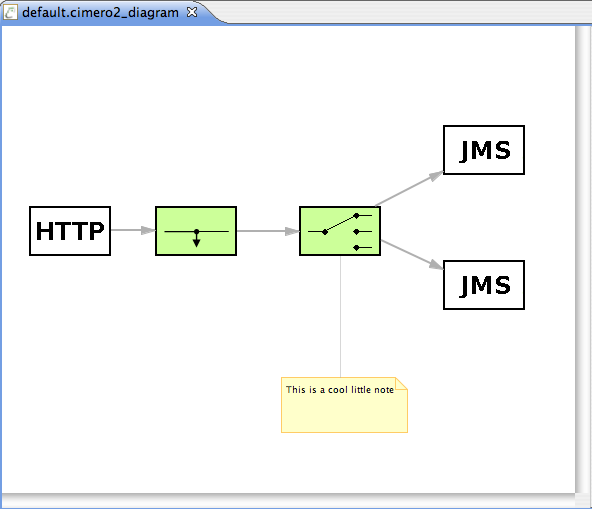
If you then select the single option on the menu, you can add a little note that will be connected to the pattern icon, where you can add some text explaining things:
Configure Pattern Properties
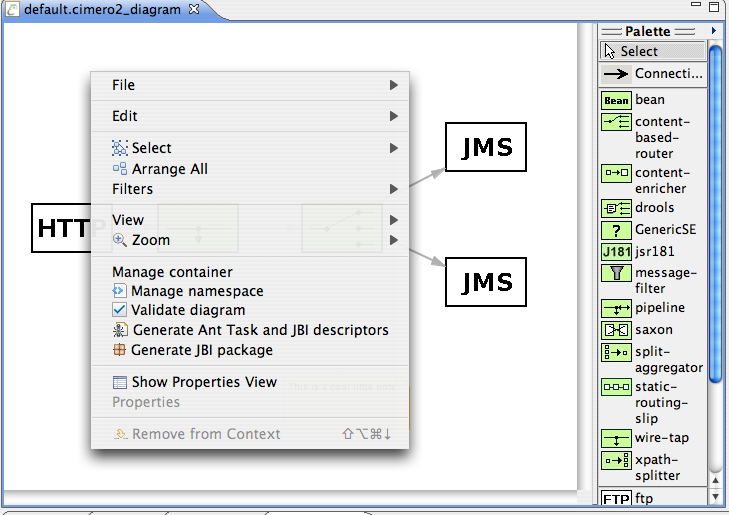
Now you have a complete diagram, the next thing is to configure the ESB-specific properties for each pattern. Right-click on the canvas and you will see the context menu below. Select Show Properties view from this menu.
