Notice: this Wiki will be going read only early in 2024 and edits will no longer be possible. Please see: https://gitlab.eclipse.org/eclipsefdn/helpdesk/-/wikis/Wiki-shutdown-plan for the plan.
Difference between revisions of "STP/BPMN Component/STP BPMN Presentation Hands on tutorial"
m |
|||
| (21 intermediate revisions by 2 users not shown) | |||
| Line 8: | Line 8: | ||
* Extend the modeler by adding the custom property "Participant". | * Extend the modeler by adding the custom property "Participant". | ||
| − | = | + | = Using the modeler: Eclipse-con registration process design = |
| − | + | A very light and fictional process that does not match the actual process in place. | |
| − | + | ||
| − | + | The only ambition of this example is to demo features of the stp BPMN modeler. | |
| + | It does not pretend to be executable or compliant to all the BPMN rules. | ||
| + | == Stage 1: workflow with a single pool == | ||
| + | === Create a pool and call it EclipseConAttendee === | ||
| + | * Check out the palette and the diagram assistant. | ||
| + | * Check out the ability to re-factor the diagram: change the type of activities. | ||
| − | + | Here is the kind of pool you can design. | |
| + | [[Image:BPMN_DESIGN_stage-1-RegistrationProcess-single-pool.gif]] | ||
| + | === BPMN Connection rules === | ||
| + | ==== At design time ==== | ||
| + | It is not possible to draw an outgoing sequence edge from an end-event shape. | ||
| + | ==== At build time ==== | ||
| + | It is possible to force the diagram into breaking the rule above: | ||
| + | Connect to task in the same pool by a flow connection. | ||
| + | Change the type of the first activity into an end-event. | ||
| − | + | Let the eclipse builder starts the validation of the diagram. It will report and error in the problems view and directly on the faulty edge. | |
| + | For example: | ||
| + | [[Image:BPMN_DESIGN_stage-1-Registration-Process-BPMNConnectionRuleValidation.gif]] | ||
| + | When many diagrams are committed in a repository, it is very efficient for a user to download them all and validate them without having to open them one by one. | ||
| + | This is what the validation executed during the build enables to do. | ||
| + | |||
| + | == Stage 2: Attaching documents and forms to the process == | ||
| + | A common feature consists of attahcing documents to the BPMN shapes. | ||
| + | The STP-BPMN modeler exposes extension points that makes this very easy. | ||
| + | As an example, the modeler is shipped with the ability to attach any kind of files. | ||
| + | It is able to validate whether the file does exist are not as part of its validation rules. | ||
| + | |||
| + | * D&D interactions | ||
| + | Place inside the project where the diagram is developed a word document. | ||
| + | For example the ListOfTutorials.doc | ||
| + | |||
| + | [[Image:BPMN_DESIGN_stage-2-Documentation-in-project.gif]] | ||
| + | |||
| + | Drag and Drop it on the shape "Choose a tutorial". | ||
| + | |||
| + | [[Image:BPMN_DESIGN_stage-2-Documentated-Task.gif]] | ||
| + | |||
| + | * The validation builder: remove the file attached to a shape. | ||
| + | The validation is called during the build and adds a marker next to the shape to let the user know that the annotation has disappeared. | ||
| + | Bug #176336: currently not working! | ||
| + | |||
| + | == Stage 3: service orchestration: BPMN pools and Messages == | ||
| + | |||
| + | === Pools and Messages === | ||
| + | At this point, we don't have visibility over the workflow of the eclipse-con-organizers. | ||
| + | |||
| + | This is all good if the scope of the diagram is purely to document the registration in the attendee's point of view: he does not need to know the gritty workflow of the eclipse-con-organizers. | ||
| + | |||
| + | In some cases it is necessary to show both workflow executing in parallel and how they interact. | ||
| + | One solution to do this in BPMN is to use pools and messages. | ||
| + | |||
| + | The advantage of that solution is that it actually matches the actual execution of the process. | ||
| + | |||
| + | We will discuss in depth the use of BPMN to design and execute workflow processes and service orchestration during the long talk: | ||
| + | http://www.eclipsecon.org/2007/index.php?page=sub/&id=3887 | ||
| + | |||
| + | In the mean time, let's create another pool where we will design the workflow of the organizers of Eclipse Con. | ||
| + | |||
| + | This is for example what could be designed: | ||
| + | [[Image:EclipseConRegistrationProcess-final.gif]] | ||
| + | |||
| + | |||
| + | === Focusing on a single workflow === | ||
| + | Although this is diagram certainly does display a lot more things at once things get complicated quickly. | ||
| + | There are several techniques to keep things manageable. | ||
| + | For example we can collpase entire pools at once to be able to work on a single workflow: | ||
| + | [[Image:BPMN_DESIGN_stage-3-Working-on-organizer-workflow.gif]] | ||
| + | |||
| + | We could also use sub-processes or link a task to a completly new diagram. | ||
| + | |||
| + | = Extending the modeler: defining a custom property = | ||
== Participants == | == Participants == | ||
| Line 231: | Line 298: | ||
[[Image:propertytabparticipant.png]] | [[Image:propertytabparticipant.png]] | ||
| − | == Showing your annotation on the diagram == | + | === Showing your annotation on the diagram === |
Now, we want the annotation to appear on the diagram. | Now, we want the annotation to appear on the diagram. | ||
| Line 554: | Line 621: | ||
With all this, you should be able to drop participants on shapes. Enjoy ! | With all this, you should be able to drop participants on shapes. Enjoy ! | ||
| + | |||
| + | == Conclusion == | ||
| + | We hope this tutorial was useful to you. | ||
| + | We are definitely looking for help on this cool project. | ||
| + | Directly on the STP modeler: | ||
| + | - the UI can improve in many areas: layout of the shapes, ability to customize the layout of the connections. | ||
| + | - develop the support for the layout of the BPMN-group and BPMN-lanes. | ||
| + | |||
| + | Path to execution. | ||
| + | - STP and WTP have advanced object models regarding services that could certainly be used in the context of custom properties on the diagram. | ||
| + | - Transformation into BPEL and WSDL: it is possible to traverse the BPMN object model, take into account the attached WSDLs annotation and start producing executable code such as BPEL or workflow languages. There are many eclipse projects developing tools to enable doing this cleanly. | ||
| + | |||
| + | [[Category:BPMN]] | ||
| + | [[Category:STP]] | ||
Latest revision as of 07:30, 21 February 2008
This tutorial is presented as part of the STP BPMN Presentation at EclipseCon 2007.
The goal of the tutorial is to demonstrate the modeling of a BPMN diagram and to extend it.
Contents
- 1 Introduction
- 2 Using the modeler: Eclipse-con registration process design
- 3 Extending the modeler: defining a custom property
Introduction
The tutorial is in 2 parts:
- Use the modeler to create an example of workflow process: eclipse-con registration process.
- Extend the modeler by adding the custom property "Participant".
Using the modeler: Eclipse-con registration process design
A very light and fictional process that does not match the actual process in place.
The only ambition of this example is to demo features of the stp BPMN modeler. It does not pretend to be executable or compliant to all the BPMN rules.
Stage 1: workflow with a single pool
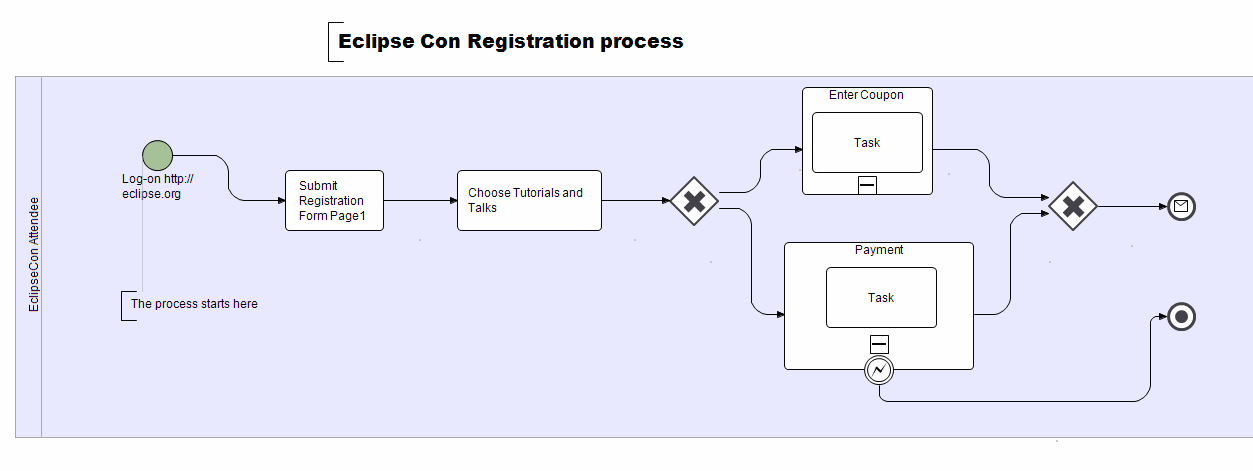
Create a pool and call it EclipseConAttendee
- Check out the palette and the diagram assistant.
- Check out the ability to re-factor the diagram: change the type of activities.
Here is the kind of pool you can design.
BPMN Connection rules
At design time
It is not possible to draw an outgoing sequence edge from an end-event shape.
At build time
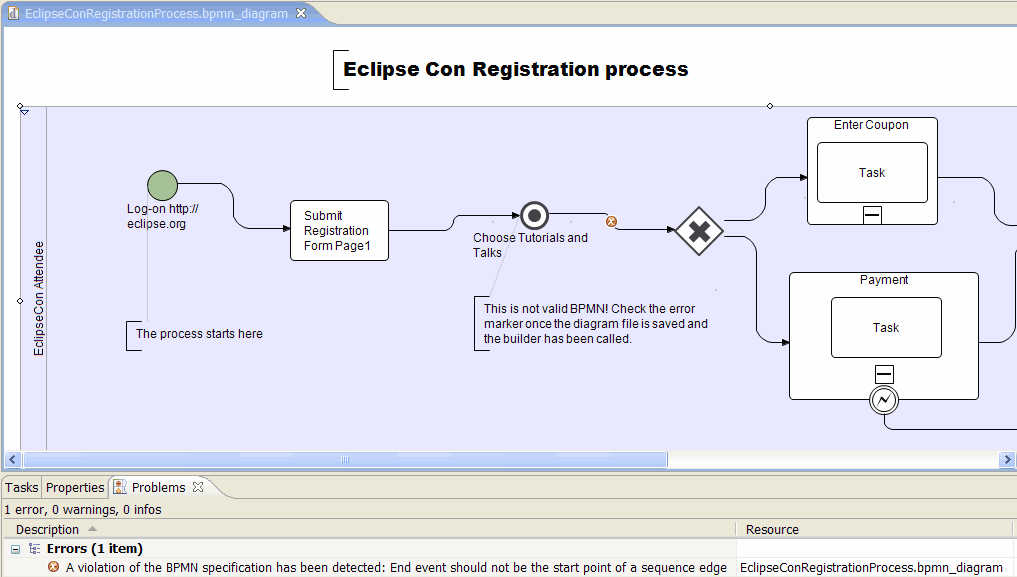
It is possible to force the diagram into breaking the rule above: Connect to task in the same pool by a flow connection. Change the type of the first activity into an end-event.
Let the eclipse builder starts the validation of the diagram. It will report and error in the problems view and directly on the faulty edge.
When many diagrams are committed in a repository, it is very efficient for a user to download them all and validate them without having to open them one by one. This is what the validation executed during the build enables to do.
Stage 2: Attaching documents and forms to the process
A common feature consists of attahcing documents to the BPMN shapes. The STP-BPMN modeler exposes extension points that makes this very easy. As an example, the modeler is shipped with the ability to attach any kind of files. It is able to validate whether the file does exist are not as part of its validation rules.
- D&D interactions
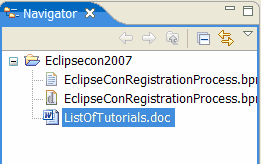
Place inside the project where the diagram is developed a word document. For example the ListOfTutorials.doc
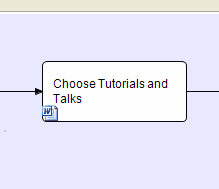
Drag and Drop it on the shape "Choose a tutorial".
- The validation builder: remove the file attached to a shape.
The validation is called during the build and adds a marker next to the shape to let the user know that the annotation has disappeared. Bug #176336: currently not working!
Stage 3: service orchestration: BPMN pools and Messages
Pools and Messages
At this point, we don't have visibility over the workflow of the eclipse-con-organizers.
This is all good if the scope of the diagram is purely to document the registration in the attendee's point of view: he does not need to know the gritty workflow of the eclipse-con-organizers.
In some cases it is necessary to show both workflow executing in parallel and how they interact. One solution to do this in BPMN is to use pools and messages.
The advantage of that solution is that it actually matches the actual execution of the process.
We will discuss in depth the use of BPMN to design and execute workflow processes and service orchestration during the long talk: http://www.eclipsecon.org/2007/index.php?page=sub/&id=3887
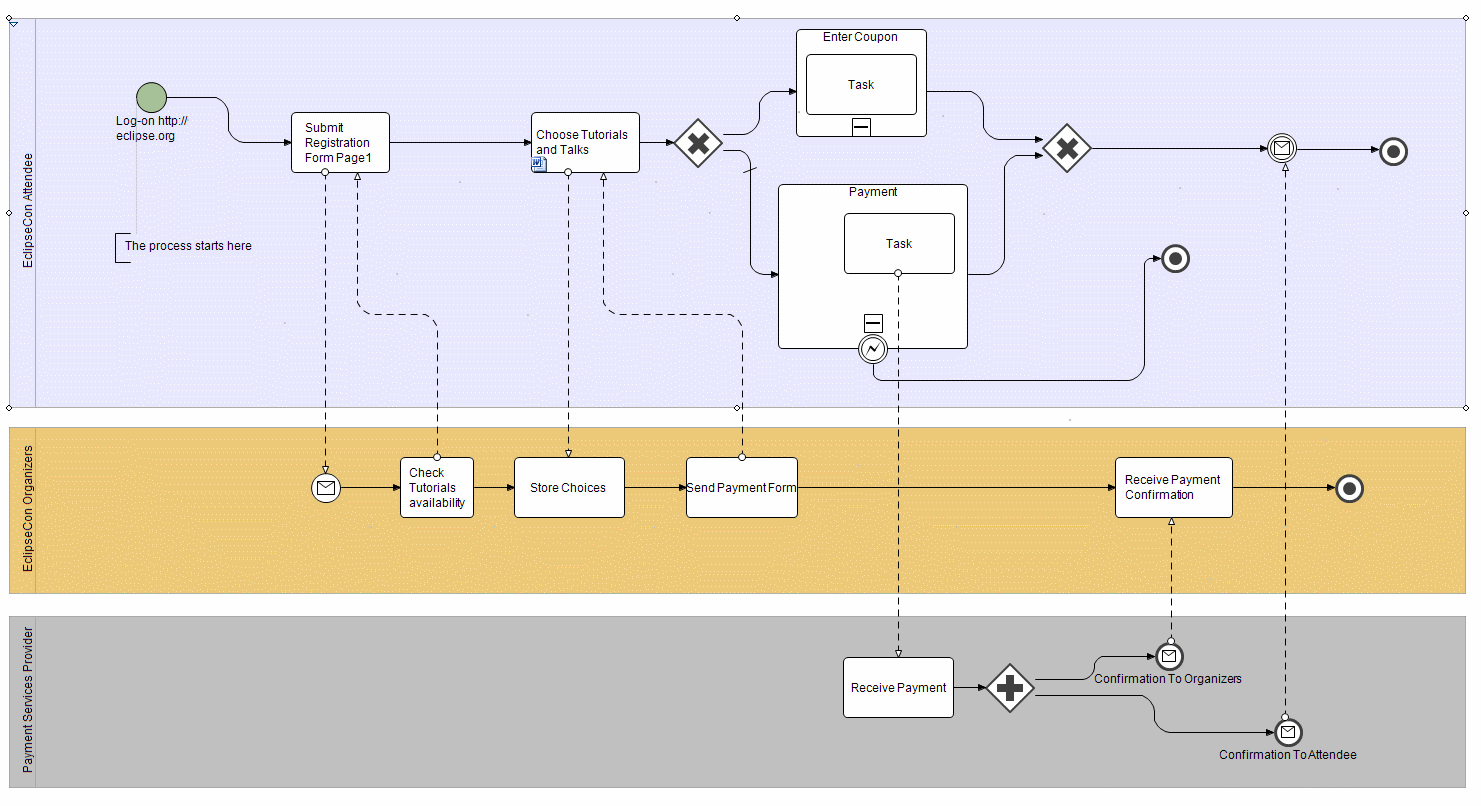
In the mean time, let's create another pool where we will design the workflow of the organizers of Eclipse Con.
This is for example what could be designed:
Focusing on a single workflow
Although this is diagram certainly does display a lot more things at once things get complicated quickly.
There are several techniques to keep things manageable.
For example we can collpase entire pools at once to be able to work on a single workflow:

We could also use sub-processes or link a task to a completly new diagram.
Extending the modeler: defining a custom property
Participants
In this section, we are going to begin to play with the modeler and try to extend its use.
We want to add a participant to our shapes. A participant represents a person with a name and a role.
Adding a property tab to create your annotation
The easiest way to add a participant to your shape is to create a property tab to represent it and enable us to enter his name and his role.
You will need to add org.eclipse.ui.views.properties.tabbed, org.eclipse.stp.bpmn and org.eclipse.stp.bpmn.diagram into the dependencies of the plugin.
Your manifest.mf file should contain these dependencies:
Require-Bundle: org.eclipse.ui,
org.eclipse.core.runtime,
org.eclipse.ui.views.properties.tabbed,
org.eclipse.stp.bpmn,
org.eclipse.stp.bpmn.diagram
In the plugin.xml file, we define a new property tab named "Participants". We add one section to the tab.
The contributor for the new tab, it defines a new category
   <extension
        point="org.eclipse.ui.views.properties.tabbed.propertyContributor">
     <propertyContributor
           contributorId="org.eclipse.gmf.runtime.diagram.ui.properties">
        <propertyCategory category="Participants"/>
     </propertyContributor>
  </extension>
The definition of the tab itself
   <extension point="org.eclipse.ui.views.properties.tabbed.propertyTabs">
     <propertyTabs contributorId="org.eclipse.gmf.runtime.diagram.ui.properties">
        <propertyTab
              category="Participants"
              id="Participants"
              indented="false"
              label="Participants"/>
     </propertyTabs>
   </extension>
The definition of the section inside the property tab
   <extension point="org.eclipse.ui.views.properties.tabbed.propertySections">
     <propertySections contributorId="org.eclipse.gmf.runtime.diagram.ui.properties">
        <propertySection
              class="org.eclipse.stp.samples.eclipsecon2007.participant.properties.ParticipantPropertySection"
              id="ParticipantsSection"
              tab="Participants">
           <input type="org.eclipse.stp.bpmn.Activity"/>
           <input type="java.lang.Object"/>
        </propertySection>
     </propertySections>
   </extension>
Now we are going to code the tab itself.
A tab is an instance of AbstractPropertySection.
Create a class in org.eclipse.stp.samples.eclipsecon2007.participant.properties as ParticipantPropertySection.
Two methods are important there :
the property tab UI is defined in createPartControl, and the input management in setInput. We need to implement those two methods.
Let's create a first version of createPartControl, with two text fields:
       /**
       * Creates the UI of the section.
       */
       @Override
       public void createControls(Composite parent,
               TabbedPropertySheetPage aTabbedPropertySheetPage) {
               super.createControls(parent, aTabbedPropertySheetPage);
               GridLayout layout = new GridLayout(2, false);
               parent.setLayout(layout);

               GridData gd = new GridData(SWT.FILL);
               gd.minimumWidth = 500;
               gd.widthHint = 500;
               getWidgetFactory().createCLabel(parent, "Name");
               nameText = getWidgetFactory().createText(parent, "");
               nameText.setLayoutData(gd);
               getWidgetFactory().createCLabel(parent, "Role");
               roleText = getWidgetFactory().createText(parent, "");
               roleText.setLayoutData(gd);
       }
Now let's handle the data.
       /**
       * Manages the input.
       */
       @Override
       public void setInput(IWorkbenchPart part, ISelection selection) {

               super.setInput(part, selection);
               if(selection instanceof IStructuredSelection) {
                       Object unknownInput =
                              ((IStructuredSelection) selection).getFirstElement();
                       if (unknownInput instanceof IGraphicalEditPart &&
                               (((IGraphicalEditPart) unknownInput).
                                       resolveSemanticElement() != null)) {
                                unknownInput = ((IGraphicalEditPart) unknownInput).resolveSemanticElement();
                       }
                       if (unknownInput instanceof Activity) {
                                       Activity elt = (Activity) unknownInput;
                                       EAnnotation ea = elt.getEAnnotation(ParticipantConstants.PARTICIPANT_ANNOTATION);
                                       if (ea != null) {
                                               nameText.setText((String) ea.getDetails().get(ParticipantConstants.PARTICIPANT_NAME));
                                               roleText.setText((String) ea.getDetails().get(ParticipantConstants.PARTICIPANT_ROLE));
                                       }
                                       activity = (Activity) elt;
                                       nameText.setEnabled(true);
                                       roleText.setEnabled(true);
                                       return;
                       }
               }
               activity = null;
               nameText.setText("");
               roleText.setText("");
               nameText.setEnabled(false);
               roleText.setEnabled(false);
       }
We now have a working section. Hopefully.
We need to make sure that the changes in the text fields are reflected in the EAnnotation. To do this, we need to add a ModifyListener on the text fields. Plus we need to create a command or use an existing one to do the job of modifying the resource in a transaction. We choose to create our own command, we could also have used a chain of commands with EMF.
       /**
        * Utility class that finds the files and the editing domain easily,
        * Abstractas the doExecuteWithResult method needs to be implemented.
        * @author <a href="mailto:hmalphettes@intalio.com">Hugues Malphettes</a>
        * @author <a href="mailto:atoulme@intalio.com">Antoine Toulmé</a>
        * @author <a href="http://www.intalio.com">© Intalio, Inc.</a>
        */
       private abstract class ModifyParticipantEAnnotationCommand extends AbstractTransactionalCommand {

       public ModifyParticipantEAnnotationCommand(Activity ann, String label) {
                super((TransactionalEditingDomain) AdapterFactoryEditingDomain.getEditingDomainFor(ann), label, getWorkspaceFiles(ann));
       }
We implement our text listener directly in the class.
      /**
        * Tracks the change occuring on the text field.
        * @author <a href="http://www.intalio.com">Hugues Malphettes</a>
        * @author <a href="http://www.intalio.com">Antoine Toulmé</a>
        * @author <a href="http://www.intalio.com">© Intalio, Inc.</a>
        */
      private class ModifyParticipantInformation implements ModifyListener {
               private String key;
               private Text field;

               public ModifyParticipantInformation(String k, Text field) {
                       key = k;
                       this.field = field;
               }

               public void modifyText(ModifyEvent e) {
                       if (activity == null) { // the value was just initialized
                               return;
                       }
                       ModifyParticipantEAnnotationCommand command =
                               new ModifyParticipantEAnnotationCommand(activity, "Modifying participant") {

                               @Override
                               protected CommandResult doExecuteWithResult(IProgressMonitor arg0, IAdaptable arg1) throws ExecutionException {
                                       EAnnotation annotation  = activity.getEAnnotation(ParticipantConstants.PARTICIPANT_ANNOTATION);
                                       if (annotation == null) {
                                               annotation = EcoreFactory.eINSTANCE.createEAnnotation();
                                               annotation.setSource(ParticipantConstants.PARTICIPANT_ANNOTATION);
                                               annotation.setEModelElement(activity);
                                               annotation.getDetails().put(ParticipantConstants.PARTICIPANT_NAME, "");
                                               annotation.getDetails().put(ParticipantConstants.PARTICIPANT_ROLE, "");
                                       }
                                       annotation.getDetails().put(key, field.getText());

                                       return CommandResult.newOKCommandResult();
                               }};
                               try {
                                       command.execute(new NullProgressMonitor(), null);
                               } catch (ExecutionException exception) {
                                       STPEclipseConPlugin.getDefault().getLog().log(new Status(IStatus.ERROR, STPEclipseConPlugin.PLUGIN_ID, IStatus.ERROR, exception.getMessage(), exception));
                               }
               }
      }
The trick is to create the EAnnotation if it doesn't exist yet.
The logical next step is to add the listener to the text fields as we initialize them in the createPartControl method.
nameText.addModifyListener(new ModifyParticipantInformation(ParticipantConstants.PARTICIPANT_NAME, nameText));
roleText.addModifyListener(new ModifyParticipantInformation(ParticipantConstants.PARTICIPANT_ROLE, roleText));
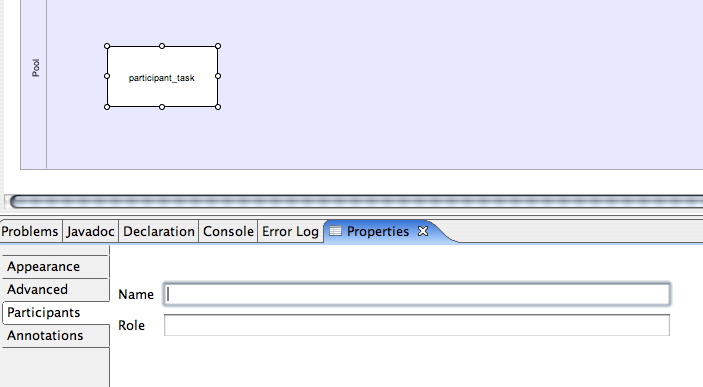
Your property tab is ready:
Showing your annotation on the diagram
Now, we want the annotation to appear on the diagram.
We need to implement the decorator extension point to do that.
  <extension
        point="org.eclipse.stp.bpmn.diagram.EAnnotationDecorator">
     <decorator
           class="org.eclipse.stp.samples.eclipsecon2007.participant.drop.ParticipantDecorator"
           source="participant"/>
  </extension>
The ParticipantDecorator class is implementing the IEAnnotationDecorator interface.
Create your own implementation of the decorator :
In the decorator, you will need to give the source of the EAnnotations the decorator will decorate:
       public String getAssociatedAnnotationSource() {
               return ParticipantConstants.PARTICIPANT_ANNOTATION;
       }
You can choose where the decoration will appear on the shape (whatever constant defined by Direction is supported):
       public Direction getDirection(EditPart part, EModelElement elt, EAnnotation ann) {
              return Direction.SOUTH_EAST;
       }
The decoration itself will be constituted into an image that you create in this method:
       public Image getImage(EditPart part, EModelElement element, EAnnotation annotation) {
               ImageDescriptor desc = STPEclipseConPlugin.imageDescriptorFromPlugin(STPEclipseConPlugin.PLUGIN_ID, "icons/participant.gif");
               return desc == null ? null : desc.createImage();
       }
Finally you can show a IFigure object that will appear as the tooltip of the decoration.
We choose to show a simple label, we could do something more complicated.
      public IFigure getToolTip(EditPart part, EModelElement element, EAnnotation annotation) {
               String name = (String) annotation.getDetails(). get(ParticipantConstants.PARTICIPANT_NAME);
               String role = (String) annotation.getDetails(). get(ParticipantConstants.PARTICIPANT_ROLE);
               return new Label("Performed by " + name + " (" + role + ")");
      }
So here it is !
Adding an annotation through a drag and drop action
We want to have some more interaction now, and the best way to do that for the end-user is to do some drag and drop on the diagram.
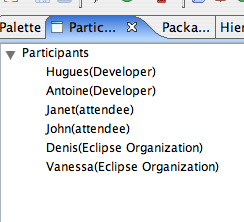
We are going to use a Participant view that will be complete enough to represent some participants. We will see how to drop them on the diagram just next.
The participant view
First, let's represent a participant.
A participant has a name and a role, right ? So here is an interface good enough to represent one:
    public interface IParticipant {

         /**
          * @return the name of the participant
         */
         public String getName();

         /**
          * @return the role of the participant
         */
         public String getRole();
    }
A basic implementation for IParticipant will be necessary as well:
       private class ParticipantImpl implements IParticipant {

               private String name;
               private String role;


               public ParticipantImpl(String name, String role) {
                       super();
                       this.name = name;
                       this.role = role;
               }

               public String getName() {
                       return name;
               }

               public String getRole() {
                       return role;
               }

               @Override
               public String toString() {
                       return name + "(" + role + ")";
               }

       }
We are going to implement a simple tree viewer view.
In the plugin.xml:
 Definition of the view for the participants
 <extension point="org.eclipse.ui.views">
    <view class="org.eclipse.stp.samples.eclipsecon2007.participant.view.ParticipantView"
        id="org.eclipse.stp.samples.eclipsecon2007.participantView"
        name="Participants"/>
 </extension>
The view should extend ViewPart.
We only care about creating some content in there, so we will only implement createPartControl:
public void createPartControl(Composite parent) {
tree = new TreeViewer(parent);
We need a content provider for the tree. Here is a simple content provider with some static content:
        /**
         * a static content provider representing some simple participants.
         * @author <a href="http://www.intalio.com">Hugues Malphettes</a>
         * @author <a href="http://www.intalio.com">Antoine Toulmé</a>
         * @author <a href="http://www.intalio.com">© Intalio, Inc.</a>
         */
        private class ParticipantContentProvider implements ITreeContentProvider {

                 /**
                  * The String representing the root of the tree.
                  */
                 private String ROOT = "Participants";

                 /**
                  * Adds some static children under the root,
                 */
                 public Object[] getChildren(Object parentElement) {
                          if (ROOT.equals(parentElement)) {
                                   return new Object[] {
                                            new ParticipantImpl("Hugues", "Developer"),
                                            new ParticipantImpl("Antoine", "Developer"),
                                            new ParticipantImpl("Janet", "attendee"),
                                            new ParticipantImpl("John", "attendee"),
                                            new ParticipantImpl("Denis", "Eclipse Organization"),
                                            new ParticipantImpl("Vanessa", "Eclipse Organization")
                                   };
                          }
                 return null;
                 }

                 public Object getParent(Object element) {
                          return ROOT;
                 }

                 public boolean hasChildren(Object element) {
                          if (ROOT.equals(element)) {
                                   return true;
                          }
                          return false;
                 }

                 public Object[] getElements(Object inputElement) {
                          return new Object[] {ROOT};
                 }

                 public void dispose() {
                 // not implemented
                 }

                 public void inputChanged(Viewer viewer, Object oldInput, Object newInput) {
                 // not implemented
                 }
        }
In the createPartControl method, add the content provider to the tree viewer and initialize it with some dummy input to see it appear:
       tree.setContentProvider(new ParticipantContentProvider());
       tree.setInput("");
One last thing is missing though. We need to add a drag and drop support to the tree so that it can drop things on the diagram.
We need a drag adapter that will copy the tree selection into the LocalSelectionTransfer.
        /**
        * Simple drag adapter that fills the LocalSelectionTransfer with the selection
        */
        private class ParticipantDragAdapter extends DragSourceAdapter {
                 @Override
                 public void dragStart(DragSourceEvent event) {
                          LocalSelectionTransfer.getTransfer().setSelection(tree.getSelection());
                 }
        }
We add the drag support to the tree in the createPartControl method:
       int ops = DND.DROP_COPY | DND.DROP_MOVE;
       Transfer[] transfers = new Transfer[] {LocalSelectionTransfer.getTransfer()};
       ParticipantDragAdapter drag = new ParticipantDragAdapter();
       tree.addDragSupport(ops, transfers, drag);
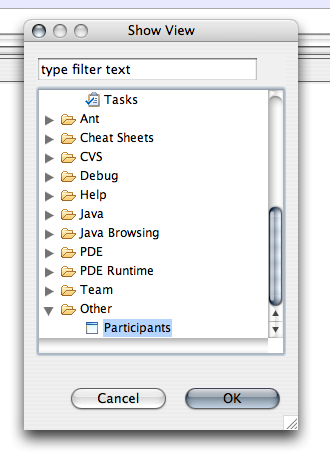
Now you can open the view from the Window>Show View>Other button, and select the view in the Others category.
Creating the EAnnotation during the drop
The drag and drop operation should now work. Meaning: something is dropped on the diagram.
The thing is, this "something" doesn't look like an EAnnotation. We need to adapt it into it.
We implement an adapterFactory and declare it into the plugin.xml.
This factory will adapt IParticipant objects into EAnnotations.
       /**
        * This adapter factory adapts files into EAnnotation that will
        * represent participants.
        * @author <a href="http://www.intalio.com">© Intalio, Inc.</a>
        */
       public class ParticipantAdapterFactory implements IAdapterFactory {

               /* (non-Javadoc)
               * @see org.eclipse.core.runtime.IAdapterFactory#getAdapter(java.lang.Object, java.lang.Class)
               */
               public Object getAdapter(Object adaptableObject, Class adapterType) {
                       if (adaptableObject instanceof IParticipant) {
                               EAnnotation ea = EcoreFactory.eINSTANCE.createEAnnotation();
                               ea.setSource(ParticipantConstants.PARTICIPANT_ANNOTATION);
                               ea.getDetails().put(ParticipantConstants.PARTICIPANT_NAME, ((IParticipant) adaptableObject).getName());
                               ea.getDetails().put(ParticipantConstants.PARTICIPANT_ROLE,((IParticipant) adaptableObject).getRole());
                               return ea;
                       }
                       return null;
               }

               /* (non-Javadoc)
                * @see org.eclipse.core.runtime.IAdapterFactory#getAdapterList()
               */
               public Class[] getAdapterList() {
                       return new Class[] {EAnnotation.class};
               }

       }
In the plugin.xml :
       <extension point="org.eclipse.core.runtime.adapters">
               <factory adaptableType="org.eclipse.stp.samples.eclipsecon2007.participant.view.IParticipant"
                        class="org.eclipse.stp.samples.eclipsecon2007.participant.drop.ParticipantAdapterFactory">
                     <adapter type="org.eclipse.emf.ecore.EAnnotation"/>
               </factory>
       </extension>
Now the IParticipant object should reach its destination.
Handling the drop of the EAnnotation
The EAnnotation is tested before being dropped on the shape.
The handler can also add some more commands while dropping the annotation.
Since there is no unicity on an annotation to a model element (several annotations with the same source can coexist on an elemnent,
and only the first one is returned when the getEAnnotation(String source) method is called), we want to enforce some sort of unicity here.
We also want EAnnotations to be only dropped on activities (activities are tasks, events, gateways and subprocesses).
Let's declare our handler in the plugin.xml:
  <extension point="org.eclipse.stp.bpmn.diagram.EAnnotationDragAndDrop">
     <DropHandler
           class="org.eclipse.stp.samples.eclipsecon2007.participant.drop.DropParticipantHandler"
           source="participant"/>
  </extension>
Now we have the choice of extending AbstractGenericEAnnotationDndHandler or implement IGenericEAnnotationDndHandler. Their main difference is that the IGenericEAnnotationDndHandler interface gives you access to the edit part, while the abstract implementation does the job of grabbing the semantic element behind it.
Whichever you choose, your handler will have two implement two methods:
       /**{@link org.eclipse.stp.bpmn.dnd.IGenericEAnnotationDndHandler#accept(EAnnotation, IGraphicalEditPart)}
        * @see
        * @param annotation
        * @param modelElement
        * @return
        */
        public abstract IStatus accept(EAnnotation annotation,	EModelElement modelElement);
This method returns a IStatus status. If its severity is different of IStatus.OK, the drop will be cancelled. The status message field is also useful to create some messages that can be shown to the user.
Here is what our implementation of the accept method should look like:
     public IStatus accept(EAnnotation annotation, EModelElement element) {
           if (!(element instanceof Activity)) {
                 return new Status(IStatus.ERROR, STPEclipseConPlugin.PLUGIN_ID, IStatus.ERROR, "A participant can only be dropped on an activity", null);
           }
           Activity activity = (Activity) element;
           if (activity.getEAnnotation(ParticipantConstants.PARTICIPANT_ANNOTATION) != null) {
                 return new Status(IStatus.OK, STPEclipseConPlugin.PLUGIN_ID, IStatus.OK, "Adding a participant on this activity will remove the previous one", null);
           }
           return new Status(IStatus.OK, STPEclipseConPlugin.PLUGIN_ID, IStatus.OK, "Add a participant to this activity", null);
     }
The other method you need to implement is the performDrop method. This method gives you an access to the command that is going to execute the drop of the annotation. You can return false if yoiu want to cancel the drop at this point.
You can also add some additional commands to the drop command:
      public boolean doPerformDrop(CompoundCommand command, EAnnotation annotation, EModelElement modelElement) {
             if (modelElement.getEAnnotation(((EAnnotation) annotation).getSource()) != null) {
                    TransactionalEditingDomain domain =((TransactionalEditingDomain) AdapterFactoryEditingDomain.getEditingDomainFor(modelElement));
                    command.append(RemoveCommand.create(domain, modelElement, EcorePackage.eINSTANCE.getEModelElement_EAnnotations(), modelElement.getEAnnotation(annotation.getSource())));
             }
             return true;
      }
That guarantees some kind of unicity on the annotation source.
With all this, you should be able to drop participants on shapes. Enjoy !
Conclusion
We hope this tutorial was useful to you. We are definitely looking for help on this cool project. Directly on the STP modeler: - the UI can improve in many areas: layout of the shapes, ability to customize the layout of the connections. - develop the support for the layout of the BPMN-group and BPMN-lanes.
Path to execution. - STP and WTP have advanced object models regarding services that could certainly be used in the context of custom properties on the diagram. - Transformation into BPEL and WSDL: it is possible to traverse the BPMN object model, take into account the attached WSDLs annotation and start producing executable code such as BPEL or workflow languages. There are many eclipse projects developing tools to enable doing this cleanly.

