Notice: this Wiki will be going read only early in 2024 and edits will no longer be possible. Please see: https://gitlab.eclipse.org/eclipsefdn/helpdesk/-/wikis/Wiki-shutdown-plan for the plan.
Difference between revisions of "STEM Overview of the STEM UI"
(→this page is under construction) |
(→Views) |
||
| (28 intermediate revisions by one other user not shown) | |||
| Line 1: | Line 1: | ||
== Menu Items == | == Menu Items == | ||
| + | The appearance of the STEM user interface (UI) will be a little bit different depending on your operating system (e.g. Windows or Mac). When you first launch stem you will probably see a welcome screen. Closing that, you will see the STEM UI. Figure 1 shows the UI as it appears for STEM V2.0 running on mac. The first thing you will probably notice are a large number of colorful shortcut icons across the top near the menu bar. | ||
| − | + | <br> [[Image:UIdesignerView.png|800px]] | |
| + | ''Figure 1: The STEM UI. The UI appearance will differ slightly between operating systems (e.g. Windows or Mac).''<br/> | ||
| + | ''Notice the many '''shortcut icons''' along the top near the menu bar.''. | ||
| + | |||
| + | To understand what the shortcuts actually do, you can ''mouse over'' the icons, or simply go the menu bar and click >NEW | ||
| + | you will get a drop-down list that shows all the available shortcut icons again along with a description. | ||
| + | |||
| + | <br> [[Image:NewMenu.png]] | ||
| + | |||
| + | ''Figure 2: Select >NEW on the menu bar. The same shortcut icons and their meaning are also visible on the NEW menu.''. | ||
| + | |||
| + | ===>New menu items=== | ||
| + | |||
| + | ''What do the shortcuts do ? '' | ||
| + | |||
| + | The shortcuts help you create new objects in STEM that, when assembled together allow a user to define and run a scenario or experiment. The list below shows a list of these objects in roughly the order you will want to learn to use them. In the list below the descriptions are also links to the right documentation page describing their use. | ||
| + | |||
| + | * [[Creating_a_STEM_Scenario|STEM Project]] This creates a STEM Project Folder. Your workspace can contain many folder as shown in the Project Explorer (see Figure 1). | ||
| + | * [[Creating a STEM Scenario|Scenario]] Create a Scenario. Scenarios are a collection of objects that taken together can actually run. You can have more than one scenario in a Project. | ||
| + | * [[Creating_a_STEM_Scenario#Create_a_Solver|Solver]] Create a Solver. All Scenarios need one to run. Solvers integrate your models over time. | ||
| + | * [[Creating_a_STEM_Scenario#Create_the_Geography_Model|Model]] Create a new Model. Models get added to scenarios. | ||
| + | * [[Creating_a_STEM_Scenario#Create_a_Sequencer|Sequencer]] Create a Sequencer. This defines time for your scenario (and is added to it). | ||
| + | * [[Creating_a_STEM_Scenario#Create_the_Population_Model|Population Model]] Create a Population Model. What's a disease without a population to infect? | ||
| + | * [[Initializing_a_Population|Population Initializer]] Create a Population Initializer to set the initial state of a population. | ||
| + | * [[Creating_a_STEM_Scenario#Create_the_Disease_Model|Disease Model]] Create a new Disease Model | ||
| + | * [[Initializing_Disease_Compartments|Infector/Inoculator]] Creates an infector/innoculator/or initializer for a disease model. | ||
| + | * [[STEM_Loggers|Logger]] Create a logger object. Lots of possible loggers can be added to your scenario including delimited files, video, etc. | ||
| + | * '''more advanced functions and features''' | ||
| + | ** [[Creating_a_new_Graph|Graph]] Create a custom graph. This might be a farm or a square lattice. | ||
| + | ** [[Running_an_Automated_Experiment|Automated Experiment]] An advanced tool to automatically optimize or fit parameters in a scenario. | ||
| + | ** [[Batch_Mode_(Running_Experiments)|Experiment]] Run Experiment (like a set of scenarios) in batch mode. | ||
| + | * [[Triggering interventions|Triggering Interventions]] | ||
| + | ** [[Triggering interventions|Modifier]] | ||
| + | ** [[Triggering interventions|Predicate]] | ||
| + | ** [[Triggering interventions|Trigger]] | ||
| + | |||
| + | |||
| + | ===>Tools menu items=== | ||
| + | |||
| + | Beginning with V2.0, STEM has an additional Menu Item called ''tools''. The first tool in stem can be used to update any older project (or all projects) in a users workspace so they run with all features in STEM V2.0 | ||
| + | |||
| + | <br> [[Image:ToolsMenu.png]] | ||
| + | |||
| + | ''Figure 3: The Tools Menu. Begining with STEM V2.0 users can access a set of tools. The first tool can be used to update projects created in STEM V1.x or earlier so they run will all features of STEM V2.0''. | ||
| + | |||
| + | == Perspectives == | ||
| + | |||
| + | STEM is an "Eclipse Rich Client" application. Like all Eclipse applications this means the UI has different 'Perspectives'. Figure 1 shows the STEM UI for four perspectives available. The perspectives in Figure 1 (they look like folder tabs). The are: | ||
| + | |||
| + | * Simulation | ||
| + | * Designer | ||
| + | * Analysis | ||
| + | * Automatic Experiment | ||
| + | |||
| + | Note that the ''Designer'' tab is selected and so the Designer Perspective is the one you see in Figure 1. | ||
| + | |||
| + | == Views == | ||
| + | |||
| + | Every Perspective is just a collection of different sub-windows called "views". The views shown in Figure 1 (the Designer Perspective) are: | ||
| + | |||
| + | * The Project Explorer (left hand side) | ||
| + | * The "Resource Set", a window that can be used to work with or change any object with drag and drop. | ||
| + | * A large number of other views as tabs in the bottom right. The "Properties" view is shown. | ||
| + | |||
| + | Users are free to add, remove, and rearrange views in any perspective to customize their UI. To find new Views, go to the menu bar and | ||
| + | select >Window>Show View | ||
| + | |||
| + | == Designer Perspective == | ||
== Run Time Perspective == | == Run Time Perspective == | ||
=== this page is under construction === | === this page is under construction === | ||
Latest revision as of 18:00, 26 September 2013
Contents
Menu Items
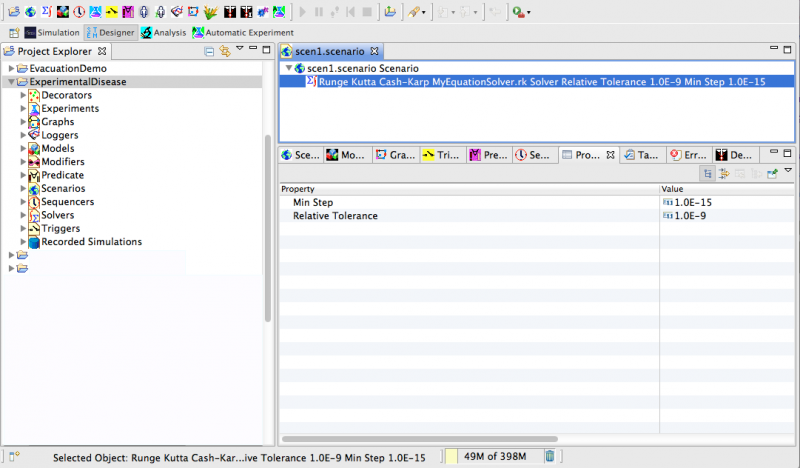
The appearance of the STEM user interface (UI) will be a little bit different depending on your operating system (e.g. Windows or Mac). When you first launch stem you will probably see a welcome screen. Closing that, you will see the STEM UI. Figure 1 shows the UI as it appears for STEM V2.0 running on mac. The first thing you will probably notice are a large number of colorful shortcut icons across the top near the menu bar.
Figure 1: The STEM UI. The UI appearance will differ slightly between operating systems (e.g. Windows or Mac).
Notice the many shortcut icons along the top near the menu bar..
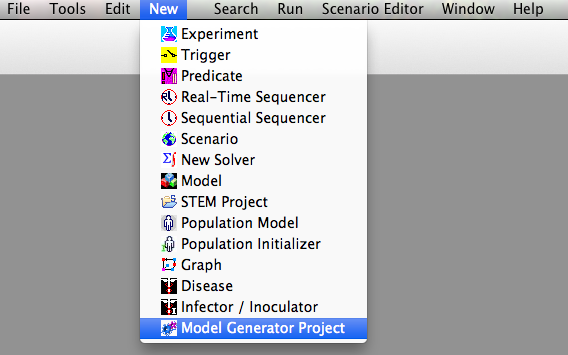
To understand what the shortcuts actually do, you can mouse over the icons, or simply go the menu bar and click >NEW you will get a drop-down list that shows all the available shortcut icons again along with a description.
Figure 2: Select >NEW on the menu bar. The same shortcut icons and their meaning are also visible on the NEW menu..
What do the shortcuts do ?
The shortcuts help you create new objects in STEM that, when assembled together allow a user to define and run a scenario or experiment. The list below shows a list of these objects in roughly the order you will want to learn to use them. In the list below the descriptions are also links to the right documentation page describing their use.
- STEM Project This creates a STEM Project Folder. Your workspace can contain many folder as shown in the Project Explorer (see Figure 1).
- Scenario Create a Scenario. Scenarios are a collection of objects that taken together can actually run. You can have more than one scenario in a Project.
- Solver Create a Solver. All Scenarios need one to run. Solvers integrate your models over time.
- Model Create a new Model. Models get added to scenarios.
- Sequencer Create a Sequencer. This defines time for your scenario (and is added to it).
- Population Model Create a Population Model. What's a disease without a population to infect?
- Population Initializer Create a Population Initializer to set the initial state of a population.
- Disease Model Create a new Disease Model
- Infector/Inoculator Creates an infector/innoculator/or initializer for a disease model.
- Logger Create a logger object. Lots of possible loggers can be added to your scenario including delimited files, video, etc.
- more advanced functions and features
- Graph Create a custom graph. This might be a farm or a square lattice.
- Automated Experiment An advanced tool to automatically optimize or fit parameters in a scenario.
- Experiment Run Experiment (like a set of scenarios) in batch mode.
- Triggering Interventions
Beginning with V2.0, STEM has an additional Menu Item called tools. The first tool in stem can be used to update any older project (or all projects) in a users workspace so they run with all features in STEM V2.0
Figure 3: The Tools Menu. Begining with STEM V2.0 users can access a set of tools. The first tool can be used to update projects created in STEM V1.x or earlier so they run will all features of STEM V2.0.
Perspectives
STEM is an "Eclipse Rich Client" application. Like all Eclipse applications this means the UI has different 'Perspectives'. Figure 1 shows the STEM UI for four perspectives available. The perspectives in Figure 1 (they look like folder tabs). The are:
- Simulation
- Designer
- Analysis
- Automatic Experiment
Note that the Designer tab is selected and so the Designer Perspective is the one you see in Figure 1.
Views
Every Perspective is just a collection of different sub-windows called "views". The views shown in Figure 1 (the Designer Perspective) are:
- The Project Explorer (left hand side)
- The "Resource Set", a window that can be used to work with or change any object with drag and drop.
- A large number of other views as tabs in the bottom right. The "Properties" view is shown.
Users are free to add, remove, and rearrange views in any perspective to customize their UI. To find new Views, go to the menu bar and select >Window>Show View


