Notice: this Wiki will be going read only early in 2024 and edits will no longer be possible. Please see: https://gitlab.eclipse.org/eclipsefdn/helpdesk/-/wikis/Wiki-shutdown-plan for the plan.
Difference between revisions of "STEM Overview of the STEM UI"
(→Menu Items) |
(→What do the shorcuts do ?) |
||
| Line 15: | Line 15: | ||
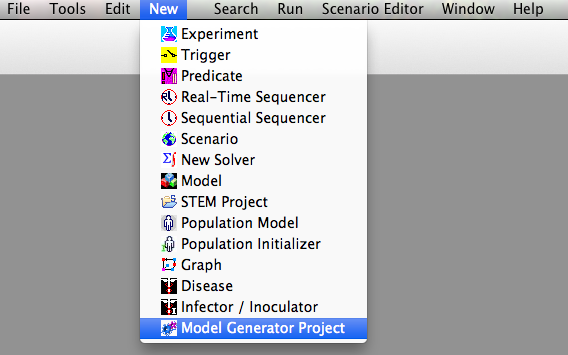
''Figure 2: Select >NEW on the menu bar. The same shortcut icons and their meaning are also visible on the NEW menu.''. | ''Figure 2: Select >NEW on the menu bar. The same shortcut icons and their meaning are also visible on the NEW menu.''. | ||
| − | ===What do the | + | ===What do the shortcuts do ? === |
| + | |||
| + | The shortcuts help you create new objects in STEM that, when assembled together allow a user to define and run a scenario or experiment. The list below shows a list of these objects in roughly the order you will want to learn to use them. In the list below the descriptions are also links to the right documentation page describing their use. | ||
| + | |||
| + | * STEM Project | ||
| + | * Scenario | ||
| + | * Solver | ||
| + | * Model | ||
| + | * Sequencer | ||
| + | * Population Model | ||
| + | * Population Initializer | ||
| + | * Disease Model | ||
| + | * Infector/Inoculator | ||
| + | * Logger | ||
| + | * Shortcutes to more advanced functions and features | ||
| + | ** Graph | ||
| + | ** Automated Experiment | ||
| + | ** Experiment | ||
| + | ** Trigger | ||
| + | ** Predicate | ||
| + | |||
| + | |||
<br> [[Image:ToolsMenu.png]] | <br> [[Image:ToolsMenu.png]] | ||
Revision as of 17:22, 26 September 2013
Contents
Menu Items
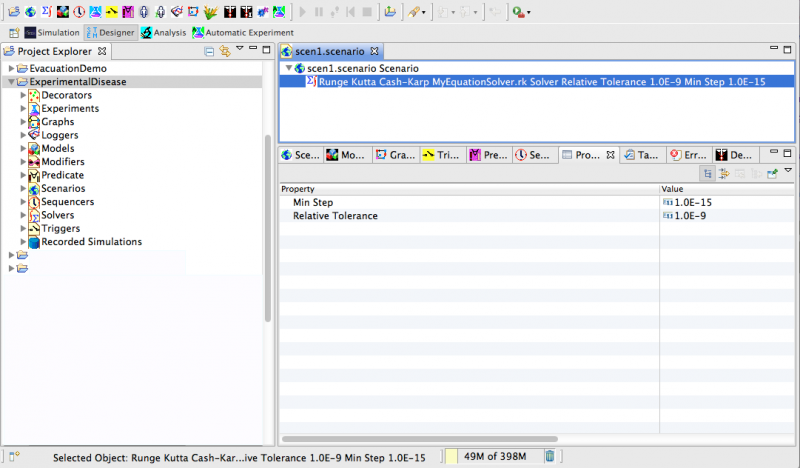
The appearance of the STEM user interface (UI) will be a little bit different depending on your operating system (e.g. Windows or Mac). When you first launch stem you will probably see a welcome screen. Closing that, you will see the STEM UI. Figure 1 shows the UI as it appears for STEM V2.0 running on mac. The first thing you will probably notice are a large number of colorful shortcut icons across the top near the menu bar.
Figure 1: The STEM UI. The UI appearance will differ slightly between operating systems (e.g. Windows or Mac).
Notice the many shortcut icons along the top near the menu bar..
To understand what the shortcuts actually do, you can mouse over the icons, or simply go the menu bar and click >NEW you will get a drop-down list that shows all the available shortcut icons again along with a description.
Figure 2: Select >NEW on the menu bar. The same shortcut icons and their meaning are also visible on the NEW menu..
What do the shortcuts do ?
The shortcuts help you create new objects in STEM that, when assembled together allow a user to define and run a scenario or experiment. The list below shows a list of these objects in roughly the order you will want to learn to use them. In the list below the descriptions are also links to the right documentation page describing their use.
- STEM Project
- Scenario
- Solver
- Model
- Sequencer
- Population Model
- Population Initializer
- Disease Model
- Infector/Inoculator
- Logger
- Shortcutes to more advanced functions and features
- Graph
- Automated Experiment
- Experiment
- Trigger
- Predicate
Figure 3: The Tools Menu. Begining with STEM V2.0 users can access a set of tools. The first tool can be used to update projects created in STEM V1.x or earlier so they run will all features of STEM V2.0.


