Notice: this Wiki will be going read only early in 2024 and edits will no longer be possible. Please see: https://gitlab.eclipse.org/eclipsefdn/helpdesk/-/wikis/Wiki-shutdown-plan for the plan.
Difference between revisions of "STEM Loggers"
(→Create a Logger) |
(→Create a Logger) |
||
| Line 18: | Line 18: | ||
#* CSV File Logger | #* CSV File Logger | ||
#* Map View Logger | #* Map View Logger | ||
| − | #* Several | + | #* Several projected map loggers, including: |
#** Equirectangular Map Logger | #** Equirectangular Map Logger | ||
#** Mercator Map Logger | #** Mercator Map Logger | ||
Revision as of 14:52, 20 January 2012
Contents
About STEM Loggers
<insert some boilerplate welcome text>
Simulation Logging in STEM
Create a Logger
Creating a STEM Logger is similar to creating STEM Models, Scenarios, Decorators, etc. A wizard is provided to guide you through the steps.
- Before you begin, launch STEM, switch to the Design perspective and make sure you have at least one STEM Project in the Project Explorer
- Launch the New Logger wizard by clicking the "Create a new logger" button
-
- This will load the New Logger wizard
-
- In the New Logger Wizard, select a Project from the dropdown menu and enter a Name
- Tip: The new logger's configuration will be stored in <PROJECT>/Loggers/<NAME>.logger.
- Select a Logger Type from the dropdown menu
- Options include:
- CSV File Logger
- Map View Logger
- Several projected map loggers, including:
- Equirectangular Map Logger
- Mercator Map Logger
- Orthographic Map Logger
- Azimuthal Equidistant Map Logger
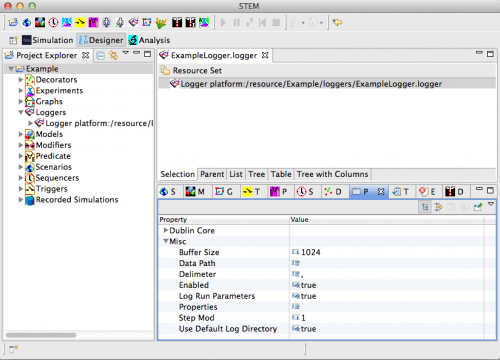
- Configure the logger by entering logger type-specific settings
- Note: See the section below for help configuring each logger type
- When you're finished, click Next or Finished if you do not need to change the logger Dublin Core metadata
- Your new Logger should automatically open in an Editor window
- In the Project Explorer, The Logger should also be listed under the Project's Loggers
-
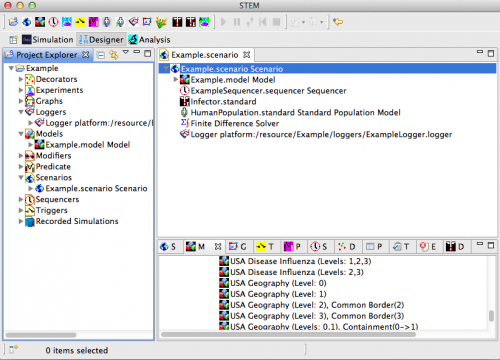
Add the Logger to a Scenario
Once the Logger is created, you're ready to move on and add it to a Scenario.
- In STEM, Create a new Scenario or Open an existing Scenario
- Navigate to the Logger you wish to add by expanding its parent Project and then Loggers sub-tree in the Project Explorer
- Select the Logger you wish to add and drag it to the Scenario in the Scenario Editor
- Tip: Scenarios can have multiple loggers. Repeat this step for each Logger you want to add to the Scenario
-
- When finished editing, save the Scenario
Simulation Logging
The STEM Logger Manager will automatically attach loggers to a Simulation from a Scenario containing one or more Loggers. By default, Loggers are enabled automatically when a simulation starts (this is configurable in your Logger's properties).
To disable or enable a logger once a simulation start, follow these steps
- Open the Active Loggers view
- Open the Window menu then click Other
- In the Show View dialog, select Active Loggers and click OK
- In the Active Loggers view, expand the running simulation
- Right click on the Logger you wish to control
- If the Logger is enabled, select Disable Logger to disable
- If the Logger is disabled, select Enable Logger to enable
Adding a Logger to a Scenario
Active Loggers View
Logger Configurations
Delimited File / CSV Logger
Projected Image Logger
Map Writer Logger
Creating Your Own Logger
Temp Images


