Notice: this Wiki will be going read only early in 2024 and edits will no longer be possible. Please see: https://gitlab.eclipse.org/eclipsefdn/helpdesk/-/wikis/Wiki-shutdown-plan for the plan.
Difference between revisions of "STEM Eclipse Setup"
(→Advanced Topics) |
(→Prerequisites) |
||
| Line 21: | Line 21: | ||
#* '' '''Note:''' Mac OS X users can use the version included with the operating system '' | #* '' '''Note:''' Mac OS X users can use the version included with the operating system '' | ||
#* '' '''Note:''' The GNU for Java (GCJ) compiler and libraries are not supported. If you're running on Linux, we strongly recommend you use an Oracle or IBM JRE.'' | #* '' '''Note:''' The GNU for Java (GCJ) compiler and libraries are not supported. If you're running on Linux, we strongly recommend you use an Oracle or IBM JRE.'' | ||
| − | # [http://download.eclipse.org/eclipse/downloads/drops/R-3. | + | # [http://download.eclipse.org/eclipse/downloads/drops/R-3.8.1-201209141540/ Eclipse Classic SDK 3.8.1 (Juno)] |
#* '' '''Note:''' If you're using a 64-bit JVM, be sure to download the 64-bit version of Eclipse '' | #* '' '''Note:''' If you're using a 64-bit JVM, be sure to download the 64-bit version of Eclipse '' | ||
Revision as of 12:46, 21 March 2013
Contents
Welcome
This is a tutorial on how to get the STEM source code downloaded, compiled, and running in your Eclipse Development Environment. This tutorial is mainly for committers and advanced users that want to work with the STEM source directly.
Getting Started
STEM is a Java application built on top of the Eclipse Rich Client Platform (RCP). To build and run STEM, a developer must install a supported Java Development Kit (JDK) and the Eclipse SDK. While it may be possible to compile STEM in another IDE, we strongly recommend you use the Eclipse SDK.
Prerequisites
To download and compile the STEM source, developers should first install the following components:
- A workstation running an Eclipse-supported operating system:
- Windows (XP, Vista, 7)
- Linux (GTK)
- Mac OS X (10.5 or later)
- A supported Java Standard Edition (J2SE) 6.0 JDK from either Oracle or IBM (32-bit or 64-bit)
- Note: Mac OS X users can use the version included with the operating system
- Note: The GNU for Java (GCJ) compiler and libraries are not supported. If you're running on Linux, we strongly recommend you use an Oracle or IBM JRE.
- Eclipse Classic SDK 3.8.1 (Juno)
- Note: If you're using a 64-bit JVM, be sure to download the 64-bit version of Eclipse
Creating a STEM Development Environment
The process for building STEM consists of several steps. The steps should be followed in this order:
Set up your Eclipse SDK
Before you attempt to checkout and compile the STEM source code, some additional features must be installed into your Eclipse SDK.
Install the Eclipse Modeling Framework (EMF)
Much of STEM is built using modeled code generated by the Eclipse Modeling Framework. To extend these models, or editing existing models, EMF must be installed into your environment.
- Launch your Eclipse SDK
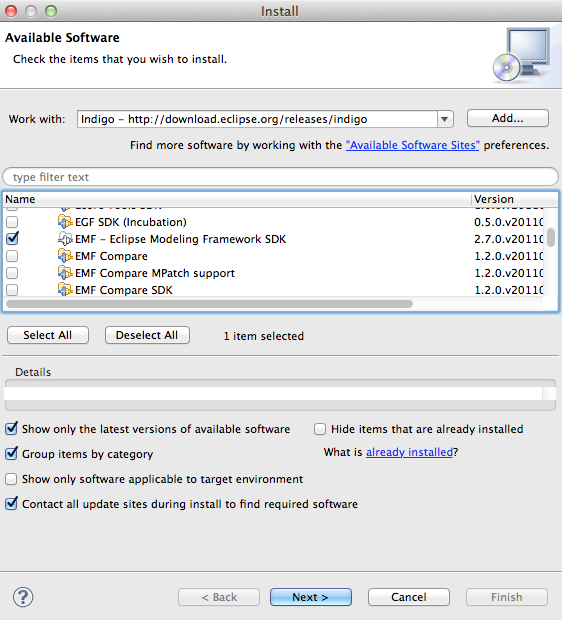
- Open the Eclipse Software Installer by opening the Help menu and choosing Install New Software
- When the Install dialog opens, select the Indigo repository from the drop-down menu. Wait while the list of additional features loads.
- Scroll down and expand the Modeling category by clicking the arrow next to it
- Select the check mark next to EMF - Eclipse Modeling Framework SDK . Click Next
- Verify that EMF is in the list of features to install. Click Next
- Read the license agreement and, if you accept, choose I accept the terms of the license agreement . Click Finish
- Wait while EMF installs into your Eclipse SDK
- This step may take up to 10 minutes to complete
- When the installer finishes, it'll prompt you to restart. Click Restart Now
Install a SVN Team Provider
The STEM source code is currently housed in a Subversion (SVN) repository hosted by the Eclipse Foundation. Eclipse does not include a built-in SVN client with their SDK distribution, so you will need to install one into your Eclipse environment. Optionally, you can check out the code using a command-line client and import the projects into Eclipse. These steps are not included in this tutorial.
Most people use one of two SVN client plug-ins for Eclipse:
You only need to install one or the other. Either will work for the rest of this guide.
Checkout and Build the STEM Source Code
Once your Eclipse environment is set up, you're ready to checkout the STEM source code. The STEM Project provides an Eclipse Team Project Set (PSF) that'll help you quickly get the STEM Source code checked out.
Checkout the STEM Source Code from a Project Set File
- Launch your Eclipse SDK
- When prompted to Select a workspace, choose a new path that does not contain an existing workspace. This creates a new workspace.
- Important Note: Eclipse and STEM work best when the workspace path contains no whitespace characters (spaces, tabs, etc). Example: C:\workspace\
- Open the File menu and choose Import
- When the Import dialog opens, expand the Team category by clicking the arrow next to it
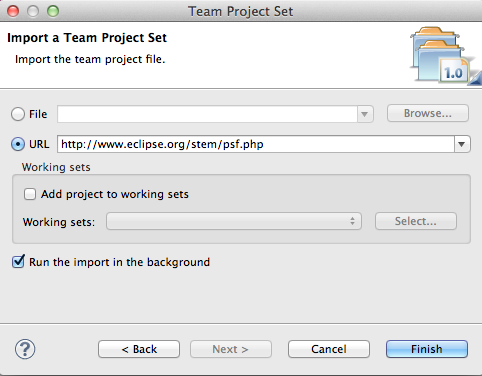
- Choose Team Project Set and click Next
- On the Import a Team Project Set page, choose URL and enter the URL for the correct Project Set file
- For new users (non-committers): http://www.eclipse.org/stem/psf.php
- For Eclipse committers (SSH): http://www.eclipse.org/stem/psf.php?r=ssh
- For Eclipse committers (HTTPS): http://www.eclipse.org/stem/psf.php?r=https
- Click Finish
- Wait while Eclipse checks out and imports the STEM source code into your environment
- Depending on your connection speed, this step may take over an hour to complete. Have some coffee and come back.
Apply the Target Platform
Once the checkout completes, there will likely be hundreds (or thousands) of build errors. STEM uses what's called an Eclipse Target Platform to manage the rest of the dependencies that must be installed to completely build and run STEM. The following steps will help you in applying the target platform.
- Important Note About Target Platforms: The target platform represents which version of the Eclipse Platform to compile and run STEM in. You should be using the same version of the Eclipse SDK or newer to apply a given platform. For example, if you want to use the Eclipse Platform 3.8 Target Platform, you should be using the Eclipse SDK 3.8 or newer.
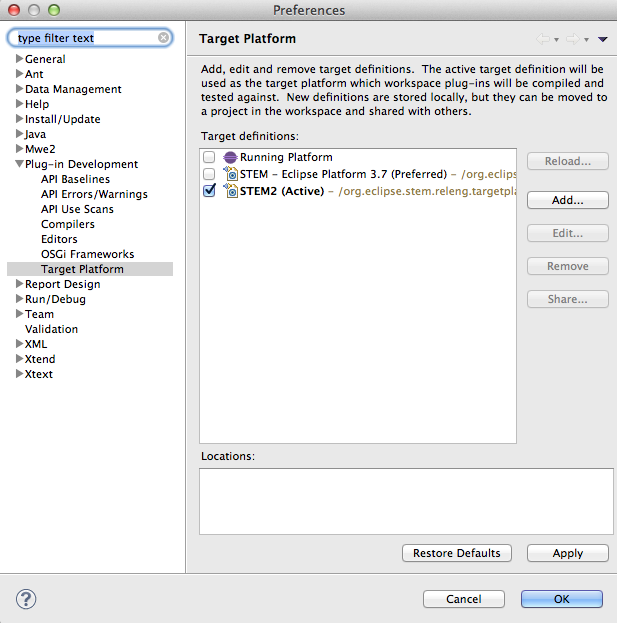
- In the Eclipse SDK, open the Preferences dialog. Select the Window menu and choose Preferences
- On Mac OS X, it's under the Eclipse menu
- In the Preferences dialog, expand the Plug-in Development category
- Select the Target Platform option under Plug-in Development category
- Select the STEM - Eclipse Platform 3.7 Target Platform by clicking checkbox
- Wait while Eclipse loads the Target Platform.
- Depending on your connection speed, this step may take up to 30 minutes to complete.
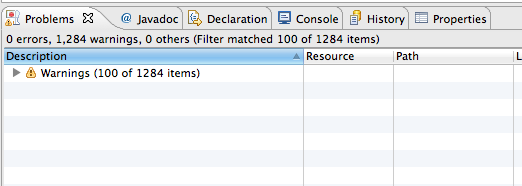
- Make sure STEM is built completely. Under the Problems tab, there should be no Errors (Warnings are OK)
- If you are still seeing errors, try cleaning the workspace
- Select the Project menu and choose Clean...
- In the Clean dialog, choose Clean All Projects
- Click OK
- Wait for Eclipse to clean and re-build STEM
Build the STEM Denominator Data
Once STEM is built, it's time to build the STEM data sets. This process transforms the data from a raw, human-readable format to STEM modeled data files that are readable by scenarios, models, decorators, etc.
- In the Eclipse SDK, in the Package Explorer , scrolls down to the org.eclipse.stem.internal.data project
- Expand the org.eclipse.stem.internal.data project by clicking the arrow next to it
- RIGHT click on the update.xml file
- In the context menu, highlight Run As and click on Ant Build
- Wait while the data builder runs.
- This will take up to 10 minutes
- When the builder finishes, the console should say BUILD SUCCESSFUL
Launch STEM
Once the STEM source is compiled and data sets built, it's time to launch the STEM application.
- In the Eclipse SDK, in the Package Explorer , scroll down to the org.eclipse.stem.ui project
- Expand the org.eclipse.stem.ui project by clicking the arrow next to it
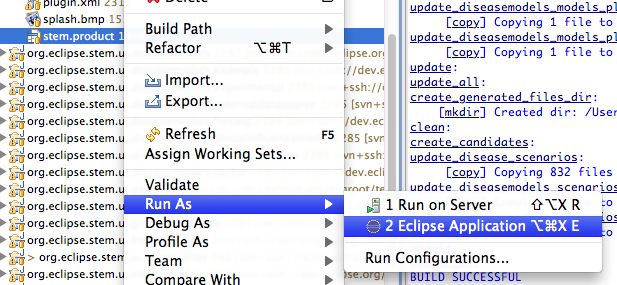
- RIGHT click on the stem.product file
- In the context menu, highlight Run As and click on Eclipse Application
- The STEM Application will now load
Advanced Topics
The following are advanced topics that existing developers may be interested in. If you're new to STEM development, you can skip this section.
Getting the Earth Science Data
The STEM project contains several gigabytes of "earth science" data derived from NASA and NOAA satellite imagery. These data include global elevations, air temperatures, rainfall, vegetation coverage, etc. By default, this data is not included when you checkout STEM. These steps will help you checkout and build the earth science data for use in your STEM development environment.
WARNING The STEM Earth Science Data is several gigabytes in size. The checkout may take several hours to finish and will use a lot of disk space
- Complete all the steps above and make sure STEM is built in your Eclipse SDK and can be launched
- In your Eclipse SDK, go to the File menu and select Import
- In the Import wizard, expand Team , select Team Project Set , and click Next
- On the Import a Team Project Set page, choose URL and enter the URL for the correct Project Set
- For new users (non-committers): http://www.eclipse.org/stem/psf.php?ws=STEM-Data-EarthScience
- For Eclipse committers: http://www.eclipse.org/stem/psf.php?ws=STEM-Data-EarthScience&r=ssh
- Click Finish
- Wait while Eclipse checks out the Earth Science Data
- This check out may take several hours.
- In the Eclipse SDK, in Package Explorer , scrolls down to the org.eclipse.stem.internal.data.geography.earthscience project
- Expand the org.eclipse.stem.internal.data.geography.earthscience project
- RIGHT click on the update.xml file
- Highlight Run As then click Ant build
- Wait while Eclipse builds the Earth Science data sets
- This step may take up to 30 minutes


