Notice: this Wiki will be going read only early in 2024 and edits will no longer be possible. Please see: https://gitlab.eclipse.org/eclipsefdn/helpdesk/-/wikis/Wiki-shutdown-plan for the plan.
Difference between revisions of "SMILA/Documentation/HowTo/Howto set up dev environment"
m (→Checkout sources from Eclipse svn) |
m (→Requirements) |
||
| Line 2: | Line 2: | ||
=== Setup an Eclipse instance/installation for SMILA === | === Setup an Eclipse instance/installation for SMILA === | ||
| − | ==== | + | ==== Set-up for SMILA developers ==== |
| − | :* | + | ===== Installed Eclipse and delta-pack ===== |
| + | If you still have not installed an eclipse and/or a delta-pack, you may download it from: | ||
| + | ::* '''Eclipse download location:''' <pre>http://www.eclipse.org/downloads/</pre> | ||
| + | ::* '''Delta-pack download location:'''<pre>http://download.eclipse.org/eclipse/downloads/</pre> | ||
| − | + | ===== Checkout SMILA sources from Eclipse svn ===== | |
| − | + | You may check out our sources from: | |
| + | <pre>http://dev.eclipse.org/svnroot/rt/org.eclipse.smila/</pre> | ||
| + | |||
| + | |||
| + | ===== Import sources into Eclipse ===== | ||
| + | If you don´t check out our sources into Eclipse, you have to import the sources into Eclipse see below: | ||
| + | |||
| + | Click File --> Import --> General --> Existing Projects into Workspace --> Next --> Select root folder of local trunk --> Finish | ||
| + | |||
| + | |||
| + | ===== Define target platform ===== | ||
| + | The goal of the following set up is to use Eclipse installation as target platform with adding the plug-ins from SMILA.extensions folder. | ||
| + | ::* Click Window --> Preferences --> Plug-in Development --> Target Platform | ||
| + | |||
| + | |||
| + | |||
| + | ::* Click Add... --> Select File System --> Click Next --> Click Add --> Select SMILA.extension folder under local trunk | ||
| + | |||
| + | |||
| + | ==== Set-up for SMILA integrators ==== | ||
| + | |||
| + | ===== Installed Eclipse and delta-pack ===== | ||
| + | If you still have not installed an eclipse and/or a delta-pack, you may download it from: | ||
| + | ::* '''Eclipse download location:''' <pre>http://www.eclipse.org/downloads/</pre> | ||
| + | ::* '''Delta-pack download location:'''<pre>http://download.eclipse.org/eclipse/downloads/</pre> | ||
| + | |||
| + | |||
| + | ===== Define target platform ===== | ||
| + | Start Ecliplse and set up a new workspace. After that you have to define a new target platform see below: | ||
| + | |||
| + | :* Download SMILA from http://www.eclipse.org/smila/downloads.php | ||
| + | :* Unzip SMILA-incubation-***.zip into a directory (e.g. E:\SMILA). | ||
| + | :* Download SMILA-test-plugins.zip from http://demo1.brox.de/pipelets/SMILA-test-plugins.zip | ||
| + | :* Unzip SMILA-test-plugins.zip into the plugins folder of your SMILA installation (e.g. E:\SMILA\plugins). | ||
| + | :* Click Window --> Preferences --> Plug-in Development --> Target Platform --> Click Browse --> Select SMILA installation folder (e.g E:\SMILA). --> Apply --> OK | ||
==== Installation and configuration of Eclipse (3.4) ==== | ==== Installation and configuration of Eclipse (3.4) ==== | ||
Revision as of 12:23, 1 April 2009
Contents
Setup an Eclipse instance/installation for SMILA
Set-up for SMILA developers
Installed Eclipse and delta-pack
If you still have not installed an eclipse and/or a delta-pack, you may download it from:
- Eclipse download location:
http://www.eclipse.org/downloads/
- Delta-pack download location:
http://download.eclipse.org/eclipse/downloads/
- Eclipse download location:
Checkout SMILA sources from Eclipse svn
You may check out our sources from:
http://dev.eclipse.org/svnroot/rt/org.eclipse.smila/
Import sources into Eclipse
If you don´t check out our sources into Eclipse, you have to import the sources into Eclipse see below:
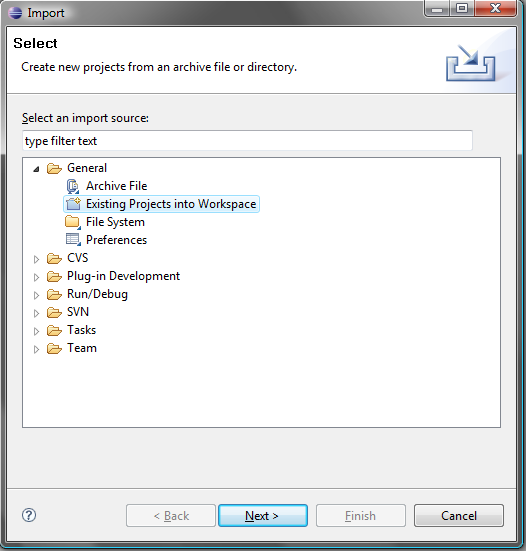
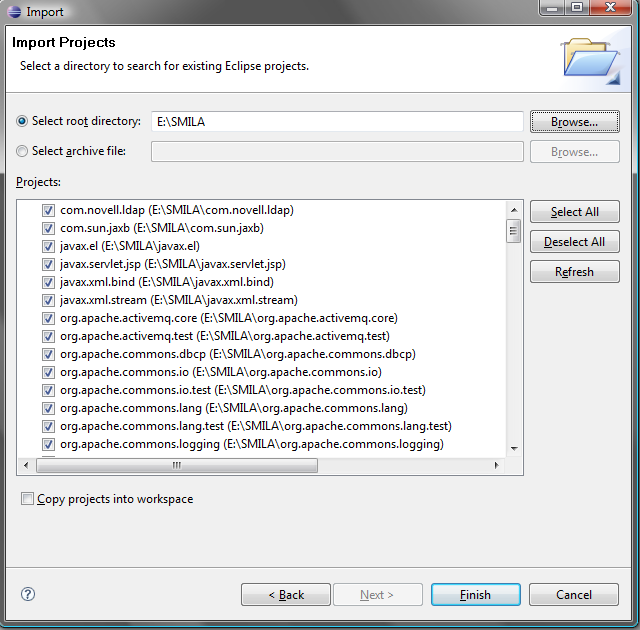
Click File --> Import --> General --> Existing Projects into Workspace --> Next --> Select root folder of local trunk --> Finish
Define target platform
The goal of the following set up is to use Eclipse installation as target platform with adding the plug-ins from SMILA.extensions folder.
- Click Window --> Preferences --> Plug-in Development --> Target Platform
- Click Add... --> Select File System --> Click Next --> Click Add --> Select SMILA.extension folder under local trunk
Set-up for SMILA integrators
Installed Eclipse and delta-pack
If you still have not installed an eclipse and/or a delta-pack, you may download it from:
- Eclipse download location:
http://www.eclipse.org/downloads/
- Delta-pack download location:
http://download.eclipse.org/eclipse/downloads/
- Eclipse download location:
Define target platform
Start Ecliplse and set up a new workspace. After that you have to define a new target platform see below:
- Download SMILA from http://www.eclipse.org/smila/downloads.php
- Unzip SMILA-incubation-***.zip into a directory (e.g. E:\SMILA).
- Download SMILA-test-plugins.zip from http://demo1.brox.de/pipelets/SMILA-test-plugins.zip
- Unzip SMILA-test-plugins.zip into the plugins folder of your SMILA installation (e.g. E:\SMILA\plugins).
- Click Window --> Preferences --> Plug-in Development --> Target Platform --> Click Browse --> Select SMILA installation folder (e.g E:\SMILA). --> Apply --> OK
Installation and configuration of Eclipse (3.4)
After getting SMILA relevant files you have to install and configure Eclipse.
- Download an eclipse SDK, starting with at least eclipse-SDK-3.4.1-win32.zip.
- Download eclipse-3.4.1-delta-pack.zip.
- Unzip the archive and copy org.eclipse.equinox.executable_<version> from features into your features folder under your eclipse installation.
- Copy all necessary plug-ins (containing linux.x86 or win32.x86) from plugins into your plugins folder under your eclipse installation.
- Start that Eclipse and set up a custom target platform:
- Unzip SMILA-xxx-.zips:
- Unzip SMILA-incubation-win32.win32.x86.zip into a directory (e.g. E:\ SMILA-incubation-win32.win32.x86). You may download it from SMILA-incubation-win32.win32.x86.zip
- Unzip Smila-test-and-sample.zip into a directory (e.g. E:\Smila-test-and-sample). You may download it from SMILA-test-and-sample.zip
- Copy test specific plug-ins to Smila target platform:
- Copy org.junit_3.8.2xxx from the “plugins” folder of your eclipse installation or copy org.junit_3.8.2.v200706111738 from Smila-test-and-sample folder to your Smila installation (e.g. E:\ SMILA-incubation-win32.win32.x86/plugins).
- Copy org.eclipse.smila.test_0.5.0.jar from Smila-test-and-sample folder to your Smila installation (e.g. E:\ SMILA-incubation-win32.win32.x86/plugins).
- Start eclipse and set the target platform location to this folder (e.g. E:\SMILA-incubation-win32.win32.x86).
- Click Window --> Preferences --> Plug-in Development --> Target Platform
Import SMILA sources into your Eclipse workspace
- Start Eclipse and import SMILA sources:
- Click File --> Import
- Expand General and choose Existing Projects into Workspace
-
- Click Next, set the root directory (e.g. e:/Smila), select all and then click Finish
-
-
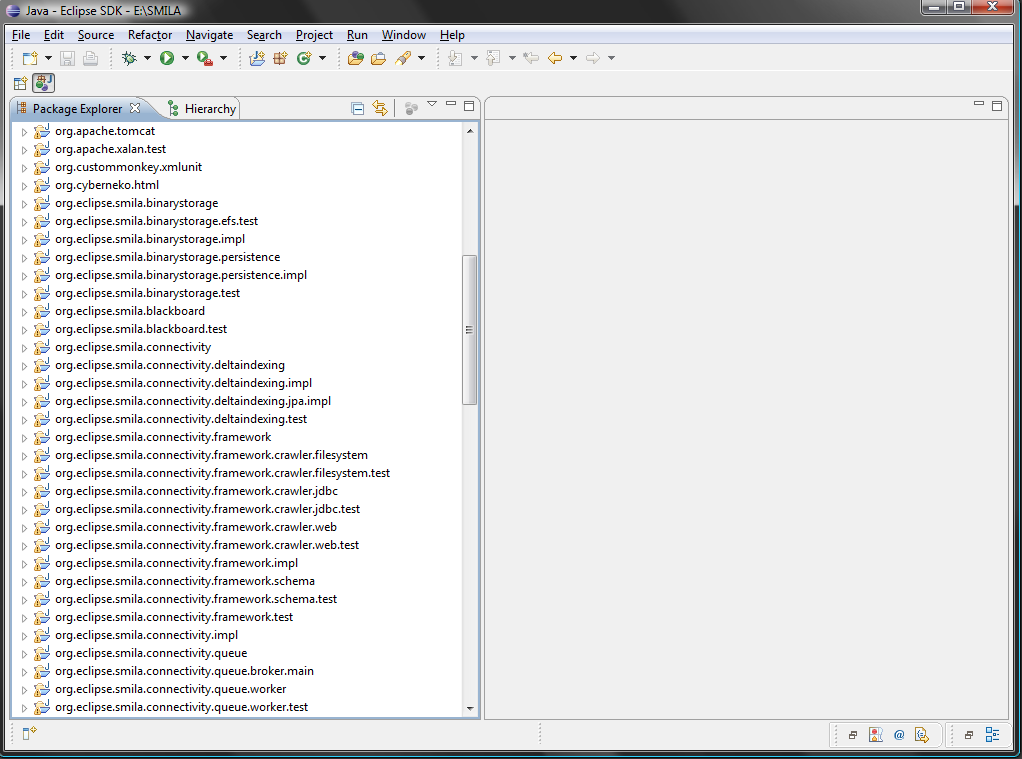
- After you followed the steps above, you should have the following structure in your Package Explorer
-
Launch SMILA in Eclipse
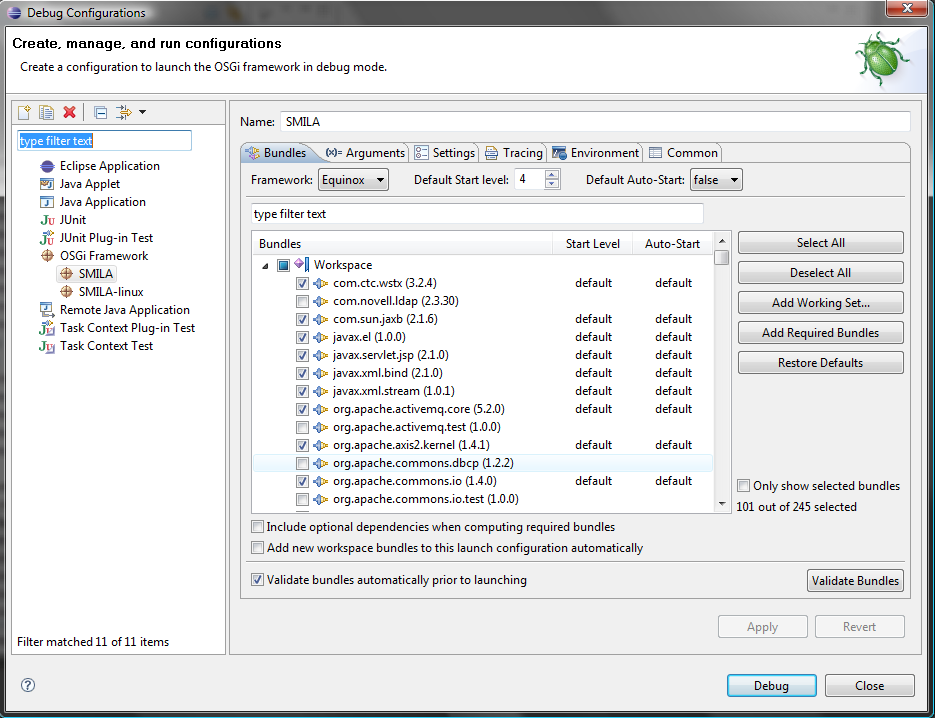
There is a folder SMILA.launch located in our trunk. This folder contains two launch configuration files for Eclipse. With these two files (one for windows (SMILA) and one for linux(SMILA-linux)) you have the possibility to start SMILA in Eclipse. Follow the steps below:
- Click Debug --> Debug Configurations and expand OSGI Framework
- Select launch file for your environment and press Debug
-
- If everything is started correctly, you will get an output in the Eclipse Console like below:
-


