Notice: this Wiki will be going read only early in 2024 and edits will no longer be possible. Please see: https://gitlab.eclipse.org/eclipsefdn/helpdesk/-/wikis/Wiki-shutdown-plan for the plan.
SCA/SCA Component/SCA First Steps With Composite Designer
The objective of this tutorial is to show how to develop a simple SCA application using the STP/SCA Composite Designer.
You can download a pdf version of this tutorial: "First Steps with the SCA Composite Designer".
The tutorial illustrates how to:
- Install the STP/SCA plugins and Apache Tuscany
- Define an SCA assembly with the SCA Composite Designer
- Refine properties in an SCA assembly
- Define an SCA assembly with different implementation technologies
- Define an RMI binding
- Run and test SCA assemblies with Tuscany
Contents
- 1 Prerequisites
- 2 The SCA Restaurant Application
- 3 First SCA Application
- 4 Change Implementation and bindings
Prerequisites
In order to be able to test the sample SCA application, you need to :
- install Apache Tuscany on your machine,
- set up Eclipse for Tuscany.
Install Tuscany
First you need to install Apache Tuscany on your machine, as follows:
- Go to the following URL: http://incubator.apache.org/tuscany/sca-java-releases.html
- Create a folder named Tuscany on your hard drive.
- Download the archive for the latest binary distribution.
- Extract the archive to the Tuscany folder.

You should see the following folder structure.

Set up Eclipse for Tuscany
Now you need to create a User Library in Eclipse to contain the Tuscany runtime JARs and dependant JARs:
- From the menu bar select Window > Preference.
- In the Preferences dialog, select Java > Build Path > User Libraries.
- Click the New button to create a new user library.
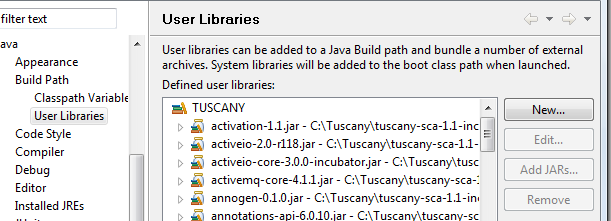
- Enter TUSCANY as the name of the user library
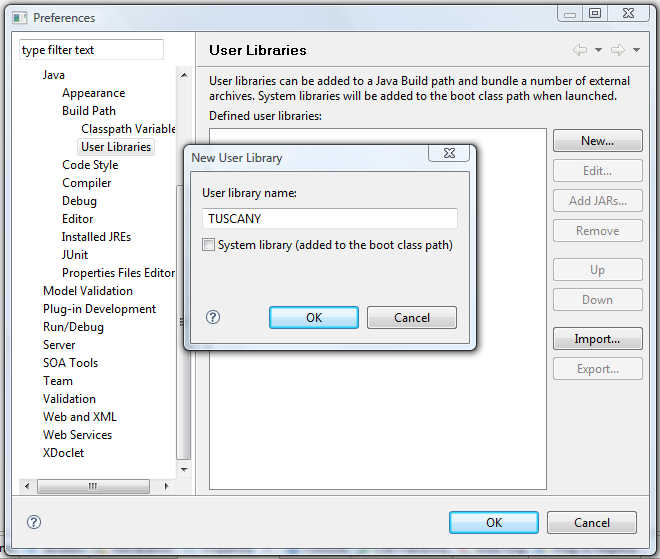
- Click the Add JARs button. Add all the JARs from the Tuscany folder that you installed earlier.


Then you have to add this library to your project build path.
The SCA Restaurant Application
The following figure shows the SCA assembly of the application that you will create.

This composite, named restaurant, is a composition of five components:
- RestaurantServiceComponent
- Allows you to see the Menus proposed by the restaurant.
- It allows also to compute the bill for a particular menu.
- MenuServiceComponent
- Provides different menus. A Menu is defined by a description and the price without taxes.
- BillServiceComponent
- Computes the price of a menu with the different taxes.
- VATServiceComponent
- Computes the VAT (Value Added Tax).
- TipServiceComponent
- Computes the tip.
First SCA Application
Create a new Java Project
First, create a Java Project to hold the Restaurant application:
- Select File > New > Java Project.
- Set "Restaurant" as the Project name. For Project layout, select Create separate folders for sources and class files. Click on the Next button.
- Click on the Finish button.
Create a new SCA Composite diagram
To create an SCA diagram:
- Right-click the project and select New > Other....
- In the New wizard, select SCA Composite Diagram in the SCA Tools folder (Other folder if there is no SOA Tools folder) and click Next.
- Choose a folder and type a unique name for the diagram in the File name field and click Finish.
The new created file is automatically open with the SCA Composite Designer. To open the Properties view, do a right click on the diagram and the select Show Properties View.

In accordance with the SCA specifications, the composite and the composite file have the same name. The name of the composite is automatically set
Now, you should see the following project structure:

Create a Restaurant Composite
Components
Add a first component named RestaurantServiceComponent. You can do it with the Component creation tool which is in the palette or using the contextual menu.

|
Then, add MenuServiceComponent, BillServiceComponent, VatServiceComponent, and TipServiceComponent.
Services
Next, add the following services:
- a service named RestaurantService on the RestaurantServiceComponent,
- a service named MenuService on the MenuServiceComponent,
- a service named BillService on the BillServiceComponent,
- a service named VatService on the VatServiceComponent,
- a service named TipService on the TipServiceComponent.
References
In the next step, add the following references:
- a reference named menuReference on the RestaurantServiceComponent,
- a reference named billReference on the RestaurantServiceComponent,
- a reference named vatReference on the BillServiceComponent,
- a reference named tipReference on the BillServiceComponent.
Wires
Now you can wire the services and references. From the palette, you can use :
- the Wire creation tool: a Wire element is added,
- the Wire target: target attribut of the Reference element is used.
Promotion
The next step is to promote the restaurant service. Two ways are possible to promote a service (or a reference). You can:
- create a new Service on the composite and then use the Promote creation tool from the palette to add a promotion link between the composite service and the promoted component service, or
- right-click a component service, and select Promote menu item.
Targeted result

Save your diagram. The Restaurant.composite_diagram contains the graphical part of your SCA assembly and the Restaurant.composite file contains the XML code that describes your SCA assembly.
You can open the Restaurant.composite file with the SCA Composite Model Editor. Right-click the Restaurant.composite file, select Open with > SCA Composite Model Editor. A multi page editor is opened. It offers a tree view and the source code of your SCA assembly. You can modify your SCA assembly with these two editors. They are synchronized with the SCA Composite Designer.


Define interfaces and implementations
First, in the src directory of the Restaurent project create a new package named restaurant with two sub-packages named api and lib.

Interfaces
Define the interfaces of the services (restaurant.api package):
- Restaurant Service
package restaurant.api;

public interface RestaurantService {
  Menu[] getMenus();
  double getBill(Menu menu);
}
- Menu Service
package restaurant.api;

public interface MenuService {
  Menu[] getMenu();
  double getPrice(Menu menu);
}
- Bill Service
package restaurant.api;

public interface BillService {
  double getBill(double menuPrice);
}
- Vat Service
package restaurant.api;

public interface VatService {
  double getPriceWithVat(double price);
}
- Tip Service
package restaurant.api;

public interface TipService {
  double getPriceWithTip(double price);
}
Define also the interface of the Menu (Data Transfert Object):
package restaurant.api;

import java.io.Serializable;

public interface Menu extends Serializable {
  String printMenu();
}
Implementations
Next, define the implementations (restaurant.lib package).
- Restaurant Service
package restaurant.lib;

import org.osoa.sca.annotations.Reference;
import org.osoa.sca.annotations.Service;

import restaurant.api.BillService;
import restaurant.api.Menu;
import restaurant.api.MenuService;
import restaurant.api.RestaurantService;

@Service(RestaurantService.class)
public class RestaurantServiceImpl implements RestaurantService {

  private MenuService menuService;
  private BillService billService;

  @Reference
  public void setMenuService(MenuService menuService) {
    this.menuService = menuService;
  }

  @Reference
  public void setBillService(BillService billService) {
    this.billService = billService;
  }

  public double getBill(Menu menu) {
    double menuPrice = this.menuService.getPrice(menu);
    return this.billService.getBill(menuPrice);
  }

  public Menu[] getMenus() {
    return this.menuService.getMenu();
  }
}
- Menu Service
package restaurant.lib;

import org.osoa.sca.annotations.Init;
import org.osoa.sca.annotations.Service;

import restaurant.api.Menu;
import restaurant.api.MenuService;

@Service(MenuService.class)
public class MenuServiceImpl implements MenuService {

  private Menu[] menus;
  private double[] prices;

  @Init
  public void init() {
    this.menus = new Menu[] {
            new MenuImpl(0, "Grilled hamburger with French fries" ),
            new MenuImpl(1, "Roasted chicken with vegetables"),
            new MenuImpl(2, "Duck breast in an orange sauce"),
            new MenuImpl(3, "Duck foie gras & mango chutney") };
    this.prices = new double[] { 10, 15, 35, 50 };
  }

  public Menu[] getMenu() {
    return this.menus;
  }

  public double getPrice(Menu menu) {
    return this.prices[((MenuImpl) menu).getId()];
  }
}
- Bill service
package restaurant.lib;

import org.osoa.sca.annotations.Reference;
import org.osoa.sca.annotations.Service;

import restaurant.api.BillService;
import restaurant.api.TipService;
import restaurant.api.VatService;

@Service(BillService.class)
public class BillServiceImpl implements BillService {

  private VatService vatService;
  private TipService tipService;

  @Reference
  public void setVatService(VatService vatService) {
    this.vatService = vatService;
  }

  @Reference
  public void setTipService(TipService tipService) {
    this.tipService = tipService;
  }

  public double getBill(double menuPrice) {
    double pricewithTaxRate =
                   this.vatService.getPriceWithVat(menuPrice);
    double priceWithTipRate =
                   this.tipService.getPriceWithTip(pricewithTaxRate);
    return priceWithTipRate;
  }
}
- Vat Service
package restaurant.lib;

import org.osoa.sca.annotations.Service;

import restaurant.api.VatService;

@Service(VatService.class)
public class VatServiceImpl implements VatService {

  public double vatRate;

  public VatServiceImpl(){
    this.vatRate=19.6;
  }

  public double getPriceWithVat(double price) {
    return price * this.vatRate/100 + price;
  }
}
- Tip service
package restaurant.lib;

import org.osoa.sca.annotations.Property;
import org.osoa.sca.annotations.Service;

import restaurant.api.TipService;

@Service(TipService.class)
public class TipServiceImpl implements TipService {

  @Property
  public double tipRate;

  public TipServiceImpl(){
    this.tipRate=10;
  }

  public double getPriceWithTip(double price) {
    return price * this.tipRate/100 + price;
  }
}
- Menu
package restaurant.lib;

import restaurant.api.Menu;

public class MenuImpl implements Menu {

  private int id;
  private String details;

  MenuImpl(int idC, String detailsC) {
    this.id = idC;
    this.details = detailsC;
  }

  public String printMenu() {
    return this.details;
  }

  public int getId() {
    return this.id;
  }
}
Now, you can fill you SCA assembly file with the interfaces and implementations that you defined. Open the Restaurant.composite_diagram with the SCA Composite Designer.
You have two ways to fill your SCA assembly file:
- Drag and drop the Java interface files on the services of your diagram and the Java implementation files on the components. The name of these elements are automatically set.

- Use the JavaInterface and the JavaImplementation creation tools from the palette or the contextual menu. For each created element, you must set (in the Properties view):
- the Interface attribute for a Java interface, and
- the Class attribute for a Java implementation.

Now, your SCA assembly diagram looks like:

and, your SCA assembly file looks like:

Right-clik your diagram (on the Canvas part = white part of your diagram), the contextual menu allows:
to validate your diagram, and
to hide/show implementation, interface and binding icons.

You have finished developping your first SCA application with the SCA Composite Designer. It is time to test.
Test the Restaurant
Create a new Package, named test, in the src folder of your porject. Create a new Java class named Client:
package test;

import org.apache.tuscany.sca.host.embedded.SCADomain;

import restaurant.api.Menu;
import restaurant.api.RestaurantService;

public class Client {

  public static void main(String[] args) throws Exception {
    SCADomain scaDomain = SCADomain.newInstance("Restaurant.composite");
    RestaurantService restaurantService = scaDomain.getService(
    RestaurantService.class, "RestaurantServiceComponent");
    Menu[] menus = restaurantService.getMenus();
    System.out.println("--- Menu ---");
    for (Menu m : menus) {
      System.out.println("- " + m.printMenu());
    }
    System.out.println();
    Menu menu = menus[3];
    System.out.println("My choice: " + menu.printMenu());
    System.out.println();
    double price = restaurantService.getBill(menu);
    System.out.println("Price (" + menu.printMenu() + "): " + price);
    scaDomain.close();
  }
}
Lauch the client:
- Do a right-click on the Client class.
- Select Run as > Java Application.
In the Console view you should see:

Refine a property
In some countries there is no tip. SCA allows to simply refine an implementation property in the configuration file.
Add a new property to the TipServiceComponent named tipRate (use the Property creation tool from the palette or the contextual menu on the TipServiceComponent).
File:RestaurantRefineTipProperty.PNG
In the Properties view set the value to 0.

Launch the client. Now you should see:

Change Implementation and bindings
Use JavaScript for your implementation
Remove the java implementation of the component VatServiceComponent. Add, as new component implementation, a script implementation (use ScriptImplementation creation tool from Palette or contextual menu on VatServiceComponent).

Set (in the Properties view) as Script with the value restaurant/lib/VatServiceImpl.js.

In directory src/restaurant/lib add a new File named VatServiceImpl.js. Open the new created file. Set the following code as implementation:
var vatRate=10
function getPriceWithVat(price) {
  return price * vatRate/100 + price;
}
Launch the Client. You should see:

Use an RMI Binding
Add a RMIBinding on the composite service named RestaurantService.

Set (in the Properties view) as
- ServiceName: RestaurantServiceRMI,
- Port: 8099, and
- Host: localhost.

In the package test add a new Java Class named RestaurantServiceServer:
package test;

import org.apache.tuscany.sca.host.embedded.SCADomain;

/**
* A restaurant service server. Starts up the SCA runtime which will start
* listening for RMI service requests.
*/
public class RestaurantServiceServer {
  public static void main(String[] args) throws Exception {
    System.out
       .println("Starting of the SCA Restaurant Application
       exposed as RMI Services...");
    SCADomain scaDomain = SCADomain
        .newInstance("Restaurant.composite");
    System.out.println("... Press Enter to Exit...");
    System.in.read();
    scaDomain.close();
    System.out.println("Exited...");
    System.exit(0);
  }
}
Create a new Java Class named Client2 in the package test.
package test;

import java.rmi.Naming;

import restaurant.api.Menu;
import restaurant.api.RestaurantService;

public class Client2 {
  public static void main(String[] args) throws Exception {
    RestaurantService restaurantService = (RestaurantService) Naming
       .lookup("//localhost:8099/RestaurantServiceRMI");
    Menu[] menus = restaurantService.getMenus();
    System.out.println("--- Menu ---");
    for (Menu m : menus) {
      System.out.println("- " + m.printMenu());
    }
    System.out.println();
    Menu menu = menus[3];
    System.out.println("My choice: " + menu.printMenu());
    System.out.println();
    double price = restaurantService.getBill(menu);
    System.out.println("Price (" + menu.printMenu() + "): " + price);
  }
}
Launch the RestaurantServiceServer application.

Launch Client2. You should see:
