Notice: this Wiki will be going read only early in 2024 and edits will no longer be possible. Please see: https://gitlab.eclipse.org/eclipsefdn/helpdesk/-/wikis/Wiki-shutdown-plan for the plan.
Difference between revisions of "Riena/E4"
(→Intro) |
m (→Set up target platform for Riena apps) |
||
| (26 intermediate revisions by 2 users not shown) | |||
| Line 1: | Line 1: | ||
| − | + | Riena supports the new E4 concepts to simplify the implementation of Riena applications in turn. Therefore there is a new branch '''rienaOnE4''' in the [http://git.eclipse.org/c/riena/org.eclipse.riena.git/ Riena Git Repository] where all Riena E4 development happens. (learn more about [[E4]]) | |
| − | + | ||
| − | + | E4 offers a compatibility layer for existing Eclipse 3.x applications. Riena does not make use of this compatibility layer, but brings native E4 support. Even so, Riena applications built on Eclipse 3.x basis will work with Riena on E4. | |
| − | + | ||
| − | + | ||
| − | + | ||
| − | + | ||
| − | + | ||
| − | + | ||
| − | + | ||
The following guide will walk through the necessary steps to setup your environment in minutes. | The following guide will walk through the necessary steps to setup your environment in minutes. | ||
| − | |||
| − | + | == Set up target platform for Riena apps == | |
| − | + | ||
| − | == | + | The screenshots in this section were made with the Riena 4 setup, but are also valid for Riena 5. |
| − | * | + | |
| − | * | + | * Download the Eclipse Kepler IDE for your platform and start with a blank workspace. [http://www.eclipse.org/downloads/index-developer.php Eclipse Developer Builds] |
| − | * Select | + | |
| − | ** | + | * Download the [http://git.eclipse.org/c/riena/org.eclipse.riena.setup.git/snapshot/RienaSetup_5.0.0.0.zip RienaSetup] project and import it into your workspace. |
| − | ** | + | [[Image:import_project_RienaSetup.png]] |
| − | ** | + | |
| − | ** Activate your | + | |
| + | * In the imported project, open the file "Riena_5.0.0.0-4x.target" and set the target Platform | ||
| + | [[Image:target_platform_editor_RienaSetup.png]] | ||
| + | |||
| + | |||
| + | * Open the "Plug-Ins" view and import "org.eclipse.riena.example.client" as source project. | ||
| + | [[Image:import_source_project_RienaSetup.png]] | ||
| + | |||
| + | |||
| + | * Select launch configuration "SWT ExampleApplication E4" and add required plug-ins, then Run it. | ||
| + | ** Before adding required plug-ins, also check "Include optional dependencies when computing required plug-ins" | ||
| + | * Now explore the code and plugin.xml in the example project | ||
| + | |||
| + | == Manual target platform setup == | ||
| + | |||
| + | * Create a new target platform under Window => Preferences => Target Platform => Add => Nothing: Start with an empty target platform => Next | ||
| + | * Provide a name like Riena 5.0.0 | ||
| + | * Click Add => Software Site | ||
| + | * Select the repository: http://download.eclipse.org/releases/kepler | ||
| + | * Uncheck "Group by Category" otherwise you can't see all components. | ||
| + | * Select following components: | ||
| + | ** Equinox Target Components | ||
| + | ** Eclipse RCP | ||
| + | ** Eclipse RCP SDK | ||
| + | ** Eclipse RCP Plug-in Developer Resources | ||
| + | * Activate target platform | ||
| + | |||
| + | == Get Riena Source Code == | ||
| + | |||
| + | *Clone the Riena Git Repository to any location in your file system | ||
| − | |||
| − | |||
<source lang="bash"> | <source lang="bash"> | ||
git clone git://git.eclipse.org/gitroot/riena/org.eclipse.riena.git | git clone git://git.eclipse.org/gitroot/riena/org.eclipse.riena.git | ||
| − | </source> | + | </source> ''For more information about using the Riena Git Repository checkout [[Riena/Git|Riena on Git]].'' |
| − | ''For more information about using the Riena Git Repository checkout [[Riena/Git| Riena on Git]].'' | + | |
| − | * Import the Git Repository in Eclipse | + | *Import the Git Repository in Eclipse |
| − | * Switch to Branch '' | + | *Switch to Branch ''rienaOnE4'' |
| − | * Checkout additional dependencies using the projectset in ''org.eclipse.riena.releng'' | + | *Checkout additional dependencies using the projectset in ''org.eclipse.riena.releng'' |
| − | ''If you have problems with the projectset checkout https://bugs.eclipse.org/bugs/show_bug.cgi?id=380375'' | + | |
| + | ''If you have problems with the projectset checkout https://bugs.eclipse.org/bugs/show_bug.cgi?id=380375'' | ||
| + | |||
| + | == Start Your Engines == | ||
| + | |||
| + | *Open the dialog ''Run Configurations...'' | ||
| + | *Use the launch configuration ''SWT ExampleApplication '''E4''''' to start the Example Application | ||
| + | **If required, select ''Add Required Plug-Ins'' in the ''Plug-Ins'' tab | ||
| + | |||
| + | == Get Riena Target Platform == | ||
| + | If you do not want to checkout the Riena sources or just want to build a Riena based application, follow this steps to load the target platform. | ||
| + | |||
| + | *Open the Target Platform configuration and select the target ''rienaE4'' which you created above | ||
| + | *In addition to the components added above, add the Riena Target components from the Software Site http://download.eclipse.org/releases/kepler | ||
| + | **''Riena Core Target Components'' | ||
| + | **''Riena Target Components'' | ||
| + | **''Riena Samples Target Components'' | ||
| + | * ''Riena Core Target Components'' and ''Riena Target Components'' will appear twice in the list. Though they have the same names, they are different. Make sure, you select only the ones that include "e4" in their identifier (e.g. org.eclipse.riena.build.feature.core.sdk.e4.feature.group). You can check the identifier usind the "Properties..." button below the list and going to "General Information". | ||
| + | |||
| + | *Open the ''Plug-Ins'' view, locate the plug-in ''org.eclipse.riena.example.client'' and import it as Source Project into your workspace | ||
| + | **This project contains the Launch Configuration for the Riena example client | ||
| + | **If required, select ''Add Required Plug-Ins'' in the ''Plug-Ins'' tab (also check ''Include optional dependencies when computing required plug-ins'') | ||
| − | == | + | == TODOs == |
| − | * | + | *Verify that Riena works with pure E4 applications (E4 Example Client) |
| − | * Use the | + | *Use E4 dependency injection (DI) mechanism for the Riena DI implementation |
| + | *Migrate Riena Toolbox to E4 (Currently Riena Toolbox on E4 is untested) | ||
Revision as of 13:09, 15 March 2013
Riena supports the new E4 concepts to simplify the implementation of Riena applications in turn. Therefore there is a new branch rienaOnE4 in the Riena Git Repository where all Riena E4 development happens. (learn more about E4)
E4 offers a compatibility layer for existing Eclipse 3.x applications. Riena does not make use of this compatibility layer, but brings native E4 support. Even so, Riena applications built on Eclipse 3.x basis will work with Riena on E4.
The following guide will walk through the necessary steps to setup your environment in minutes.
Contents
Set up target platform for Riena apps
The screenshots in this section were made with the Riena 4 setup, but are also valid for Riena 5.
- Download the Eclipse Kepler IDE for your platform and start with a blank workspace. Eclipse Developer Builds
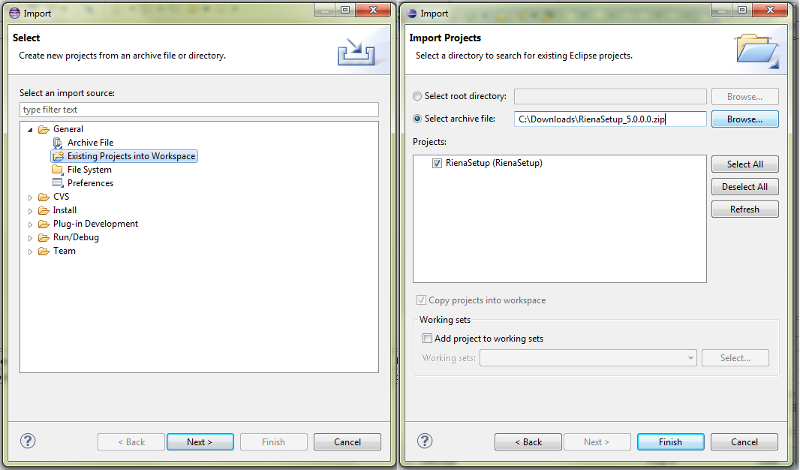
- Download the RienaSetup project and import it into your workspace.
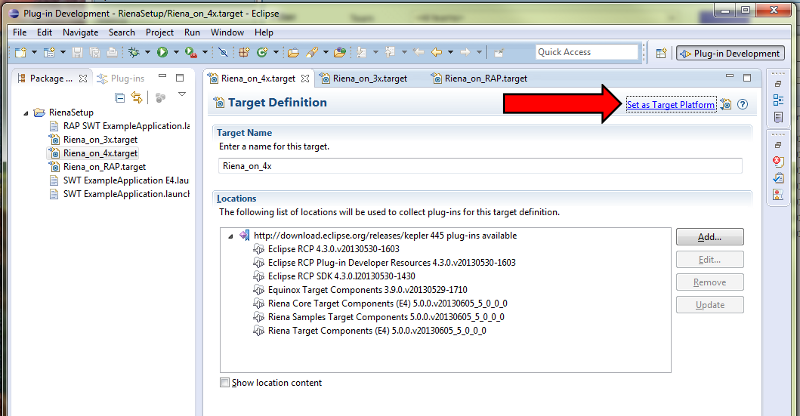
- In the imported project, open the file "Riena_5.0.0.0-4x.target" and set the target Platform
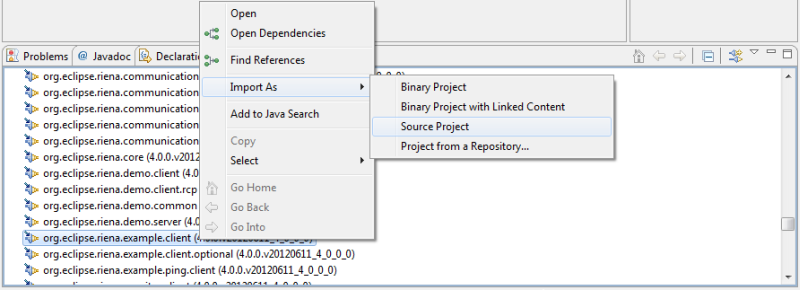
- Open the "Plug-Ins" view and import "org.eclipse.riena.example.client" as source project.
- Select launch configuration "SWT ExampleApplication E4" and add required plug-ins, then Run it.
- Before adding required plug-ins, also check "Include optional dependencies when computing required plug-ins"
- Now explore the code and plugin.xml in the example project
Manual target platform setup
- Create a new target platform under Window => Preferences => Target Platform => Add => Nothing: Start with an empty target platform => Next
- Provide a name like Riena 5.0.0
- Click Add => Software Site
- Select the repository: http://download.eclipse.org/releases/kepler
- Uncheck "Group by Category" otherwise you can't see all components.
- Select following components:
- Equinox Target Components
- Eclipse RCP
- Eclipse RCP SDK
- Eclipse RCP Plug-in Developer Resources
- Activate target platform
Get Riena Source Code
- Clone the Riena Git Repository to any location in your file system
git clone git://git.eclipse.org/gitroot/riena/org.eclipse.riena.git
- Import the Git Repository in Eclipse
- Switch to Branch rienaOnE4
- Checkout additional dependencies using the projectset in org.eclipse.riena.releng
If you have problems with the projectset checkout https://bugs.eclipse.org/bugs/show_bug.cgi?id=380375
Start Your Engines
- Open the dialog Run Configurations...
- Use the launch configuration SWT ExampleApplication E4 to start the Example Application
- If required, select Add Required Plug-Ins in the Plug-Ins tab
Get Riena Target Platform
If you do not want to checkout the Riena sources or just want to build a Riena based application, follow this steps to load the target platform.
- Open the Target Platform configuration and select the target rienaE4 which you created above
- In addition to the components added above, add the Riena Target components from the Software Site http://download.eclipse.org/releases/kepler
- Riena Core Target Components
- Riena Target Components
- Riena Samples Target Components
- Riena Core Target Components and Riena Target Components will appear twice in the list. Though they have the same names, they are different. Make sure, you select only the ones that include "e4" in their identifier (e.g. org.eclipse.riena.build.feature.core.sdk.e4.feature.group). You can check the identifier usind the "Properties..." button below the list and going to "General Information".
- Open the Plug-Ins view, locate the plug-in org.eclipse.riena.example.client and import it as Source Project into your workspace
- This project contains the Launch Configuration for the Riena example client
- If required, select Add Required Plug-Ins in the Plug-Ins tab (also check Include optional dependencies when computing required plug-ins)
TODOs
- Verify that Riena works with pure E4 applications (E4 Example Client)
- Use E4 dependency injection (DI) mechanism for the Riena DI implementation
- Migrate Riena Toolbox to E4 (Currently Riena Toolbox on E4 is untested)


