Notice: this Wiki will be going read only early in 2024 and edits will no longer be possible. Please see: https://gitlab.eclipse.org/eclipsefdn/helpdesk/-/wikis/Wiki-shutdown-plan for the plan.
Difference between revisions of "Remus/Getting started"
(New page: Welcome to the Getting started guide. This page covers the installation of additional components for Remus and provides a brief introduction how to create new information units, search for...) |
|||
| Line 7: | Line 7: | ||
== Installing additional components == | == Installing additional components == | ||
| − | The default installation installs neither information types nor remote repository connectors. They can be installed also via the Eclipse Marketplace client. To install additional components open the Marketplace and switch the Marketplace. | + | The default installation installs neither information types nor remote repository connectors. They can be installed also via the Eclipse Marketplace client. To install additional components open the Marketplace and switch the Marketplace (see Pic 1). |
| − | [[Image:Switch marketplace 26.11.png | + | [[Image:Switch marketplace 26.11.png|400px|Picture 2:Use the link under the listing to switch the marketplace]] |
| − | + | ||
| − | After you have chosen the Remus Marketplace you are able to browse through the available components for Remus. To install one or multiple components select the elements you wan to be installed and step through the wizard. After a restart your selected components are installed and ready to use. | + | |
| + | [[Image:Mp listing 26.11.png|400px|Picture 3:Select Remus Marketplace to install information types and connectors]] | ||
| + | |||
| + | After you have chosen the Remus Marketplace (see Pic 2) you are able to browse through the available components for Remus. To install one or multiple components select the elements you wan to be installed and step through the wizard. After a restart your selected components are installed and ready to use. | ||
== Creating information units == | == Creating information units == | ||
| + | The creation of information follows the methodology of creating new files in Eclipse. Via '''New'''->'''Other''' or '''Ctrl'''+'''N''' you can create new information units (see Pic 4). Your information structure is accessible in the Navigation window on the right. This view is accessible either in the '''Information Management''' perspective or via '''Window'''->'''Show View'''-->'''Remus'''-->'''Navigation'''. | ||
| + | |||
| + | The application has two type of containers for information units. | ||
| + | # Projects | ||
| + | # Categories | ||
| + | |||
| + | Projects are the top-level containers and can contain categories and information units. A category can be created within a project or under another category. | ||
| + | |||
| + | [[Image:New unit 26.11.png|400px|Picture 3:Select Remus Marketplace to install information types and connectors]] | ||
| + | |||
| + | == Editing information units == | ||
| + | Information units are represented in an editor and opened in Eclipses Editor-Area. The most information types have at least two sub-pages, the first is a read-only view which is optimized for browsing through information, the second sub page is for editing the information unit. | ||
| + | |||
| + | [[Image:Text editor view.png|400px|Picture 4: Editor of a plaintext information unit]] | ||
| + | |||
| + | == Search == | ||
| + | Searching through your information pool can be done via the search-field in the toolbar or the search view. The search results are opened in a separate editor. You can browse through the search results with '''Ctrl'''+'''ArrowLeft''' or '''Ctrl'''+'''ArrowRight'''. With the additional information unit '''Favorite Search''' you can save a search query as information unit. For an overview of supported search queries see [[Remus/Search_Syntax|here]]. | ||
| + | |||
| + | [[Image:Search toolbar.png]] | ||
Revision as of 20:33, 26 November 2010
Welcome to the Getting started guide. This page covers the installation of additional components for Remus and provides a brief introduction how to create new information units, search for information and howto share your information through a repository connector.
Contents
Installing Remus
The easiest way to install Remus in your IDE is via the Marketplace. Open the Marketplace Client (Help -> Eclipse Marketplace...) and search for "Remus'" or navigate alternatively to the Marketplace Webinterface. After the installation restart your Eclipse and you'll see new buttons in the toolbar and a new perspective.
Installing additional components
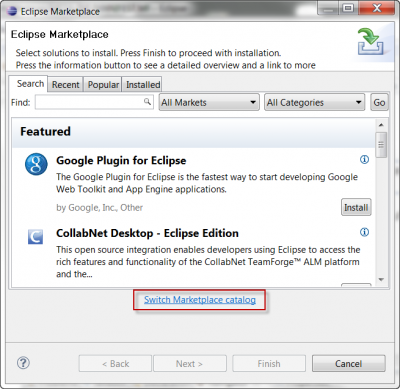
The default installation installs neither information types nor remote repository connectors. They can be installed also via the Eclipse Marketplace client. To install additional components open the Marketplace and switch the Marketplace (see Pic 1).
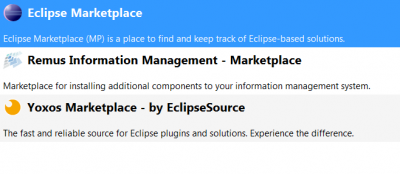
After you have chosen the Remus Marketplace (see Pic 2) you are able to browse through the available components for Remus. To install one or multiple components select the elements you wan to be installed and step through the wizard. After a restart your selected components are installed and ready to use.
Creating information units
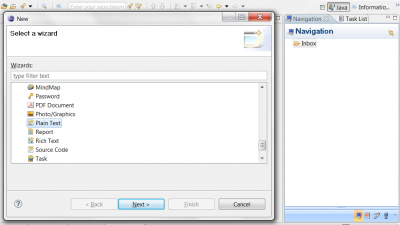
The creation of information follows the methodology of creating new files in Eclipse. Via New->Other or Ctrl+N you can create new information units (see Pic 4). Your information structure is accessible in the Navigation window on the right. This view is accessible either in the Information Management perspective or via Window->Show View-->Remus-->Navigation.
The application has two type of containers for information units.
- Projects
- Categories
Projects are the top-level containers and can contain categories and information units. A category can be created within a project or under another category.
Editing information units
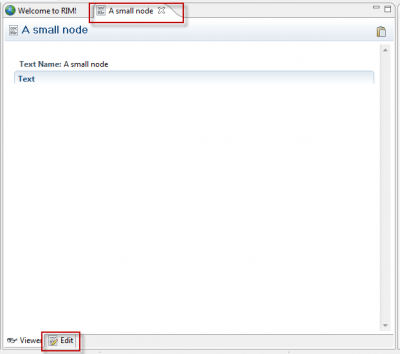
Information units are represented in an editor and opened in Eclipses Editor-Area. The most information types have at least two sub-pages, the first is a read-only view which is optimized for browsing through information, the second sub page is for editing the information unit.
Search
Searching through your information pool can be done via the search-field in the toolbar or the search view. The search results are opened in a separate editor. You can browse through the search results with Ctrl+ArrowLeft or Ctrl+ArrowRight. With the additional information unit Favorite Search you can save a search query as information unit. For an overview of supported search queries see here.


