Notice: this Wiki will be going read only early in 2024 and edits will no longer be possible. Please see: https://gitlab.eclipse.org/eclipsefdn/helpdesk/-/wikis/Wiki-shutdown-plan for the plan.
Difference between revisions of "RMF/User Guide/Tutorial"
(→Customizing the SpecType) |
|||
| Line 100: | Line 100: | ||
Upon closing the dialog, little will have changed - the Specification still shows just two columns, Description and Link. However, if you select the requirement, you will see the new Properties (ID and Owner) in the Property view. | Upon closing the dialog, little will have changed - the Specification still shows just two columns, Description and Link. However, if you select the requirement, you will see the new Properties (ID and Owner) in the Property view. | ||
| + | |||
| + | == Showing the new Attributes in the Specification == | ||
| + | |||
| + | To show the new Attributes in the Specification, we have to configure the Specification columns. We do this by selecting ProR > Column Configuration. | ||
| + | |||
| + | The resulting Dialog shows one entry for the one and only Column of the Specification. By clicking on the "Add Column" icon at the top of the dialog, we can add two more columns. We do this and name them "ID" and "Description" (in the lower pane). Feel free to rearrange the order with drag and drop, as you see fit. When all is done, the dialog should look as follows: | ||
| + | |||
| + | [[Image:pror_column_configuration.jpg]] | ||
[[Category:RMF]] | [[Category:RMF]] | ||
Revision as of 11:08, 15 May 2012
Contents
Basic ReqIF Concepts
A ReqIF model is a structured collection of natural language requirements. However, it comes with its own terminology. For instance, a "Requirement" is called "SpecObject" in ReqIF:
A ReqIF model has some similarities to a Excel Spreadsheet, although there are some notable differences. It's simply meant as a starting point to get a feel for ReqIF.
The following table compares a Spreadsheet model with a ReqIF model, introduces the terminology and explains it:
| ReqIF Term (RIF Term) | Excel Analog | Traditional RM&E Term | Description |
| Specification (SpecHierarchyRoot) | Sheet | Document | A ReqIF model consists of an arbitrary number of Specifications. The Specification is the "Container" for the Requirements. Think of an Excel Document, that allows you to create an arbitrary number of Sheets. There are two differences to Excel: (1) The requirements in the Specification are references (which means that the same requirement can appear in multiple places); (2) The content of Specification is hierarchical. |
| SpecObject | Row | Requirement | A SpecObject represents the actual Requirement. A requirement typically has a number Attributes. Again compared with Excel, each row in a Sheet represents a requirement. In contrast to Excel, the ReqIF model may contain SpecObjects that do not appear in any Specification (whether this is useful is a different question). |
| Attribute | Cell | Attribute | Besides the actual text of the requirement, typical Attributes include ID, Status, etc. Note that there are no "standard" Attributes. The ReqIF model contains the definitions of the Attributes. Here the Excel analogy starts to break down. In Excel, each row has the same columns. Different SpecObjects may have different sets of Attributes. |
| SpecObjectType (SpecType) | n/a | Requirements Type | Each SpecObject has a SpecObjectType. The SpecObjectType contains a list of Attributes for the SpecObject. For instance, the SpecObjecType "Headline" may have only one Attribute "HeadlineText". Another SpecObjectType "Requirement" may have three Attributes, "ID", "Description" and "Status". A Specification may then contain a mixture of SpecObjects with different types. |
There are many more concepts, but this is enough to get us started.
Let's look at a concrete example to understand this. Here is a sniplet of a Specification:
The table shows the first four SpecObects, as visualized in a Specification. The tree-like structure is recognizable: INF-1 is a node with three children, REQ-1, REQ-2 and REQ-3 (this can be seen by the indentation). Let's look at INF-1 and REQ-1. If they would be selected in the GUI, the Property pane would show their Attributes, as it is shown to the right.
INF-1 has two attributes, "Description" and "ID". The SpecObjectType is "Information Type" (shown as the root in the properties view).
REQ-1 has three attributes, "Description", "ID" and "Status". The SpecObjectType is callse "Requirements Type". Let's have a closer look at that one.
The "Requirements Type" SpecObjectType is shown in the picture, with arrows indicating how the Attributes relate to the SpecObjectType (a simple one-to-one relationship). A SpecObjectType has one entry for each Attribute, consisting of a name and a Datatype. For instance, the first entry has the name "ID" and the datatype "T_ID_REQ". Note that multiple Attributes may have the same Datatype: "Description" and "Status" both have the Datatype "String32k".
Last, The Datatypes must be defined as well. In this example, there are two Datatypes, "String32" and "T_ID_REQ". These are finally based on a number of standard types that ReqIF supports.
NOTE: As of this writing, we only implemented the simple and the enumeration ReqIF types. This leaves out the complex ones (rich text, attachements, embedded files, etc.) for now.
Tutorial 1: Creating a basic ReqIF Model
In this Section, we will build a ReqIF model from scratch, step by step.
Install ProR
You can download ProR from the Download page. Alternatively, you can install ProR in any Eclipse-Installation via its update site (also listed on the Download page). Using the update site allows you to use the Eclipse Update mechanism, something that is currently not yet enabled for the standalone version.
Create the Model
- Make sure that you have at least one Project in the Workspace
- Select File > New > Reqif10 Model
- Select a Project and name the file (ending in .reqif), then click "Finish"
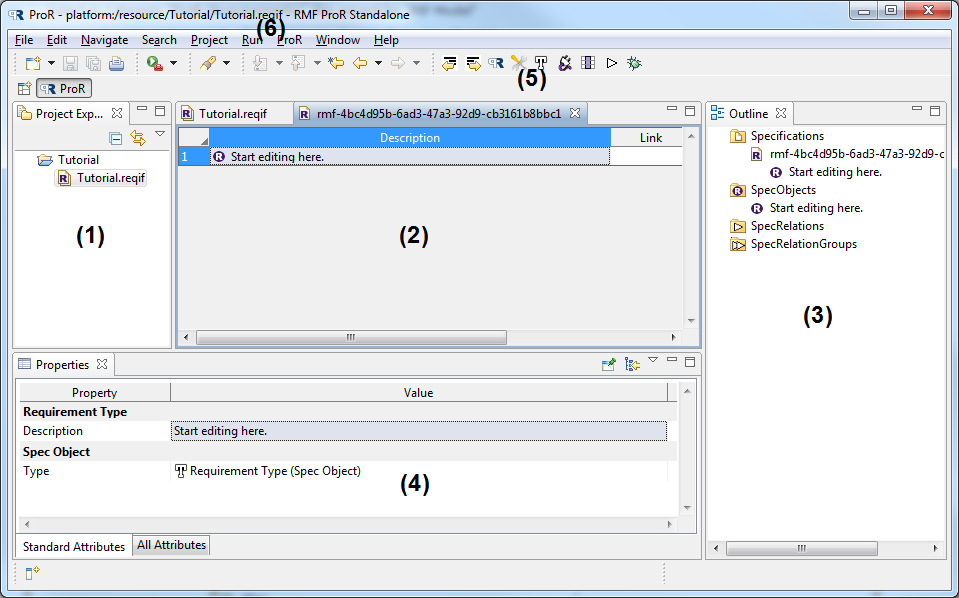
After this, your window should look more or less as follows:
You will see your ReqIF file in the (1) Rodin Project Explorer or the regular Navigator.
The Editor (2) shows your Specifications. There will be a tab at the bottom of the editor for every Specification (Currently, there is only one, called "Specification Document").
In the Editor, you see the SpecObjects that exist in this Specification. There is currently only one, with the description "Start Editing".
The Outline (3) has three folders:
- "Specifications" shows the Specifications in the ReqIF. You can expand the tree to expose the hierarchy of SpecObjects in the Specification.
- "SpecObjects" shows all SpecObjects in the ReqIF as a flat list. Keep in mind that SpecObjects in Specifications are references. In contracst, this folder shows all SpecObjects in the ReqIF model, no matter whether they appear in any Specification.
- "SpecRelations" shows all SpecRelations in the ReqIF as a flat list. For now, we will ignore SpecRelations.
The properties of a selected Element are shown in the Properties view (4). As the only Requirement in the model is selected, we see its SpecObjectTpye ("Requirements Type") and its only Attribute ("Description") with the value "Start editing here.".
When a ReqIF Editor is active, there are also additional tool bar items (5) and an additional menu (6).
Customizing the SpecType
To get familiar with the system, next we will:
- Add two more attributes to the SpecObjectType called "ID" and "Owner"
- We will show those Attributes in the Specification
To add new attributes, we open the Datatype Configuration dialog with ProR > Datatype Configuration.
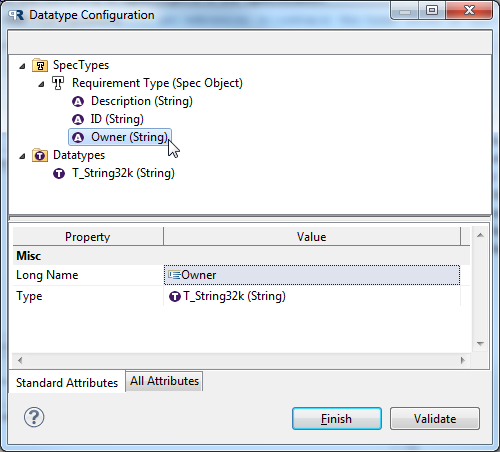
The resulting Dialog has a folder for SpecTypes and Datatypes. Currently, there is only one Datatype (T_String32k) and one SpecType called "Requirements Type" with one Attribute "Description".
We add more Attributes to "Requirements Type" by right-clicking "Requirements Type" and selecting "New Child > Attribute Definition String". This will create a new element. Upon selecting, we can rename it in the lower pane. We do this twice for "ID" and "Owner". We assign both Attributes the same Datatype, "String32k". In the end, the dialog should look as follows:
Upon closing the dialog, little will have changed - the Specification still shows just two columns, Description and Link. However, if you select the requirement, you will see the new Properties (ID and Owner) in the Property view.
Showing the new Attributes in the Specification
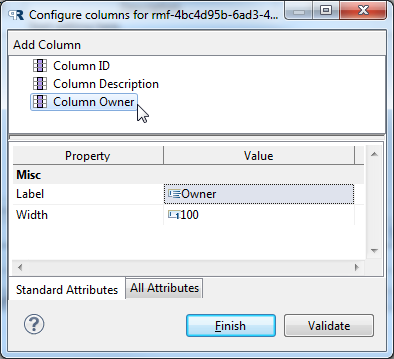
To show the new Attributes in the Specification, we have to configure the Specification columns. We do this by selecting ProR > Column Configuration.
The resulting Dialog shows one entry for the one and only Column of the Specification. By clicking on the "Add Column" icon at the top of the dialog, we can add two more columns. We do this and name them "ID" and "Description" (in the lower pane). Feel free to rearrange the order with drag and drop, as you see fit. When all is done, the dialog should look as follows:


