Notice: this Wiki will be going read only early in 2024 and edits will no longer be possible. Please see: https://gitlab.eclipse.org/eclipsefdn/helpdesk/-/wikis/Wiki-shutdown-plan for the plan.
Difference between revisions of "Papyrus/Papyrus User Guide"
(→Constraints in Papyrus) |
(→Toolbars) |
||
| (32 intermediate revisions by 4 users not shown) | |||
| Line 4: | Line 4: | ||
--> | --> | ||
| − | = Using | + | = Using modeling editors = |
== UML modeling == | == UML modeling == | ||
| Line 128: | Line 128: | ||
=== Constraints in Papyrus === | === Constraints in Papyrus === | ||
| − | ==== Create and edit constraints | + | ==== Create and edit constraints ==== |
| − | + | [[Papyrus/UserGuide/Papyrus Constraints|Create and edit constraints]] | |
| − | + | ||
| − | + | ||
| − | + | ||
| − | + | ||
| − | + | ||
| − | + | ||
| − | [[ | + | |
| − | + | ||
| − | + | ||
| − | + | ||
| − | + | ||
| − | + | ||
| − | + | ||
| − | + | ||
| − | + | ||
| − | + | ||
| − | + | ||
| − | + | ||
| − | + | ||
| − | + | ||
| − | + | ||
| − | + | ||
| − | + | ||
| − | + | ||
| − | + | ||
| − | + | ||
| − | + | ||
| − | + | ||
| − | + | ||
| − | + | ||
| − | + | ||
| − | + | ||
| − | + | ||
| − | + | ||
| − | + | ||
| − | + | ||
| − | + | ||
| − | + | ||
| − | + | ||
| − | + | ||
| − | + | ||
| − | + | ||
| − | + | ||
| − | + | ||
| − | + | ||
| − | + | ||
| − | + | ||
| − | + | ||
| − | + | ||
| − | + | ||
| − | + | ||
| − | + | ||
| − | + | ||
| − | + | ||
| − | + | ||
| − | + | ||
| − | + | ||
==== Validate OCL Constraints of a Profile ==== | ==== Validate OCL Constraints of a Profile ==== | ||
| − | + | [[Papyrus/UserGuide/Profile Constraints|Define Profile Constraints]] | |
| − | + | ||
| − | + | ||
| − | + | ||
| − | + | ||
| − | + | ||
| − | + | ||
| − | + | ||
| − | + | ||
| − | + | ||
| − | + | ||
| − | + | ||
| − | + | ||
| − | + | ||
| − | + | ||
| − | + | ||
| − | + | ||
| − | + | ||
| − | + | ||
| − | + | ||
| − | + | ||
| − | + | ||
| − | + | ||
| − | + | ||
| − | [[ | + | |
| − | + | ||
| − | + | ||
| − | + | ||
| − | + | ||
| − | + | ||
| − | + | ||
| − | + | ||
| − | + | ||
| − | + | ||
| − | + | ||
| − | + | ||
| − | + | ||
| − | + | ||
| − | + | ||
| − | + | ||
| − | + | ||
| − | + | ||
| − | + | ||
| − | Constraints | + | |
| − | + | ||
| − | + | ||
| − | + | ||
| − | + | ||
| − | + | ||
| − | + | ||
| − | + | ||
| − | + | ||
| − | + | ||
== SysML Modeling == | == SysML Modeling == | ||
| Line 294: | Line 185: | ||
== Layer Support == | == Layer Support == | ||
See [[Papyrus/UserGuide/Layers|Layers Guide]] | See [[Papyrus/UserGuide/Layers|Layers Guide]] | ||
| + | |||
| + | == Model Execution == | ||
| + | [[Papyrus/UserGuide/ModelExecution|Execute your fUML models with MOKA]] | ||
== Automatic Layout Support == | == Automatic Layout Support == | ||
| Line 300: | Line 194: | ||
=== JAVA Code Generation === | === JAVA Code Generation === | ||
| + | see [http://wiki.eclipse.org/Java_Code_Generation Java code generation] | ||
=== C/C++ Code Generation === | === C/C++ Code Generation === | ||
| − | see [http://wiki.eclipse.org/ | + | see [http://wiki.eclipse.org/Papyrus/Codegen/Cpp_description Papyrus C++ code generation] |
=== ADA Code Generation === | === ADA Code Generation === | ||
| + | |||
| + | == Reverse Engineering == | ||
| + | |||
| + | === Java Reverse Engineering === | ||
| + | |||
| + | see [http://wiki.eclipse.org/Java_reverse_engineering Java reverse engineering] | ||
== Documentation Support == | == Documentation Support == | ||
| Line 313: | Line 214: | ||
=== Documentation Generation === | === Documentation Generation === | ||
| + | == Deploy your applications == | ||
| + | |||
| + | see [http://wiki.eclipse.org/Papyrus_Qompass Qompass for Papyrus] | ||
| + | |||
| + | [[Category:Papyrus]] | ||
| + | |||
| + | = General Feature = | ||
| + | |||
| + | == Editors == | ||
| + | === Palette === | ||
| + | The palette is available with any diagrams. But its content depends on the diagrams type. | ||
| + | The standard palette ( the top container of the palette in red in the here-after capture) contents a standard selection tool (the white arrow), a zoom in and zoom out tool, and marquee selection tools.<br/> | ||
| + | [[File:Palette1.JPG]] <br/> | ||
| + | The standard palette is available for every diagram. | ||
| + | ==== Properties ==== | ||
| + | |||
| + | See [http://wiki.eclipse.org/Papyrus_User_Guide/Palette/Properties Properties] | ||
| + | |||
| + | ==== Standard Selection tool ==== | ||
| + | |||
| + | See [http://wiki.eclipse.org/Papyrus_User_Guide/Palette/Standard_Selection_Tool Standard selection Tool] | ||
| + | |||
| + | ==== Zoom Tools ==== | ||
| + | See [http://wiki.eclipse.org/Papyrus_User_Guide/Palette/Zoom_Tools Zoom Tools] | ||
| + | |||
| + | ==== Marquee Selection Tools==== | ||
| + | See [http://wiki.eclipse.org/Papyrus_User_Guide/Palette/Marquee_Selection_Documentation Marquee Selection Tool] | ||
| + | |||
| + | === Toolbars === | ||
| + | Papyrus has its own set of Toolbars. A Toolbar regroups a set of tools belonging to the same kind of activity. | ||
| + | The different Toolbars can be shown or hide depending on the perspectives. <br/> | ||
| + | The toolbars visibility can be customized from the menu Windows/Customize Perspectives. <br/> | ||
| + | [[File:Customize_Perspective.JPG|frame|center|Alignment Perpective]] | ||
| + | |||
| + | ==== Alignment ==== | ||
| + | See [http://wiki.eclipse.org/Papyrus_User_Guide/Toolbars/Alignment Alignment] | ||
| + | |||
| + | --[[User:Celine.Janssens.all4tec.net|Céline Janssens [ALL4TEC]]] ([[User talk:Celine.Janssens.all4tec.net|talk]]) 12:06, 28 August 2014 (EDT) | ||
[[Category:Papyrus]] | [[Category:Papyrus]] | ||
Revision as of 12:06, 28 August 2014
Contents
- 1 Using modeling editors
- 2 Developing custom DSL based editor with Papyrus
- 3 Additional Utilities of Papyrus
- 4 General Feature
Using modeling editors
UML modeling
Getting Started
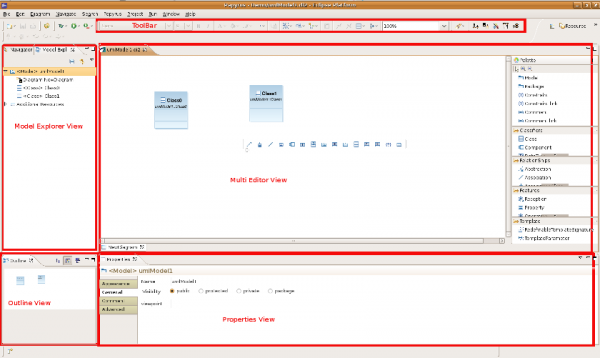
Papyrus Perspective
The Papyrus perspective contains :
- Model Explorer view
- Outline view
- Multi diagram editor view
- Properties view
- Toolbar
Model Explorer View
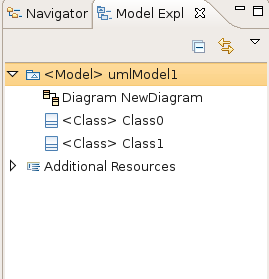
The model explorer is used to navigate to the all model's elements and the diagrams.
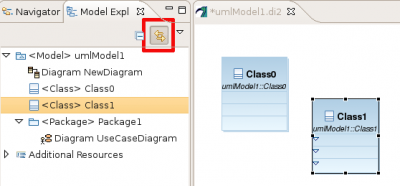
This action link the model explorer with the active diagram selection. This action works bidirectionally.
This action allow to add new semantic element.
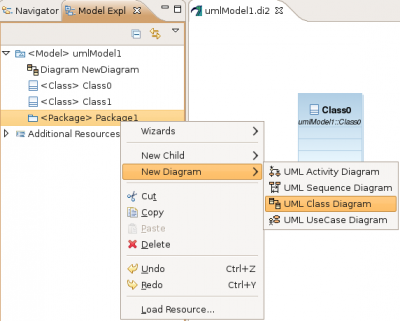
This action allow to add new diagram in current selection.
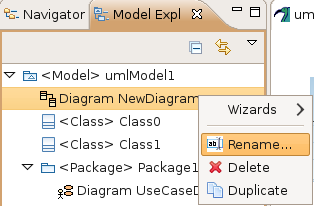
All actions are available on diagram item.
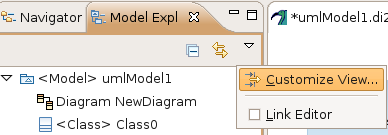
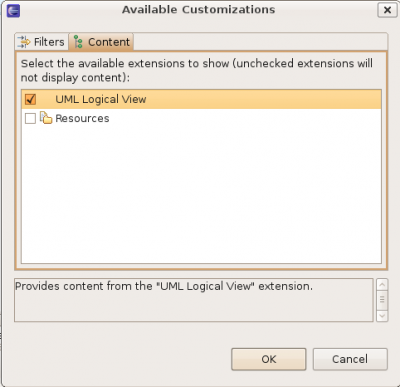
The model explorer used Common Navigator Framework and provide facilities to customize view.
To customize the content of treeViewer:
To filter the content of treeViewer:
Outline View
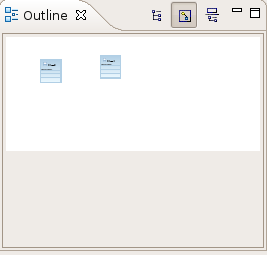
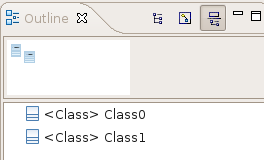
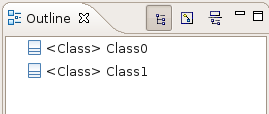
The Outline offers a thumbnail of the graphical representation and the list of semantic elements used in current diagram.
Tutorials on UML modeling with Papyrus
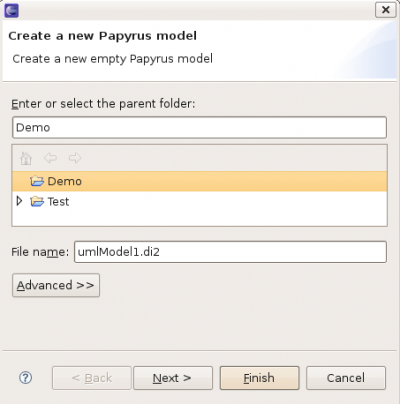
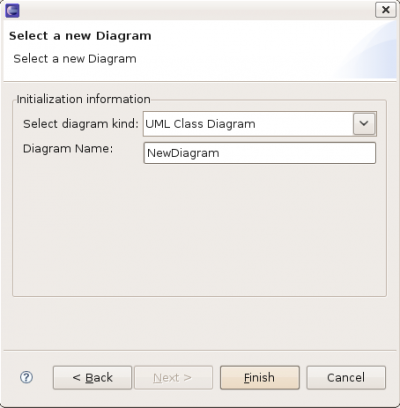
Model/Diagram creation wizard
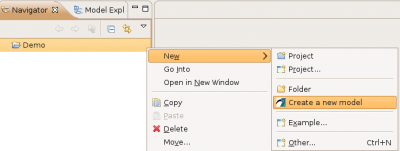
Create a new Model.
Choose the model file name and the first diagram to create.
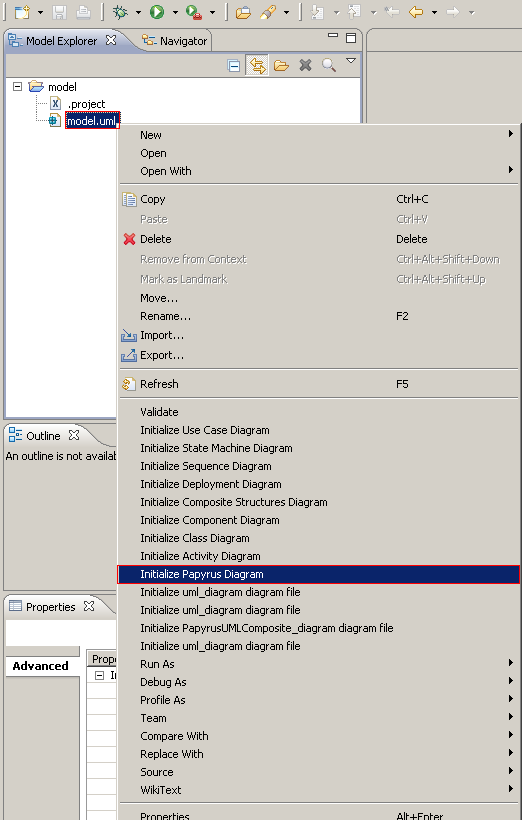
Create a diagram from an existing uml file
From your uml file, select the "Initialize Papyrus diagram" to access the creation wizard of Papyrus. Your Papyrus diagram will be linked with your existing model.
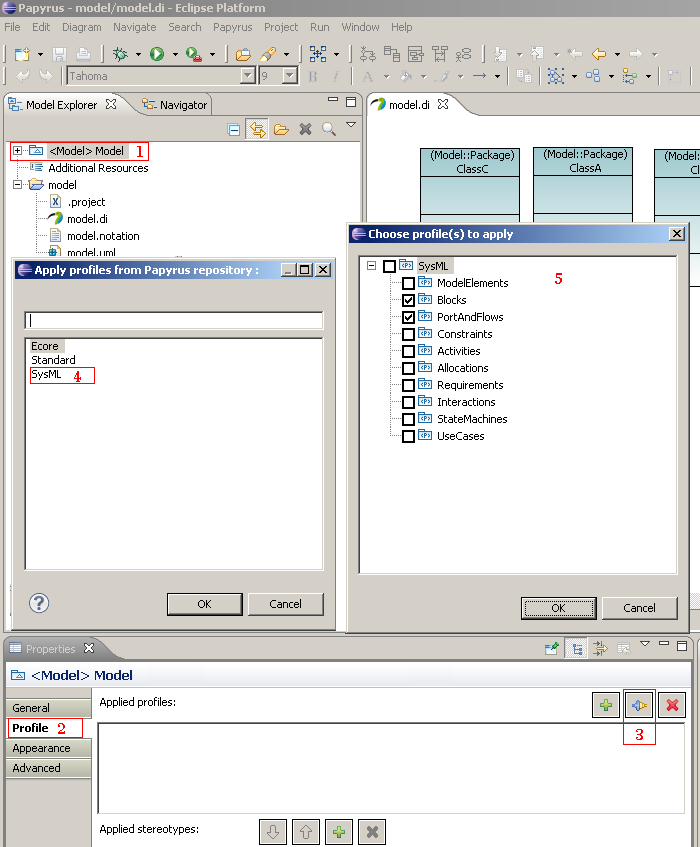
Apply a static profile
- 1 - Select a package element (ie a Model or a Package).
- 2 - Select the tab "Profile" on the "Properties" view
- 3 - Click on the plug-in icon
- 4 - Select your static profile
- 5 - Choose profiles to apply
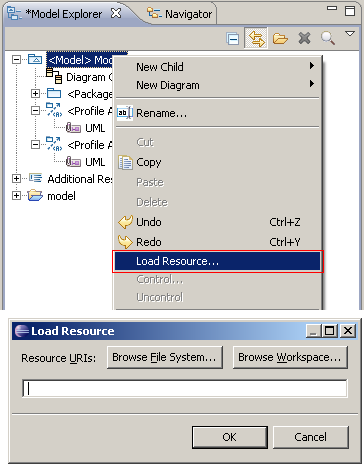
Load an additionnal resource
Show additional resources in your model explorer view
Ensure that the filter for the additional resources is not checked on your model explorer view : 
Add an additional resource
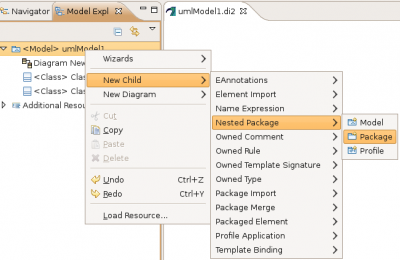
Right click on an element of your model and select the menu "Load resource..."
Table Documentation
See http://wiki.eclipse.org/Papyrus_User_Guide/Table_Documentation
Papyrus Zoo of UML Models
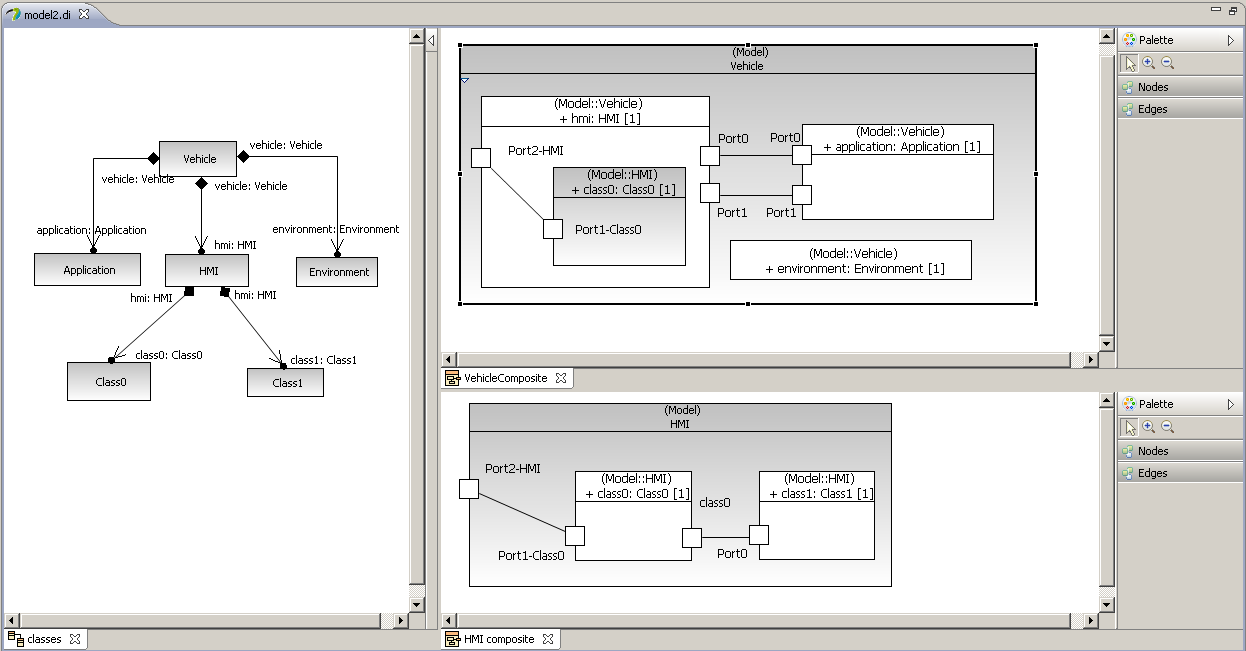
Composite Structure Diagram
The project is available here [1]
Constraints in Papyrus
Create and edit constraints
Validate OCL Constraints of a Profile
SysML Modeling
Tutorials on SysML modeling with Papyrus
Papyrus Zoo of SysML Models
MARTE Modeling
Tutorials on MARTE modeling with Papyrus
Papyrus Zoo of MARTE Models
fUML and Alf Modeling
Using fUML and Alf to produce executable models
Developing custom DSL based editor with Papyrus
UML Profile Modeling
MetaModel Modeling
Additional Editor Integration (this section is for the Backone)
Diagram Editors Customizations
Specific Diagram Editors Creation
Diagram Editor Palette Customization
Here you can find the documentation describing palette customization: Doc
This document can also be found in Papyrus help section => User Guide => Palette customization
Property Editor Customization
Model Explorer Customization
Diagram Appearance Customization with CSS Stylesheets
Additional Utilities of Papyrus
Collaborative Work Support
Layer Support
See Layers Guide
Model Execution
Execute your fUML models with MOKA
Automatic Layout Support
Code Generation Support
JAVA Code Generation
C/C++ Code Generation
see Papyrus C++ code generation
ADA Code Generation
Reverse Engineering
Java Reverse Engineering
Documentation Support
Documentation Modelling
Documentation Generation
Deploy your applications
General Feature
Editors
Palette
The palette is available with any diagrams. But its content depends on the diagrams type.
The standard palette ( the top container of the palette in red in the here-after capture) contents a standard selection tool (the white arrow), a zoom in and zoom out tool, and marquee selection tools.
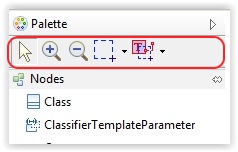
The standard palette is available for every diagram.
Properties
See Properties
Standard Selection tool
Zoom Tools
See Zoom Tools
Marquee Selection Tools
Toolbars
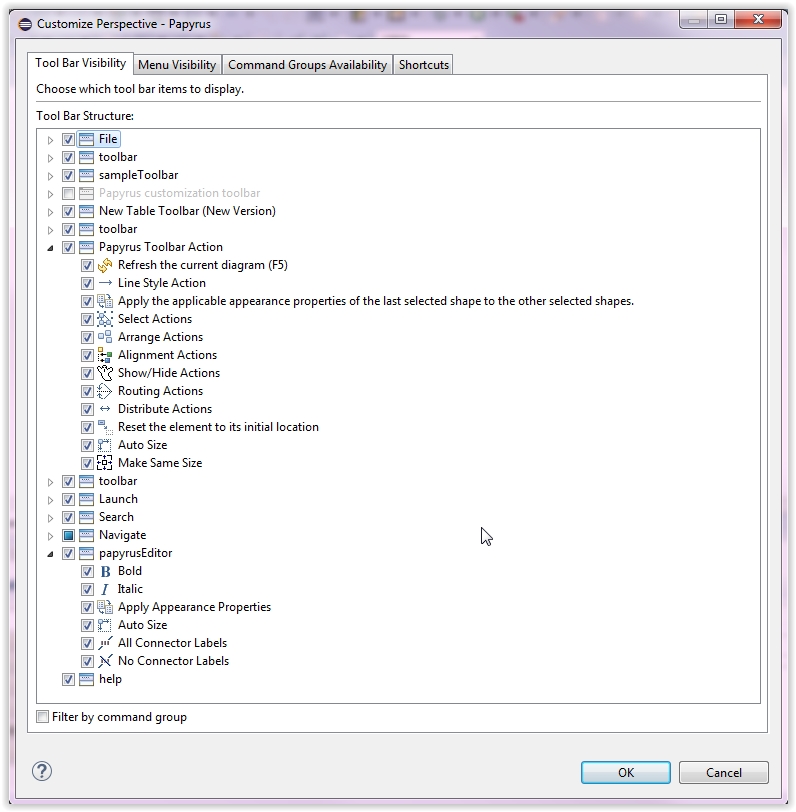
Papyrus has its own set of Toolbars. A Toolbar regroups a set of tools belonging to the same kind of activity.
The different Toolbars can be shown or hide depending on the perspectives.
The toolbars visibility can be customized from the menu Windows/Customize Perspectives.
Alignment
See Alignment
--Céline Janssens [ALL4TEC] (talk) 12:06, 28 August 2014 (EDT)

