Notice: this Wiki will be going read only early in 2024 and edits will no longer be possible. Please see: https://gitlab.eclipse.org/eclipsefdn/helpdesk/-/wikis/Wiki-shutdown-plan for the plan.
Difference between revisions of "Papyrus/UserGuide/Profile Constraints"
(Copy of the Profile Constraint documentation embedded in Papyrus 0.10.0) |
(Prefix all images with Papyrus) |
||
| Line 1: | Line 1: | ||
In order to validate constraints from a profile, first creation of constraint with specific annotations will be explained and then generation of validation will be explained.<br/> | In order to validate constraints from a profile, first creation of constraint with specific annotations will be explained and then generation of validation will be explained.<br/> | ||
| − | [[image:ConstraintCreationUseCase.png]]<br/> | + | [[image:Papyrus ConstraintCreationUseCase.png]]<br/> |
Figure 1: Constraint creation<br/> | Figure 1: Constraint creation<br/> | ||
=Create a constraint= | =Create a constraint= | ||
| Line 7: | Line 7: | ||
===How to=== | ===How to=== | ||
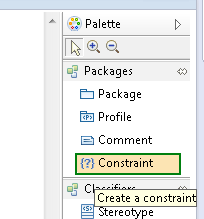
In the context of a profile diagram you can create a constraint from the palette.<br/> | In the context of a profile diagram you can create a constraint from the palette.<br/> | ||
| − | [[image:diagramConstraintCreation.png]] <br/> | + | [[image:Papyrus diagramConstraintCreation.png]] <br/> |
Figure 2: Constraint creation from the palette<br/> | Figure 2: Constraint creation from the palette<br/> | ||
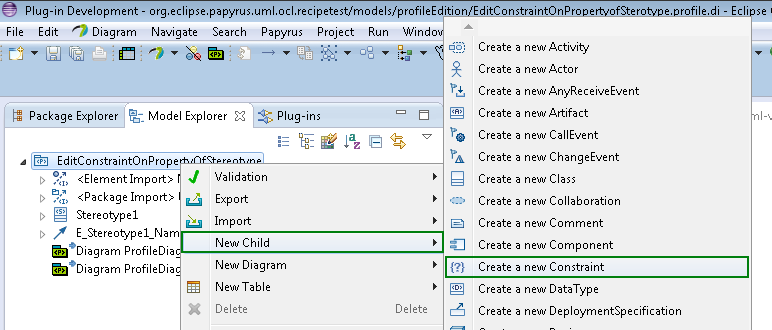
From the model explorer, click right --> new child--> Create a new Constraint<br/> | From the model explorer, click right --> new child--> Create a new Constraint<br/> | ||
| − | [[image:MEConstraintCreation.png]]<br/> | + | [[image:Papyrus MEConstraintCreation.png]]<br/> |
Figure 3: Constraint creation from the model explorer<br/> | Figure 3: Constraint creation from the model explorer<br/> | ||
| Line 17: | Line 17: | ||
===How to=== | ===How to=== | ||
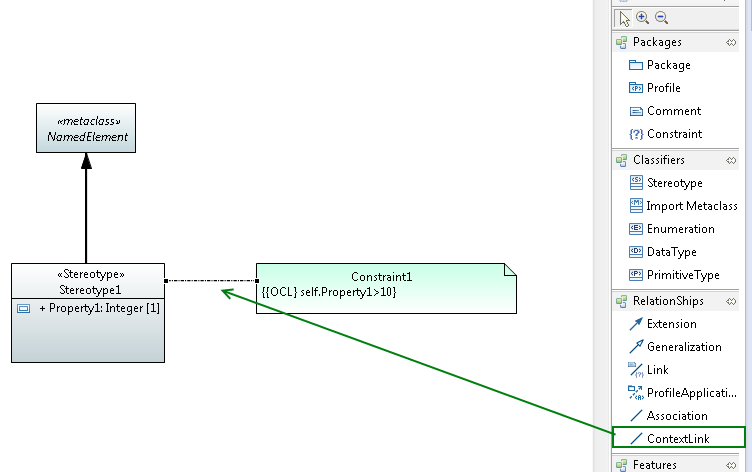
From the diagram, a context link can be added between the constraints and the context of the constraint:<br/> | From the diagram, a context link can be added between the constraints and the context of the constraint:<br/> | ||
| − | [[image:DiagramContextLink.png]]<br/> | + | [[image:Papyrus DiagramContextLink.png]]<br/> |
Figure 4: Context link creation in a the profile diagram<br/> | Figure 4: Context link creation in a the profile diagram<br/> | ||
<br/> | <br/> | ||
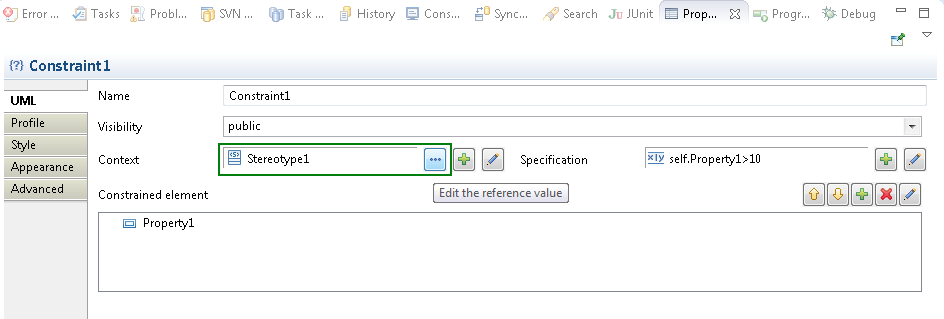
From the property view, the context can be specified:<br/> | From the property view, the context can be specified:<br/> | ||
| − | [[image:propertyviewContextlink.png]]<br/> | + | [[image:Papyrus propertyviewContextlink.png]]<br/> |
Figure 5: specify context from the property view<br/> | Figure 5: specify context from the property view<br/> | ||
| Line 29: | Line 29: | ||
By default if your try to edit a constraint, default language will be OCL.<br/> | By default if your try to edit a constraint, default language will be OCL.<br/> | ||
At the creation, after set the context, you can choose the editor for the constraint:<br/> | At the creation, after set the context, you can choose the editor for the constraint:<br/> | ||
| − | [[image:constraintEdition.png]]<br/> | + | [[image:Papyrus constraintEdition.png]]<br/> |
Figure 6: choose the editor for the constraint<br/> | Figure 6: choose the editor for the constraint<br/> | ||
You can also specify the language in the property view:<br/> | You can also specify the language in the property view:<br/> | ||
*Select the field specification and choose create or edit the associated opaque expression: | *Select the field specification and choose create or edit the associated opaque expression: | ||
| − | [[image:SpecificationCreation.png]]<br/> | + | [[image:Papyrus SpecificationCreation.png]]<br/> |
Figure 7: creation of a specification for the constraint<br/> | Figure 7: creation of a specification for the constraint<br/> | ||
You can add the language, see following figure:<br/> | You can add the language, see following figure:<br/> | ||
| − | [[image:opaqueExpressionCreation.png]]<br/> | + | [[image:Papyrus opaqueExpressionCreation.png]]<br/> |
Figure 8: specify the language<br/> | Figure 8: specify the language<br/> | ||
Then if you want you write the body in the specified language:<br/> | Then if you want you write the body in the specified language:<br/> | ||
| − | [[image:fillOpaqueExpression.png]]<br/> | + | [[image:Papyrus fillOpaqueExpression.png]]<br/> |
Figure 9: Write the body of the opaque expression<br/> | Figure 9: Write the body of the opaque expression<br/> | ||
| Line 62: | Line 62: | ||
*4. Selection the DSML validation profile | *4. Selection the DSML validation profile | ||
| − | [[image:DSMLprofileApplication.png]]<br/> | + | [[image:Papyrus DSMLprofileApplication.png]]<br/> |
Figure 10: apply DSML profile<br/> | Figure 10: apply DSML profile<br/> | ||
Apply Stereotype on constraint | Apply Stereotype on constraint | ||
| Line 69: | Line 69: | ||
*3. Click on apply profile button | *3. Click on apply profile button | ||
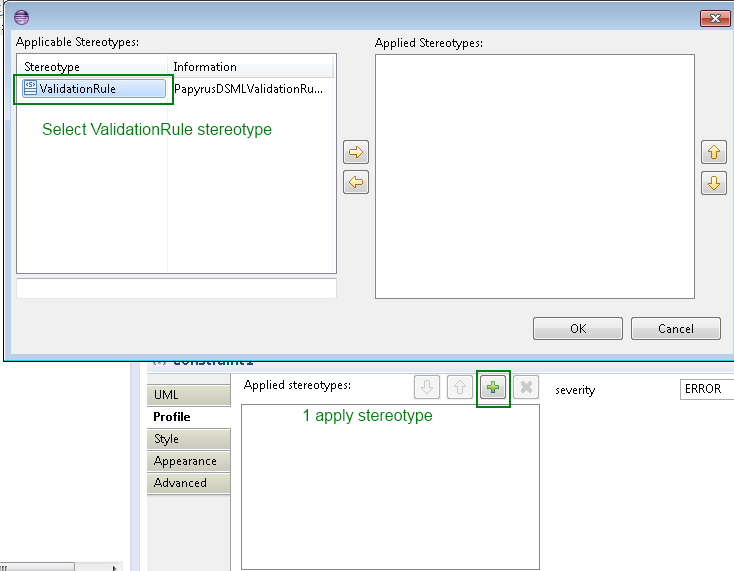
*4. Select validationRule stereotype | *4. Select validationRule stereotype | ||
| − | [[image:stereotypeApplication.png]]<br/> | + | [[image:Papyrus stereotypeApplication.png]]<br/> |
Figure 11: Apply validationRule stereotype<br/> | Figure 11: Apply validationRule stereotype<br/> | ||
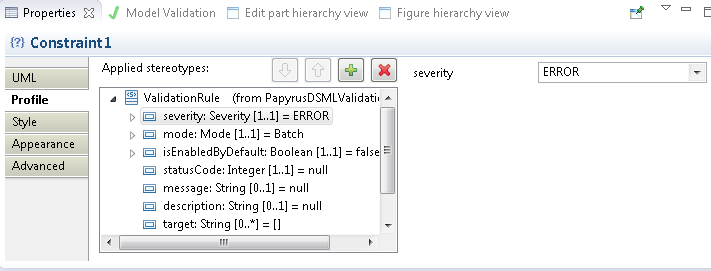
Then you can edit property of stereotype to add information about the behavior of the validation<br/> | Then you can edit property of stereotype to add information about the behavior of the validation<br/> | ||
| − | [[image:AnnotationEdition.png]]<br/> | + | [[image:Papyrus AnnotationEdition.png]]<br/> |
Figure 12: edition of the property of stereotype<br/> | Figure 12: edition of the property of stereotype<br/> | ||
=Generation from Constraints= | =Generation from Constraints= | ||
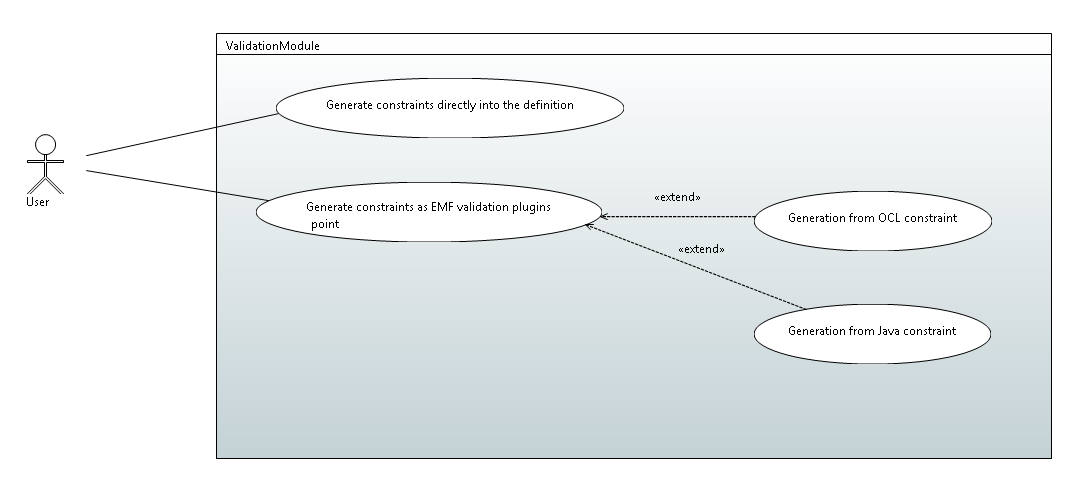
| − | [[image:UseCaseGeneration.png]]<br/> | + | [[image:Papyrus UseCaseGeneration.png]]<br/> |
Figure 13: Constraint generation<br/> | Figure 13: Constraint generation<br/> | ||
==Generate constraints directly into the definition== | ==Generate constraints directly into the definition== | ||
| Line 85: | Line 85: | ||
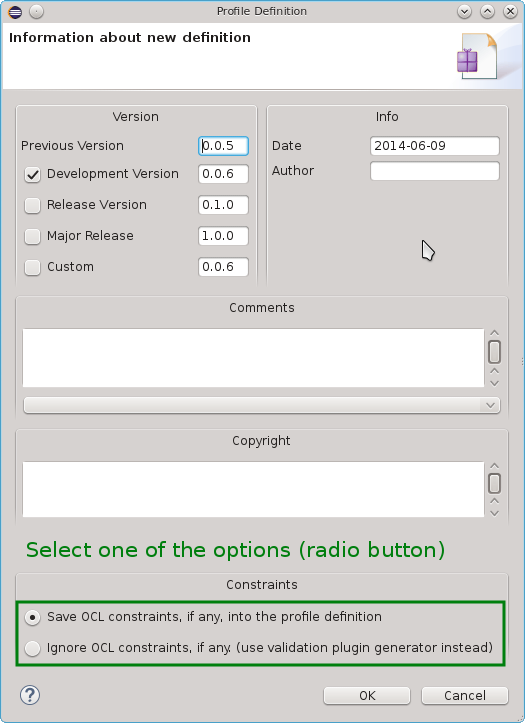
When you save the profile,Papyrus asks to you if want to define the profile.<br/> | When you save the profile,Papyrus asks to you if want to define the profile.<br/> | ||
Click on yes and then do not forget to check save OCL constraint in the definition<br/> | Click on yes and then do not forget to check save OCL constraint in the definition<br/> | ||
| − | [[image:ConstraintDefinition.png]]<br/> | + | [[image:Papyrus ConstraintDefinition.png]]<br/> |
Figure 14: save OCL constraints in the definition<br/> | Figure 14: save OCL constraints in the definition<br/> | ||
| Line 94: | Line 94: | ||
Select the root profile<br/> | Select the root profile<br/> | ||
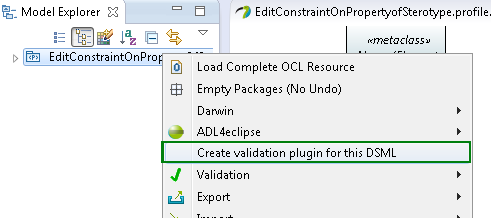
Click right on the model explorer-> create validation plugin for this DSML<br/> | Click right on the model explorer-> create validation plugin for this DSML<br/> | ||
| − | [[image:PluginValidationGeneration.png]]<br/> | + | [[image:Papyrus PluginValidationGeneration.png]]<br/> |
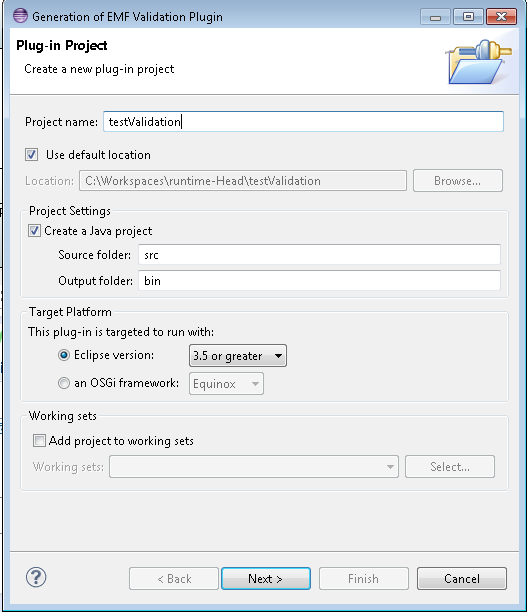
Then a wizard to create the validation is launched. You have to give a name for you validation plugin.<br/> | Then a wizard to create the validation is launched. You have to give a name for you validation plugin.<br/> | ||
| − | [[image:pluginwizard.png]]<br/> | + | [[image:Papyrus pluginwizard.png]]<br/> |
Figure 15: wizard of constraint validation creation<br/> | Figure 15: wizard of constraint validation creation<br/> | ||
The you need to install the created plugin.<br/> | The you need to install the created plugin.<br/> | ||
Revision as of 07:11, 23 July 2013
In order to validate constraints from a profile, first creation of constraint with specific annotations will be explained and then generation of validation will be explained.
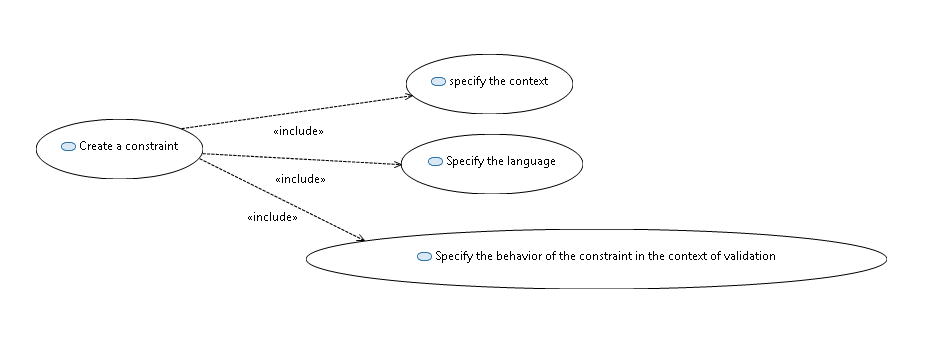
Figure 1: Constraint creation
Create a constraint
In the context of the construction of a profile, it is possible to add constraints.
A constraint is a condition or restriction expressed in a language for the purpose of declaring some of the semantics of an element.
How to
In the context of a profile diagram you can create a constraint from the palette.
Figure 2: Constraint creation from the palette
From the model explorer, click right --> new child--> Create a new Constraint
Figure 3: Constraint creation from the model explorer
Specify the context
Before editing a constraint, it is important to specify the constraint; it can be a stereotype, an operation.
How to
From the diagram, a context link can be added between the constraints and the context of the constraint:
Figure 4: Context link creation in a the profile diagram
From the property view, the context can be specified:
Figure 5: specify context from the property view
Specify the language
It is possible to precise the language of the constraint into Papyrus. The constraint body may be written into OCL, JAVA, or natural language.
In order to make constraints usable by the Papyrus, constraint must be written in OCL or JAVA.
How to
By default if your try to edit a constraint, default language will be OCL.
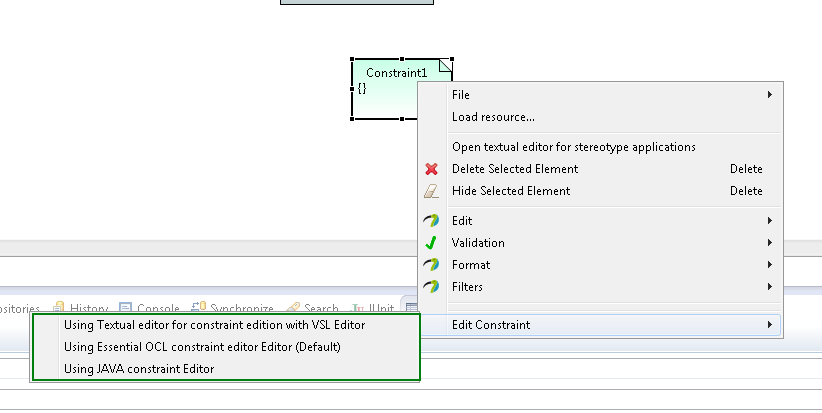
At the creation, after set the context, you can choose the editor for the constraint:
Figure 6: choose the editor for the constraint
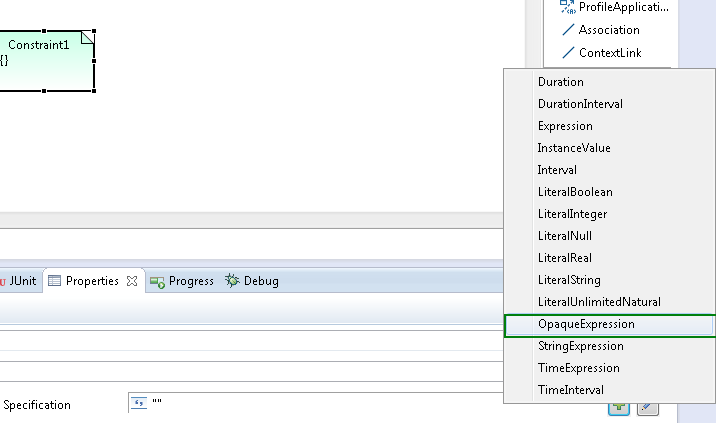
You can also specify the language in the property view:
- Select the field specification and choose create or edit the associated opaque expression:
Figure 7: creation of a specification for the constraint
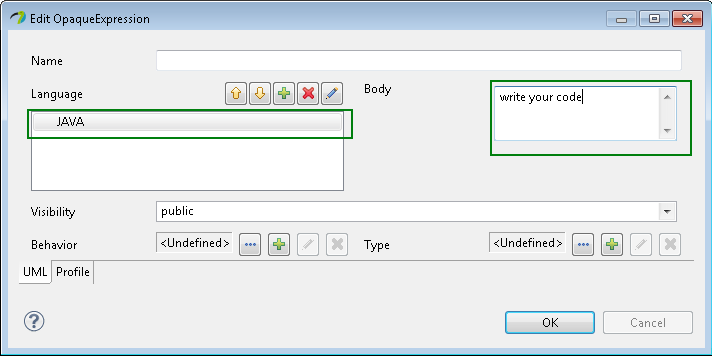
You can add the language, see following figure:
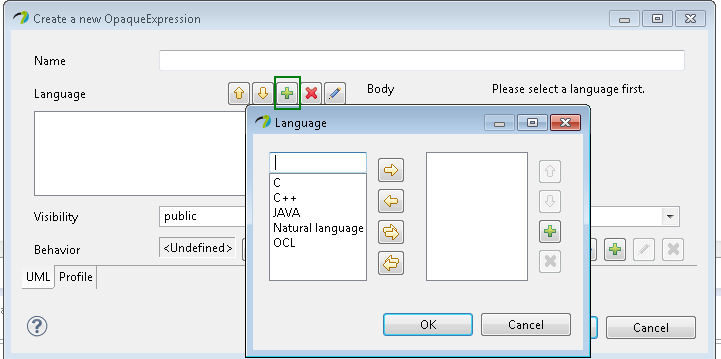
Figure 8: specify the language
Then if you want you write the body in the specified language:
Figure 9: Write the body of the opaque expression
Specify the behavior of the constraint in the context of validation
Into Papyrus, the behavior of the constraint during the validation can be precise.
It is possible to precise:
- The mode, if the validation of the constraint can be done, in t “batch” or “live” mode.
- The severity: The severity of the problem if the constraint is violated. This correlates to the severity of tasks in the Tasks view of the Eclipse environment. The default severity (if none specified) is ERROR. The CANCEL severity should be used with caution, as it causes the validation operation to be interrupted, possibly resulting in the loss of valuable diagnostic information from other constraints.
- The message: the message that will be displayed if the constraints is violated
- The description: a description of the constraint
- If it is enable by default: Indicates if this constraint should be enabled by default.
For advanced user you can also precise:
- The Id : the constraint id
- The status code: The plug-in unique status code, useful for logging.
- the target of validation, the element to be validated
How to
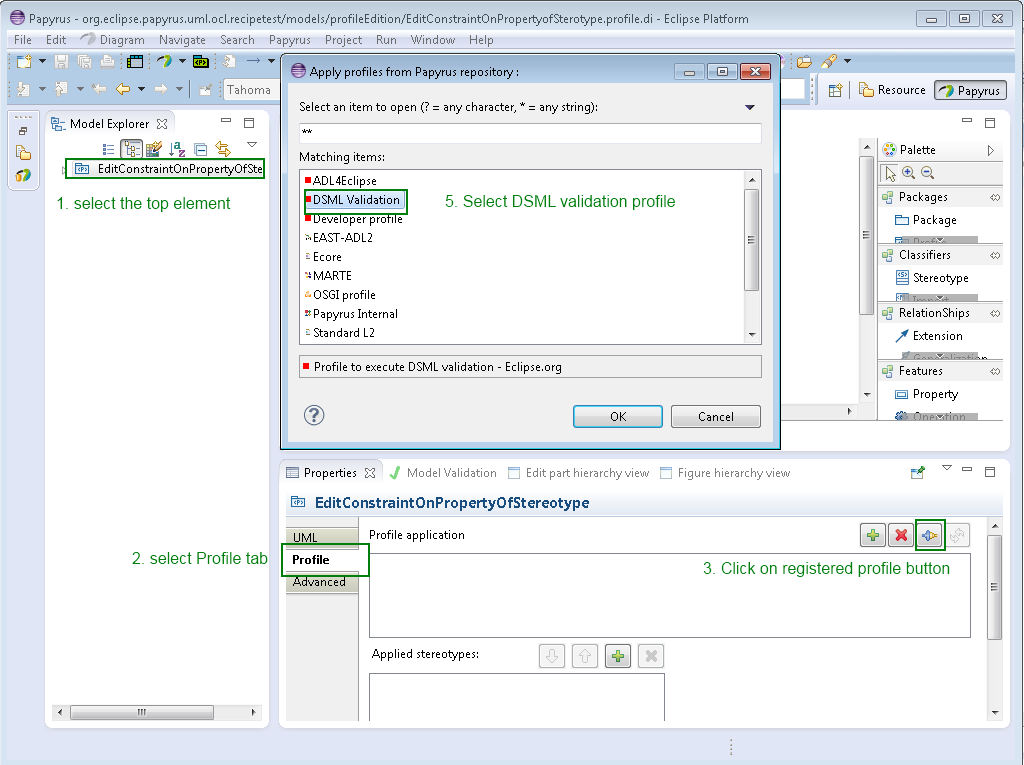
Apply the DSML validation profile
- 1. Select the profile root and apply the profile
- 2. Select the profile tab in the property view
- 3. Click on the registered profile button
- 4. Selection the DSML validation profile
Figure 10: apply DSML profile
Apply Stereotype on constraint
- 1. Select the constraint
- 2. Select profile tab of the property view
- 3. Click on apply profile button
- 4. Select validationRule stereotype
Figure 11: Apply validationRule stereotype
Then you can edit property of stereotype to add information about the behavior of the validation
Figure 12: edition of the property of stereotype
Generation from Constraints
Figure 13: Constraint generation
Generate constraints directly into the definition
Constraint written in OCL in the profile can be generated into the definition of the profile and taken in charge during the validation of the model.
How to
When you save the profile,Papyrus asks to you if want to define the profile.
Click on yes and then do not forget to check save OCL constraint in the definition
Figure 14: save OCL constraints in the definition
Generate constraints as EMF validation plugins
The user can generate plugins that wrap constraint and can be used in the EMF plugin validation.
The constraint can be generated in Java code, or directly from OCL.
How to
Select the root profile
Click right on the model explorer-> create validation plugin for this DSML
Then a wizard to create the validation is launched. You have to give a name for you validation plugin.
Figure 15: wizard of constraint validation creation
The you need to install the created plugin.

