Notice: this Wiki will be going read only early in 2024 and edits will no longer be possible. Please see: https://gitlab.eclipse.org/eclipsefdn/helpdesk/-/wikis/Wiki-shutdown-plan for the plan.
Difference between revisions of "Papyrus/Papyrus Developer Guide/Release Process: How To"
(→Useful commands to do this (optional - if you do not have any other choices available)) |
(→Useful commands to do this (optional - if you do not have any other choices available)) |
||
| Line 120: | Line 120: | ||
| − | + | ==== Useful commands to do this (optional - if you do not have any other choices available) ==== | |
Place yourself at the root of the git repository. | Place yourself at the root of the git repository. | ||
Revision as of 05:44, 1 September 2016
The Papyrus project is built using Tycho with this releng project: Releng
Contents
Hudson Jobs
The Papyrus builds are started from Hudson. The following jobs on the Neon branch exist currently. There should always be the following jobs on each release branch:
- papyrus-Master : builds the main plug-ins of Papyrus
- papyrus-Master-Analysis : static analysis of the code, i.e. findBugs, sonar...
- papyrus-Master-Tests : builds the tests for the main plugins of Papyrus
- papyrus-Master-Tests-Failures : tests identified as failed, not regressions, kept to keep the main tests clean and without spams
- papyrus-Master-Developer : developer tools, such as debug views in eclipse, papyrus diagram code generator and building tools
- papyrus-Master-Extra : builds the "extra" plug-ins of Papyrus
- papyrus-Master-Extra-Tests : builds the tests for the "extra" plug-ins
See all the currently defined Papyrus jobs on the page : https://hudson.eclipse.org/papyrus/view/<Eclipse version> You can add the name of the eclipse release to find the associated jobs, i.e. Mars, Luna...
Before starting a build
General Information
Unlike Nightlies, Milestone builds are publicly available to anyone downloading the latest Developer Build of Eclipse. This implies a few differences in terms of quality of the release:
- All artifacts must be signed, using the Eclipse Certificate
- The build must be as stable as possible. Especially, any Blocker or Critical bug must be fixed before the release
- All License files must be available and up-to-date
- All plug-in metadata must be defined (Especially, bundle name, bundle vendor and feature description)
- The Papyrus update site must contain everything that is not already contained in the Eclipse Simrel repository (i.e. any plug-in from an Eclipse Project that is not in the release train)
Must Have
As a rule of thumbs, before starting your build journey it is preferable to possess a clean install of the Eclipse you want to test your build against. Then install the following on it (some may require you to fetch previously build components from other projects that contributes earlier in the train:
- Use an Eclipse with Papyrus developer tools installed from the following update site, eg for Master:
- Install the tpd updater tool from this Github project from this update site:
It can be useful to have the Git View active and import the following repositories in it:
- The Papyrus (a clean clone is also useful to have for the builds as it will be much less susceptible to be corrupted by your daily work):
- The Simrel on which you will later post your updated aggregator file:
It is also very important to follow the discussion on the Eclipse cross-project-issues-dev Mailing List.
What is built?
Taking the example of "papyrus-Master", we use the releng's pom.xml files.
These files must include all features, plugins and update sites that must be built, either directly or indirectly.
The releng's pom.xml files also specifies how to get the plug-ins and features that are to be built and specifies the update sites from which to retrieve the binary dependencies from the dependent projects.
Updating the releng's target platform's (.tpd) dependencies
The file reflects the dependencies on the other projects. So, it must be updated at least before each milestone, to make sure that the code that is built works with the latest versions of all the dependencies.
A good/nice practice is to also update Oomph's papyrus.setup while we are at it.
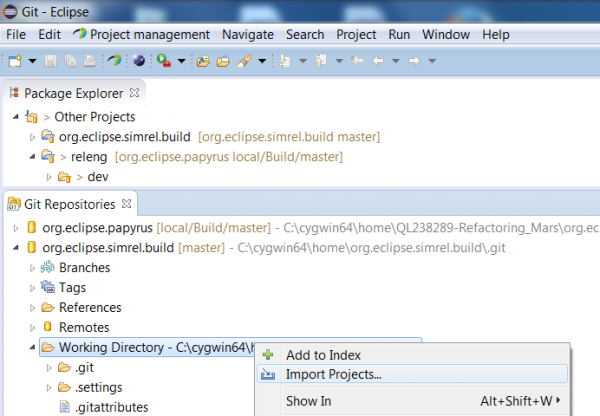
The easiest way to update the dependencies is to copy them from the aggregation build model, which all projects must fill in with the correct reference to their update site(s) and feature(s).
This model is in a project with the release name on the Eclipse Git:
First:
Verify that the branch is up to date (fetch and rebase or a pull).
git fetch origin
git rebase origin/master
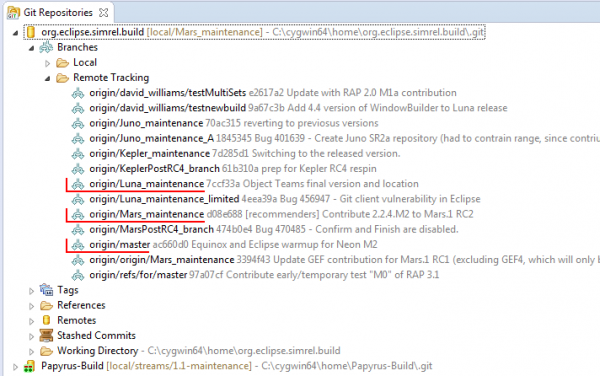
Be on the correct branch of the simrel repository before selecting the aggregation model in order to have the correct addresses of the papyrus' version dependencies (master or <Eclipse version>_maintenance, e.g. Luna_maintenance) as the models will differ from one another and result in erroneous updates.
Second:
Update the target's dependencies adresses to the latest release available.
Then verify that both the .tpd and .target have been correctly updated and that the changes are coherent (e.g. with eclipse, Compare with > HEAD revision).
A few dependencies are not in the aggregation build model though, so they must be updated manually (e.g. nebula). To get them check the tpd's '// manualUpdate' tags.
find . -name "*.tpd" | xargs grep -a2 -n "manualUpdate" {}
Finding manual dependencies update site
If you don't know where a particular plug-in or feature is located, the easiest way to find it is to search the Eclipse download area using "find" on the ssh of build.eclipse.org. For example, using the ssh connection to the eclipse repository, to look for "org.eclipse.emf.compare" :
find /home/data/httpd/download.eclipse.org/modeling/emf/ -name 'org.eclipse.emf.compare_*'
Updating the versions (optional)
During a release you can have to update the plugin versions and their linked features and categories as the API and other contents of the plug-in change, in accordance with the Eclipse Versioning Guidelines. The PDE API Tooling builders help to identify version number changes that are required by flagging problems on the bundle manifests. Also, if enabled, the Oomph Version Management builders perform additional checks, including;
- consistency of POM version number with plug-in/feature manifest
- ripple effect of bundle version number changes up to features that include tham
Also, be aware that some version number changes also require updates to other metadata, such as the category.xml and the *.product definition files for any RCP packages (especially for feature version changes).
As of the Neon release, Papyrus plug-in and feature versions are not bulk updated to the "next" version number as they were in previous releases. Accordingly, BundleTestUtils.java (tests>junit>plugins>developer>org.eclipse.papyrus.bundle.tests) no longer tracks the expected current version number of bundles. Correct versions are enforced by PDE and Oomph tooling.
Useful commands to do this (optional - if you do not have any other choices available)
Place yourself at the root of the git repository.
You can find the dependencies to update using the following:
find . -name "MANIFEST.MF" | xargs grep -n "Bundle-Version: 2.[0-9].[0-9]" | grep -v "target" | grep -v "2.0.0.qualifier" | awk -F "org.eclipse.papyrus." '{ print "org.eclipse.papyrus."$2}' | awk -F "/" '{print "id=\""$1"\""}' > query.plugins
That will yield you all the bundles which version numbers are greater than 2.0.0 (which is the current release version at this time).
After this you will need to look at the different features containing those updated plugins and see if they were updated accordingly:
find ./features -name "feature.xml" | grep -v "target" | xargs grep -n -f query.plugins {} | awk -F "/" '{print "id=\""$4"\""}' > feature.look
You will need to look at those features to see their versions but do not forget to look at the category.xml and *.product to verify that their references to those features point to the correct versions. You should repeat the process to update all the dependencies by sifting through the result incrementally [>...]:
find ./features -name "feature.xml" | grep -v "target" | xargs grep -n -f feature.look {} [>...]
Now for a little explanation of what does what:
- the find command will look for all the files which name matches the one in the double quotes
- then it will use this result | to search for all occurrences of the string between the second double quotes
- then we filter out results that are not wanted grep -v
- then we separate awk the different fields -F of the results using org.eclipse.papyrus. as a field separator and we print org.eclipse.papyrus. plus the 2nd $2 field
- those results will be used to get the id=... that will be used to search the features
- after that we put all the results in a file > query.plugins
Then we proceed more or less the same way to filter out the necessary changes on the features.
Push the modifications (tpd,target and version) on gerrit
When pushing to the papyrus' gerrit you should use the standardized message :
- [Releng] Update dependencies for <Eclipse Version> <Milestone> (e.g.: [Releng] Update dependencies for Mars M7)
Then wait for a committer to merge the changes brought by this commit.
How to start a build?
Builds, master and maintenance, are run automatically every night, every day and each hour if there has been a commit. When a build following specific changes is required, wait for the gerrit contribution to be merged and launch the main build and the the extras (both will launch their associated tests upon completion). Then once both are successful launch a signed build for each of them.
Note that the tests depend on the xxx-Developer build. Therefore don't forget to launch this one before or you will have an error (in case of a version update for example as the tests will only find the old version).
Manually
Only committers or release engineers in the Papyrus project can launch Papyrus build jobs from Hudson.
Go to the wanted page if you want to launch a selected build (e.g.: Mars page)
Then:
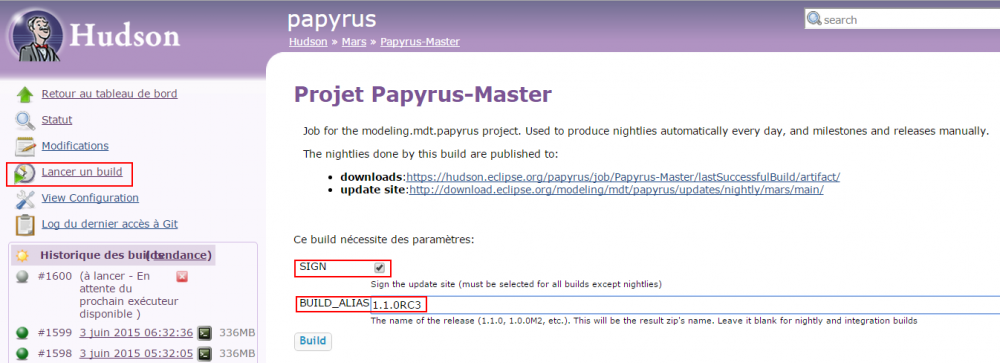
- In Hudson, click on Build Now, change the #Build parameters as needed, and click on Build.
- You can then click on the job name in the Build History section in the left column, and then on Console Output, to follow build progress in real time.
Build parameters
Hudson builds expect these parameters:
- BUILD_ALIAS : the name of the release (0.9.0, 1.1.0M6, etc.); leave it blank for nightly and integration builds
- SIGN : whether to sign the update site (can take up to an hour on the Eclipse build server); mandatory for all builds except nightlies
Warning: Don't forget to do the same manipulation for the Master-Extra.
Tip: As the signing of the build can take quite a long time, it is recommended to launch a non-signed build first as the tests are automatically launched at the end of a master branch build. As the tests roughly take the same amount of time you can see if the current build passes the tests without having to wait the extra time needed by the signing step.
How to publish a build?
Nightly builds
Successful Nightly builds are automatically published to :
Milestones / Release Candidate
Stable builds are not automatically published. They should be first tested internally before publishing. For example, to publish the 1.1.0M6 milestone build:
- First, the build is on the update site nightly http://download.eclipse.org/modeling/mdt/papyrus/updates/nightly/mars/
- Then, install the build and test it manually
Publish builds
To publish a milestone or release from a build, you can use the following scripts on: /opt/public/modeling/mdt/papyrus/
- manualPromote.sh for Luna
- manualPromote-mars.sh for Mars, ...
if there are any doubt on which to use, you can always search the repository for the present promote scripts and pick the correct one: ls -la .
Start this script, and fill in the parameters in the interactive script:
- the signed builds numbers
- the corresponding version
- the update site in which to publish it
Be careful however as Hudson does not make, as of yet, a zip for the tests and the current script will crash if a build number is provided and it does not find any corresponding zip. This may lead to some, fixable but annoying, access permissions problems.
For example:
In the previous example, the script will:
- publish the main Papyrus plug-ins from Papyrus-Master build #1600 to the Papyrus download in "drops/1.1.0" and the update site in "milestones/1.1/RC3/main"
- publish the extra plug-ins from Papyrus-Master-Extra build #1237 to the Papyrus download in "drops/1.1.0" in the same build folder as the main build, and the update site in "milestones/1.1/RC3/extra"
- do not publish the test results from Papyrus-Master-Tests build
- make "milestones/1.1/RC3" a composite update site, which contains "milestones/1.1/RC3/main" and "milestones/1.1/RC3/extra"
- enable p2 download statistics both on "milestones/1.1/RC3/main" and "milestones/1.1/RC3/extra"
- set the correct linux access rights on the new folders
Once the script is done, all you have left to do is to:
- Tag the build: Releases should have a tag like 1.1.0, and milestones like 1.1.0_M6
- update the aggregation model if this build must be part of the simultaneous release
Add a new update site with the new build to the parent composite (~/downloads/modeling/mdt/papyrus/updates/milestones/1.1/):
- update both the
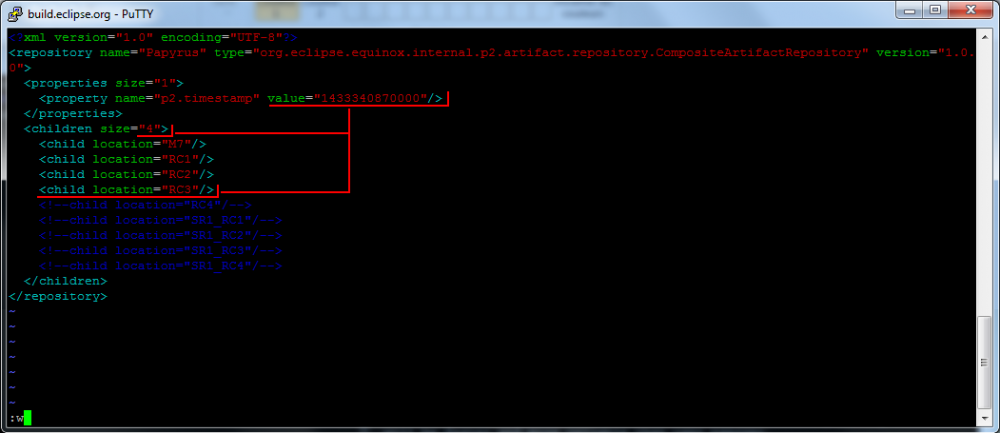
compositeContent.xmlandcompositeArtifacts.xmlfiles of the update site (that are located in the parent of the folder to which you extracted the update site) to add a reference to your newly added update site- set the value of p2.timestamp to the result of "
date +%s000" - increase the "size" attribute of the children element
- add a "child" element inside the "children" element with a "location" set to the name of the folder (e.g "M6")
- set the value of p2.timestamp to the result of "
- Check that the new build appears on http://www.eclipse.org/papyrus/downloads/.
- Check the edited composites on http://download.eclipse.org/modeling/mdt/papyrus/updates/milestones/?d. (or [...]/releases/?d in case of a release)
- and add browse through the directory content to check your version, e.g.: /1.1 will give you the edited root composites, and 1.1/M6 will give you the main and extra composites
Builds can be hidden from this page before a release by modifying downloads-scripts.php in /downloads/ on git://git.eclipse.org/gitroot/www.eclipse.org/papyrus.git
Simultaneous Release
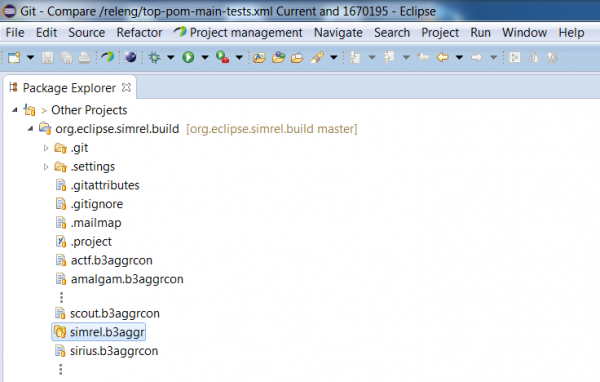
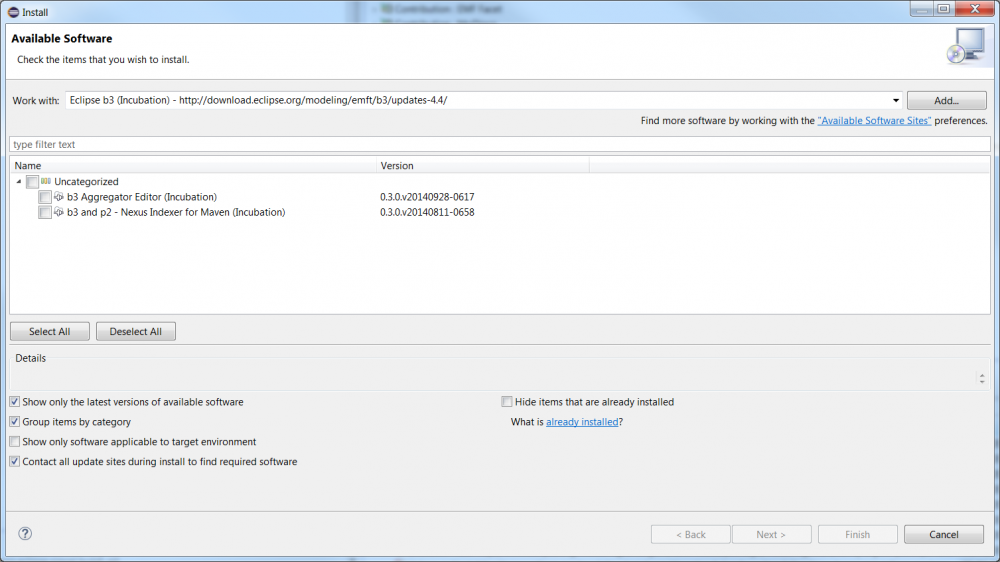
Install the b3Aggregator plugin by selecting the wanted version from the directory.
If the build must be part of the simultaneous release, you must also:
- Use the B3 Aggregator (or a text editor if the modification is trivial) and push to the simrel's gerrit which path is : ssh://username@git.eclipse.org:29418/simrel/org.eclipse.simrel.build.git)
Usually, the only thing to change is the location (for example "milestones/1.1/M6/main"):
<repositories location="http://download.eclipse.org/modeling/mdt/papyrus/updates/milestones/1.1/M6/main" description="Papyrus">
Tip: You can check the status of the contribution at simrel's gerrit page
Tagging
Releases should have a tag like 1.1.0, and milestones should have a tag like 1.1.0_M6.
Finalizing the Release
When the release is complete and has been tagged in the repository, it is time to prepare the next release's development branch for continued version management. One aspect of this is ensuring that the Oomph Version Management tool's reference baseline for the next release completely and correctly describes the release just completed.
Oomph maintains a description of the release in the release.* files in the Papyrus release bundles in the plugins/developer tree. So far, these are:
- oep.releng.main.release for the Papyrus Main product bundles and features
- oep.releng.dev.release for the Papyrus Developer Tools bundles and features
The release.xml file is a manifest of all of the features and bundles, with their versions and the relationships between them, that comprise the Papyrus Release and the release.digest is a more efficient binary representation of the same that is loaded by Oomph tooling when needed. The Oomph Version Management builder creates these automatically from the current workspace and PDE target configuration, so long as all of the Papyrus feature projects are in the workspace. To rebuild the release description, simply delete the release.xml and release.digest files and they will be rebuilt with all of the requisite metadata to describe what is now the "previous release" reference baseline for the next release.
Checking
Check simrel reports
After the simrel build, you can check the reports at :
Check installations
Check installation from the simrel/staging update site at :
- http://download.eclipse.org/releases/staging (Master)
- http://download.eclipse.org/releases/maintenance (Maintenance)


