Notice: This Wiki is now read only and edits are no longer possible. Please see: https://gitlab.eclipse.org/eclipsefdn/helpdesk/-/wikis/Wiki-shutdown-plan for the plan.
Difference between revisions of "Papyrus/Codegen/Adding a New Code Generator"
(→The User Interface Project ("org.eclipse.papyrus.x.codegen.ui")) |
(→The User Interface Project ("org.eclipse.papyrus.x.codegen.ui")) |
||
| Line 102: | Line 102: | ||
[[File:CodeGen-Plugin-Project-UI-Creation-12.png]] | [[File:CodeGen-Plugin-Project-UI-Creation-12.png]] | ||
| − | * The second extension | + | * The second extension you need to add is '''org.eclipse.ui.commands''' and you need to create a command for it also, which has the following the properties: in the '''id''' box type '''org.eclipse.papyrus.x.codegen.command''', in the '''name''' and '''description''' bozes type '''Generate X Code''', in the '''categoryId''' box type '''org.eclipse.papyrus.editor.category''' and in the '''defaultHandler''' box type '''org.eclipse.papyrus.x.codegen.ui.handlers.GenerateCodeHandler'''. |
[[File:CodeGen-Plugin-Project-UI-Creation-13.png]] | [[File:CodeGen-Plugin-Project-UI-Creation-13.png]] | ||
| − | * Careful readers has already noticed that there is a warning occuring after this step (see the Problems tab on the above figure). The reason for this warning is that | + | * Careful readers has already noticed that there is a warning occuring after this step (see the '''Problems''' tab on the above figure). The reason for this warning is that you defined a default handler that does not exist yet. To go to source of the problem, double-click to the warning and create a new handler class (keep default properties in the create class dialog window). |
[[File:CodeGen-Plugin-Project-UI-Creation-14.png]] | [[File:CodeGen-Plugin-Project-UI-Creation-14.png]] | ||
| − | * The created handler class should extend the | + | * The created handler class should extend the '''CmdHandler''' class which is located in the '''org.eclipse.papyrus.acceleo.ui''' plug-in. Thus, add this plug-in to the dependencies and then implement the unimplemented methods. To see how this handler is executed, add a system verbose inside its '''execute()''' method. |
[[File:CodeGen-Plugin-Project-UI-Creation-14-2.png]] | [[File:CodeGen-Plugin-Project-UI-Creation-14-2.png]] | ||
| − | * The last extension | + | * The last extension you need to add is '''org.eclipse.ui.preferencePages'''. Upon its creation, it comes with a default page. Modify the properties of this page as follows: in the '''id''' box type '''org.eclipse.papyrus.x.codegen.ui.preferences.CodeGenPreferencePage''', in the '''name''' box type '''X code generation''', in the '''class''' box type '''org.eclipse.papyrus.x.codegen.ui.preferences.CodegenPreferencePage''' and in the '''category''' box type '''org.eclipse.papyrus.infra.core.sasheditor.preferences.generalcategory'''. |
[[File:CodeGen-Plugin-Project-UI-Creation-15.png]] | [[File:CodeGen-Plugin-Project-UI-Creation-15.png]] | ||
| − | * However, like before, there is a warning occuring after this step (see the Problems tab on the above figure). The reason for this warning is that | + | * However, like before, there is a warning occuring after this step (see the '''Problems''' tab on the above figure). The reason for this warning is that you defined a '''preference page''' that does not exist yet. To go to source of the problem, double-click to this warning and creat a new preference page class (keep default properties in the create class dialog window). |
[[File:CodeGen-Plugin-Project-UI-Creation-15-2.png]] | [[File:CodeGen-Plugin-Project-UI-Creation-15-2.png]] | ||
| − | * The created preference page class should extend the | + | * The created preference page class should extend the '''PreferencePage''' class and implement the '''IWorkbenchPreferencePage''' interface. Normally, no modification is needed after the creation of the preference page class. |
[[File:CodeGen-Plugin-Project-UI-Creation-15-3.png]] | [[File:CodeGen-Plugin-Project-UI-Creation-15-3.png]] | ||
| − | * Now let's try what | + | * Now let's try what you have done so far and see your code generation menu on a real case. In this sense, to create an '''Eclipse Application''' run configuration click '''Run > Run Configurations...''' and in the '''VM arguments''' box type: '''-Dosgi.requiredJavaVersion=1.7 -Xmn256m -Xms512m -Xmx512m -Xss4m -XX:PermSize=256m -XX:MaxPermSize=256m'''. |
[[File:CodeGen-Plugin-Project-UI-Creation-16.png]] | [[File:CodeGen-Plugin-Project-UI-Creation-16.png]] | ||
| − | * Then click | + | * Then click '''Run''' to run our eclipse application. In the new eclipse instance, click '''File > New > Example...''', click '''C/C++ hello world example''' under the '''Papyrus examples''' folder and click '''Next >'''. |
[[File:CodeGen-Plugin-Project-UI-Creation-17.png]] | [[File:CodeGen-Plugin-Project-UI-Creation-17.png]] | ||
| − | * After, | + | * After, select a parent folder for your example and click '''Finish'''. In this example, there is a '''CodeGenerationExamples''' java project that was created in advance. |
[[File:CodeGen-Plugin-Project-UI-Creation-18.png]] | [[File:CodeGen-Plugin-Project-UI-Creation-18.png]] | ||
| − | * The example project will be created and the | + | * The example project will be created and the '''HelloWorldOO.di''' Papyrus model will be opened directly. There is only one class diagram which is called '''HelloWorld''' in this model. Now, right click on the '''HelloWorld''' class and go to '''Code Generation'''. You need to see '''Generate X code''' there, click it! (Curious readers may click '''Generate C++ code''' and see how Qompass generates C++ codes.) |
[[File:CodeGen-Plugin-Project-UI-Creation-19.png]] | [[File:CodeGen-Plugin-Project-UI-Creation-19.png]] | ||
| − | * Clicking the | + | * Clicking the '''Generate X code''' pop-up menu will cause the handler to execute and thus you need to see the system verbose you defined the handler class on the console of the main workbench. |
[[File:CodeGen-Plugin-Project-UI-Creation-20.png]] | [[File:CodeGen-Plugin-Project-UI-Creation-20.png]] | ||
| − | If all the steps worked fine, | + | If all the steps worked fine, you can go on by creating the test project of your code generator. |
=== The Test Project ("org.eclipse.papyrus.x.codegen.tests")=== | === The Test Project ("org.eclipse.papyrus.x.codegen.tests")=== | ||
Revision as of 12:18, 4 November 2014
Papyrus has already have code generation support for C++ and Java programming languages. Besides, support for Ada and C programming languages are also on the way. However, it is possible to develop and integrate new code generators for other programming languages to Papyrus. In this article you will find how add a new code generator to Papyrus from scratch.
Contents
Preparing the Development Environment (Prerequisites)
This section provides a step-by-step guide to set up your development environment in order to be able to add a new code generator for Papyrus.
Assuming that you have already installed Papyrus, here are the steps you need to follow:
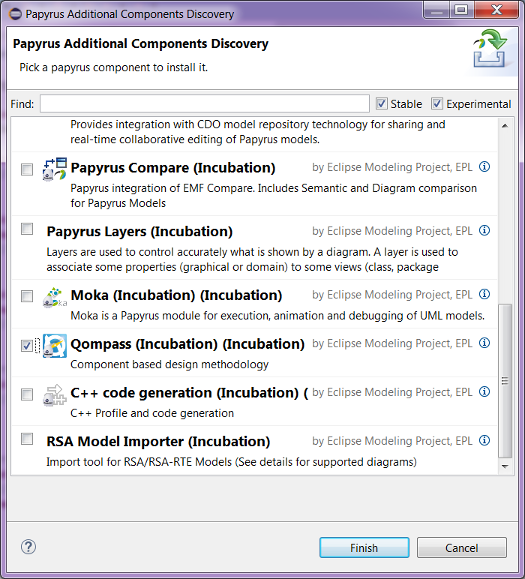
- Install the Qompass (Incubation) modeler extension from Help > Install Papyrus Additional Components.
- Clone the Eclipse/Papyrus git repository to your local computer.
Preparing the Required Projects
To be able to develop a new code generator for a programming language (let's say the X programming language), you need to create three different (but interrelated) projects.
- A main eclipse plug-in project for developing the code generator, which you should name it as org.eclipse.papyrus.x.codegen
- An eclipse plug-in project for connecting the code generator to the user interface of Qompass, which you should name it as org.eclipse.papyrus.x.codegen.ui
- Another eclipse plug-in project for developing the tests of the code generator, which you should name it as org.eclipse.papyrus.x.codegen.tests
Now, let's create and prepare all these projects one by one.
The Main Code Generation Project for the Hypothetical X Programming Language ("org.eclipse.papyrus.x.codegen")
Here are the steps for creating and setting the org.eclipse.papyrus.x.codegen project:
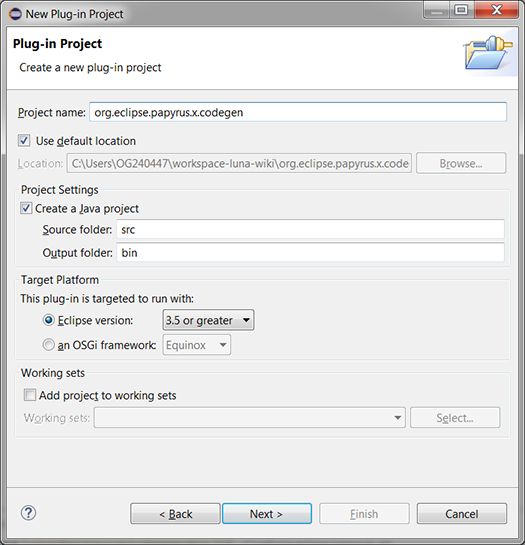
- Create an eclipse plug-in project. In the Project name box type org.eclipse.papyrus.x.codegen (as shown) and then click Next >.
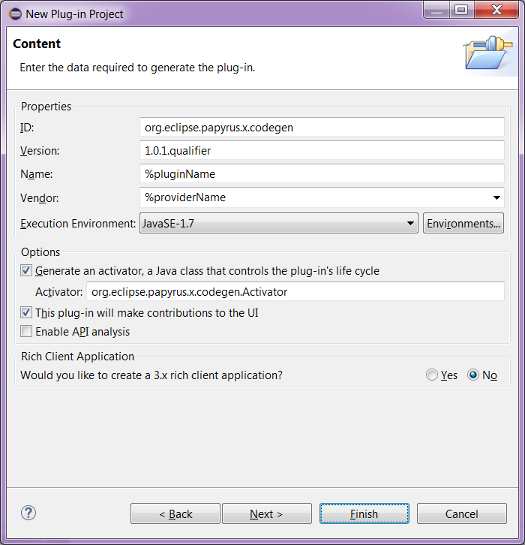
- In the Version box type the version number of our target Papyrus (in our case to 1.0.1.qualifier), in the Name box type %pluginName, in the Vendor box type %providerName and then click Finish.
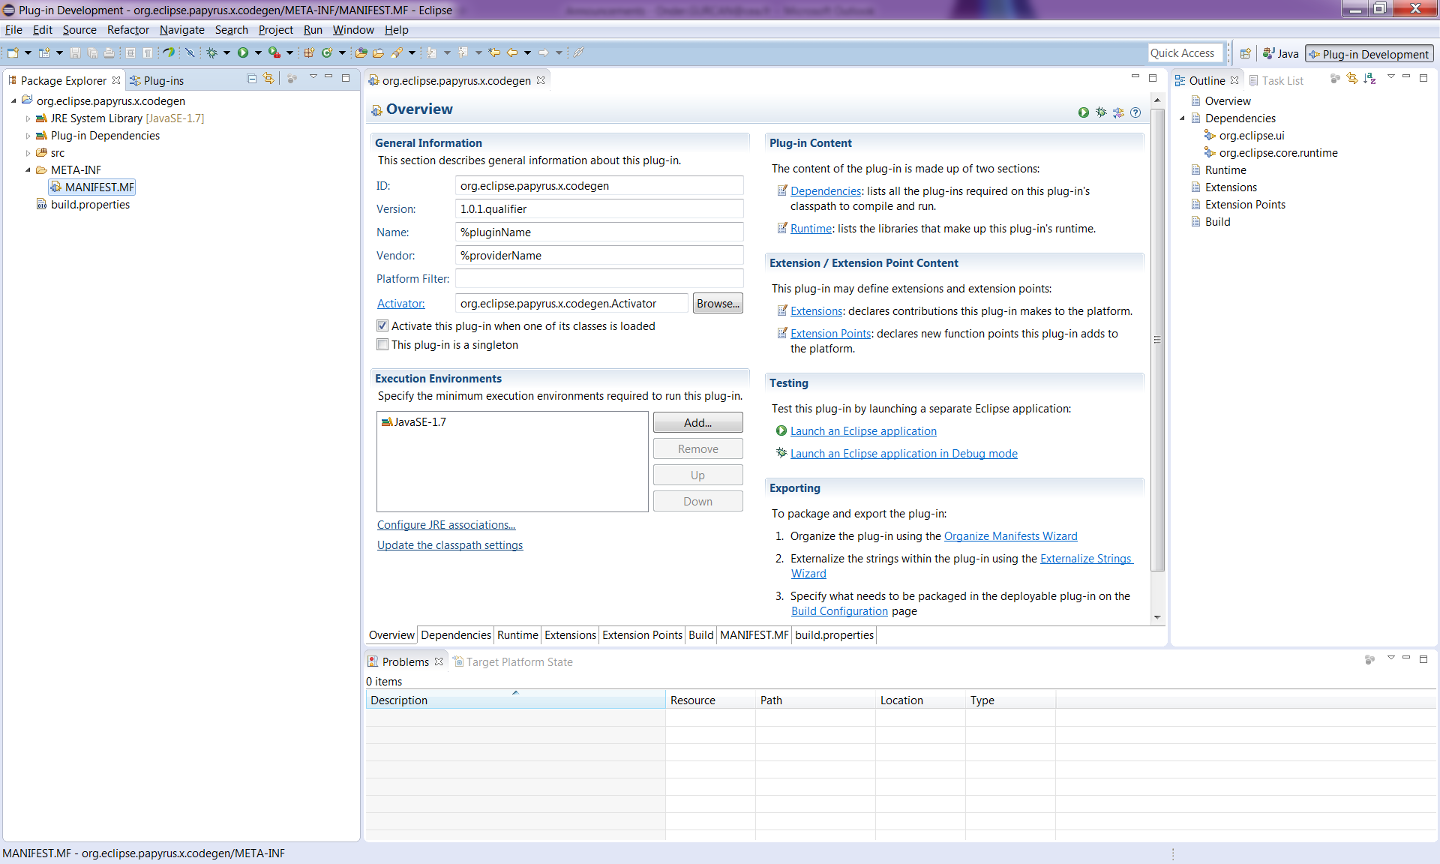
- Upon a successful project creation, you will switch to the Plug-in Development perspective and see an Eclipse workbench window like below.
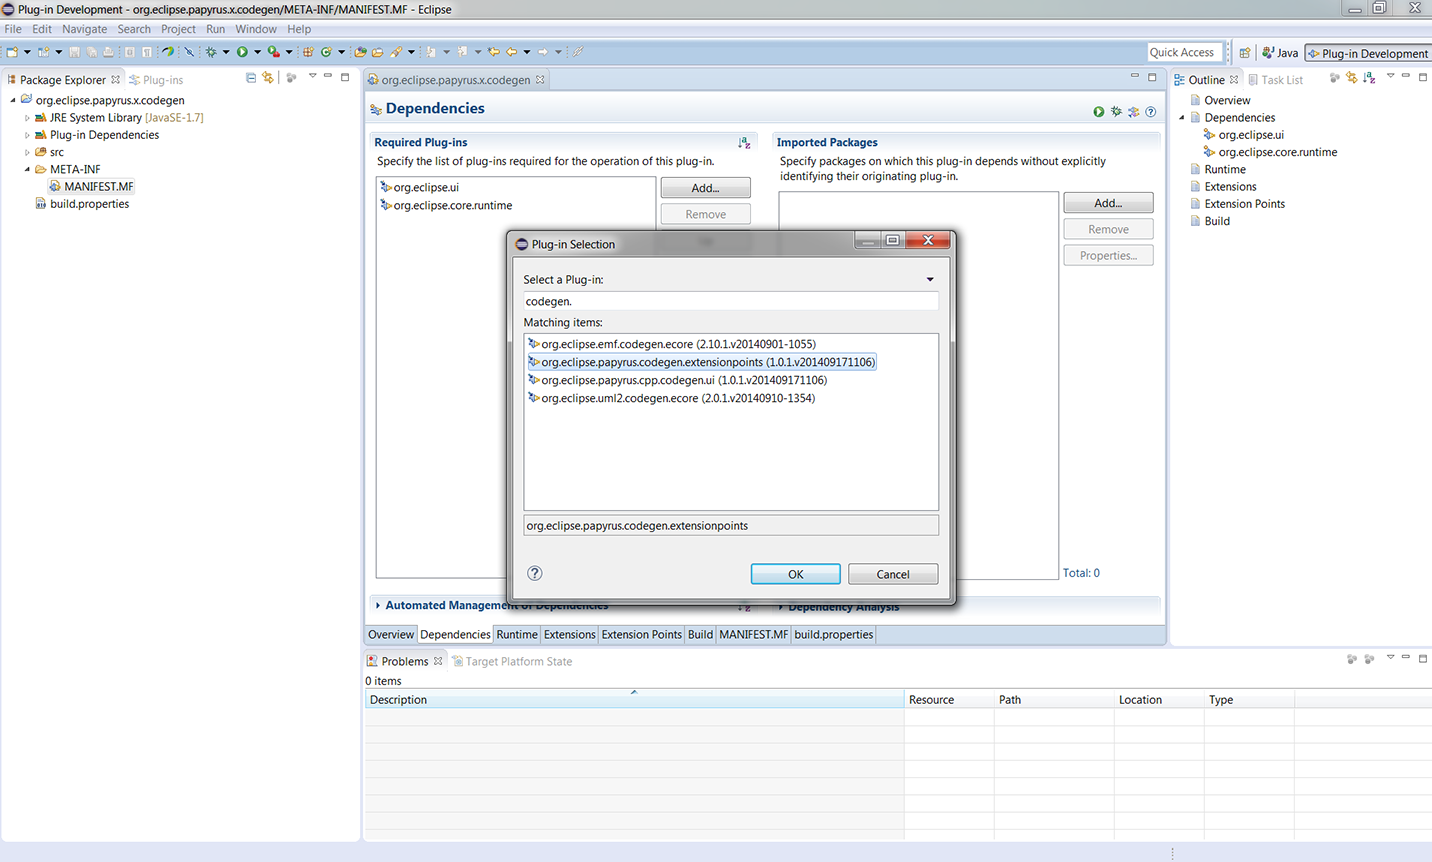
- The project is created. Now, you need to do the required settings for integrating your project to Papyrus. Firstly, add a dependency to the org.eclipse.papyrus.codegen.extensionpoints extension point.
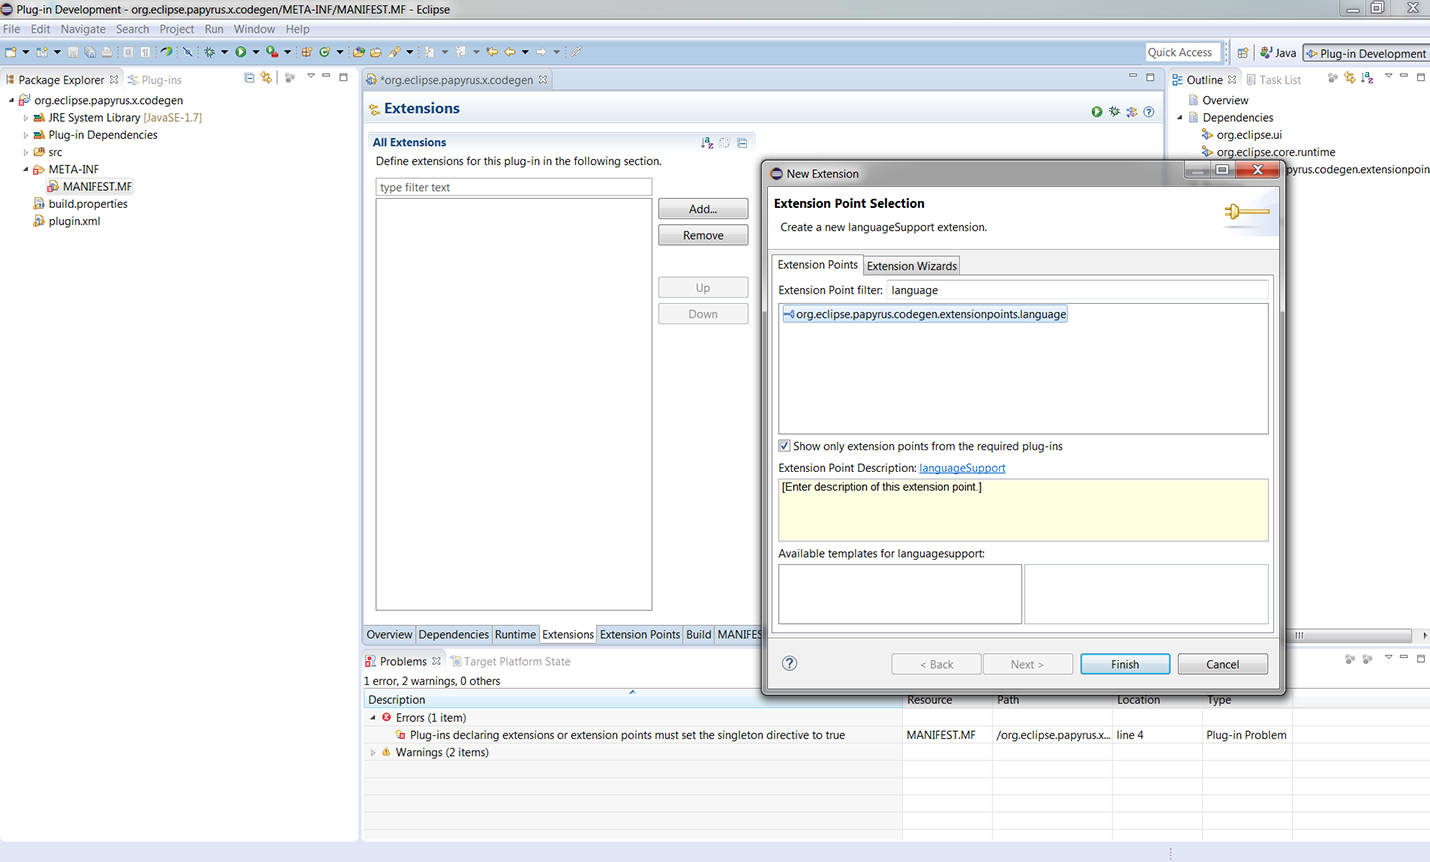
- Then add a new language support extension called org.eclipse.papyrus.codegen.extensionpoints.language.
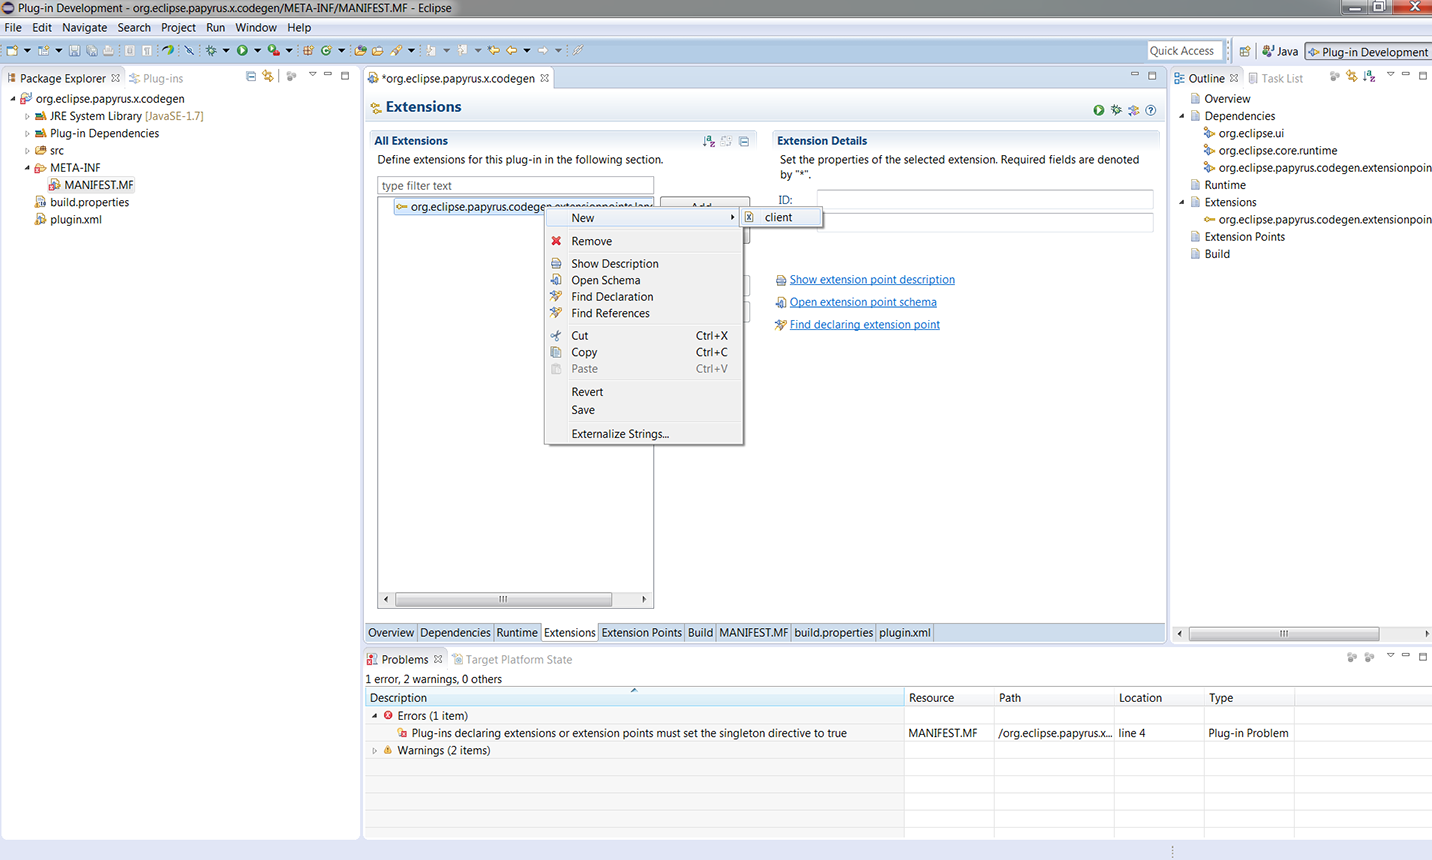
- After, create a client for this extension as shown.
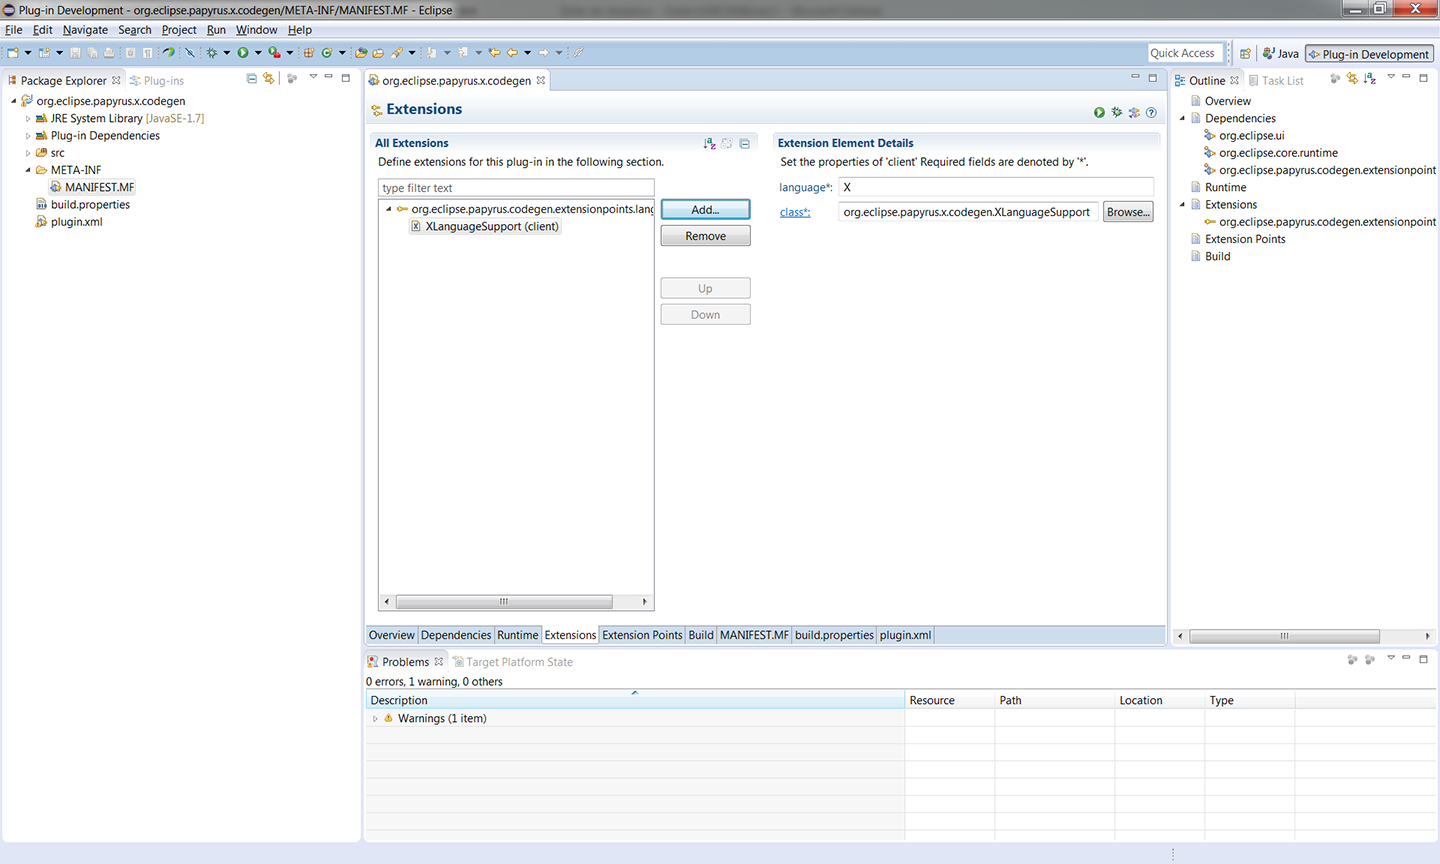
- And type in this client's language* box X, and in the class box type org.eclipse.papyrus.x.codegen.XLanguageSupport.
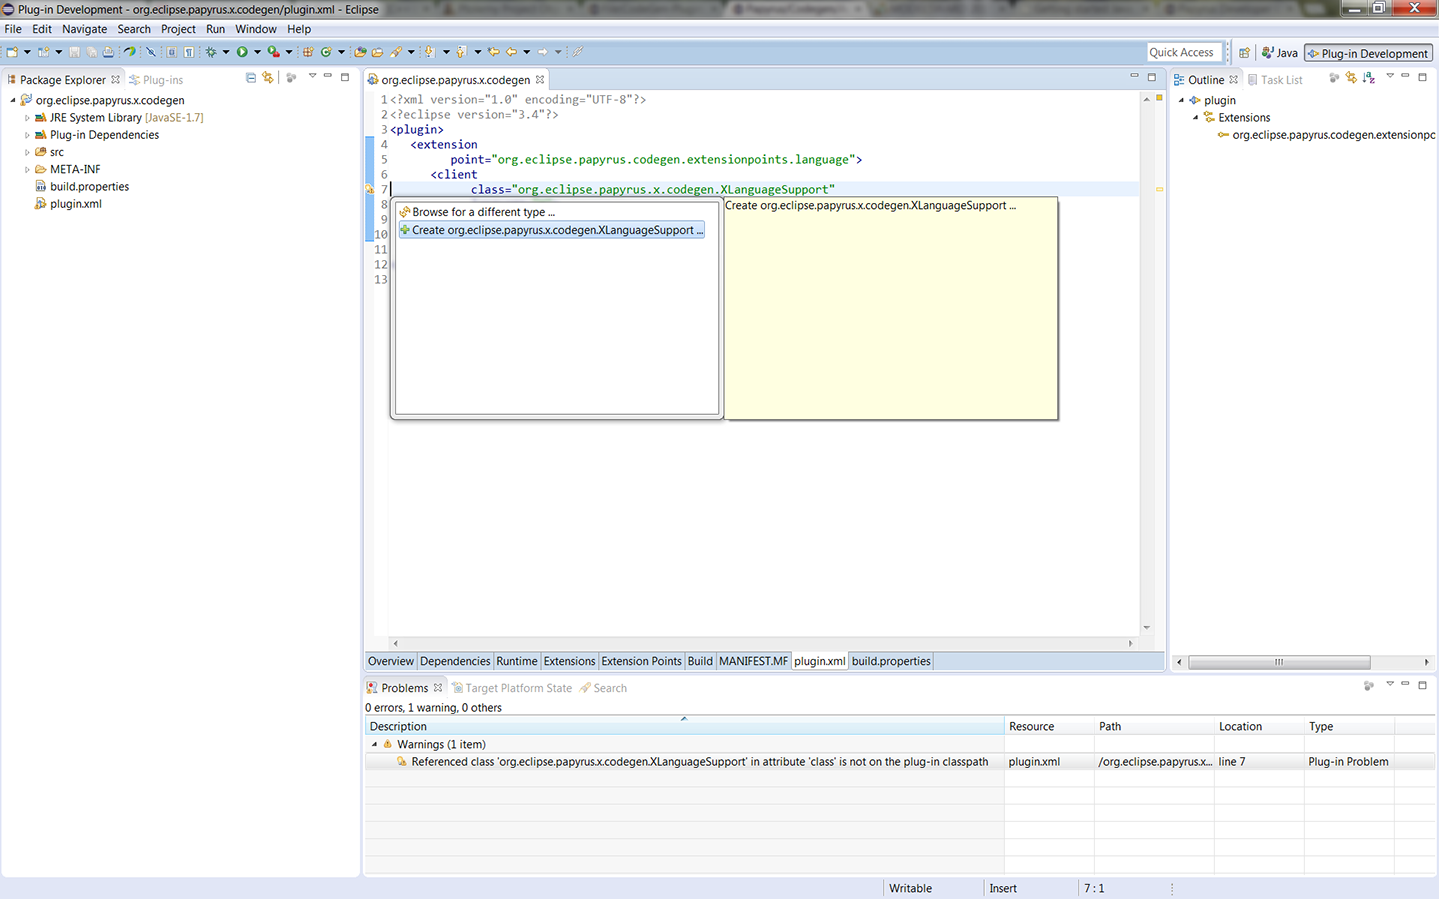
- Since you do not have such a class yet, you will see a warning like below.
- Double click on this warning. go to the warning icon on the opened editor and click Create org.eclipse.papyrus.x.codegen.XLanguageSupport ....
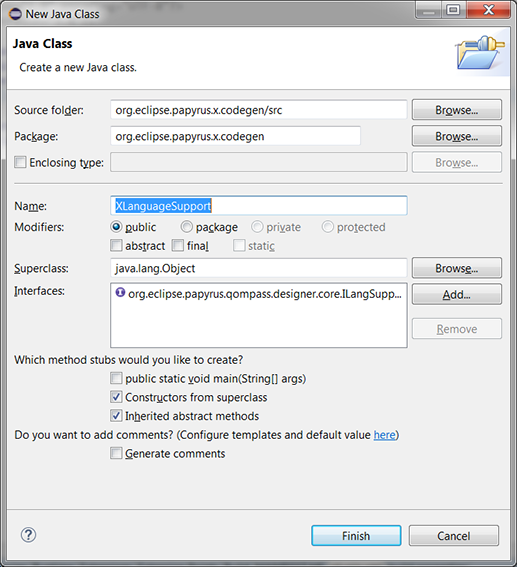
- On the upcoming dialog box, do not change anything and click Finish.
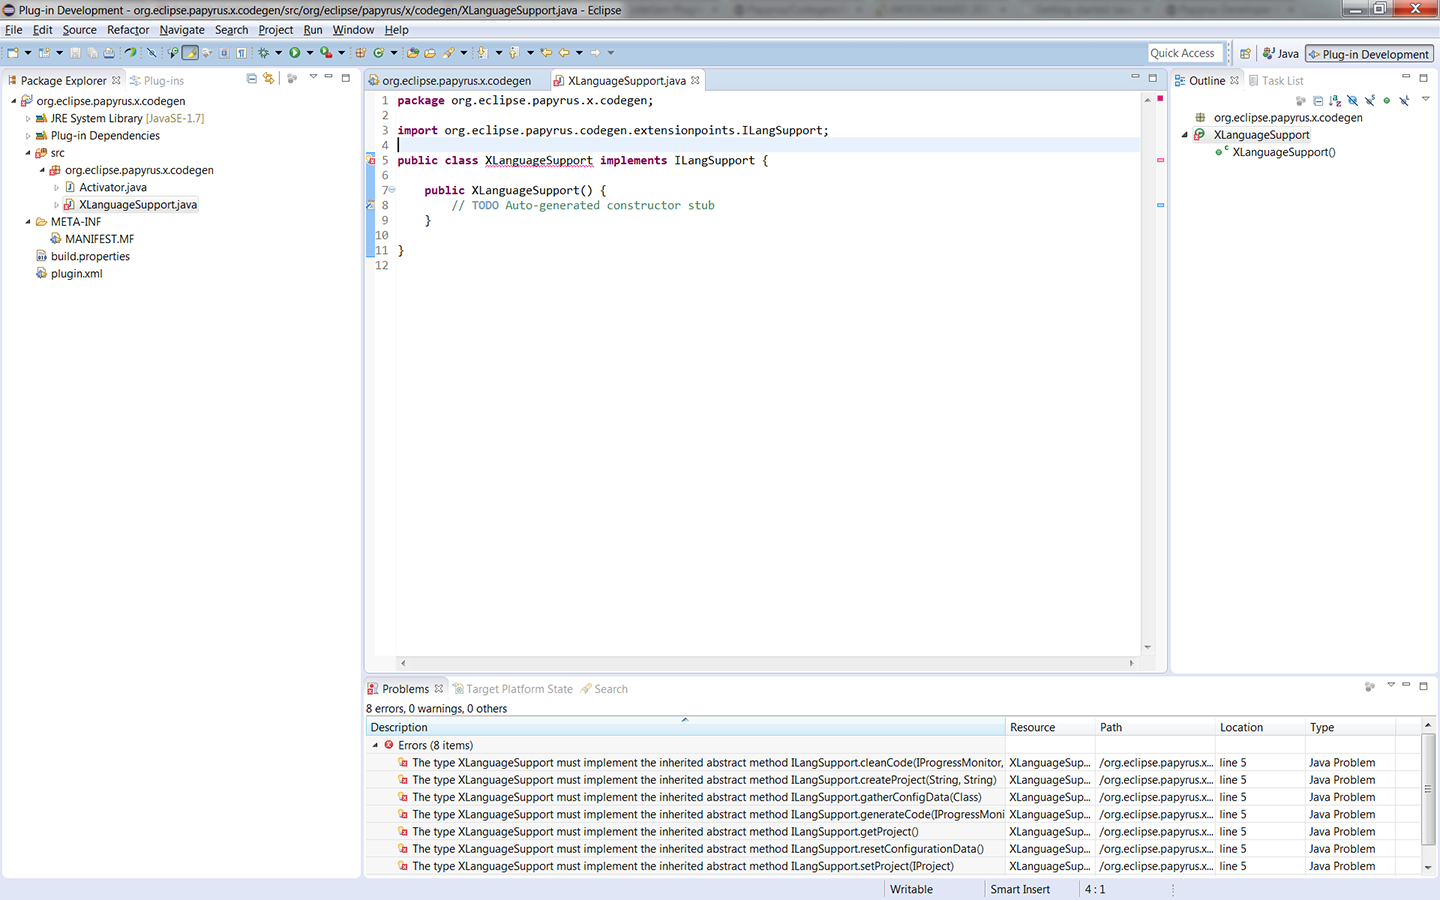
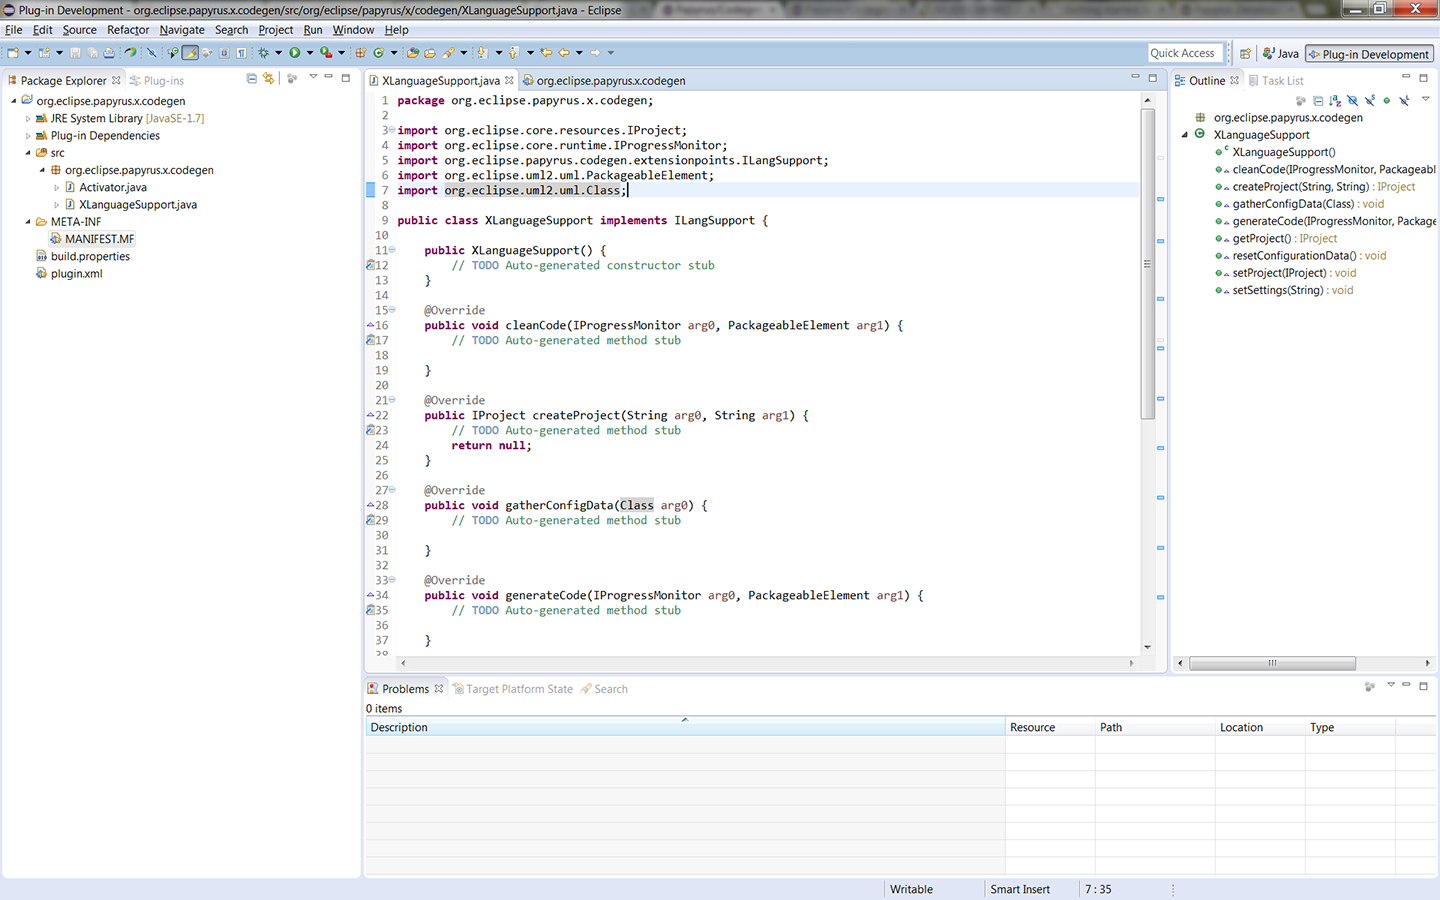
- Upon creation, you will see "XLanguageSupport.java" as below. To remove the errors, implement the methods coming from the ILangSupport interface.
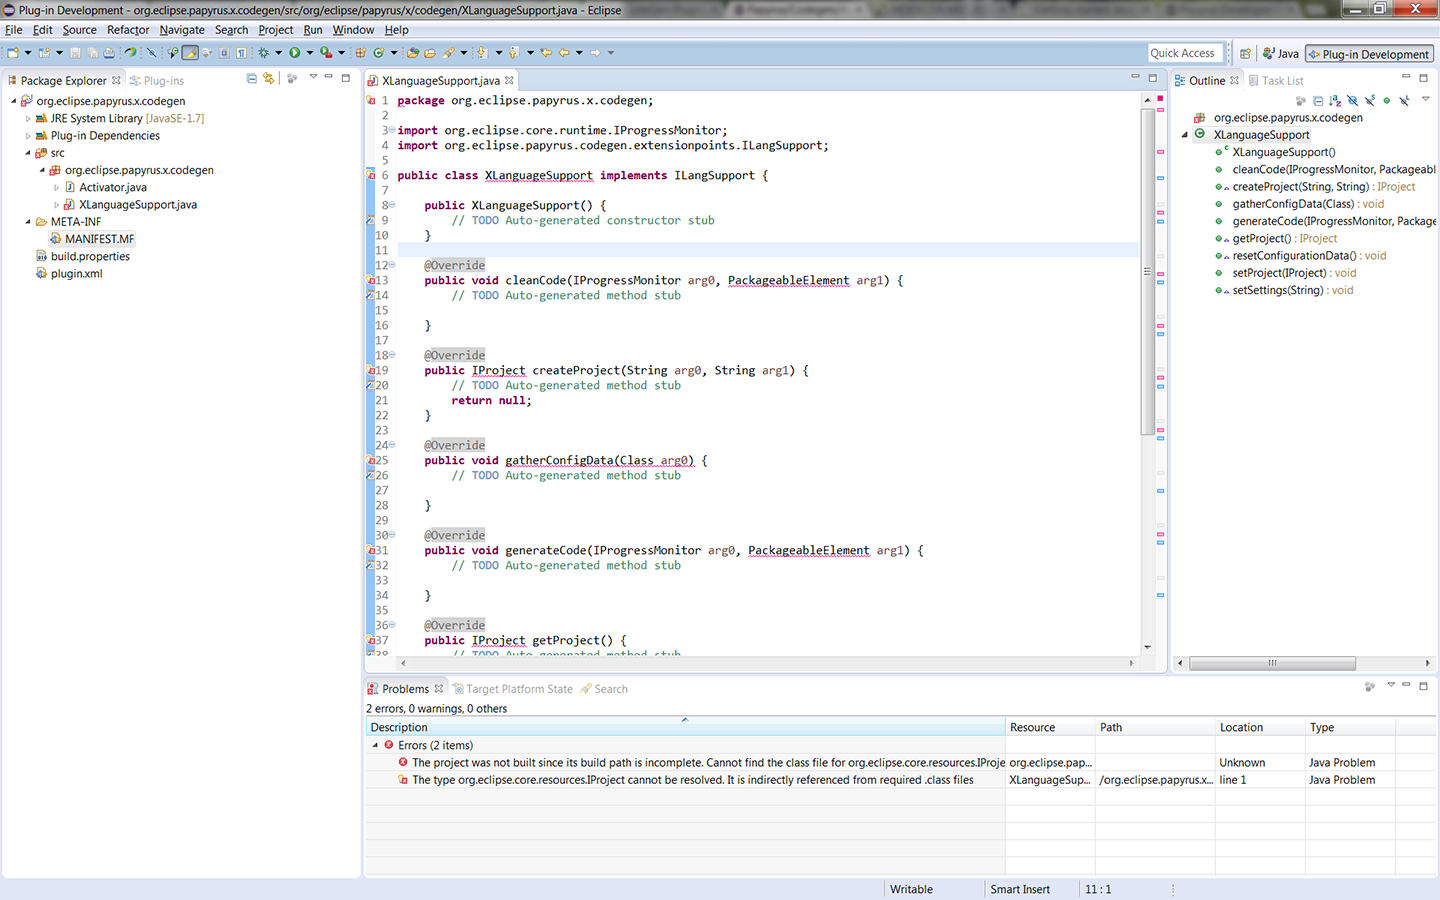
- However, there will now be other errors due to the new dependencies.
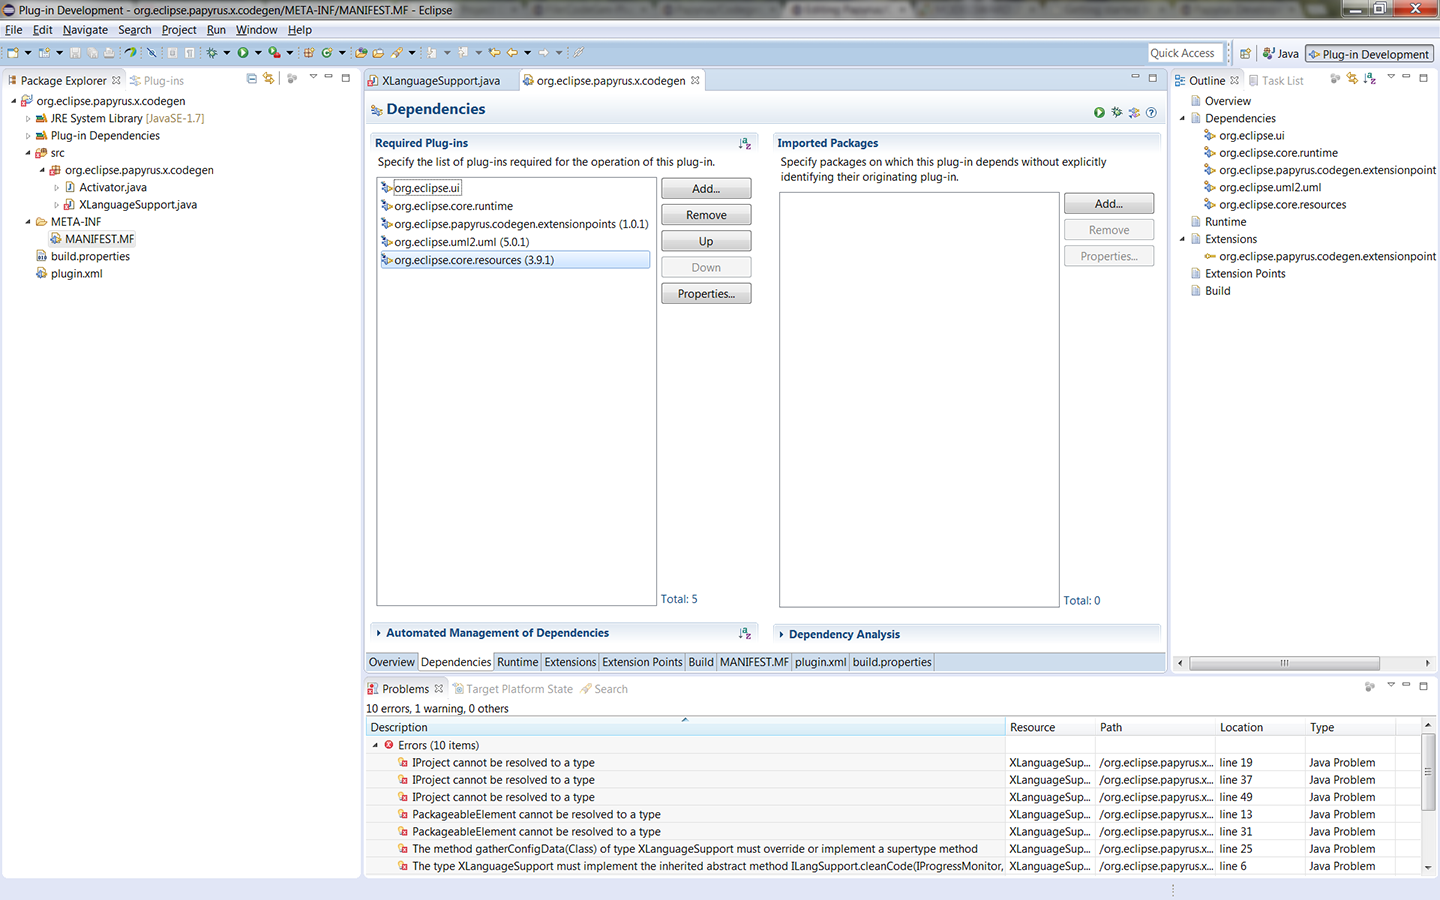
- For importing the PackageableElement and Class classes, you need the org.eclipse.uml2.uml plug-in and, for importing the IProject interface, you need the org.eclipse.core.resources plug-in. Add them as dependencies as shown below.
- Now, there must be no problem in our project.
The User Interface Project ("org.eclipse.papyrus.x.codegen.ui")
Here are the steps for creating and setting the org.eclipse.papyrus.x.codegen.ui project:
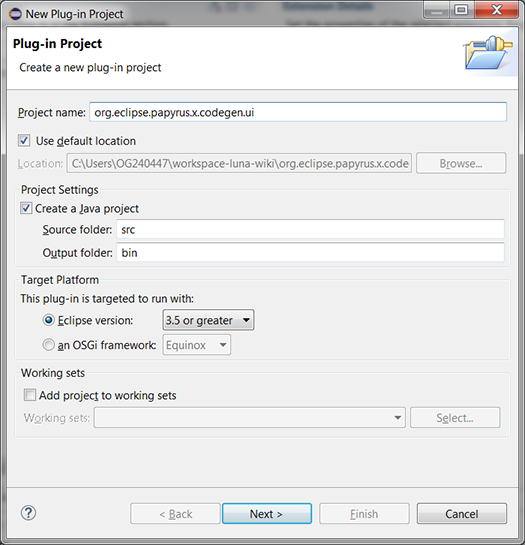
- Create an eclipse plug-in project. In the Project name box type org.eclipse.papyrus.x.codegen.ui (as shown) and then click Next >.
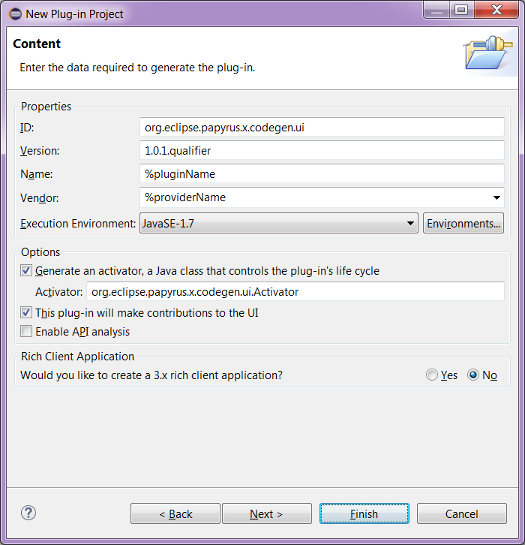
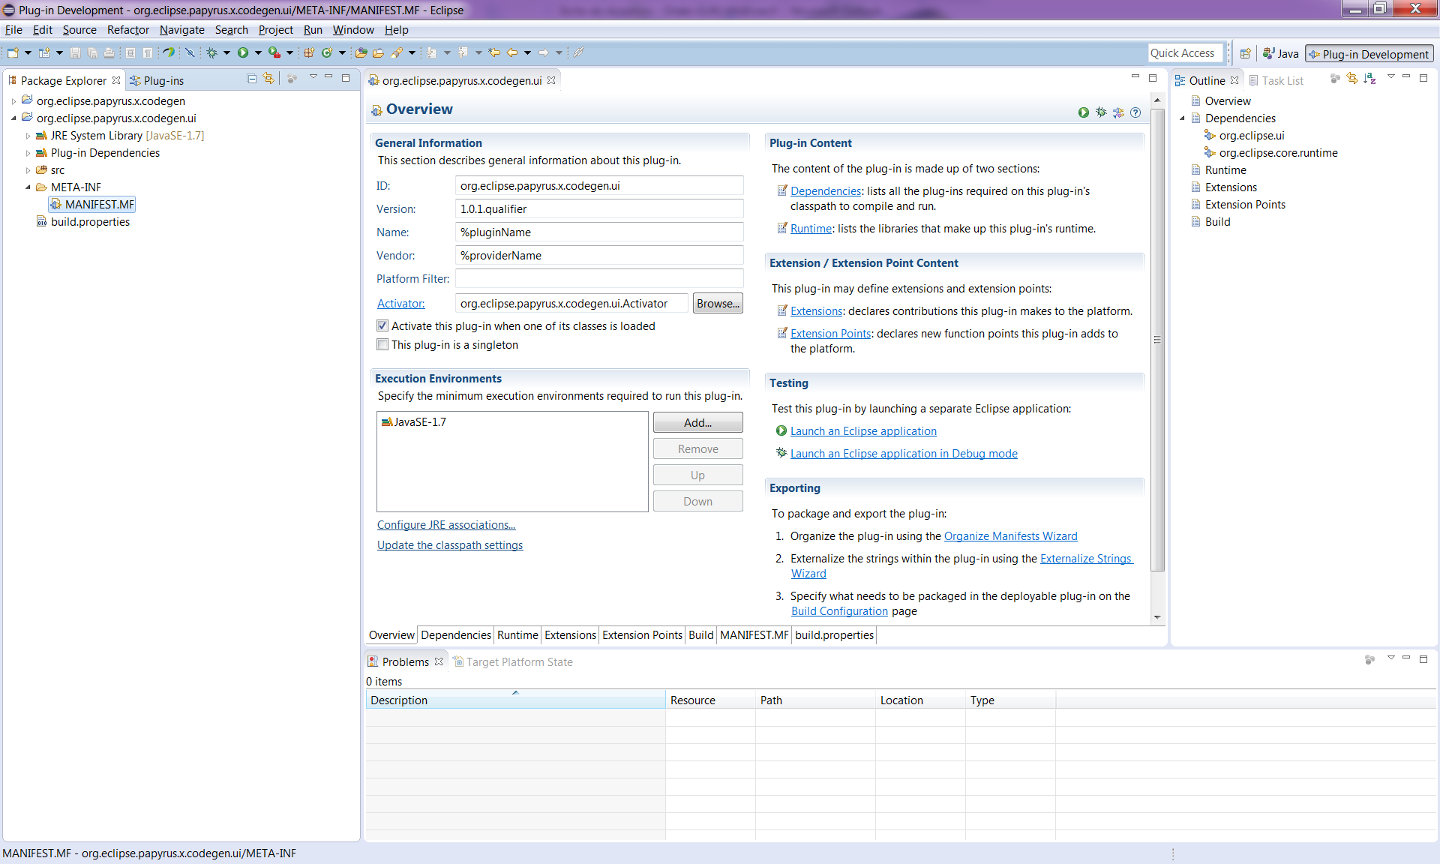
- In the Version box type the version number of our target Papyrus (in your case to 1.0.1.qualifier), in the Name box type %pluginName, in the Vendor box type %providerName and then click Finish.
- Upon a successful project creation, you will switch to the Plug-in Development perspective and see a window like below.
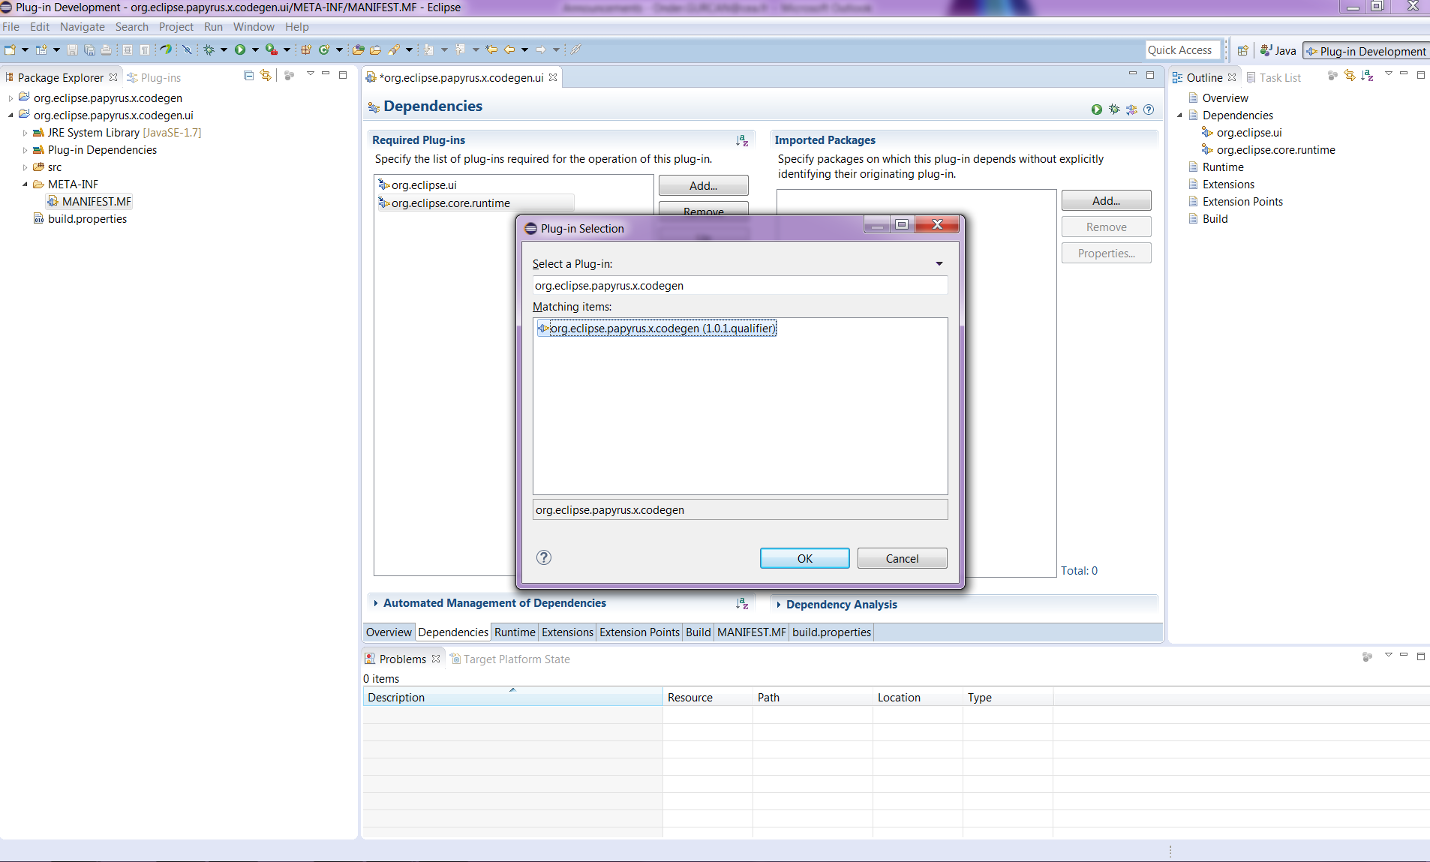
- The project is created. Now, you need to do the required settings for integrating this user interface project to the main code generation project. Firstly, add a dependency to the org.eclipse.papyrus.x.codegen plug-in, in which you prepared in the previous step.
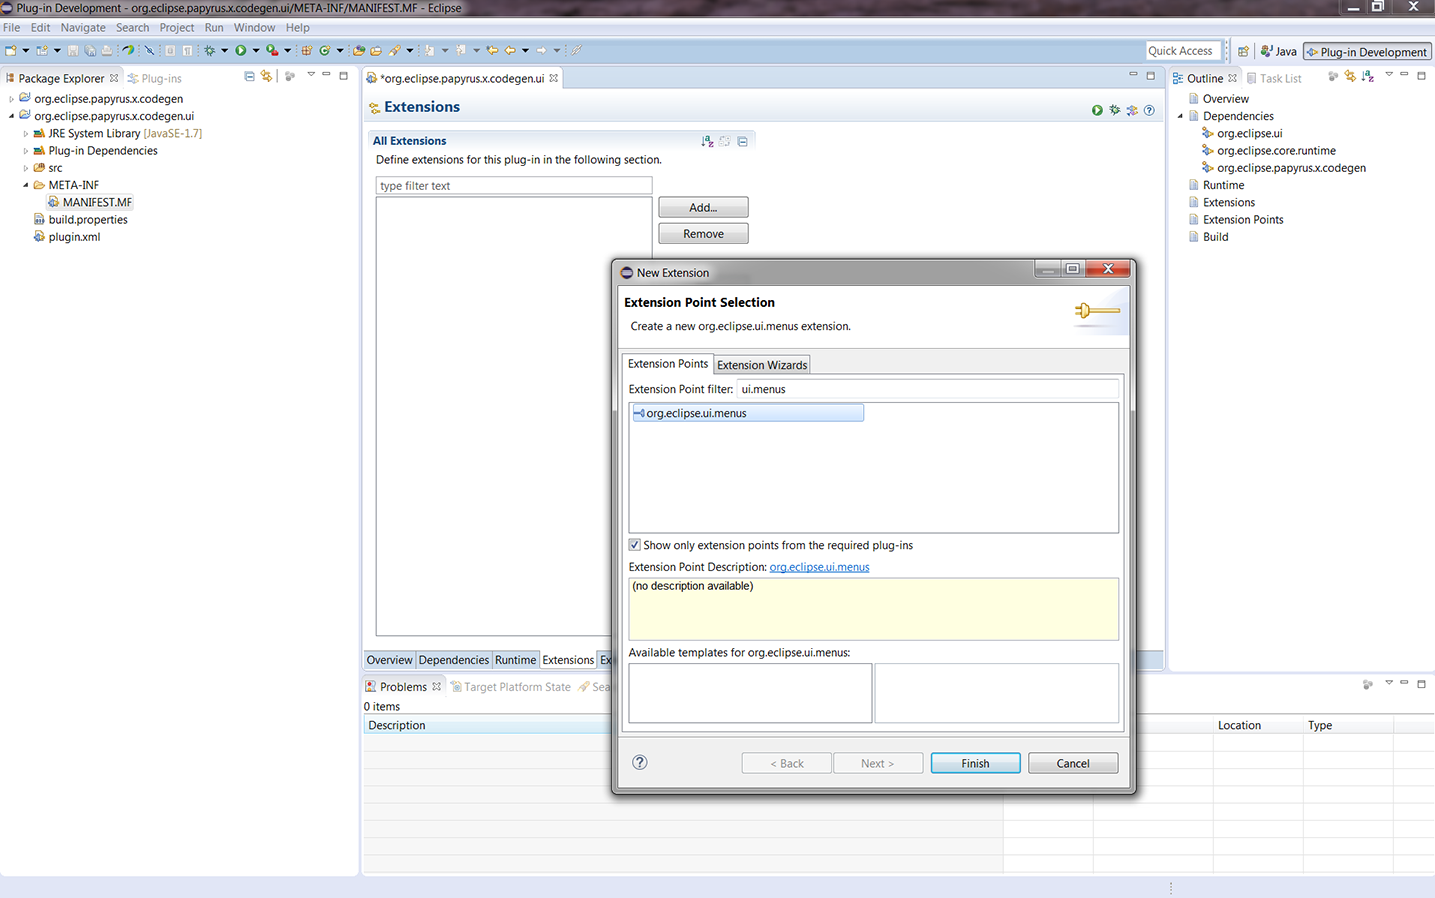
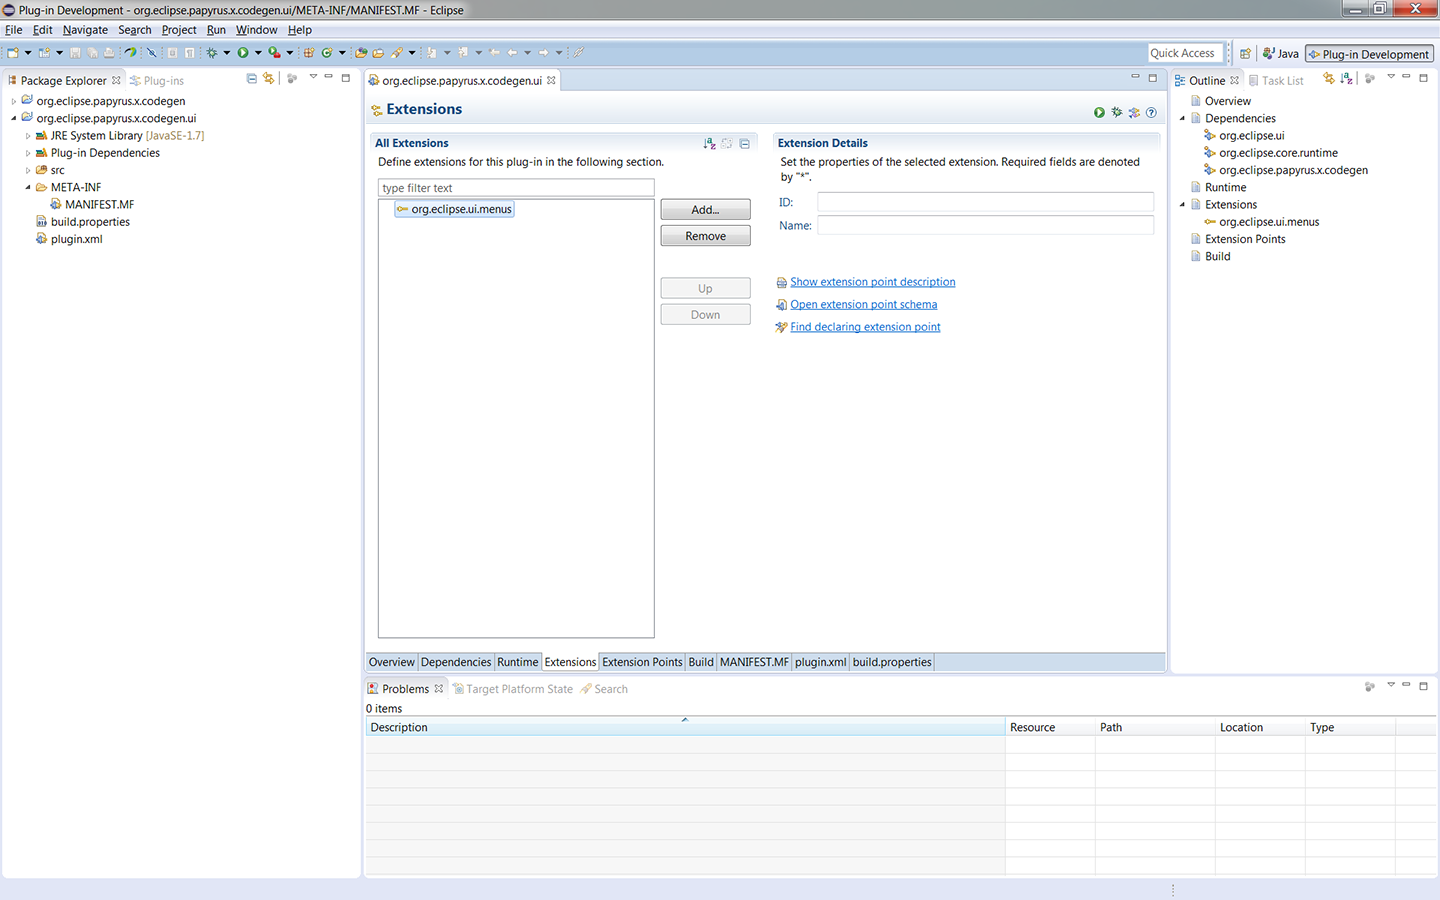
- Now you need to add some extensions for organizing your menus. Firstly, add org.eclipse.ui.menus.
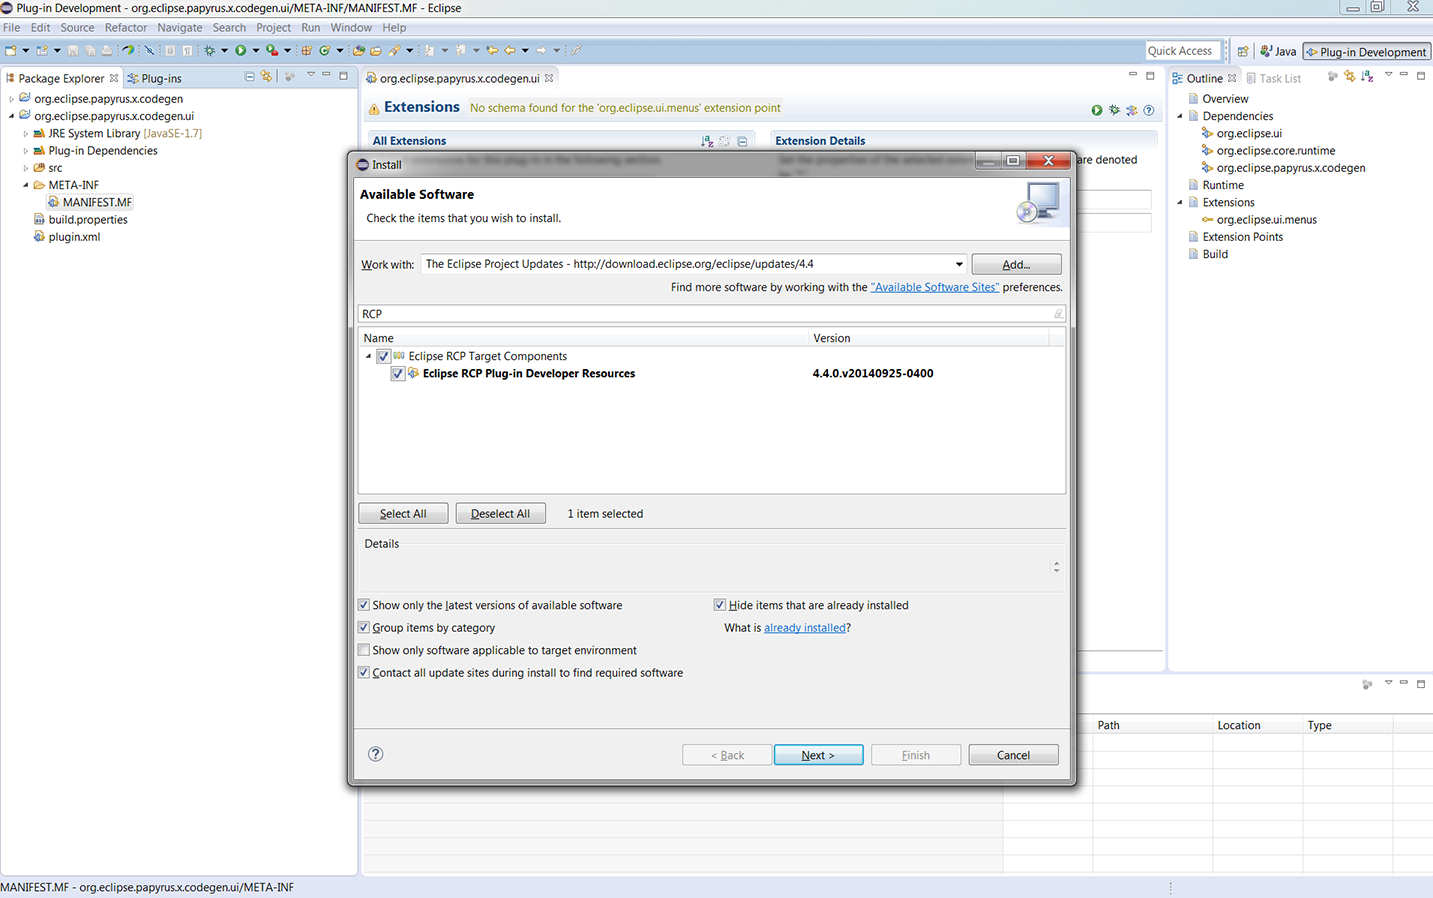
- However, upon this addition, you may see a No schema found for the 'org.eclipse.ui.menus' extension point warning message as shown.
- In this case,install Eclipse RCP Target Components to your eclipse from The Eclipse Project Updates software site.
- After following the installation instructions and restarting your eclipse, things will be fine.
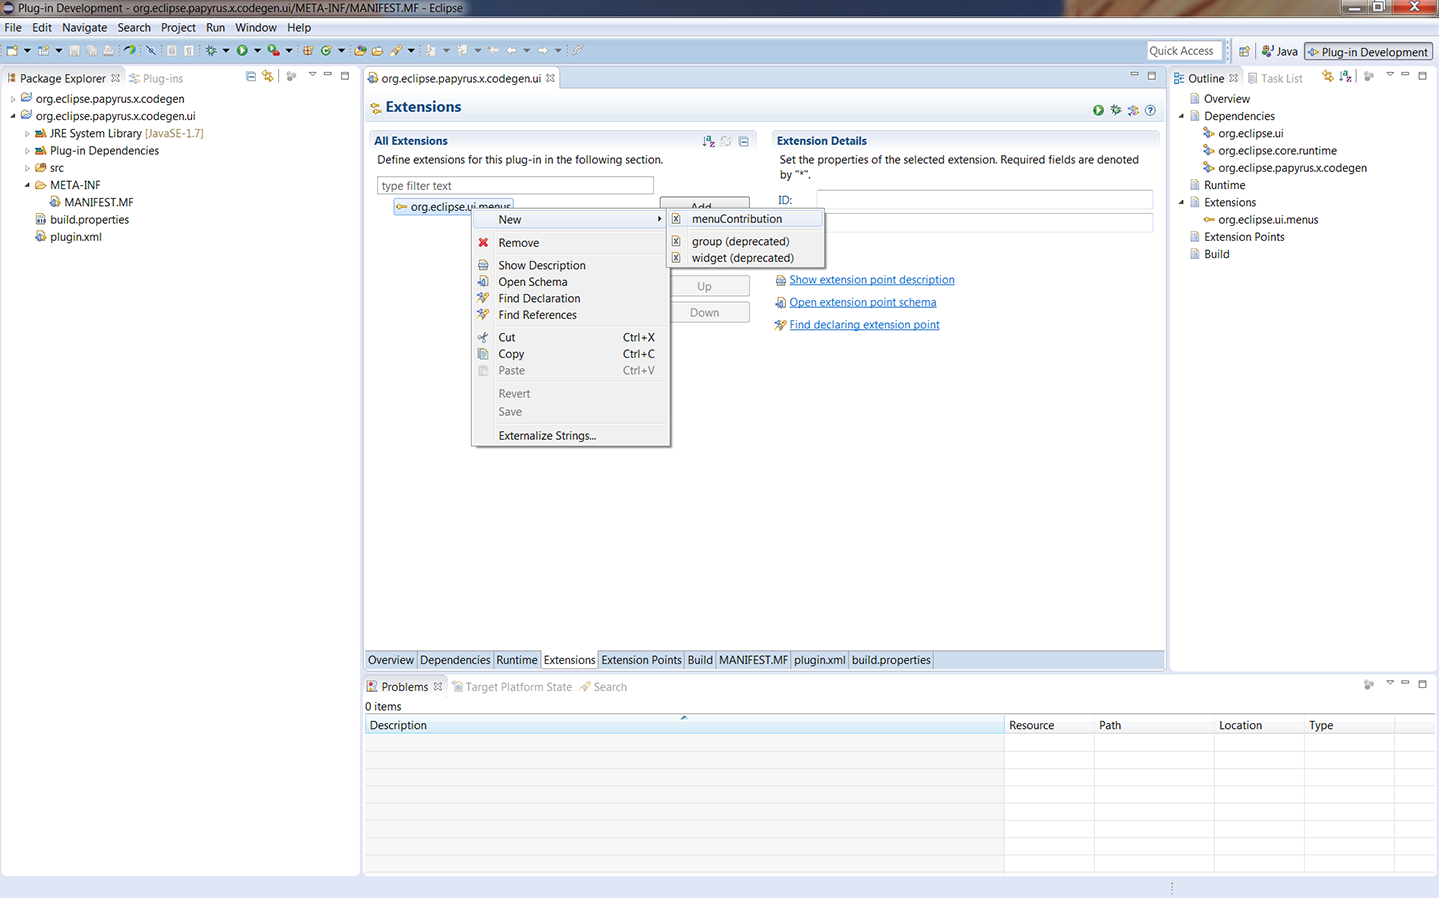
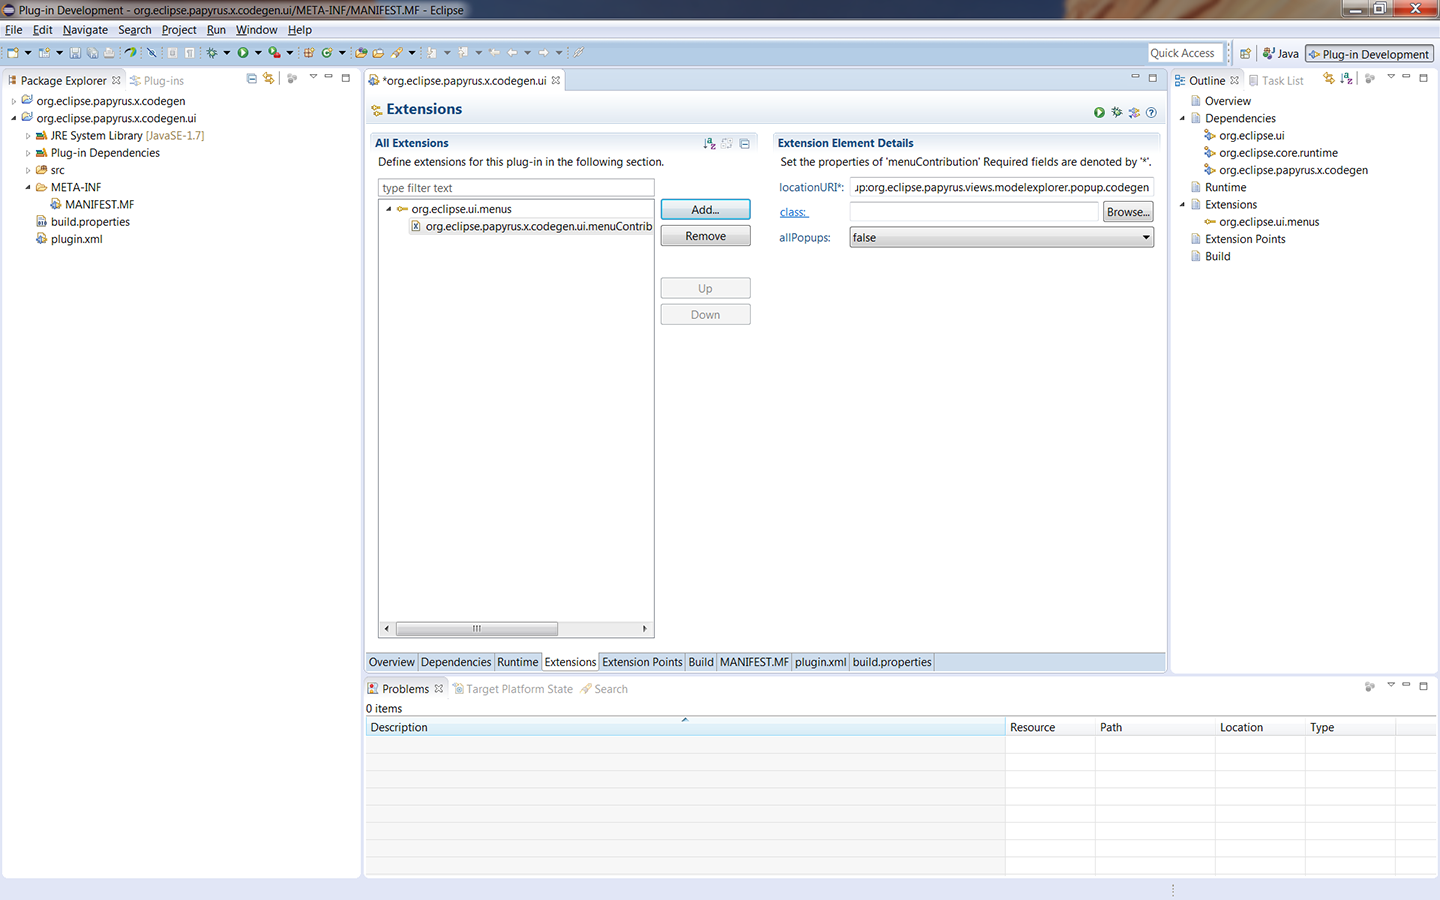
- Now add a menu contribution to the extension you added and...
- ...in the locationURI box type popup:org.eclipse.papyrus.views.modelexplorer.popup.codegen.
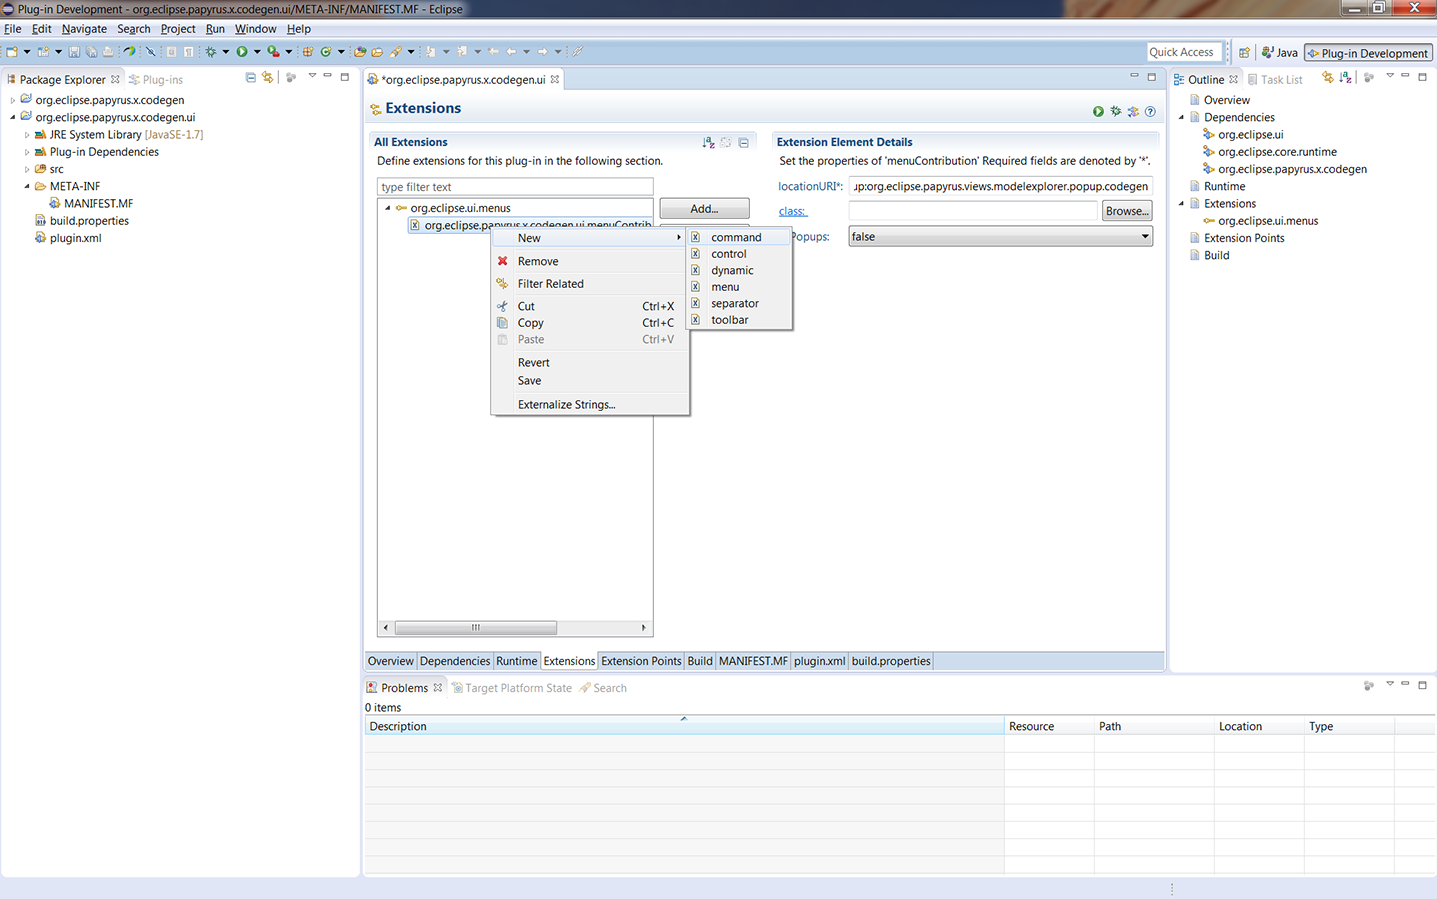
- Then create a command for this menu contribution and...
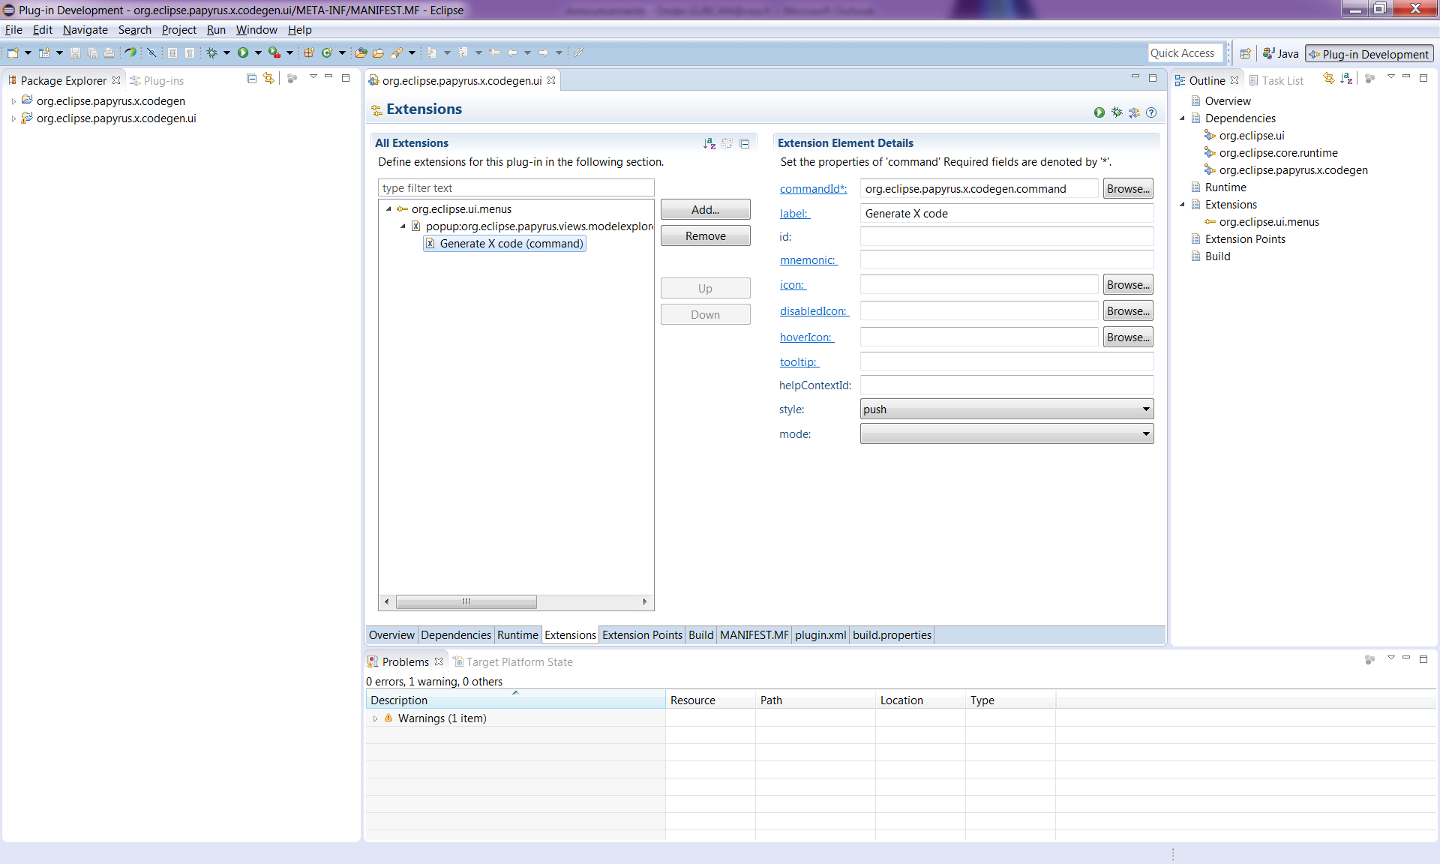
- ...in the commandID box type org.eclipse.papyrus.x.codegen.command, in the label and tooltip boxes type Generate X code.
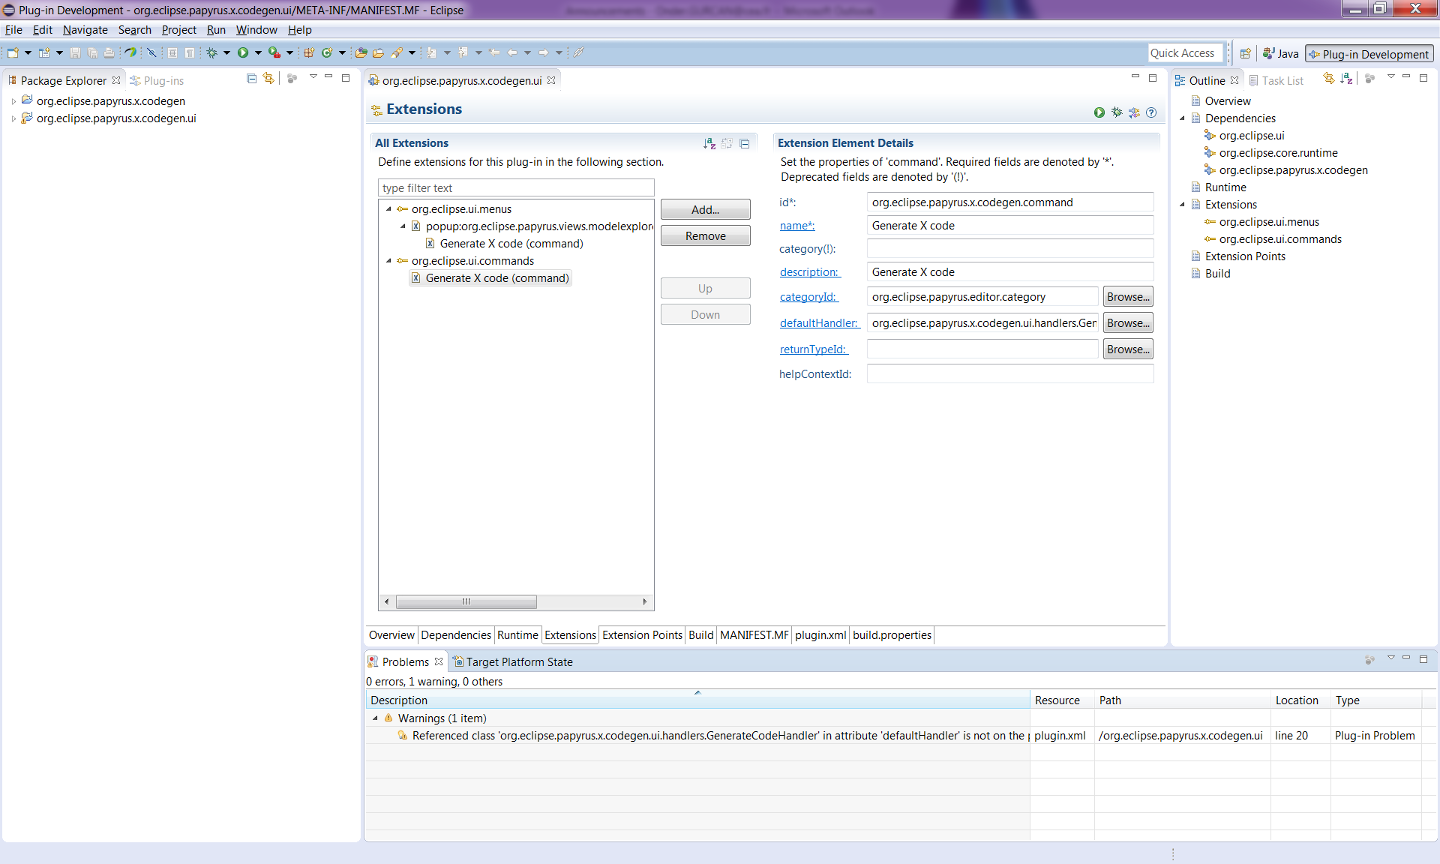
- The second extension you need to add is org.eclipse.ui.commands and you need to create a command for it also, which has the following the properties: in the id box type org.eclipse.papyrus.x.codegen.command, in the name and description bozes type Generate X Code, in the categoryId box type org.eclipse.papyrus.editor.category and in the defaultHandler box type org.eclipse.papyrus.x.codegen.ui.handlers.GenerateCodeHandler.
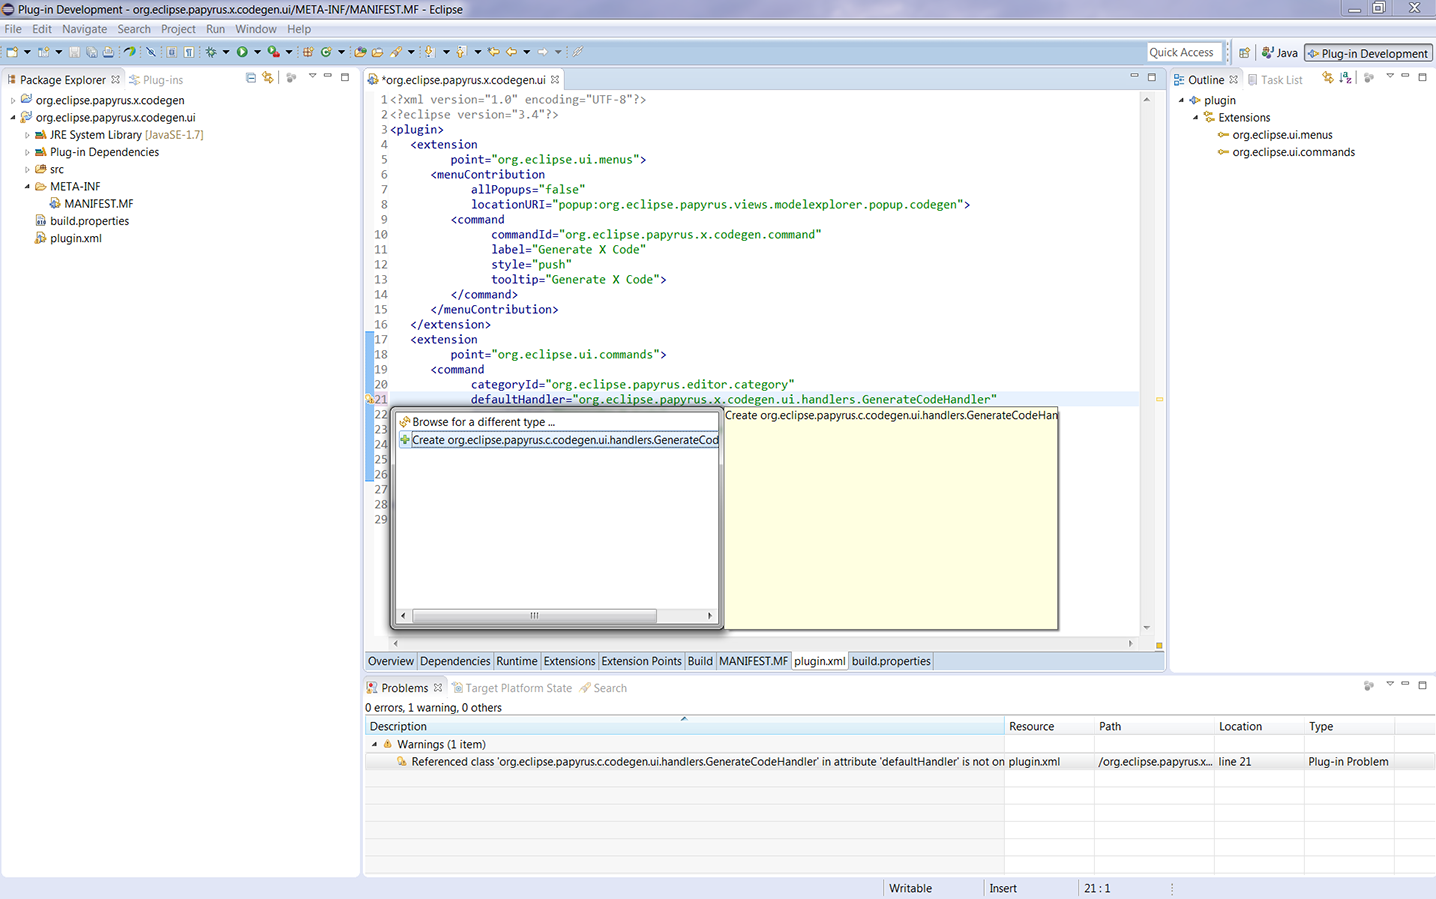
- Careful readers has already noticed that there is a warning occuring after this step (see the Problems tab on the above figure). The reason for this warning is that you defined a default handler that does not exist yet. To go to source of the problem, double-click to the warning and create a new handler class (keep default properties in the create class dialog window).
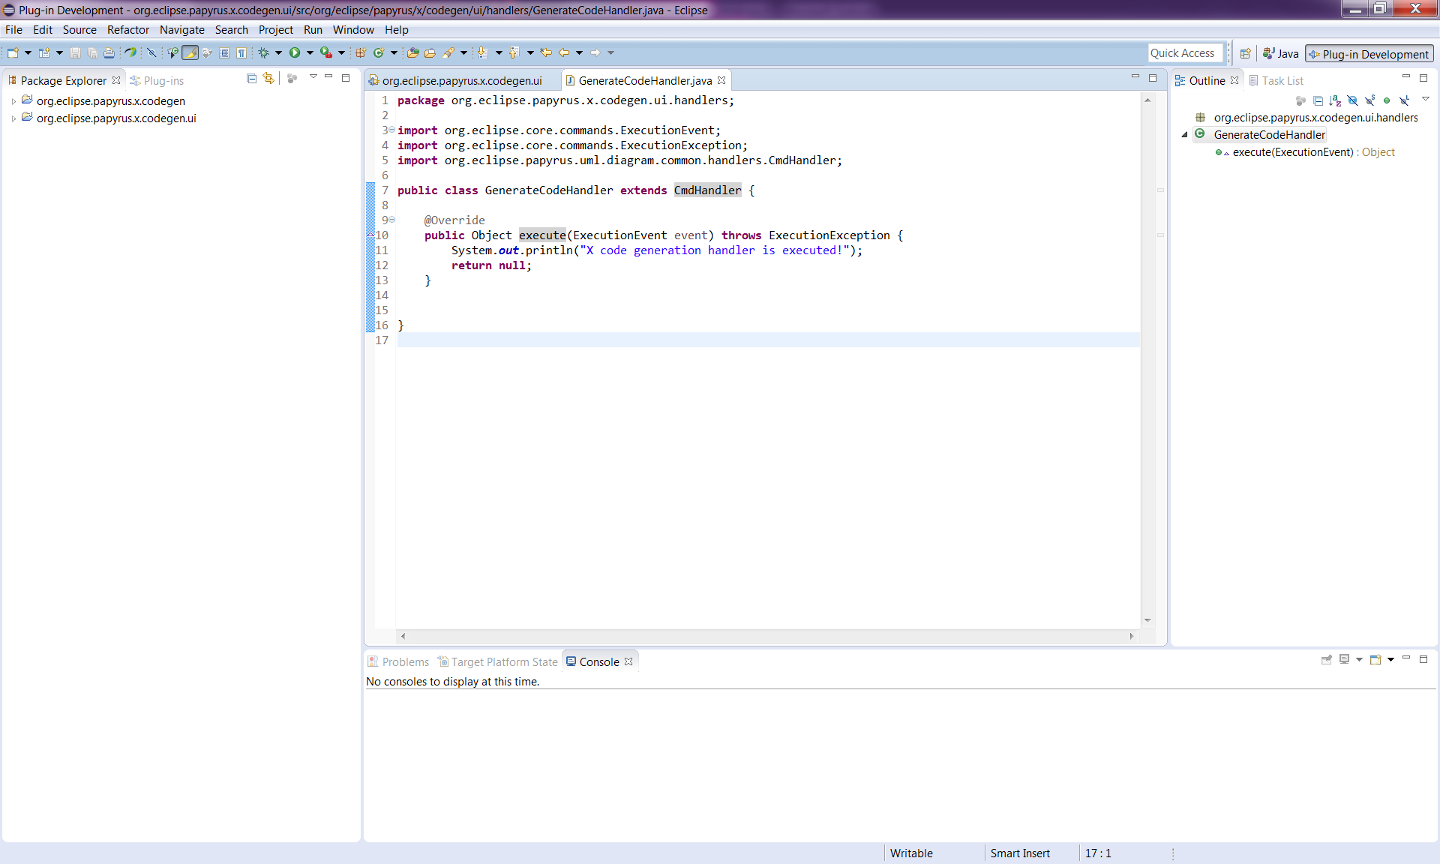
- The created handler class should extend the CmdHandler class which is located in the org.eclipse.papyrus.acceleo.ui plug-in. Thus, add this plug-in to the dependencies and then implement the unimplemented methods. To see how this handler is executed, add a system verbose inside its execute() method.
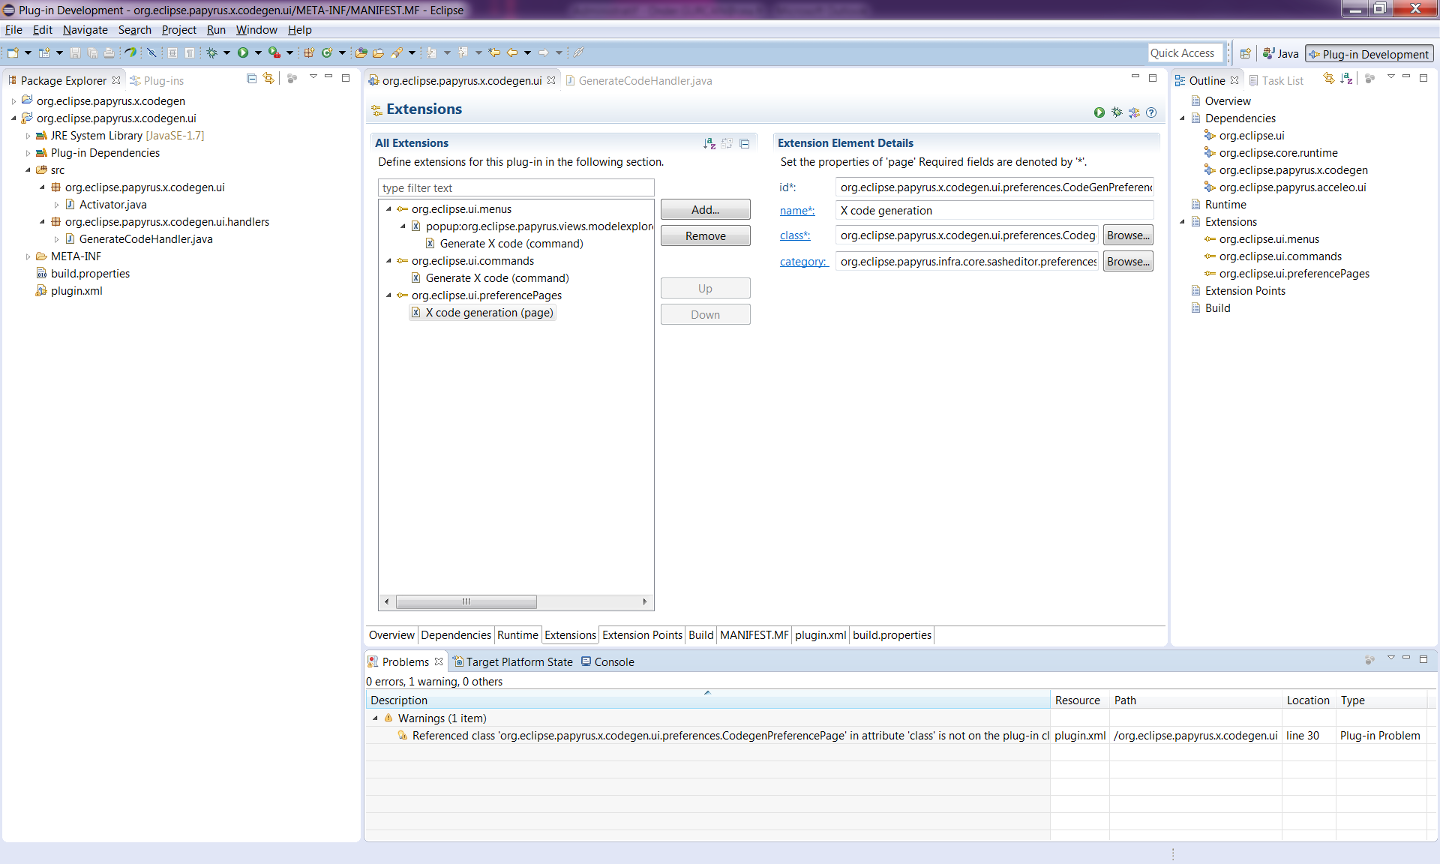
- The last extension you need to add is org.eclipse.ui.preferencePages. Upon its creation, it comes with a default page. Modify the properties of this page as follows: in the id box type org.eclipse.papyrus.x.codegen.ui.preferences.CodeGenPreferencePage, in the name box type X code generation, in the class box type org.eclipse.papyrus.x.codegen.ui.preferences.CodegenPreferencePage and in the category box type org.eclipse.papyrus.infra.core.sasheditor.preferences.generalcategory.
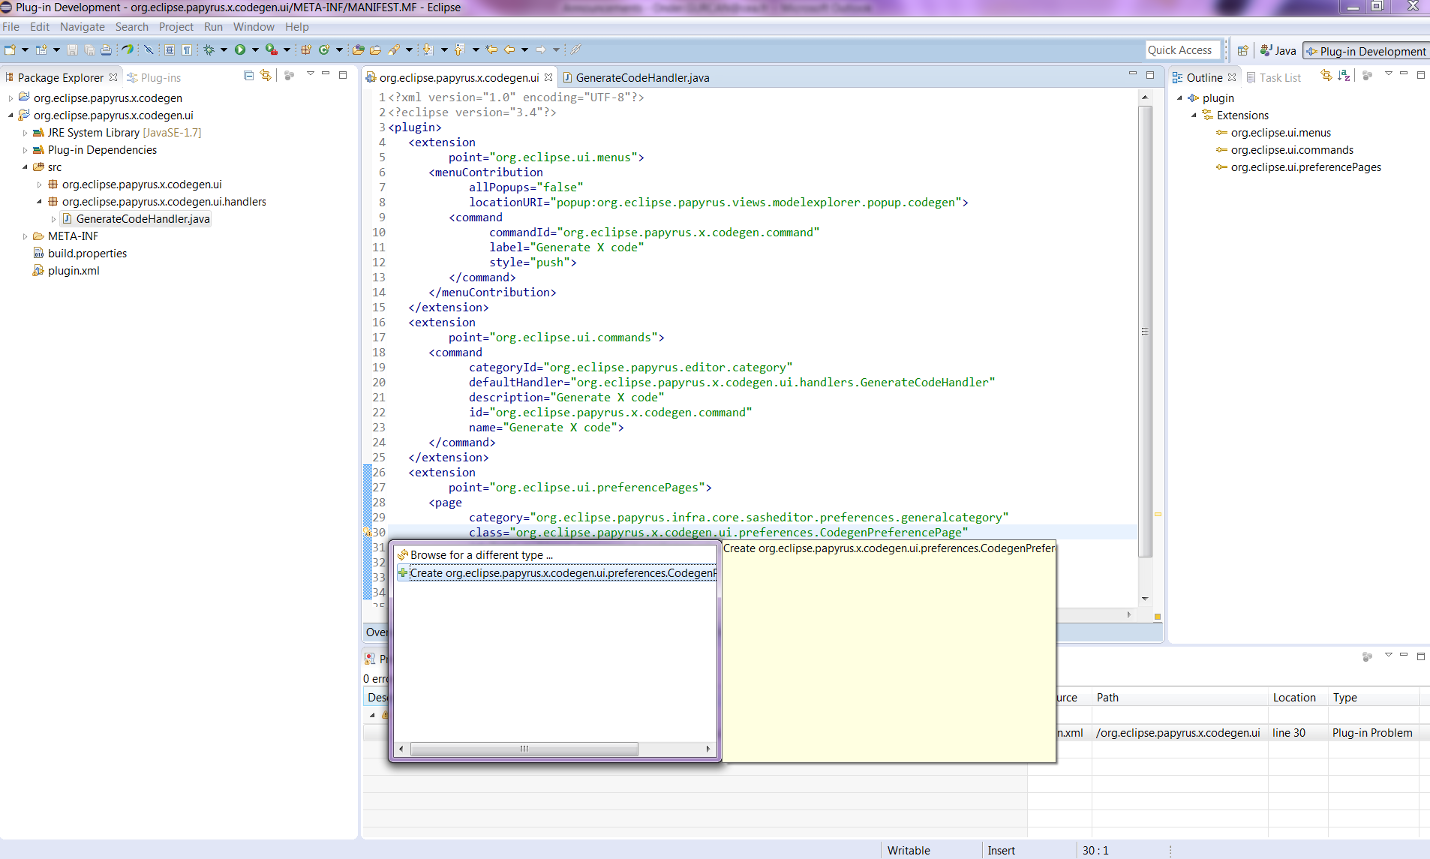
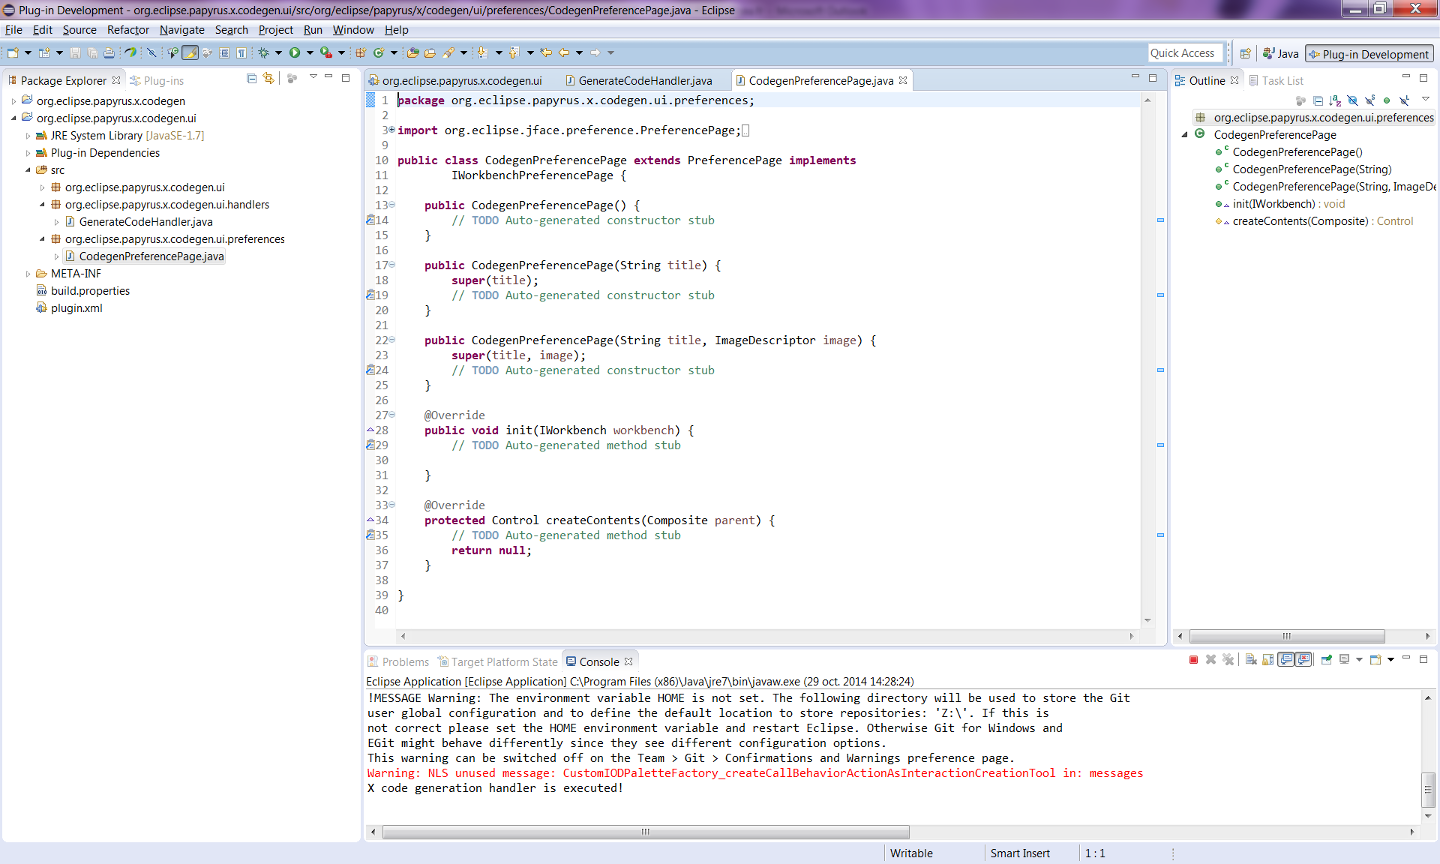
- However, like before, there is a warning occuring after this step (see the Problems tab on the above figure). The reason for this warning is that you defined a preference page that does not exist yet. To go to source of the problem, double-click to this warning and creat a new preference page class (keep default properties in the create class dialog window).
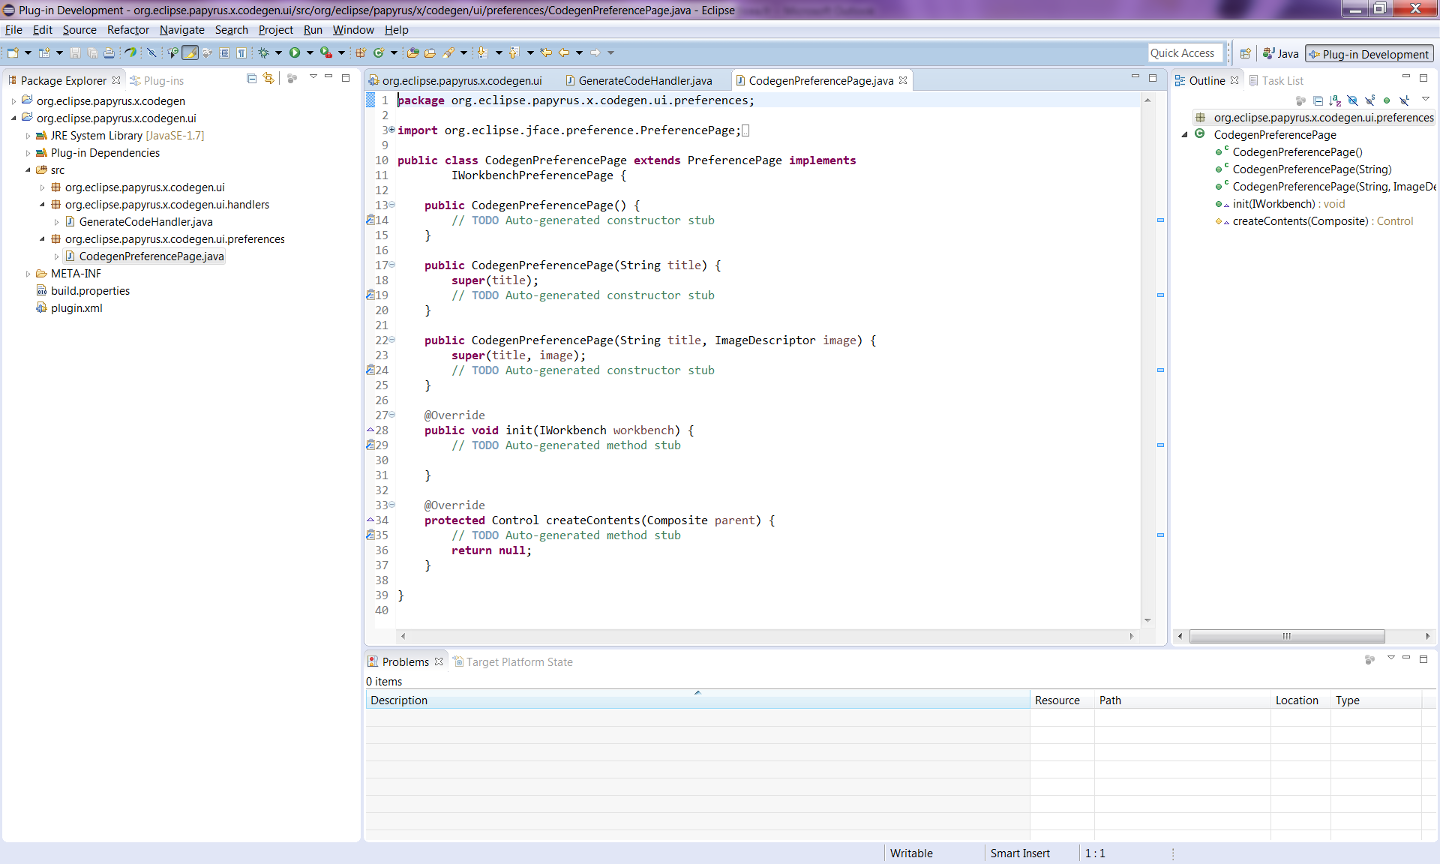
- The created preference page class should extend the PreferencePage class and implement the IWorkbenchPreferencePage interface. Normally, no modification is needed after the creation of the preference page class.
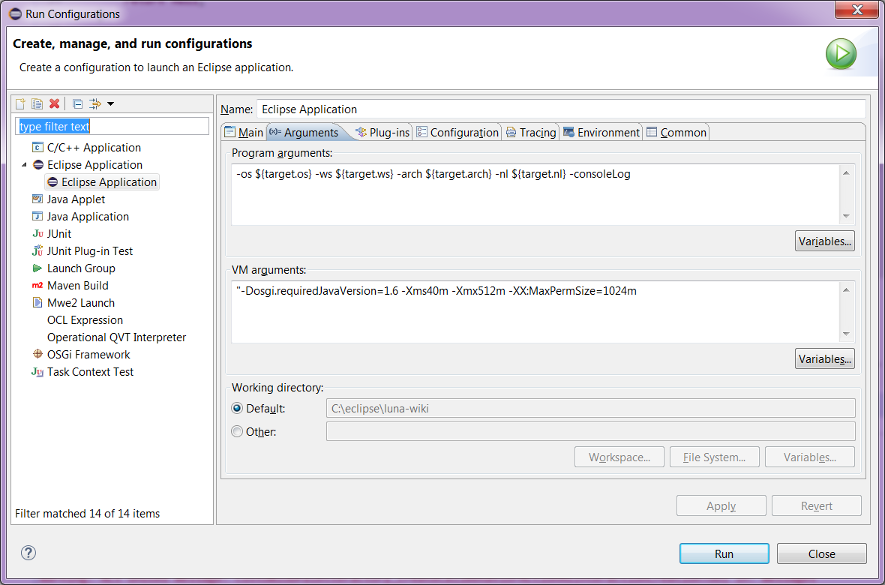
- Now let's try what you have done so far and see your code generation menu on a real case. In this sense, to create an Eclipse Application run configuration click Run > Run Configurations... and in the VM arguments box type: -Dosgi.requiredJavaVersion=1.7 -Xmn256m -Xms512m -Xmx512m -Xss4m -XX:PermSize=256m -XX:MaxPermSize=256m.
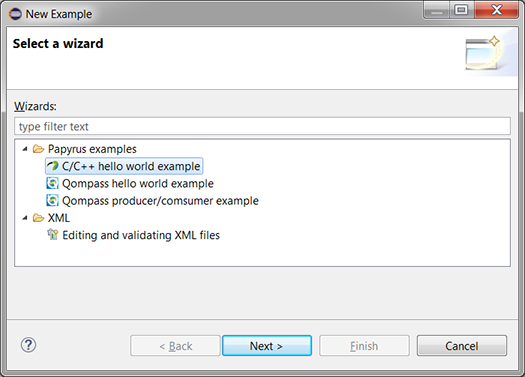
- Then click Run to run our eclipse application. In the new eclipse instance, click File > New > Example..., click C/C++ hello world example under the Papyrus examples folder and click Next >.
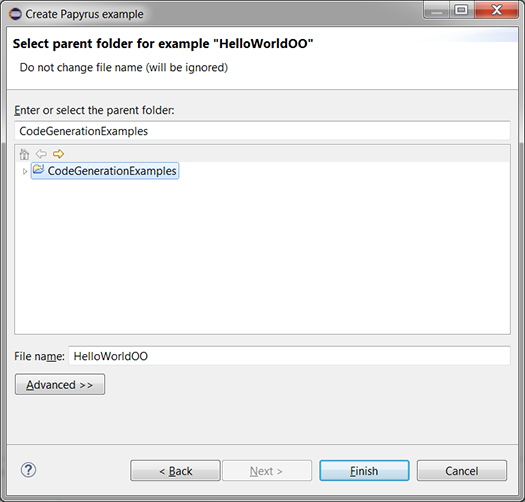
- After, select a parent folder for your example and click Finish. In this example, there is a CodeGenerationExamples java project that was created in advance.
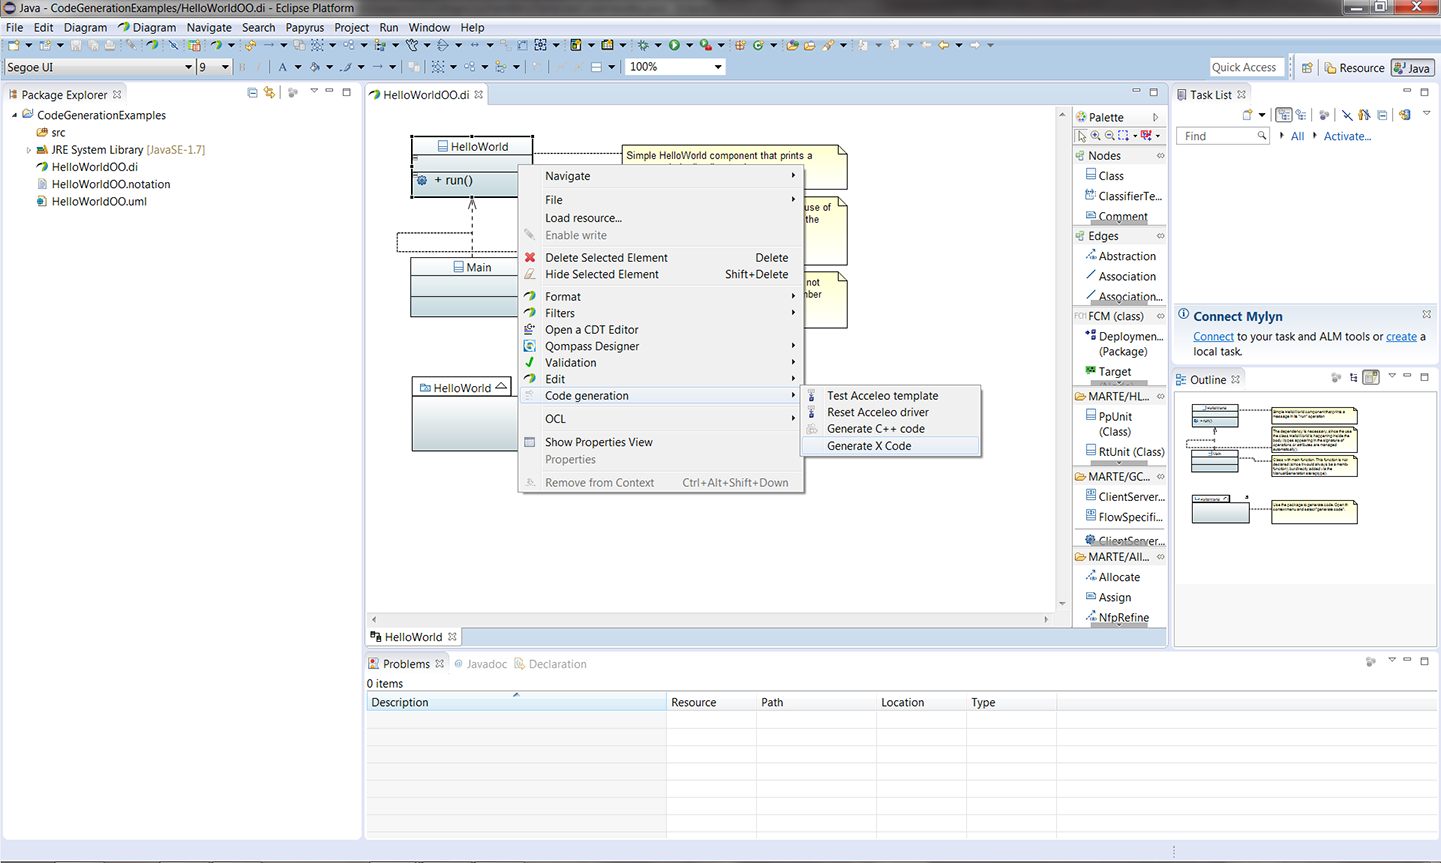
- The example project will be created and the HelloWorldOO.di Papyrus model will be opened directly. There is only one class diagram which is called HelloWorld in this model. Now, right click on the HelloWorld class and go to Code Generation. You need to see Generate X code there, click it! (Curious readers may click Generate C++ code and see how Qompass generates C++ codes.)
- Clicking the Generate X code pop-up menu will cause the handler to execute and thus you need to see the system verbose you defined the handler class on the console of the main workbench.
If all the steps worked fine, you can go on by creating the test project of your code generator.
The Test Project ("org.eclipse.papyrus.x.codegen.tests")
Here are the steps for creating and setting the "org.eclipse.papyrus.x.codegen.tests" project:

