Notice: this Wiki will be going read only early in 2024 and edits will no longer be possible. Please see: https://gitlab.eclipse.org/eclipsefdn/helpdesk/-/wikis/Wiki-shutdown-plan for the plan.
Difference between revisions of "Orion/Running the tests"
m (→Setting up) |
|||
| (6 intermediate revisions by one other user not shown) | |||
| Line 1: | Line 1: | ||
== Client tests == | == Client tests == | ||
| − | + | === Running a test === | |
* Tests are located under the <code>js-test</code> folders. | * Tests are located under the <code>js-test</code> folders. | ||
| − | * A test is an HTML file, typically named <code>test.html</code>. | + | * A test is defined by an HTML file, typically named <code>test.html</code>. |
| − | * To run a test, | + | * To run a test, load its <code>test.html</code> file in your browser. (Example: <code>http://[your_orion_server]/js-tests/serviceRegistry/test.html</code> ) |
** Test output is printed to the JavaScript console. | ** Test output is printed to the JavaScript console. | ||
| − | |||
| − | == Server tests == | + | <!-- |
| + | === Writing === | ||
| + | To create a new test: | ||
| + | * Create a subdirectory of <code>js-tests</code> for your component. | ||
| + | * Create a <code>test.html</code> file. Using RequireJS, your file should load these libraries: | ||
| + | ** <code>orion/plugin</code> | ||
| + | ** <code>orion/test</code> | ||
| + | ** Your <code>testcase.js</code> file (see next step). | ||
| + | Example test.html: | ||
| + | <script src="../../orion/requirejs/require.js"></script> | ||
| + | <script> | ||
| + | window.onload = function() { | ||
| + | require(['orion/plugin', 'orion/test', './testcase'], function(plugin, runner, testcase) { | ||
| + | runner.run(testcase); | ||
| + | }); | ||
| + | }; | ||
| + | </script> | ||
| + | * Create a <code>testcase.js</code> file. | ||
| + | ** This file is a RequireJS module that exports a TestCase object. | ||
| + | ** Any properties of the TestCase object whose name begins with <code>"test"</code> will be executed. | ||
| + | ** TestCase objects can be nested. | ||
| + | ** A test method may optionally return a [http://dojotoolkit.org/documentation/tutorials/1.6/promises/ promise], which indicates the method will complete asynchronously when the promises resolves. | ||
| + | Example testcase.js: | ||
| + | define(['orion/assert'], function(assert) { | ||
| + | var tests = {}; | ||
| + | tests.testOne = function() { | ||
| + | assert.strictEqual('a', String.fromCharCode(97), 'a is a'); | ||
| + | }; | ||
| + | return tests; | ||
| + | }); | ||
| + | * At this point, load the <code>test.html</code> file in your browser and you should see the test results, like so: | ||
| + | [[Image:Test-run.png]] | ||
| + | * To register a test so it will be run automatically during the Orion build process, add a line to the <code>jsTestSuite.js</code> file, like this: | ||
| + | OrionTestCase("My awesome test case", "/js-tests/mycomponent/test.html"); | ||
| + | --> | ||
| + | |||
| + | == JVM Server tests == | ||
=== Setting up === | === Setting up === | ||
# Set up your Eclipse IDE as explained in [[Orion/Getting the source]]. | # Set up your Eclipse IDE as explained in [[Orion/Getting the source]]. | ||
| Line 19: | Line 54: | ||
## Click Finish. | ## Click Finish. | ||
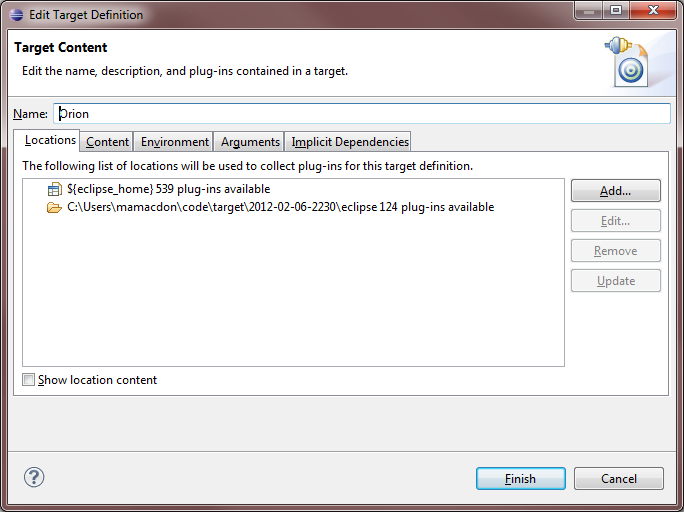
## Now there should be 2 locations shown in your target definition. Click Finish.<br>[[Image:Orion-target-result.png]] | ## Now there should be 2 locations shown in your target definition. Click Finish.<br>[[Image:Orion-target-result.png]] | ||
| − | # | + | # Now we will checkout the remaining test dependencies from CVS. Download this file:<br>[[Image:OrionServerTestDepdendencies.psf]]. |
| − | + | # In your Eclipse IDE, go to File -> Import -> Team -> Team Project Set, select OrionServerTestDependencies.psf, and click Finish. | |
| − | # | + | |
| − | + | ||
| − | + | ||
| − | + | ||
| − | + | ||
| − | + | ||
# At this point you should have no Java compilation errors. You can now run the tests. | # At this point you should have no Java compilation errors. You can now run the tests. | ||
| + | |||
| + | ==== Manually checking out the dependent projects ==== | ||
| + | If the previous section fails for some reason, here's the list of projects from the .psf file. You can check them out manually if need be. | ||
| + | |||
| + | Projects from the [[CVS_Howto#Anonymous_CVS|Eclipse Platform CVS repository]] (<code>/cvsroot/eclipse</code>): | ||
| + | * org.eclipse.core.runtime.compatibility | ||
| + | * org.eclipse.core.runtime.compatibility.auth | ||
| + | * org.eclipse.core.tests.harness | ||
| + | * org.eclipse.core.tests.resources | ||
| + | * org.eclipse.test.performance | ||
| + | * org.eclipse.test.performance.data | ||
| + | * org.eclipse.test.performance.win32 | ||
| + | |||
| + | Projects from the [[Orbit_Faq#How_do_I_work_with_a_bundle_in_Orbit.3F|Orbit CVS repository]] (<code>/cvsroot/tools</code>): | ||
| + | * javax.mail.glassfish (Branch '''v1_4_1''') | ||
| + | * org.antlr.runtime (Branch '''v3_2_0''') | ||
| + | * org.hamcrest.core (Branch '''v1_1''') | ||
| + | * org.junit (Branch '''v3_8_2''') | ||
| + | * org.junit4 (Branch '''v4_8_2''') | ||
=== Running === | === Running === | ||
| Line 35: | Line 83: | ||
To run just a subset of the tests, edit the launch configuration (Run > Run Configurations). | To run just a subset of the tests, edit the launch configuration (Run > Run Configurations). | ||
| + | |||
| + | == Node.js Server Tests == | ||
| + | |||
| + | Our Node server unit tests are written against the [http://visionmedia.github.com/mocha/ Mocha] test framework. | ||
| + | |||
| + | === Running the tests === | ||
| + | |||
| + | From the <code>org.eclipse.orion.client/modules/orionode</code> directory, just run the command: | ||
| + | npm test | ||
| + | |||
| + | This will invoke Mocha and produce console output showing which tests passed and failed. | ||
| + | |||
| + | If you want to pass custom arguments to Mocha, you'll need to invoke it explicitly like this: | ||
| + | ./node_modules/mocha/bin/mocha [debug] [options] [files] | ||
| + | |||
| + | To make this easier, you can install Mocha as a global npm package (<code>npm install mocha -g</code>), and then invoke it as simply <code>mocha</code> from a command shell. | ||
| + | |||
| + | === Writing more tests === | ||
| + | When you're prototyping a new feature, writing unit tests for it is always a good idea. Here's how to write a test: | ||
| + | # Create a new file <code>my_tests.js</code> in the <code>org.eclipse.orion.client/modules/orionode/test/</code> directory. | ||
| + | # Write your tests in the file. Here are two resources to help you get started: | ||
| + | #* [http://visionmedia.github.com/mocha/ Mocha reference]: the general structure of a test. | ||
| + | #* [http://visionmedia.github.com/superagent/ Superagent reference]: how to write concise assertions for testing HTTP. | ||
| + | # [[# Running the tests|Run the tests]]. | ||
| + | #* You don't have to register your new tests with the framework; it will discover anything in the <code>test/</code> directory automatically. | ||
| + | |||
| + | Helper data or classes should go in <code>test/support/</code>. | ||
[[Category:Orion|Test]] | [[Category:Orion|Test]] | ||
Revision as of 14:15, 8 February 2013
Contents
Client tests
Running a test
- Tests are located under the
js-testfolders. - A test is defined by an HTML file, typically named
test.html. - To run a test, load its
test.htmlfile in your browser. (Example:http://[your_orion_server]/js-tests/serviceRegistry/test.html)- Test output is printed to the JavaScript console.
JVM Server tests
Setting up
- Set up your Eclipse IDE as explained in Orion/Getting the source.
- Make sure you have imported the test projects into your workspace, and they're open:
- org.eclipse.orion.server.tests
- org.eclipse.orion.server.tests.feature
- The test projects have additional dependencies over the rest of the Orion source code. The next 3 steps explain how to satisfy them.
- Add the plugins from your Eclipse SDK to your target platform:
- Go to Preferences > Target Platform, select your target definition and click Edit.
- Click Add... > Installation, then type
${eclipse_home}in the Location field. - Click Finish.
- Now there should be 2 locations shown in your target definition. Click Finish.
- Now we will checkout the remaining test dependencies from CVS. Download this file:
File:OrionServerTestDepdendencies.psf. - In your Eclipse IDE, go to File -> Import -> Team -> Team Project Set, select OrionServerTestDependencies.psf, and click Finish.
- At this point you should have no Java compilation errors. You can now run the tests.

Manually checking out the dependent projects
If the previous section fails for some reason, here's the list of projects from the .psf file. You can check them out manually if need be.
Projects from the Eclipse Platform CVS repository (/cvsroot/eclipse):
- org.eclipse.core.runtime.compatibility
- org.eclipse.core.runtime.compatibility.auth
- org.eclipse.core.tests.harness
- org.eclipse.core.tests.resources
- org.eclipse.test.performance
- org.eclipse.test.performance.data
- org.eclipse.test.performance.win32
Projects from the Orbit CVS repository (/cvsroot/tools):
- javax.mail.glassfish (Branch v1_4_1)
- org.antlr.runtime (Branch v3_2_0)
- org.hamcrest.core (Branch v1_1)
- org.junit (Branch v3_8_2)
- org.junit4 (Branch v4_8_2)
Running
- Go to the org.eclipse.orion.server.tests project.
- Open the launchConfigurations folder, right-click All Server Tests.launch and choose Run As > All Server Tests.
- The JUnit view will open and display the test results.
To run just a subset of the tests, edit the launch configuration (Run > Run Configurations).
Node.js Server Tests
Our Node server unit tests are written against the Mocha test framework.
Running the tests
From the org.eclipse.orion.client/modules/orionode directory, just run the command:
npm test
This will invoke Mocha and produce console output showing which tests passed and failed.
If you want to pass custom arguments to Mocha, you'll need to invoke it explicitly like this:
./node_modules/mocha/bin/mocha [debug] [options] [files]
To make this easier, you can install Mocha as a global npm package (npm install mocha -g), and then invoke it as simply mocha from a command shell.
Writing more tests
When you're prototyping a new feature, writing unit tests for it is always a good idea. Here's how to write a test:
- Create a new file
my_tests.jsin theorg.eclipse.orion.client/modules/orionode/test/directory. - Write your tests in the file. Here are two resources to help you get started:
- Mocha reference: the general structure of a test.
- Superagent reference: how to write concise assertions for testing HTTP.
- Run the tests.
- You don't have to register your new tests with the framework; it will discover anything in the
test/directory automatically.
- You don't have to register your new tests with the framework; it will discover anything in the
Helper data or classes should go in test/support/.