Notice: this Wiki will be going read only early in 2024 and edits will no longer be possible. Please see: https://gitlab.eclipse.org/eclipsefdn/helpdesk/-/wikis/Wiki-shutdown-plan for the plan.
Difference between revisions of "Orion/Running the tests"
< Orion
m (→Client tests) |
(add a →Writing: section) |
||
| Line 1: | Line 1: | ||
== Client tests == | == Client tests == | ||
| − | * Our JavaScript tests use the [http://code.google.com/p/js-test-driver/wiki/TestCase jsTestDriver API]. | + | === Running === |
| + | <!-- * Our JavaScript tests use the [http://code.google.com/p/js-test-driver/wiki/TestCase jsTestDriver API]. --> | ||
* Tests are located under the <code>js-test</code> folders. | * Tests are located under the <code>js-test</code> folders. | ||
* A test is defined by an HTML file, typically named <code>test.html</code>. | * A test is defined by an HTML file, typically named <code>test.html</code>. | ||
* To run a test, load its <code>test.html</code> file in your browser. (Example: <code>http://[your_orion_server]/js-tests/serviceRegistry/test.html</code> ) | * To run a test, load its <code>test.html</code> file in your browser. (Example: <code>http://[your_orion_server]/js-tests/serviceRegistry/test.html</code> ) | ||
** Test output is printed to the JavaScript console. | ** Test output is printed to the JavaScript console. | ||
| − | * To register a test so it will be run automatically during the Orion build process, add | + | |
| + | === Writing === | ||
| + | To create a new test: | ||
| + | * Create a subdirectory of <code>js-tests</code> for your component. | ||
| + | * Create a <code>test.html</code> file. Using RequireJS, your file should load these libraries: | ||
| + | ** <code>orion/plugin</code> <!-- Transforms your test.html file into a [[Orion/Developer Guide/Simple plugin example#What is a plugin?|plugin]] (required to integrate with the Orion build process).--> | ||
| + | ** <code>orion/test</code> <!-- Orion test harness. Used to run your testcase. --> | ||
| + | ** Your <code>testcase.js</code> file (see next step). | ||
| + | Example test.html: | ||
| + | <script src="../../orion/requirejs/require.js"></script> | ||
| + | <script> | ||
| + | window.onload = function() { | ||
| + | require(['orion/plugin', 'orion/test', './testcase'], function(plugin, runner, testcase) { | ||
| + | runner.run(testcase); | ||
| + | }); | ||
| + | }; | ||
| + | </script> | ||
| + | * Create a <code>testcase.js</code> file. | ||
| + | ** This file is a RequireJS module that exports a TestCase object. | ||
| + | ** Any properties of the TestCase object whose name begins with <code>"test"</code> will be executed. | ||
| + | ** TestCase objects can be nested. | ||
| + | ** A test method may optionally return a [http://dojotoolkit.org/documentation/tutorials/1.6/promises/ promise], which indicates the method will complete asynchronously when the promises resolves. | ||
| + | Example testcase.js: | ||
| + | define(['orion/assert'], function(assert) { | ||
| + | var tests = {}; | ||
| + | tests.testOne = function() { | ||
| + | assert.strictEqual('a', String.fromCharCode(97), 'a is a'); | ||
| + | }; | ||
| + | return tests; | ||
| + | }); | ||
| + | * At this point, load the <code>test.html</code> file in your browser and you should see the test results, like so: | ||
| + | [[Image:Test-run.png]] | ||
| + | * To register a test so it will be run automatically during the Orion build process, add a line to the <code>jsTestSuite.js</code> file, like this: | ||
| + | OrionTestCase("My awesome test case", "/js-tests/mycomponent/test.html"); | ||
== Server tests == | == Server tests == | ||
Revision as of 13:05, 2 April 2012
Client tests
Running
- Tests are located under the
js-testfolders. - A test is defined by an HTML file, typically named
test.html. - To run a test, load its
test.htmlfile in your browser. (Example:http://[your_orion_server]/js-tests/serviceRegistry/test.html)- Test output is printed to the JavaScript console.
Writing
To create a new test:
- Create a subdirectory of
js-testsfor your component. - Create a
test.htmlfile. Using RequireJS, your file should load these libraries:-
orion/plugin -
orion/test - Your
testcase.jsfile (see next step).
-
Example test.html:
 <script src="../../orion/requirejs/require.js"></script>
 <script>
 window.onload = function() {
   require(['orion/plugin', 'orion/test', './testcase'], function(plugin, runner, testcase) {
     runner.run(testcase);
   });
 };
 </script>
- Create a
testcase.jsfile.- This file is a RequireJS module that exports a TestCase object.
- Any properties of the TestCase object whose name begins with
"test"will be executed. - TestCase objects can be nested.
- A test method may optionally return a promise, which indicates the method will complete asynchronously when the promises resolves.
Example testcase.js:
 define(['orion/assert'], function(assert) {
   var tests = {};
   tests.testOne = function() {
     assert.strictEqual('a', String.fromCharCode(97), 'a is a');
   };
   return tests;
 });
- At this point, load the
test.htmlfile in your browser and you should see the test results, like so:

- To register a test so it will be run automatically during the Orion build process, add a line to the
jsTestSuite.jsfile, like this:
OrionTestCase("My awesome test case", "/js-tests/mycomponent/test.html");
Server tests
Setting up
- Set up your Eclipse IDE as explained in Orion/Getting the source.
- Make sure you have imported the test projects into your workspace, and they're open:
- org.eclipse.orion.server.tests
- org.eclipse.orion.server.tests.feature
- The test projects have additional dependencies over the rest of the Orion source code. The next 3 steps explain how to satisfy them.
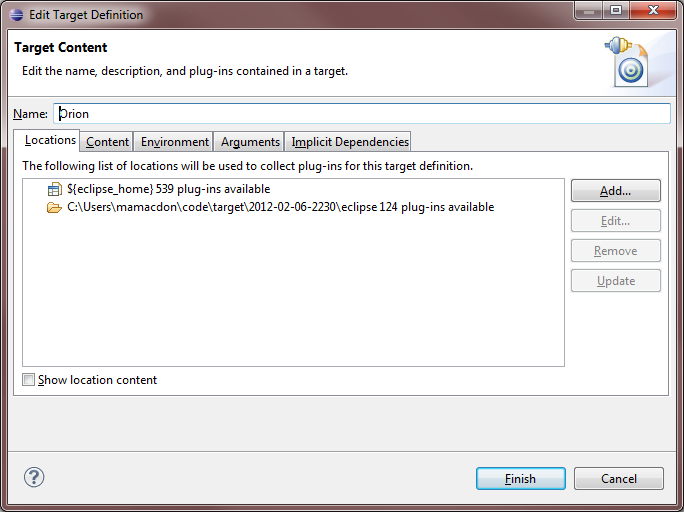
- Add the plugins from your Eclipse SDK to your target platform:
- Go to Preferences > Target Platform, select your target definition and click Edit.
- Click Add... > Installation, then type
${eclipse_home}in the Location field. - Click Finish.
- Now there should be 2 locations shown in your target definition. Click Finish.
- Checkout these projects from the Eclipse Platform CVS repository (
/cvsroot/eclipse):- org.eclipse.test.performance.win32
- org.eclipse.core.tests.harness
- org.eclipse.core.tests.resources
- org.eclipse.test.performance
- org.eclipse.test.performance.data
- Checkout these additional libraries from the Orbit CVS repository (
/cvsroot/tools):- javax.mail.glassfish (Branch v1_4_1)
- At this point you should have no Java compilation errors. You can now run the tests.

Running
- Go to the org.eclipse.orion.server.tests project.
- Open the launchConfigurations folder, right-click All Server Tests.launch and choose Run As > All Server Tests.
- The JUnit view will open and display the test results.
To run just a subset of the tests, edit the launch configuration (Run > Run Configurations).