Notice: this Wiki will be going read only early in 2024 and edits will no longer be possible. Please see: https://gitlab.eclipse.org/eclipsefdn/helpdesk/-/wikis/Wiki-shutdown-plan for the plan.
Difference between revisions of "Orion/How Tos/Install Orion on Localhost"
(→Downloading Orion: updated link) |
(→Starting the server) |
||
| Line 8: | Line 8: | ||
# Make sure you have Java installed - the server is implemented in Java and '''requires''' Java SE 6. (Does 'java -version' print something like: java version "1.6.0_22"?) | # Make sure you have Java installed - the server is implemented in Java and '''requires''' Java SE 6. (Does 'java -version' print something like: java version "1.6.0_22"?) | ||
# Launch the Orion server: | # Launch the Orion server: | ||
| − | #* '''Linux:''' Run <code>eclipse/ | + | #* '''Linux:''' Run <code>eclipse/orion</code>. |
| − | #* '''Mac OS X:''' Double-click <code>eclipse/ | + | #* '''Mac OS X:''' Double-click <code>eclipse/orion</code>. |
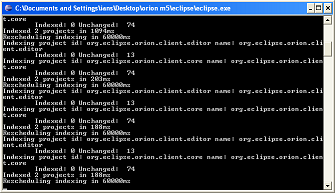
| − | #* '''Windows:''' Double-click <code>eclipse\ | + | #* '''Windows:''' Double-click <code>eclipse\orion.exe</code>.<p>Once you launch the Orion server, the server console should start.</p>[[Image:Orion_Console.png]] |
| − | # Now the server is running on port 8080. (If you want it to use a different port, change the setting in the | + | # Now the server is running on port 8080. (If you want it to use a different port, change the setting in the orion.ini file. On Mac OS X, you will have to right-click on eclipse/eclipse and select "Show Package Contents", then navigate into Contents/MacOS.) |
# Point your web browser to [http://localhost:8080/ http://localhost:8080/]. | # Point your web browser to [http://localhost:8080/ http://localhost:8080/]. | ||
# You'll be directed to the Orion login screen:<br/>[[Image:Orion_Create_Account.png]]<br/>From here you can create a new account for yourself on your local Orion server, or connect Orion to an existing Google, Yahoo, AOL or myOpenID account instead. | # You'll be directed to the Orion login screen:<br/>[[Image:Orion_Create_Account.png]]<br/>From here you can create a new account for yourself on your local Orion server, or connect Orion to an existing Google, Yahoo, AOL or myOpenID account instead. | ||
Revision as of 11:56, 15 December 2011
This page explains how to download, install, and run Orion on your local machine.
Contents
Downloading Orion
- Download Orion for your platform from the download page. Choose the most recent Stable Build.
- Unzip the zip file to a folder on your computer.
Note: Be sure to choose a folder that you have write access to.
Starting the server
- Make sure you have Java installed - the server is implemented in Java and requires Java SE 6. (Does 'java -version' print something like: java version "1.6.0_22"?)
- Launch the Orion server:
- Linux: Run
eclipse/orion. - Mac OS X: Double-click
eclipse/orion. - Windows: Double-click
eclipse\orion.exe.Once you launch the Orion server, the server console should start.
- Linux: Run
- Now the server is running on port 8080. (If you want it to use a different port, change the setting in the orion.ini file. On Mac OS X, you will have to right-click on eclipse/eclipse and select "Show Package Contents", then navigate into Contents/MacOS.)
- Point your web browser to http://localhost:8080/.
- You'll be directed to the Orion login screen:
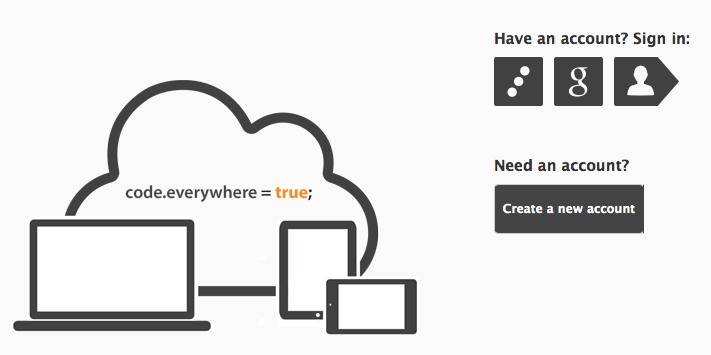
From here you can create a new account for yourself on your local Orion server, or connect Orion to an existing Google, Yahoo, AOL or myOpenID account instead.


Stopping the server
- Go to the server console window that opened when you launched the server.
- Type
closeand press Enter.
Using Orion
Getting started
After you've got Orion installed and running, read Getting started with Orion for a brief tour of the user interface and basic features.
Linking to existing content
You can try out Orion's text editing features by editing existing files on your computer.
- Configure the allowed local paths the Orion server can access. See the Server administration guide for details on how to configure what directories are available to the Orion server.
- Log in and click the "Link Folder" button on the toolbar.
- Type in a name for the link, and in the Server path: field, enter the path to the folder you want to link to (it must be a subdirectory of one of the paths you supplied in Step 2).
- Click OK.
- You should now be able to browse and edit the contents of the folder from the Orion UI.