Notice: this Wiki will be going read only early in 2024 and edits will no longer be possible. Please see: https://gitlab.eclipse.org/eclipsefdn/helpdesk/-/wikis/Wiki-shutdown-plan for the plan.
Difference between revisions of "Orion/Getting the source"
(→Set up the launch to run from source) |
|||
| (44 intermediate revisions by 8 users not shown) | |||
| Line 1: | Line 1: | ||
| − | This page covers how to | + | This page covers how to get the Orion source code, as well as how to set up for self-hosting (changing Orion code from Orion) using an Eclipse development environment. |
| − | + | ||
| − | == | + | == What you need == |
| − | + | * Basic knowledge of the Git version control system. (New to Git? [http://githowto.com/ Here's an introduction]). | |
| − | + | * (Optional) An [http://download.eclipse.org Eclipse IDE]. "Eclipse Classic" is recommended. | |
| − | * | + | * (Optional) An [http://download.eclipse.org/orion/ Orion build]. |
| − | * | + | |
| − | + | ||
| − | + | ||
| + | == Browsing the source == | ||
| + | Just want to take a peek at our code? You can browse it on the web here: | ||
| + | * http://git.eclipse.org/c/orion/ | ||
| + | We also have GitHub mirrors if you prefer: | ||
* https://github.com/eclipse/orion.client | * https://github.com/eclipse/orion.client | ||
* https://github.com/eclipse/orion.server | * https://github.com/eclipse/orion.server | ||
| − | == | + | == Getting the source onto your computer == |
| − | + | The Orion source code lives in two [[Git]] repositories: | |
| + | * {{Git|orion|org.eclipse.orion.client.git}} | ||
| + | * {{Git|orion|org.eclipse.orion.server.git}} | ||
| + | To checkout our repositories, you'll generally perform the following commands in your command shell: | ||
| + | git clone http://git.eclipse.org/gitroot/orion/org.eclipse.orion.client.git | ||
| + | git clone http://git.eclipse.org/gitroot/orion/org.eclipse.orion.server.git | ||
| + | If you're running an older version of Git, the '''http''' protocol may not work. In that case, try the '''git''' protocol instead: | ||
| + | git clone git://git.eclipse.org/gitroot/orion/org.eclipse.orion.client.git | ||
| + | git clone git://git.eclipse.org/gitroot/orion/org.eclipse.orion.server.git | ||
| + | If you are self-hosting on your local computer using an Eclipse IDE, see the section below to load the source into Eclipse. | ||
| + | === Notes for Eclipse committers === | ||
| + | This section applies only to [http://www.eclipse.org/membership/become_a_member/committer.php Eclipse Committers]. If you're not a committer, you can skip these instructions. | ||
| + | * Ensure that your Git configuration uses the same email address that you've set in your [https://dev.eclipse.org/portal/myfoundation/portal/portal.php Eclipse Foundation profile]. If the addresses don't match, you won't be able to push changes (see [[Git#Committers_new_to_Git]]). | ||
| + | * Committers need to use different URLs to access the Orion Git repositories. The URL includes your committer ID: | ||
| + | ssh://myCommitterId@git.eclipse.org/gitroot/orion/org.eclipse.orion.client.git | ||
| + | ssh://myCommitterId@git.eclipse.org/gitroot/orion/org.eclipse.orion.server.git | ||
| − | == | + | == Overview of self-hosting == |
| − | + | To edit Orion's own source code using Orion, there's a few different ways we can do it. Here are our options: | |
| − | + | ; Pure cloud. | |
| − | Self-hosting | + | : Using a cloud deployment of Orion (like [http://orionhub.org/ OrionHub], a public Orion server that anyone can use), you checkout the Orion source code using Orion's built-in Git features, then edit and test it. There's no software install; all you need is a web browser. Since you don't control the server, this method only allows you to hack on the Orion client code. See [[Orion/Selfhosting|Selfhosting]] for instructions. |
| + | ; Self-hosting on your local computer using Eclipse IDE. | ||
| + | : This method requires the Eclipse IDE. On your local computer, you checkout the Orion source code from a Git repository, and launch the Orion server from your Eclipse IDE. You can develop both client-side and server-side code using this method. | ||
| + | ; Self-hosting on your local computer using Node.js | ||
| + | : This method uses [http://nodejs.org Node.js] to run a local Orion server, with Orion development tools running in the browser. | ||
| + | == Self-hosting on your local computer using Eclipse IDE == | ||
| + | Self-hosting locally involves running an Orion server on your local workstation, pointing your Orion editor at your local Git repository, and working within Orion to make changes. Changes are committed using any Git client; for instructions on Orion's Git features, see [[Orion/How Tos/Working with git | Working with git]]. | ||
Here are the steps needed to get up and running. | Here are the steps needed to get up and running. | ||
| + | === Install the Eclipse SDK === | ||
| + | * When working with the latest Orion code from master you will need a Kepler stable build of the Eclipse SDK to run the server, such as [http://download.eclipse.org/eclipse/downloads/drops4/S-4.3RC3-201305301430/ Eclipse 4.3 RC3]. | ||
| + | * If you use an older version of Eclipse, such as a Eclipse 4.2.2 or earlier, you might get a warning indicating that you are attempting to launch an application that is using a newer version of Eclipse. You should be able to ignore, see [https://bugs.eclipse.org/bugs/show_bug.cgi?id=409440 Bug 409440] for more information. | ||
| + | * You should also install the [http://www.eclipse.org/egit/ Eclipse Git Team Provider] package via Help > Install New Software. Select the '''Kepler''' repository and search for 'Eclipse Git Team Provider' to find the package. | ||
| + | * At the same time, install the [http://www.eclipse.org/webtools/ Eclipse Web Developer Tools] package to view and edit the HTML, CSS and JavaScript source within Eclipse. | ||
| + | === Clone the client and server Git repositories into Eclipse === | ||
| + | * Start Eclipse and create a new workspace. | ||
| + | * Clone the Orion client repository: | ||
| + | ** Open the Git Repository Exploring perspective. | ||
| + | ** Select Clone a Git Repository. | ||
| + | ** Specify the Location URI http://git.eclipse.org/gitroot/orion/org.eclipse.orion.client.git and click Next on the Source Git Repository page. | ||
| + | ** Click Next on the Branch Selection page to accept the defaults. | ||
| + | ** At the Local Destination page, the directory can be placed in a new git folder under your workspace folder so all your files are within the workspace tree (the default is under your user home folder). | ||
| + | ** Also select '''Import all existing projects after clone finishes''' so all the projects are loaded into your workspace. | ||
| + | ** You may also wish to assign a working set such as '''orion.client''' to group the client projects via the Working Sets section of the page. | ||
| + | ** Click Finish on the Local Destination page to clone the repository. | ||
| + | * Repeat the steps above to clone the Orion server repository. | ||
| + | ** Specify the Location URI http://git.eclipse.org/gitroot/orion/org.eclipse.orion.server.git . | ||
| + | === Specify a target to build your Orion server === | ||
| + | * After loading in the client and server projects, a number of the server projects will have compile errors. To resolve we need to specify a target definition for your self-hosting workspace. | ||
| + | * Go the '''org.eclipse.orion.target''' project and open '''org.eclipse.orion.target.target''' in the Eclipse Target Definition editor. | ||
| + | * Upon opening, you will see in your progress indicator '''Resolving Target Definition'''. Eclipse is downloading the requisite plug-ins onto your workstation. This step may take some time. | ||
| + | * Upon completion, the locations in the target definition will expand indicating plug-ins available. For example: you will see http://download.eclipse.org/eclipse/updates/4.4-I-builds 397 plugins available. | ||
| + | * At this point, you can select the '''Set as Target Platform''' link in the upper right corner of the editor. | ||
| + | * A Load Target Platform dialog will appear, your target will be set and the workspace will be built. | ||
| + | * All compiler errors have now been resolved and you may close the target editor. | ||
| − | === | + | === Set up the server configuration file === |
| − | * ''' | + | * The launch configuration we will use is associated with a [[Orion/Server_admin_guide|Orion server configuration file]] called '''web-ide.conf'''. This file controls which directories the Orion server can access on your machine, among other things. |
| − | * | + | *Since we want to use Orion to edit its own source code, we have to ensure the Orion server can access the files in your local git repo. |
| − | <br> | + | ** Add a line like this to web-ide.conf: <br><pre>orion.file.allowedPaths=C:\\Users\\orionfan\\workspace\\git</pre>The path points to under the git folder where you checked out the Orion source code. (Windows paths must be separated with '''double backslashes'''!) |
| − | + | === Run the Orion server === | |
| − | + | * Open the '''Run->Run Configurations''' dialog, expand '''OSGi Framework''', and select the OSGi Framework launch called '''web-ide'''. | |
| − | < | + | * Run the launch configuration (click the '''Run''' button from the launch configuration dialog, or use the '''Run''' command on the Eclipse toolbar.) |
| − | + | * Point your browser at [http://localhost:8080 http://localhost:8080]. | |
| − | + | * You'll be prompted to login (create an account). | |
| + | * Once logged in, you'll see an empty Navigator view. Click the '''New''' button and choose '''Link to Server'''. | ||
| + | * Type a name (for example, "Orion Client") and in the '''Server Path''' field, enter the path to the Orion code on your local machine. | ||
| + | ** The path must be of one of the <code>orion.file.allowedPaths</code> entries we created in the previous section (or a subfolder thereof). | ||
| + | ** For example, if you wanted to make changes to the client, you might link to the following file path:<br><pre>C:\Users\orionfan\workspace\git\org.eclipse.orion.client</pre> | ||
| + | <!--* Repeat the previous step to add links for each git repository that you care about.--> | ||
| + | * You should see the folders show up in your Orion explorer:<br>[[Image:orion-navexample30M2.jpg]] | ||
| + | * From here, you can start editing files. As you make changes to the client code, you can simply reload the corresponding page in your browser to see the changes. We recommend you keep a browser tab open with a stable editor and stable navigator, and open a new tab for reloading and trying changes. In this way, you'll always have a couple of safe browser tabs to use to revert changes if you break something! | ||
| + | == Self-hosting on your local computer using Node.js == | ||
| − | Make sure | + | === Installing from source === |
| + | #Make sure you have Node.js and npm installed. See [http://nodejs.org/download/ nodejs.org] for details. | ||
| + | #[[Orion/Getting_the_source#Getting_the_source_onto_your_computer|Get the Orion source]]. You only need to get the [http://git.eclipse.org/c/orion/org.eclipse.orion.client.git client source]. | ||
| + | #Open a command shell and change directory to '''org.eclipse.orion.client/modules/orionode'''. | ||
| + | #Run the <code>npm install</code> command to automatically download Orionode's dependencies. | ||
| + | #*If you're not interested in developing the server, you can instead run <code>npm install --production</code>, which omits the dev-time dependencies for a smaller download. | ||
| − | + | === Concatenation and Minification === | |
| − | + | By default the pages served up by Orionode are not concatenated or minified, so they will load rather slowly. You can mitigate this by running the client-side build. To do this, just run <code>build.js</code>, found in the <code>org.eclipse.orion.client/modules/orionode/build</code> directory: | |
| − | + | node ./build/build.js | |
| + | {{warning| Running the script will overwrite files in your working directory! Make sure anything important is committed to a branch first.}} | ||
| − | + | Clear your browser cache. The next time you load Orionode, it should be much faster. | |
| − | + | ||
| − | === | + | === Running tests === |
| − | + | ||
| − | + | ||
| − | + | ||
| − | + | ||
| − | + | ||
| − | + | ||
| − | + | ||
| − | + | ||
| − | + | ||
| − | + | ||
| − | + | ||
| − | + | ||
| − | + | ||
| − | + | The Orion node server has its own test suite. See [[Orion/Running_the_tests#Node.js_Server_Tests]] for more details. | |
| − | The | + | |
| − | + | == Related links == | |
| − | + | ||
| − | + | ||
| − | + | ||
| − | + | ||
| − | + | See the [[Orion/Releng_Builds|Releng Builds]] page for details on how to contribute changes to the Orion build. | |
| − | + | ||
| − | + | ||
| − | + | ||
| − | + | ||
| − | + | ||
| − | + | ||
| − | + | ||
| + | See the cloud [[Orion/Selfhosting|Selfhosting]] page for details on self-hosting purely from the browser | ||
[[Category:Orion|Getting the source]] | [[Category:Orion|Getting the source]] | ||
Revision as of 13:19, 20 September 2013
This page covers how to get the Orion source code, as well as how to set up for self-hosting (changing Orion code from Orion) using an Eclipse development environment.
Contents
What you need
- Basic knowledge of the Git version control system. (New to Git? Here's an introduction).
- (Optional) An Eclipse IDE. "Eclipse Classic" is recommended.
- (Optional) An Orion build.
Browsing the source
Just want to take a peek at our code? You can browse it on the web here:
We also have GitHub mirrors if you prefer:
Getting the source onto your computer
The Orion source code lives in two Git repositories:
To checkout our repositories, you'll generally perform the following commands in your command shell:
git clone http://git.eclipse.org/gitroot/orion/org.eclipse.orion.client.git
git clone http://git.eclipse.org/gitroot/orion/org.eclipse.orion.server.git
If you're running an older version of Git, the http protocol may not work. In that case, try the git protocol instead:
git clone git://git.eclipse.org/gitroot/orion/org.eclipse.orion.client.git
git clone git://git.eclipse.org/gitroot/orion/org.eclipse.orion.server.git
If you are self-hosting on your local computer using an Eclipse IDE, see the section below to load the source into Eclipse.
Notes for Eclipse committers
This section applies only to Eclipse Committers. If you're not a committer, you can skip these instructions.
- Ensure that your Git configuration uses the same email address that you've set in your Eclipse Foundation profile. If the addresses don't match, you won't be able to push changes (see Git#Committers_new_to_Git).
- Committers need to use different URLs to access the Orion Git repositories. The URL includes your committer ID:
ssh://myCommitterId@git.eclipse.org/gitroot/orion/org.eclipse.orion.client.git
ssh://myCommitterId@git.eclipse.org/gitroot/orion/org.eclipse.orion.server.git
Overview of self-hosting
To edit Orion's own source code using Orion, there's a few different ways we can do it. Here are our options:
- Pure cloud.
- Using a cloud deployment of Orion (like OrionHub, a public Orion server that anyone can use), you checkout the Orion source code using Orion's built-in Git features, then edit and test it. There's no software install; all you need is a web browser. Since you don't control the server, this method only allows you to hack on the Orion client code. See Selfhosting for instructions.
- Self-hosting on your local computer using Eclipse IDE.
- This method requires the Eclipse IDE. On your local computer, you checkout the Orion source code from a Git repository, and launch the Orion server from your Eclipse IDE. You can develop both client-side and server-side code using this method.
- Self-hosting on your local computer using Node.js
- This method uses Node.js to run a local Orion server, with Orion development tools running in the browser.
Self-hosting on your local computer using Eclipse IDE
Self-hosting locally involves running an Orion server on your local workstation, pointing your Orion editor at your local Git repository, and working within Orion to make changes. Changes are committed using any Git client; for instructions on Orion's Git features, see Working with git. Here are the steps needed to get up and running.
Install the Eclipse SDK
- When working with the latest Orion code from master you will need a Kepler stable build of the Eclipse SDK to run the server, such as Eclipse 4.3 RC3.
- If you use an older version of Eclipse, such as a Eclipse 4.2.2 or earlier, you might get a warning indicating that you are attempting to launch an application that is using a newer version of Eclipse. You should be able to ignore, see Bug 409440 for more information.
- You should also install the Eclipse Git Team Provider package via Help > Install New Software. Select the Kepler repository and search for 'Eclipse Git Team Provider' to find the package.
- At the same time, install the Eclipse Web Developer Tools package to view and edit the HTML, CSS and JavaScript source within Eclipse.
Clone the client and server Git repositories into Eclipse
- Start Eclipse and create a new workspace.
- Clone the Orion client repository:
- Open the Git Repository Exploring perspective.
- Select Clone a Git Repository.
- Specify the Location URI http://git.eclipse.org/gitroot/orion/org.eclipse.orion.client.git and click Next on the Source Git Repository page.
- Click Next on the Branch Selection page to accept the defaults.
- At the Local Destination page, the directory can be placed in a new git folder under your workspace folder so all your files are within the workspace tree (the default is under your user home folder).
- Also select Import all existing projects after clone finishes so all the projects are loaded into your workspace.
- You may also wish to assign a working set such as orion.client to group the client projects via the Working Sets section of the page.
- Click Finish on the Local Destination page to clone the repository.
- Repeat the steps above to clone the Orion server repository.
- Specify the Location URI http://git.eclipse.org/gitroot/orion/org.eclipse.orion.server.git .
Specify a target to build your Orion server
- After loading in the client and server projects, a number of the server projects will have compile errors. To resolve we need to specify a target definition for your self-hosting workspace.
- Go the org.eclipse.orion.target project and open org.eclipse.orion.target.target in the Eclipse Target Definition editor.
- Upon opening, you will see in your progress indicator Resolving Target Definition. Eclipse is downloading the requisite plug-ins onto your workstation. This step may take some time.
- Upon completion, the locations in the target definition will expand indicating plug-ins available. For example: you will see http://download.eclipse.org/eclipse/updates/4.4-I-builds 397 plugins available.
- At this point, you can select the Set as Target Platform link in the upper right corner of the editor.
- A Load Target Platform dialog will appear, your target will be set and the workspace will be built.
- All compiler errors have now been resolved and you may close the target editor.
Set up the server configuration file
- The launch configuration we will use is associated with a Orion server configuration file called web-ide.conf. This file controls which directories the Orion server can access on your machine, among other things.
- Since we want to use Orion to edit its own source code, we have to ensure the Orion server can access the files in your local git repo.
- Add a line like this to web-ide.conf:
orion.file.allowedPaths=C:\\Users\\orionfan\\workspace\\git
The path points to under the git folder where you checked out the Orion source code. (Windows paths must be separated with double backslashes!)
- Add a line like this to web-ide.conf:
Run the Orion server
- Open the Run->Run Configurations dialog, expand OSGi Framework, and select the OSGi Framework launch called web-ide.
- Run the launch configuration (click the Run button from the launch configuration dialog, or use the Run command on the Eclipse toolbar.)
- Point your browser at http://localhost:8080.
- You'll be prompted to login (create an account).
- Once logged in, you'll see an empty Navigator view. Click the New button and choose Link to Server.
- Type a name (for example, "Orion Client") and in the Server Path field, enter the path to the Orion code on your local machine.
- The path must be of one of the
orion.file.allowedPathsentries we created in the previous section (or a subfolder thereof). - For example, if you wanted to make changes to the client, you might link to the following file path:
C:\Users\orionfan\workspace\git\org.eclipse.orion.client
- The path must be of one of the
- You should see the folders show up in your Orion explorer:
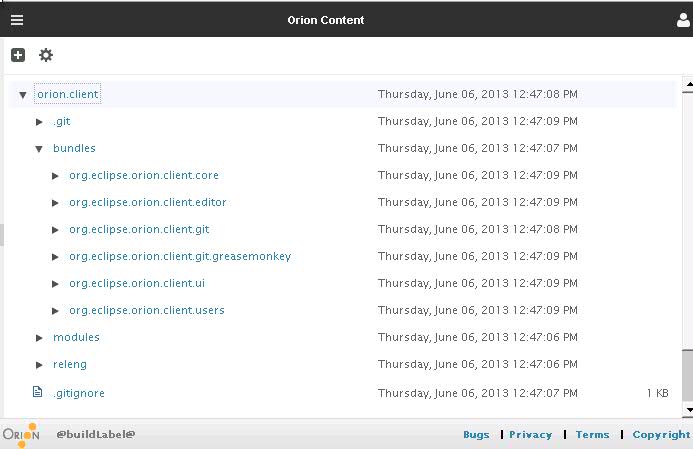
- From here, you can start editing files. As you make changes to the client code, you can simply reload the corresponding page in your browser to see the changes. We recommend you keep a browser tab open with a stable editor and stable navigator, and open a new tab for reloading and trying changes. In this way, you'll always have a couple of safe browser tabs to use to revert changes if you break something!

Self-hosting on your local computer using Node.js
Installing from source
- Make sure you have Node.js and npm installed. See nodejs.org for details.
- Get the Orion source. You only need to get the client source.
- Open a command shell and change directory to org.eclipse.orion.client/modules/orionode.
- Run the
npm installcommand to automatically download Orionode's dependencies.- If you're not interested in developing the server, you can instead run
npm install --production, which omits the dev-time dependencies for a smaller download.
- If you're not interested in developing the server, you can instead run
Concatenation and Minification
By default the pages served up by Orionode are not concatenated or minified, so they will load rather slowly. You can mitigate this by running the client-side build. To do this, just run build.js, found in the org.eclipse.orion.client/modules/orionode/build directory:
node ./build/build.js
Clear your browser cache. The next time you load Orionode, it should be much faster.
Running tests
The Orion node server has its own test suite. See Orion/Running_the_tests#Node.js_Server_Tests for more details.
Related links
See the Releng Builds page for details on how to contribute changes to the Orion build.
See the cloud Selfhosting page for details on self-hosting purely from the browser