Notice: this Wiki will be going read only early in 2024 and edits will no longer be possible. Please see: https://gitlab.eclipse.org/eclipsefdn/helpdesk/-/wikis/Wiki-shutdown-plan for the plan.
Difference between revisions of "Orion/Getting the source"
(→Accessing the code) |
(→Set up the launch to run from source) |
||
| (25 intermediate revisions by 7 users not shown) | |||
| Line 1: | Line 1: | ||
| − | This page covers how to | + | This page covers how to get the Orion source code, as well as how to set up for self-hosting (changing Orion code from Orion) using an Eclipse development environment. |
| − | + | ||
| − | + | ||
| − | + | ||
| − | + | ||
| − | + | ||
| − | + | ||
| − | + | ||
| − | + | == What you need == | |
| + | * Basic knowledge of the Git version control system. (New to Git? [http://githowto.com/ Here's an introduction]). | ||
| + | * (Optional) An [http://download.eclipse.org Eclipse IDE]. "Eclipse Classic" is recommended. | ||
| + | * (Optional) An [http://download.eclipse.org/orion/ Orion build]. | ||
| + | == Browsing the source == | ||
| + | Just want to take a peek at our code? You can browse it on the web here: | ||
| + | * http://git.eclipse.org/c/orion/ | ||
| + | We also have GitHub mirrors if you prefer: | ||
* https://github.com/eclipse/orion.client | * https://github.com/eclipse/orion.client | ||
* https://github.com/eclipse/orion.server | * https://github.com/eclipse/orion.server | ||
| − | == | + | == Getting the source onto your computer == |
| − | + | The Orion source code lives in two [[Git]] repositories: | |
| + | * {{Git|orion|org.eclipse.orion.client.git}} | ||
| + | * {{Git|orion|org.eclipse.orion.server.git}} | ||
| + | To checkout our repositories, you'll generally perform the following commands in your command shell: | ||
| + | git clone http://git.eclipse.org/gitroot/orion/org.eclipse.orion.client.git | ||
| + | git clone http://git.eclipse.org/gitroot/orion/org.eclipse.orion.server.git | ||
| + | If you're running an older version of Git, the '''http''' protocol may not work. In that case, try the '''git''' protocol instead: | ||
| + | git clone git://git.eclipse.org/gitroot/orion/org.eclipse.orion.client.git | ||
| + | git clone git://git.eclipse.org/gitroot/orion/org.eclipse.orion.server.git | ||
| − | + | === Notes for Eclipse committers === | |
| + | This section applies only to [http://www.eclipse.org/membership/become_a_member/committer.php Eclipse Committers]. If you're not a committer, you can skip these instructions. | ||
| + | * Ensure that your Git configuration uses the same email address that you've set in your [https://dev.eclipse.org/portal/myfoundation/portal/portal.php Eclipse Foundation profile]. If the addresses don't match, you won't be able to push changes (see [[Git#Committers_new_to_Git]]). | ||
| + | * Committers need to use different URLs to access the Orion Git repositories. The URL includes your committer ID: | ||
| + | ssh://myCommitterId@git.eclipse.org/gitroot/orion/org.eclipse.orion.client.git | ||
| + | ssh://myCommitterId@git.eclipse.org/gitroot/orion/org.eclipse.orion.server.git | ||
| − | |||
| − | == | + | == Overview of self-hosting == |
| − | + | To edit Orion's own source code using Orion, there's two fundamentally different ways we can do it. Here are our options: | |
| − | + | ; Pure cloud. | |
| − | <br> | + | : Using a cloud deployment of Orion (like [http://orionhub.org/ OrionHub], a public Orion server that anyone can use), you checkout the Orion source code using Orion's built-in Git features, then edit and test it. There's no software install; all you need is a web browser. Since you don't control the server, this method only allows you to hack on the Orion client code. See [[Orion/Selfhosting|Selfhosting]] for instructions.<br><br> |
| − | + | ; Local computer using Eclipse IDE. | |
| − | + | : This method requires the Eclipse IDE and a build of Orion. On your local computer, you checkout the Orion source code, and launch the Orion server from your Eclipse IDE. You can develop both client-side and server-side code using this method. Git functionality can be provided by any Git client (Orion's built-in Git features, or [http://www.eclipse.org/egit/ EGit], or msysgit on Windows, or the native command-line Git client, etc). This method is more complex, but also more flexible. | |
| − | + | ||
| − | + | ||
| − | + | ||
| + | This page talks about the '''Local computer''' method. For selfhosting in the cloud, read the [[Orion/Selfhosting|Selfhosting page]]. | ||
| − | + | == Local computer == | |
| + | Self-hosting locally involves running an Orion server on localhost, pointing your Orion editor at your local Git repo directories, and working within Orion to make changes. Changes are committed using any Git client; for instructions on Orion's Git features, see [[Orion/How Tos/Working with git | Working with git]]. | ||
| + | |||
| + | Here are the steps needed to get up and running. | ||
| − | |||
| − | |||
| − | |||
=== Install the Eclipse SDK === | === Install the Eclipse SDK === | ||
| − | * You can use any recent stable build of the Eclipse SDK to run the server | + | * You can use any recent stable build of the Eclipse SDK to run the server, such as [http://download.eclipse.org/eclipse/downloads/drops/R-3.7.1-201109091335/index.php Eclipse 3.7.1]. |
| − | === Load | + | |
| − | * [http://download.eclipse.org | + | === Load the source into Eclipse === |
| + | * [http://download.eclipse.org/orion/ Download] a stable orion build (latest integration build is the current recommendation) and unpack it somewhere on your hard disk. This download will be used as a so-called "target platform" when you run the server from Eclipse. | ||
** Occasionally, new dependencies are introduced in the server and you will need to take a nightly build to keep up-to-date. Check the [https://dev.eclipse.org/mailman/listinfo/orion-dev orion-dev mailing list] if you aren't sure which build to take. | ** Occasionally, new dependencies are introduced in the server and you will need to take a nightly build to keep up-to-date. Check the [https://dev.eclipse.org/mailman/listinfo/orion-dev orion-dev mailing list] if you aren't sure which build to take. | ||
* Create a new workspace using your Eclipse SDK. | * Create a new workspace using your Eclipse SDK. | ||
| Line 52: | Line 63: | ||
** Once you finish the wizard, you'll have a new target definition available in the list of targets. | ** Once you finish the wizard, you'll have a new target definition available in the list of targets. | ||
** Make this the active target definition for your self-hosting workspace.<br>[[Image:orion-targetdefinition.png]] | ** Make this the active target definition for your self-hosting workspace.<br>[[Image:orion-targetdefinition.png]] | ||
| − | * Your workspace will be rebuilt and compile errors should disappear. There might be a few errors related to unsatisfied dependencies from | + | * Your workspace will be rebuilt and most of the compile errors should disappear. |
| + | ** There might be a few errors related to unsatisfied dependencies from <code>.tests</code> plugins, but you can ignore them for now. You can also ignore any errors from <code>org.eclipse.orion.server.ui</code>, as it is not required to launch the server. Right-click these projects and close them if you get sick of seeing the errors. | ||
=== Set up the launch to run from source === | === Set up the launch to run from source === | ||
| − | The plugin source you've loaded into Eclipse | + | The plugin source you've loaded into Eclipse will now be used to run Orion, taking priority over the plugins in the working stable build. |
| − | * Open the '''Run->Run Configurations''' dialog, expand | + | * Open the '''Run->Run Configurations''' dialog, expand '''OSGi Framework''', and select the OSGi Framework launch called '''web-ide'''. |
| − | * | + | * The launch configuration we will use is associated with a [[Orion/Server_admin_guide|Orion server configuration file]] called '''web-ide.conf'''. This file controls which directories the Orion server can access on your machine, among other things. Since we want to use Orion to edit its own source code, we have to ensure the Orion server can access the files in your local git repo. |
| + | ** Add a line like this to web-ide.conf: <br><pre>orion.file.allowedPaths=C:\\Users\\orionfan\\code\\orion</pre>The path points to the folder where you checked out the Orion source code. (Windows paths must be separated with '''double backslashes'''!) | ||
| + | * On the '''Bundles''' tab, ensure that "Launch with: '''features selected below'''" is selected. Ensure there are five Orion features checked (see image below) | ||
| + | [[Image:Orion-launch-config.png]] | ||
* If you only want to work on the client (not the server), you can now close the server projects (5 client projects should remain). | * If you only want to work on the client (not the server), you can now close the server projects (5 client projects should remain). | ||
| − | + | ||
| − | === | + | === Run the server === |
| − | * Run the launch | + | * Run the launch configuration (click the '''Run''' button from the launch configuration dialog, or use the '''Run''' command on the Eclipse toolbar.) |
| + | * Point your browser at [http://localhost:8080 http://localhost:8080]. | ||
* You'll be prompted to login (create an account). | * You'll be prompted to login (create an account). | ||
| − | * Once logged in, you'll see | + | * Once logged in, you'll see an empty Navigator view. Click the '''New''' button and choose '''Link to Server'''. |
| − | * | + | * Type a name (for example, "Orion Client") and in the '''Server Path''' field, enter the path to the Orion code on your local machine. |
| − | * Repeat the previous step to add links for each | + | ** The path must be of one of the <code>orion.file.allowedPaths</code> entries we created in the previous section (or a subfolder thereof). |
| + | ** For example, if you wanted to make changes to the client, you might link to the following file path:<br><pre>C:\Users\orionfan\code\orion\org.eclipse.orion.client</pre> | ||
| + | <!--* Repeat the previous step to add links for each git repository that you care about.--> | ||
* You should see the folders show up in your Orion explorer:<br>[[Image:orion-navexampleM6.png]] | * You should see the folders show up in your Orion explorer:<br>[[Image:orion-navexampleM6.png]] | ||
* From here, you can start editing files. As you make changes to the client code, you can simply reload the corresponding page in your browser to see the changes. We recommend you keep a browser tab open with a stable editor and stable navigator, and open a new tab for reloading and trying changes. In this way, you'll always have a couple of safe browser tabs to use to revert changes if you break something! | * From here, you can start editing files. As you make changes to the client code, you can simply reload the corresponding page in your browser to see the changes. We recommend you keep a browser tab open with a stable editor and stable navigator, and open a new tab for reloading and trying changes. In this way, you'll always have a couple of safe browser tabs to use to revert changes if you break something! | ||
| + | === Contributing to Orion === | ||
| + | See the [[Orion/Releng_Builds|Releng Builds]] page for details on how to contribute changes to the build. | ||
| + | |||
| + | === See also === | ||
| + | [[Orion/Selfhosting|Selfhosting]] | ||
[[Category:Orion|Getting the source]] | [[Category:Orion|Getting the source]] | ||
Revision as of 14:46, 13 November 2012
This page covers how to get the Orion source code, as well as how to set up for self-hosting (changing Orion code from Orion) using an Eclipse development environment.
Contents
What you need
- Basic knowledge of the Git version control system. (New to Git? Here's an introduction).
- (Optional) An Eclipse IDE. "Eclipse Classic" is recommended.
- (Optional) An Orion build.
Browsing the source
Just want to take a peek at our code? You can browse it on the web here:
We also have GitHub mirrors if you prefer:
Getting the source onto your computer
The Orion source code lives in two Git repositories:
To checkout our repositories, you'll generally perform the following commands in your command shell:
git clone http://git.eclipse.org/gitroot/orion/org.eclipse.orion.client.git
git clone http://git.eclipse.org/gitroot/orion/org.eclipse.orion.server.git
If you're running an older version of Git, the http protocol may not work. In that case, try the git protocol instead:
git clone git://git.eclipse.org/gitroot/orion/org.eclipse.orion.client.git
git clone git://git.eclipse.org/gitroot/orion/org.eclipse.orion.server.git
Notes for Eclipse committers
This section applies only to Eclipse Committers. If you're not a committer, you can skip these instructions.
- Ensure that your Git configuration uses the same email address that you've set in your Eclipse Foundation profile. If the addresses don't match, you won't be able to push changes (see Git#Committers_new_to_Git).
- Committers need to use different URLs to access the Orion Git repositories. The URL includes your committer ID:
ssh://myCommitterId@git.eclipse.org/gitroot/orion/org.eclipse.orion.client.git
ssh://myCommitterId@git.eclipse.org/gitroot/orion/org.eclipse.orion.server.git
Overview of self-hosting
To edit Orion's own source code using Orion, there's two fundamentally different ways we can do it. Here are our options:
- Pure cloud.
- Using a cloud deployment of Orion (like OrionHub, a public Orion server that anyone can use), you checkout the Orion source code using Orion's built-in Git features, then edit and test it. There's no software install; all you need is a web browser. Since you don't control the server, this method only allows you to hack on the Orion client code. See Selfhosting for instructions.
- Local computer using Eclipse IDE.
- This method requires the Eclipse IDE and a build of Orion. On your local computer, you checkout the Orion source code, and launch the Orion server from your Eclipse IDE. You can develop both client-side and server-side code using this method. Git functionality can be provided by any Git client (Orion's built-in Git features, or EGit, or msysgit on Windows, or the native command-line Git client, etc). This method is more complex, but also more flexible.
This page talks about the Local computer method. For selfhosting in the cloud, read the Selfhosting page.
Local computer
Self-hosting locally involves running an Orion server on localhost, pointing your Orion editor at your local Git repo directories, and working within Orion to make changes. Changes are committed using any Git client; for instructions on Orion's Git features, see Working with git.
Here are the steps needed to get up and running.
Install the Eclipse SDK
- You can use any recent stable build of the Eclipse SDK to run the server, such as Eclipse 3.7.1.
Load the source into Eclipse
- Download a stable orion build (latest integration build is the current recommendation) and unpack it somewhere on your hard disk. This download will be used as a so-called "target platform" when you run the server from Eclipse.
- Occasionally, new dependencies are introduced in the server and you will need to take a nightly build to keep up-to-date. Check the orion-dev mailing list if you aren't sure which build to take.
- Create a new workspace using your Eclipse SDK.
- Use the File->Import->General->Existing Projects into Workspace wizard. In the wizard, set the root directory for the import to whatever directory you used when you cloned the Git repositories. You'll know you have the right path when you see a bunch of org.eclipse.orion.* projects in the project list.
- Ensure that Copy projects into workspace is not checked. Feel free to import just a subset of the projects (for example, just client plugins) - the remaining ones will come from the 'target platform'.
- The projects should appear in your workspace. Don't worry about compile errors just yet until after you've set up the target platform.
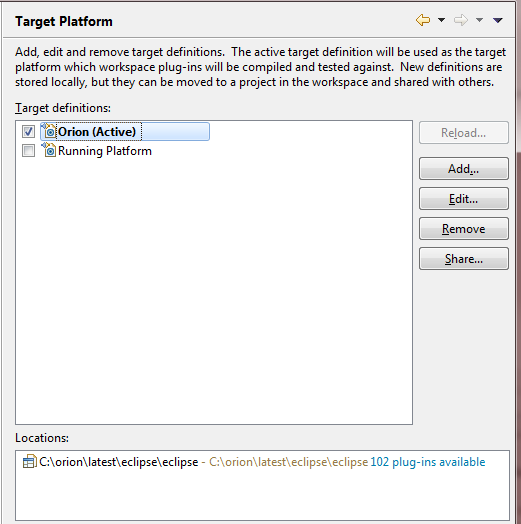
- Now you need to set up a target that points to the Orion build you downloaded. (Window->Preferences->Plug-in Development->Target Platform).
- Add a target
- Initialize the target definition with "Nothing", Next...
- In the Locations tab, click Add... , Select Installation, click "Next", click "Browse...", and point to the eclipse directory of your stable Orion build
- Once you finish the wizard, you'll have a new target definition available in the list of targets.
- Make this the active target definition for your self-hosting workspace.
- Your workspace will be rebuilt and most of the compile errors should disappear.
- There might be a few errors related to unsatisfied dependencies from
.testsplugins, but you can ignore them for now. You can also ignore any errors fromorg.eclipse.orion.server.ui, as it is not required to launch the server. Right-click these projects and close them if you get sick of seeing the errors.
- There might be a few errors related to unsatisfied dependencies from

Set up the launch to run from source
The plugin source you've loaded into Eclipse will now be used to run Orion, taking priority over the plugins in the working stable build.
- Open the Run->Run Configurations dialog, expand OSGi Framework, and select the OSGi Framework launch called web-ide.
- The launch configuration we will use is associated with a Orion server configuration file called web-ide.conf. This file controls which directories the Orion server can access on your machine, among other things. Since we want to use Orion to edit its own source code, we have to ensure the Orion server can access the files in your local git repo.
- Add a line like this to web-ide.conf:
orion.file.allowedPaths=C:\\Users\\orionfan\\code\\orion
The path points to the folder where you checked out the Orion source code. (Windows paths must be separated with double backslashes!)
- Add a line like this to web-ide.conf:
- On the Bundles tab, ensure that "Launch with: features selected below" is selected. Ensure there are five Orion features checked (see image below)

- If you only want to work on the client (not the server), you can now close the server projects (5 client projects should remain).
Run the server
- Run the launch configuration (click the Run button from the launch configuration dialog, or use the Run command on the Eclipse toolbar.)
- Point your browser at http://localhost:8080.
- You'll be prompted to login (create an account).
- Once logged in, you'll see an empty Navigator view. Click the New button and choose Link to Server.
- Type a name (for example, "Orion Client") and in the Server Path field, enter the path to the Orion code on your local machine.
- The path must be of one of the
orion.file.allowedPathsentries we created in the previous section (or a subfolder thereof). - For example, if you wanted to make changes to the client, you might link to the following file path:
C:\Users\orionfan\code\orion\org.eclipse.orion.client
- The path must be of one of the
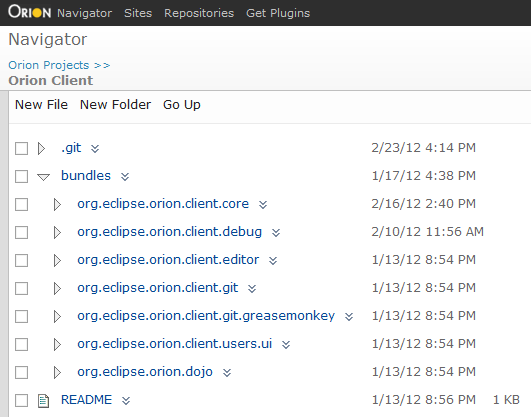
- You should see the folders show up in your Orion explorer:
- From here, you can start editing files. As you make changes to the client code, you can simply reload the corresponding page in your browser to see the changes. We recommend you keep a browser tab open with a stable editor and stable navigator, and open a new tab for reloading and trying changes. In this way, you'll always have a couple of safe browser tabs to use to revert changes if you break something!

Contributing to Orion
See the Releng Builds page for details on how to contribute changes to the build.