Notice: this Wiki will be going read only early in 2024 and edits will no longer be possible. Please see: https://gitlab.eclipse.org/eclipsefdn/helpdesk/-/wikis/Wiki-shutdown-plan for the plan.
Difference between revisions of "OSEE/Users Guide/Getting Started"
(→Launch & Configuration) |
|||
| (88 intermediate revisions by 6 users not shown) | |||
| Line 1: | Line 1: | ||
| − | =What is OSEE= | + | =What is OSEE?= |
The [http://www.eclipse.org/osee Open System Engineering Environment (OSEE)] project provides a tightly integrated environment supporting lean principles across a product's full life-cycle in the context of an overall systems engineering approach. The system captures project data into a common user-defined data model providing bidirectional traceability, project health reporting, status, and metrics which seamlessly combine to form a coherent, accurate view of a project in real-time. By building on top of this data model, OSEE has been architected to provide an all-in-one solution to configuration management, requirements management, testing, validation, and project management. All of these work together to help an organization achieve lean objectives by reducing management activities, eliminating data duplication, reducing cycle-time through streamlined processes, and improving overall product quality through work flow standardization and early defect detection. | The [http://www.eclipse.org/osee Open System Engineering Environment (OSEE)] project provides a tightly integrated environment supporting lean principles across a product's full life-cycle in the context of an overall systems engineering approach. The system captures project data into a common user-defined data model providing bidirectional traceability, project health reporting, status, and metrics which seamlessly combine to form a coherent, accurate view of a project in real-time. By building on top of this data model, OSEE has been architected to provide an all-in-one solution to configuration management, requirements management, testing, validation, and project management. All of these work together to help an organization achieve lean objectives by reducing management activities, eliminating data duplication, reducing cycle-time through streamlined processes, and improving overall product quality through work flow standardization and early defect detection. | ||
| Line 6: | Line 6: | ||
==Requirements== | ==Requirements== | ||
| − | |||
| − | |||
* System with at least 1GB of RAM | * System with at least 1GB of RAM | ||
* Java Runtime Environment (JRE) 1.6 or higher | * Java Runtime Environment (JRE) 1.6 or higher | ||
| − | * | + | * [http://www.eclipse.org/downloads/ Current Eclipse Release] |
| − | + | * Relational Databases: OSEE comes bundled with H2. For additional database support, see [[OSEE/Users_Guide/Getting_Started#Supported_Databases|Supported Databases]]. | |
| − | + | ||
| − | + | ||
| − | + | ||
| − | + | ||
| − | + | ||
| − | + | ||
| − | + | ||
| − | * | + | |
| − | + | ||
| − | + | ||
| − | + | ||
| − | + | ||
| − | + | ||
| − | ==Eclipse Installation== | + | ==Eclipse Installation == |
| − | OSEE can be installed from within Eclipse | + | The OSEE client can be installed from within Eclipse like any other Eclipse plugin. |
To install OSEE: | To install OSEE: | ||
| − | # Start Eclipse and select menu item ''Help > Software | + | # Start Eclipse and select the menu item '''Help > Install New Software...''' <!--[[Image:Find_and_install.png]]--> |
| − | # Select the ''Available Software'' tab group and click the ''Add | + | # Select the ''Available Software'' tab group and click the ''Add...'' button. <br/> [[Image:Add_site.png|500px]] [[Image:New_update_site.png]]<br/> |
| − | # On the ''Add Site'' dialog | + | # On the ''Add Site'' dialog copy the URL for the ''OSEE Client Incubation Update Site'' from [http://www.eclipse.org/osee/downloads/ downloads] page. '''Please note that the use of the software you are about to access may be subject to third party terms and conditions and you are responsible for abiding by such terms and conditions.''' |
| − | # Click on the ''OK'' button to store update site information. | + | # Click on the ''OK'' button to store update site information. |
# Select the OSEE update site entry and all features listed under its category. Click the ''Install'' button. [[Image:Install_updates.png]] | # Select the OSEE update site entry and all features listed under its category. Click the ''Install'' button. [[Image:Install_updates.png]] | ||
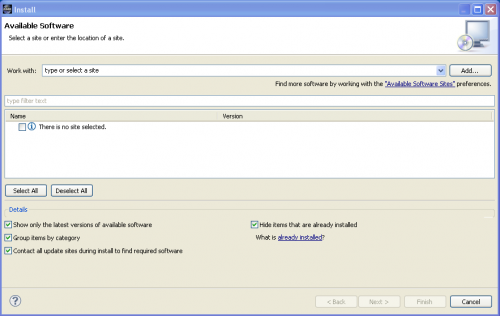
# The update manager calculates dependencies and offers you a list of features to install. Select the needed ones and click the ''Next'' button.[[Image:Install.png]] | # The update manager calculates dependencies and offers you a list of features to install. Select the needed ones and click the ''Next'' button.[[Image:Install.png]] | ||
# Accept terms of license agreement and click the ''Finish'' button in order to start the download of selected features.[[Image:Install_license.png]] | # Accept terms of license agreement and click the ''Finish'' button in order to start the download of selected features.[[Image:Install_license.png]] | ||
| − | # To apply installation changes click on the ''No'' button and shutdown Eclipse. It is important that you don't restart Eclipse until you have completed the database initialization steps below.[[Image:Restart_dialog.png]] | + | # To apply installation changes click on the ''No'' button and shutdown Eclipse. It is important that you don't restart Eclipse until you have completed the database initialization steps below. |
| − | # Before you can use OSEE you will need to install a relational database. Follow the instructions at [[#Supported Databases]] to complete this step. | + | [[Image:Restart_dialog.png]] |
| − | # Initialize the database with default OSEE data [[#Database Initialization]] | + | # Before you can use OSEE you will need to install a relational database. Follow the instructions at [[#Supported Databases|Supported Databases]] to complete this step. |
| − | # Setup config.ini and launch eclipse to start using OSEE [[# | + | # Initialize the database with default OSEE data. See [[#Database Initialization| Database Initialization]] |
| + | # Setup config.ini and launch eclipse to start using OSEE [[#Launch_.26_Configuration| Launch and Configuration]] | ||
# You can find different OSEE perspectives, such as Define and ATS, and views in correspondent dialogs, activated by menu items ''Window > Open Perspective > Other...'' and ''Window > Show View > Other...''. | # You can find different OSEE perspectives, such as Define and ATS, and views in correspondent dialogs, activated by menu items ''Window > Open Perspective > Other...'' and ''Window > Show View > Other...''. | ||
| Line 50: | Line 36: | ||
<td valign="top">[[Image:Show_view.png]]</td></tr> | <td valign="top">[[Image:Show_view.png]]</td></tr> | ||
</table> | </table> | ||
| + | |||
| + | ==Server Installation == | ||
| + | |||
| + | #Download the server zip file from [http://www.eclipse.org/osee/downloads/ downloads]. | ||
| + | #Unzip the file | ||
| + | #Set up the database (as described below) | ||
==Supported Databases== | ==Supported Databases== | ||
| − | Data created and managed by OSEE is persisted into a data store divided into two sections. A relational database to store type, configuration, and | + | Data created and managed by OSEE is persisted into a data store divided into two sections. A relational database to store type, configuration, and small content (< 4000 bytes) and a remote file system to store larger binary content. |
| − | Before you can use OSEE, you will need to select and install a relational database suited for your needs and identify a file system path for binary content storage. | + | Before you can use OSEE, you will need to select and install a relational database suited for your needs and identify a file system path for binary content storage. OSEE provides support for the databases listed below. For launch and configuration instructions visit [[#Launch_.26_Configuration| Launch and Configuration]]. |
| − | + | ||
| − | OSEE provides support for the databases listed below. | + | |
| − | + | ||
| − | + | ||
| − | === | + | ===H2 Installation=== |
| − | + | H2 is bundled with the OSEE Application Server and requires no additional installation. | |
| − | + | ||
===PostgreSQL Installation=== | ===PostgreSQL Installation=== | ||
| Line 75: | Line 62: | ||
# Download PostgreSQL from http://www.postgresql.org/download | # Download PostgreSQL from http://www.postgresql.org/download | ||
# Follow PostgreSQL installation instructions | # Follow PostgreSQL installation instructions | ||
| − | # By default, the PostgreSQL database server is configured to allow only local connections. If remote connections are to be | + | # By default, the PostgreSQL database server is configured to allow only local connections. If remote connections are to be allowed, edit postgresql.conf and pg_hba.conf to set the necessary permissions. (To setup an unsecured database instance set listen_address to * in the postgresql.conf file and add the following line to the pg_hba.conf file: host all all 0.0.0.0/0 trust) |
# Configure PostgreSQL for OSEE | # Configure PostgreSQL for OSEE | ||
## Launch pgAdmin (in windows Start->All Programs->PostgreSQL*->pgAdmin III) | ## Launch pgAdmin (in windows Start->All Programs->PostgreSQL*->pgAdmin III) | ||
| − | ## Double | + | ## Double click on PostgreSQL Database Server (listed under Servers on the left hand side) |
### If you are prompted for a password type the password selected during installation (user should be postgres by default) | ### If you are prompted for a password type the password selected during installation (user should be postgres by default) | ||
## Create an "osee" user | ## Create an "osee" user | ||
| Line 84: | Line 71: | ||
### Enter the following in the dialog: | ### Enter the following in the dialog: | ||
#### Role Name: osee | #### Role Name: osee | ||
| − | #### Can login should be checked | + | #### "Can login" should be checked |
#### Password: osee | #### Password: osee | ||
#### Password (again): osee | #### Password (again): osee | ||
| − | #### | + | #### Role Privileges--select all of the following: |
##### Inherits rights from parent roles | ##### Inherits rights from parent roles | ||
##### Superuser | ##### Superuser | ||
| Line 94: | Line 81: | ||
### Click 'OK' | ### Click 'OK' | ||
### You should now have an "osee" user under Login Roles | ### You should now have an "osee" user under Login Roles | ||
| − | ## Expand the Databases item in the tree | + | ## Expand the "Databases" item in the tree |
| − | ### Create the OSEE database right-clicking on Databases and selecting "New Database..." | + | ### Create the "OSEE" database by right-clicking on "Databases" and selecting "New Database..." |
### Enter the following in the dialog: | ### Enter the following in the dialog: | ||
#### Name: OSEE | #### Name: OSEE | ||
| Line 102: | Line 89: | ||
### Click 'OK' | ### Click 'OK' | ||
### You should now have an "OSEE" Database under Databases | ### You should now have an "OSEE" Database under Databases | ||
| − | ## Click on OSEE and then expand it | + | ## Click on "OSEE" and then expand it, then expand "Schemas" |
### Create the "osee" schema: | ### Create the "osee" schema: | ||
| − | #### Right click on Schemas and select "New Schema..." | + | #### Right click on "Schemas" and select "New Schema..." |
#### Enter the following in the dialog: | #### Enter the following in the dialog: | ||
##### Name: osee | ##### Name: osee | ||
| Line 112: | Line 99: | ||
### The relational database is now configured. Proceed to OSEE Database Initialization | ### The relational database is now configured. Proceed to OSEE Database Initialization | ||
| − | == | + | ==Launch Application Server== |
| − | + | '''Prerequisites''' | |
| − | + | * Database has been installed | |
| − | + | '''Instructions''' | |
| − | + | * Execute the launch script for your database and OS (if running from microdoc: http://osee.microdoc.com/node/2) - typical launch script names are ''runPostgresqlLocal.sh'' for a local Postgres on Unix and ''runH2.sh'' for H2 on Unix. It is straightforward to convert the downloaded scripts to Windows batch files. | |
| + | ** If running PostgreSQL, be sure to add the driver bundle ([http://www.eclipse.org/osee/downloads/ downloads]) to the server installation. Unzip the files into the server installation and add org.postgresql.driver@start to the bundles in config.ini. | ||
| + | * Wait until server finishes the startup procedure - '''do not close the console''' | ||
| + | * To check that the server has connected successfully to the database, enter the command "tagger_stats". If all is well, you will get a list of statistics. If not, you will get an exception. If the database has not been initialized, exceptions regarding missing tables are OK. | ||
| − | + | == Database Initialization == | |
| − | + | '''Prerequisites''' | |
| − | + | Visit the 'User's Guide' if you need more information about any of the pre-requisites below. | |
| − | + | *Database has been installed | |
| + | *Database server is running | ||
| + | *A file system path has been selected for binary data storage. The system default the user's home directory. | ||
| + | *An application server is running. See 'Application Server Launch' for more info. | ||
| − | + | <br>'''''Warning: This process will delete all data from OSEE Data Store. Make sure you are certain before running this process.''''' | |
| − | + | ||
| − | + | <br> | |
| − | + | '''Instructions''' | |
| − | + | <br> | |
| − | + | *Ensure database connection information matches database installation. OSEE is pre-configured to work with a PostgreSQL server running on port 5432. If you need a specialized database connection see the 'Configuring Database Connection' section. | |
| − | + | *If using PostgreSQL, make sure the driver bundle has been installed on the client eclipse (available at [http://www.eclipse.org/osee/downloads/ downloads]). | |
| − | + | **The zip file can be dragged and dropped on the install new software window. | |
| − | + | **Uncheck the "Group items by category" for it to show up. | |
| + | *In a console from the client installation, launch the database initialization application by entering the following: | ||
| + | <br> | ||
| − | + | {| style="background:rgb(230,230,230);color:black; border:1px solid gray; font-family: fixedsys;text-align: left" cellpadding=20px cellspacing=0 width=80% | |
| + | | | ||
| + | <nowiki> | ||
| + | eclipsec -nosplash -application org.eclipse.osee.framework.database.init.configClient -vmargs -XX:MaxPermSize=256m -Xmx512m -Dosee.application.server=http://localhost:8089 -Dosee.default.log=INFO -Dosee.authentication.protocol=demo | ||
| + | </nowiki> | ||
| + | |} | ||
| + | <br> | ||
| + | *When prompted select "Y" | ||
| + | *Wait for initialization to complete | ||
| − | + | == Messaging Service == | |
| + | OSEE utilizes the [http://en.wikipedia.org/wiki/Java_Message_Service Java Message Service (JMS) API] for loosely coupled, reliable, and asynchronous communication with OSEE clients. You will need an implementation of this API such as [http://activemq.apache.org ActiveMQ] in order for clients to receive updates to cached artifacts that were modified by another client (remote events). Download the latest version from [http://activemq.apache.org/download.html here]. | ||
| − | + | ==== Install ==== | |
| − | + | General installation [http://activemq.apache.org/getting-started.html#GettingStarted-InstallationProcedureforUnix instructions]. | |
| − | + | If you are downloading a release of ActiveMQ from the terminal and need to use an http proxy, this command will set up your proxy: | |
| − | + | <pre> | |
| − | + | $ export http_proxy=http://proxy.host.com:1234 | |
| − | + | </pre> | |
| − | + | ||
| + | ==== Start ==== | ||
| + | |||
| + | General instructions on how to start ActiveMQ are [http://activemq.apache.org/getting-started.html#GettingStarted-StartingActiveMQ here]. | ||
| + | |||
| + | To direct the OSEE client to use this service, in your launcher ini file, include the following Java system property: | ||
| + | <pre> | ||
| + | -Dosee.default.broker.uri=tcp://<localhost_or_your_server>:61616 | ||
| + | </pre> | ||
==Launch & Configuration== | ==Launch & Configuration== | ||
| − | Before you can launch OSEE, you will need the address of an arbitration server or an application server to access the OSEE data store. If you have questions regarding client/server interactions, visit 'Client/Server Overview'. | + | Before you can launch OSEE, you will need the address of an arbitration server or an application server to access the OSEE data store. If you have questions regarding client/server interactions, visit 'Client/Server Overview'. If everything is on the same machine, the following examples will work. |
| − | Prerequisites | + | <br> |
| + | <br> | ||
| + | |||
| + | '''Prerequisites''' | ||
| + | |||
| + | * Database has been installed | ||
| + | * Database server is running | ||
| + | * A file system path has been selected for binary data storage. The system default the user's home directory. | ||
| − | + | <br> | |
| + | '''Application Server Launch Instructions''' | ||
| − | + | {| style="background:rgb(230,230,230);color:black; border:1px solid gray; font-family: fixedsys;text-align: left" cellpadding=20px cellspacing=0 width=80% | |
| − | + | | | |
| − | + | <nowiki> | |
| + | java -Dorg.osgi.service.http.port=8089 -Dosee.check.tag.queue.on.startup=true -Dosee.db.connection.id=<ConnectionId> -jar plugins/org.eclipse.equinox.launcher_<VersionForYourEclipse>.jar -console | ||
| + | </nowiki> | ||
| + | |} | ||
| + | <br> | ||
| + | For PostgreSQL: | ||
| + | <br> | ||
| + | {| style="background:rgb(230,230,230);color:black; border:1px solid gray; font-family: fixedsys;text-align: left" cellpadding=20px cellspacing=0 width=80% | ||
| + | | | ||
| + | <nowiki> | ||
| + | runPostgresqlLocal.sh | ||
| + | </nowiki> | ||
| + | |} | ||
| − | + | <br> | |
| − | + | '''OSEE Client Launch Instructions''' | |
| − | + | {| style="background:rgb(230,230,230);color:black; border:1px solid gray; font-family: fixedsys;text-align: left" cellpadding=20px cellspacing=0 width=80% | |
| + | | | ||
| + | <nowiki> | ||
| + | eclipse -vmargs -Xmx512m -Dosee.log.default=INFO -Dosee.arbitration.server=http://localhost:8089 -Dosee.authentication.protocol=trustAll | ||
| + | </nowiki> | ||
| + | |} | ||
| − | '' | + | ==Configure a New Project in OSEE== |
| + | # Create baseline branch | ||
| + | ## From the Branch Manager's select parent branch -> open context menu -> select "branch" and enter new branch name | ||
| + | ## From the Branch Manager's select new branch -> open context menu -> access control | ||
| + | ### Add system administrators with Full Access | ||
| + | ### Add Everyone with Read Access | ||
=Screencasts= | =Screencasts= | ||
| Line 192: | Line 233: | ||
* The [http://www.eclipse.org/downloads/download.php?file=/technology/osee/6.0%20OSEE%20ATS%20Introduction%20Screencast.zip OSEE ATS] screencast introduces OSEE ATS, the integrated configuration management/change request application built into OSEE. It will introduce the purpose of creating an integrated change management system, the terms and objects used in ATS, the benefits of integrated processes and configured workflows in an integrated environment and the scenarios of creating and transitioning an action to completion. It will also walk through a simple configuration of ATS for a new product and briefly introduce the peer review framework that is available. | * The [http://www.eclipse.org/downloads/download.php?file=/technology/osee/6.0%20OSEE%20ATS%20Introduction%20Screencast.zip OSEE ATS] screencast introduces OSEE ATS, the integrated configuration management/change request application built into OSEE. It will introduce the purpose of creating an integrated change management system, the terms and objects used in ATS, the benefits of integrated processes and configured workflows in an integrated environment and the scenarios of creating and transitioning an action to completion. It will also walk through a simple configuration of ATS for a new product and briefly introduce the peer review framework that is available. | ||
| + | |||
| + | |||
[[Category:OSEE]] | [[Category:OSEE]] | ||
Revision as of 16:06, 23 November 2011
Contents
What is OSEE?
The Open System Engineering Environment (OSEE) project provides a tightly integrated environment supporting lean principles across a product's full life-cycle in the context of an overall systems engineering approach. The system captures project data into a common user-defined data model providing bidirectional traceability, project health reporting, status, and metrics which seamlessly combine to form a coherent, accurate view of a project in real-time. By building on top of this data model, OSEE has been architected to provide an all-in-one solution to configuration management, requirements management, testing, validation, and project management. All of these work together to help an organization achieve lean objectives by reducing management activities, eliminating data duplication, reducing cycle-time through streamlined processes, and improving overall product quality through work flow standardization and early defect detection.
Installation and Initialization
Requirements
- System with at least 1GB of RAM
- Java Runtime Environment (JRE) 1.6 or higher
- Current Eclipse Release
- Relational Databases: OSEE comes bundled with H2. For additional database support, see Supported Databases.
Eclipse Installation
The OSEE client can be installed from within Eclipse like any other Eclipse plugin.
To install OSEE:
- Start Eclipse and select the menu item Help > Install New Software...
- Select the Available Software tab group and click the Add... button.
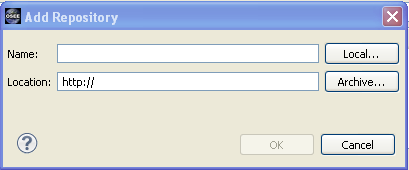
- On the Add Site dialog copy the URL for the OSEE Client Incubation Update Site from downloads page. Please note that the use of the software you are about to access may be subject to third party terms and conditions and you are responsible for abiding by such terms and conditions.
- Click on the OK button to store update site information.
- Select the OSEE update site entry and all features listed under its category. Click the Install button.
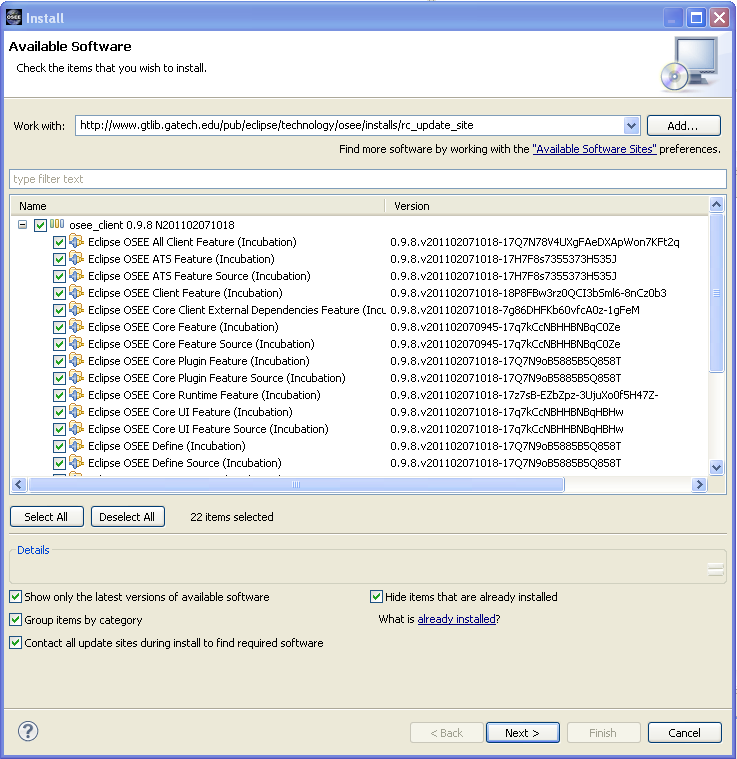
- The update manager calculates dependencies and offers you a list of features to install. Select the needed ones and click the Next button.
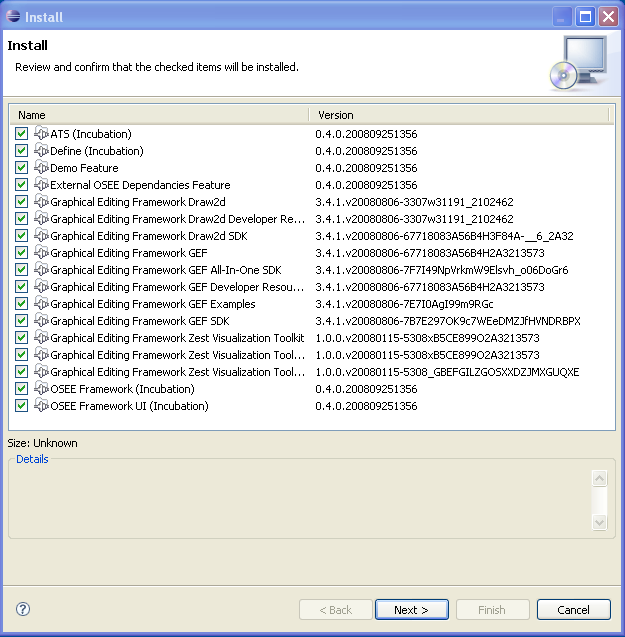
- Accept terms of license agreement and click the Finish button in order to start the download of selected features.

- To apply installation changes click on the No button and shutdown Eclipse. It is important that you don't restart Eclipse until you have completed the database initialization steps below.


- Before you can use OSEE you will need to install a relational database. Follow the instructions at Supported Databases to complete this step.
- Initialize the database with default OSEE data. See Database Initialization
- Setup config.ini and launch eclipse to start using OSEE Launch and Configuration
- You can find different OSEE perspectives, such as Define and ATS, and views in correspondent dialogs, activated by menu items Window > Open Perspective > Other... and Window > Show View > Other....
 |
 |
Server Installation
- Download the server zip file from downloads.
- Unzip the file
- Set up the database (as described below)
Supported Databases
Data created and managed by OSEE is persisted into a data store divided into two sections. A relational database to store type, configuration, and small content (< 4000 bytes) and a remote file system to store larger binary content.
Before you can use OSEE, you will need to select and install a relational database suited for your needs and identify a file system path for binary content storage. OSEE provides support for the databases listed below. For launch and configuration instructions visit Launch and Configuration.
H2 Installation
H2 is bundled with the OSEE Application Server and requires no additional installation.
PostgreSQL Installation
Prerequisites
- Ensure you have selected the best database for your needs
Instructions
- Download PostgreSQL from http://www.postgresql.org/download
- Follow PostgreSQL installation instructions
- By default, the PostgreSQL database server is configured to allow only local connections. If remote connections are to be allowed, edit postgresql.conf and pg_hba.conf to set the necessary permissions. (To setup an unsecured database instance set listen_address to * in the postgresql.conf file and add the following line to the pg_hba.conf file: host all all 0.0.0.0/0 trust)
- Configure PostgreSQL for OSEE
- Launch pgAdmin (in windows Start->All Programs->PostgreSQL*->pgAdmin III)
- Double click on PostgreSQL Database Server (listed under Servers on the left hand side)
- If you are prompted for a password type the password selected during installation (user should be postgres by default)
- Create an "osee" user
- Right-click on Login Roles (at the bottom of the tree on the left hand side) and select "New Login Role..."
- Enter the following in the dialog:
- Role Name: osee
- "Can login" should be checked
- Password: osee
- Password (again): osee
- Role Privileges--select all of the following:
- Inherits rights from parent roles
- Superuser
- Can create database objects
- Can modify catalog directly
- Click 'OK'
- You should now have an "osee" user under Login Roles
- Expand the "Databases" item in the tree
- Create the "OSEE" database by right-clicking on "Databases" and selecting "New Database..."
- Enter the following in the dialog:
- Name: OSEE
- Owner: osee
- Encoding: UTF-8
- Click 'OK'
- You should now have an "OSEE" Database under Databases
- Click on "OSEE" and then expand it, then expand "Schemas"
- Create the "osee" schema:
- Right click on "Schemas" and select "New Schema..."
- Enter the following in the dialog:
- Name: osee
- Owner: osee
- Click 'OK'
- You should now have an "osee" schema under schemas
- The relational database is now configured. Proceed to OSEE Database Initialization
- Create the "osee" schema:
Launch Application Server
Prerequisites
- Database has been installed
Instructions
- Execute the launch script for your database and OS (if running from microdoc: http://osee.microdoc.com/node/2) - typical launch script names are runPostgresqlLocal.sh for a local Postgres on Unix and runH2.sh for H2 on Unix. It is straightforward to convert the downloaded scripts to Windows batch files.
- If running PostgreSQL, be sure to add the driver bundle (downloads) to the server installation. Unzip the files into the server installation and add org.postgresql.driver@start to the bundles in config.ini.
- Wait until server finishes the startup procedure - do not close the console
- To check that the server has connected successfully to the database, enter the command "tagger_stats". If all is well, you will get a list of statistics. If not, you will get an exception. If the database has not been initialized, exceptions regarding missing tables are OK.
Database Initialization
Prerequisites
Visit the 'User's Guide' if you need more information about any of the pre-requisites below.
- Database has been installed
- Database server is running
- A file system path has been selected for binary data storage. The system default the user's home directory.
- An application server is running. See 'Application Server Launch' for more info.
Warning: This process will delete all data from OSEE Data Store. Make sure you are certain before running this process.
Instructions
- Ensure database connection information matches database installation. OSEE is pre-configured to work with a PostgreSQL server running on port 5432. If you need a specialized database connection see the 'Configuring Database Connection' section.
- If using PostgreSQL, make sure the driver bundle has been installed on the client eclipse (available at downloads).
- The zip file can be dragged and dropped on the install new software window.
- Uncheck the "Group items by category" for it to show up.
- In a console from the client installation, launch the database initialization application by entering the following:
|
eclipsec -nosplash -application org.eclipse.osee.framework.database.init.configClient -vmargs -XX:MaxPermSize=256m -Xmx512m -Dosee.application.server=http://localhost:8089 -Dosee.default.log=INFO -Dosee.authentication.protocol=demo |
- When prompted select "Y"
- Wait for initialization to complete
Messaging Service
OSEE utilizes the Java Message Service (JMS) API for loosely coupled, reliable, and asynchronous communication with OSEE clients. You will need an implementation of this API such as ActiveMQ in order for clients to receive updates to cached artifacts that were modified by another client (remote events). Download the latest version from here.
Install
General installation instructions.
If you are downloading a release of ActiveMQ from the terminal and need to use an http proxy, this command will set up your proxy:
$ export http_proxy=http://proxy.host.com:1234
Start
General instructions on how to start ActiveMQ are here.
To direct the OSEE client to use this service, in your launcher ini file, include the following Java system property:
-Dosee.default.broker.uri=tcp://<localhost_or_your_server>:61616
Launch & Configuration
Before you can launch OSEE, you will need the address of an arbitration server or an application server to access the OSEE data store. If you have questions regarding client/server interactions, visit 'Client/Server Overview'. If everything is on the same machine, the following examples will work.
Prerequisites
- Database has been installed
- Database server is running
- A file system path has been selected for binary data storage. The system default the user's home directory.
Application Server Launch Instructions
|
java -Dorg.osgi.service.http.port=8089 -Dosee.check.tag.queue.on.startup=true -Dosee.db.connection.id=<ConnectionId> -jar plugins/org.eclipse.equinox.launcher_<VersionForYourEclipse>.jar -console |
For PostgreSQL:
|
runPostgresqlLocal.sh |
OSEE Client Launch Instructions
|
eclipse -vmargs -Xmx512m -Dosee.log.default=INFO -Dosee.arbitration.server=http://localhost:8089 -Dosee.authentication.protocol=trustAll |
Configure a New Project in OSEE
- Create baseline branch
- From the Branch Manager's select parent branch -> open context menu -> select "branch" and enter new branch name
- From the Branch Manager's select new branch -> open context menu -> access control
- Add system administrators with Full Access
- Add Everyone with Read Access
Screencasts
The following screencasts provide an effective way to quickly learn what OSEE is and how it can be applied to your engineering project.
- The OSEE Demo Introduction Screencast presents preliminary material and introduces the other available screencasts.
- The OSEE Overview provides an overview of OSEE, including the driving forces that led to its creation, its architecture, the maturity of the application framework, and the status and maturity of the different applications that use the framework.
- The OSEE Application Framework screencast introduces the application framework that OSEE applications use to persist their shared data. It also gives an introduction to the generic views and editors that are available to all OSEE applications.
- The OSEE Demo Data Introduction introduces the data that is loaded into the OSEE Demo database for use by these screencasts. This helps the user understand how the data for an engineering environment fits into Application Framework and will help clarify the OSEE Define and OSEE ATS screencast demos.
- The OSEE Define screencast introduces OSEE Define, the requirements and document management application that is built into OSEE. It will discuss the difference between requirements and document management and how both types are imported into OSEE. It will also introduce editing artifacts directly on the main branch, using working branches and show the basics of relating artifacts to each other.
- The OSEE ATS screencast introduces OSEE ATS, the integrated configuration management/change request application built into OSEE. It will introduce the purpose of creating an integrated change management system, the terms and objects used in ATS, the benefits of integrated processes and configured workflows in an integrated environment and the scenarios of creating and transitioning an action to completion. It will also walk through a simple configuration of ATS for a new product and briefly introduce the peer review framework that is available.