Notice: this Wiki will be going read only early in 2024 and edits will no longer be possible. Please see: https://gitlab.eclipse.org/eclipsefdn/helpdesk/-/wikis/Wiki-shutdown-plan for the plan.
Difference between revisions of "OSEE/Users Guide/Features"
(→Quick Search View) |
(→Attribute Tagging for Quick Search) |
||
| Line 825: | Line 825: | ||
To produce tags, modified attributes are sent to the OSEE application server where the tagging system processes each attribute using an <b>Attribute Tagger</b> specified by the attribute's type. The <b>Attribute Tagger</b> knows how to interpret the attribute's data and how to extract words from the content. At this point, a word is defined as a sequential set of alphanumeric characters delimited by one or more spaces. As words are parsed, they are sent to the tagging system's word encoder where the following processing takes place: | To produce tags, modified attributes are sent to the OSEE application server where the tagging system processes each attribute using an <b>Attribute Tagger</b> specified by the attribute's type. The <b>Attribute Tagger</b> knows how to interpret the attribute's data and how to extract words from the content. At this point, a word is defined as a sequential set of alphanumeric characters delimited by one or more spaces. As words are parsed, they are sent to the tagging system's word encoder where the following processing takes place: | ||
| − | + | * The characters in the original word are converted to lower case. | |
| − | + | * The lowercase version of the word is encoded and stored in the tagging system. | |
| − | + | * The lowercase version of the word is split using [[Users_Guide#Quick_Search_View|punctuation characters]] as delimiters. | |
| − | + | * Words given in inflected form (possessive, plural, etc) are converted into [http://en.wikipedia.org/wiki/Dictionary_form citation form]. | |
| − | + | * Each word is encoded and stored in the tag system. | |
| − | + | ||
When encoding words into tags, the tag encoder uses an algorithm which transforms the word's characters into a bit-packed tag that will fit in a 64-bit integer. The tag will represent up to 12 characters (all that can fit into 64-bits). Longer words will be turned into consecutive tags. | When encoding words into tags, the tag encoder uses an algorithm which transforms the word's characters into a bit-packed tag that will fit in a 64-bit integer. The tag will represent up to 12 characters (all that can fit into 64-bits). Longer words will be turned into consecutive tags. | ||
| Line 842: | Line 841: | ||
</tr> | </tr> | ||
<tr> | <tr> | ||
| − | <td> | + | <td>appendices</td> |
<td>appendix</td> | <td>appendix</td> | ||
<td>-220858502</td> | <td>-220858502</td> | ||
| Line 867: | Line 866: | ||
</tr> | </tr> | ||
</table> | </table> | ||
| − | |||
| − | |||
= Custom Widgets = | = Custom Widgets = | ||
Revision as of 15:47, 9 June 2009
Contents
- 1 What is OSEE
- 2 Documentation
- 3 Component Overview
- 4 Screencasts
- 5 Installation and Initialization
- 6 Concepts
- 7 Views and Editors
- 8 Services
- 9 Custom Widgets
- 10 Tips and Tricks
- 11 What's new
What is OSEE
The Open System Engineering Environment (OSEE) project provides a tightly integrated environment supporting lean principles across a product's full life-cycle in the context of an overall systems engineering approach. The system captures project data into a common user-defined data model providing bidirectional traceability, project health reporting, status, and metrics which seamlessly combine to form a coherent, accurate view of a project in real-time. By building on top of this data model, OSEE has been architected to provide an all-in-one solution to configuration management, requirements management, testing, validation, and project management. All of these work together to help an organization achieve lean objectives by reducing management activities, eliminating data duplication, reducing cycle-time through streamlined processes, and improving overall product quality through work flow standardization and early defect detection.
Documentation
Component Overview
Application Framework
Key Capabilities
- Dynamic and strongly typed artifact model (persistence layer)
- Bidirectional traceability through typed relations model
- Advanced version control including multi-level branching
- Subject-based and object-based Access Control
- User management and authentication
- Dynamic searching API
- Indexing and tagging services
- Views and editors for the creation, manipulation, and navigation of artifacts, attributes, and relations
- Remote event service for communication and synchronization of OSEE instances
- Rules framework for text processing
- Utilities for plug-in developers
- Scheduling framework
- API for the extension and use of this framework to build tightly integrated applications
- Encryption Utility
- Database Utilities
- Jini Utilities
- Scheduling Service
- Datastore Adaptor
Define - Requriements Management
Define provides requirements and process management with tightly integrated change management using the Action Tracking System (ATS). OSEE provides publishing capabilities that enable the creation of documents from smaller internal documents to the complex documents needed to meet military requirements for contract deliverables such as the Software Requirements Specification (SRS), System Performance Specification (SPS), Prime Item Development Specification (PIDS), and all the required traceability between them.
Key Capabilities
- Enterprise support for concurrent, distributed requirements development
- Integrated process and workflow
- Programmatic, bidirectional traceability
- End user navigation and search capabilities
- Capture accurate, meaningful review metrics
- Tight integration with lifecycle tools
- Automated change detection capabilities
Action Tracking System (ATS)
ATS is a tightly integrated change tracking system that manages changes throughout a product's lifecycle. ATS provides integrated change management to all OSEE applications through user customizable workflows.
Key Capabilities
- Built on same OSEE application framework as requirements, code, test development
- Common Workflow Framework that provides for the creation of any number of simple to complex workflow state machine configurations that can work together during the engineering lifecycle
- Workflows are configured through graphical diagrams that ATS uses at runtime
- Configuration of ATS performed through OSEE?s common application framework enabling workflows to be created and modified without separate OSEE releases
- Advanced project planning capabilities and release management
- Duplication errors are minimized as items are automatically linked and data is shared
- Menus, Views and Editors give access to ATS while working in any other aspect in OSEE
- ATS is used to track changes and support issues for the development of OSEE itself
- Bug Icon allows quick Action creation against any OSEE integrated tool
Test Environment (OTE)
OTE is a powerful test solution within OSEE that integrates with existing Java, C, and C++ development environments to provide a seamless flow between developing, debugging, executing, and dispositioning of tests for complex hardware and software. The user is provided a common interface to the simulated and real-time environments for both functional and unit testing.
Key Capabilities
- Supports the execution of multiple simultaneous batches within a single workspace
- Built-in help system extended with test manger user guide
- Message system supporting MIL-STD-1553 MUX, serial, wire, Ethernet, and Data Distribution Service (DDS)
- Message GUIs provide monitoring, manipulation, and recording of messaging data
- Utilizes OSEE application framework to provide traceability to software requirements
- Automatic generation of tests and testing support classes, directly from requirements.
- Leverages off Java Development Toolkit (JDT) and C/C++ Development Toolkit (CDT)
- Provides remote execution of scripts against target hardware and operating system
- Test results are logged in XML
- Transforms test results via built-in or user supplied XSL Transformations
- Built-in XSL Transformations produce interactive HTML result reports
- A test environment service that provides both soft real-time and simulated capabilities, schedules the periodic execution of simulation components, and manages the I/O and testing resources.
BLAM
BLAM Lightweight Artifact Manipulation (BLAM) allows non-programmers to graphically construct workflows to automate repetitive tasks. A given workflow can be used for variety of similar tasks by using customizable controls to specify workflow parameters.
Program/Project Management
Program and project management tightly integrated with the Action Tracking System and other OSEE components to provide services necessary for estimation, planning, execution, and delivery of products managed within OSEE.
Key Capabilities
- Integrated management of charge/cost accounting
- Build planning and execution
- Reporting services
- Rules framework for requiring/alerting certain conditions
- Scheduling services for automating reoccurring tasks
Discovery and Learning
Services provided for allowing advanced learning and discovery using OSEE?s abundant and inherent lifecycle data and metrics.
Key Capabilities
- Discovery of inefficiencies in lifecycle processes
- Advanced data mining and data fusion
- Advanced estimating
- Advanced export/import of product capabilities between programs including applicable design, requirements, code, and test
- Advanced data visualization
- Prediction of future risks
- Simulation of recommended process and lifecycle changes
Application Development
Provide capabilities needed for external software application development plug-ins, like JDT, to utilize the OSEE persistence layer and integrate with other OSEE-based applications.
Design and Modeling
Provide capabilities needed for external design and modeling plug-ins to utilize the OSEE persistence layer and integrate with other OSEE-based applications.
Screencasts
The following screencasts provide an effective way to quickly learn what OSEE is and how it can be applied to your engineering project.
- The OSEE Demo Introduction Screencast presents preliminary material and introduces the other available screencasts.
- The OSEE Overview provides an overview of OSEE, including the driving forces that led to its creation, its architecture, the maturity of the application framework, and the status and maturity of the different applications that use the framework.
- The OSEE Application Framework screencast introduces the application framework that OSEE applications use to persist their shared data. It also gives an introduction to the generic views and editors that are available to all OSEE applications.
- The OSEE Demo Data Introduction introduces the data that is loaded into the OSEE Demo database for use by these screencasts. This helps the user understand how the data for an engineering environment fits into Application Framework and will help clarify the OSEE Define and OSEE ATS screencast demos.
- The OSEE Define screencast introduces OSEE Define, the requirements and document management application that is built into OSEE. It will discuss the difference between requirements and document management and how both types are imported into OSEE. It will also introduce editing artifacts directly on the main branch, using working branches and show the basics of relating artifacts to each other.
- The OSEE ATS screencast introduces OSEE ATS, the integrated configuration management/change request application built into OSEE. It will introduce the purpose of creating an integrated change management system, the terms and objects used in ATS, the benefits of integrated processes and configured workflows in an integrated environment and the scenarios of creating and transitioning an action to completion. It will also walk through a simple configuration of ATS for a new product and briefly introduce the peer review framework that is available.
Installation and Initialization
Requirements
System Requirements (non-Eclipse)
- System with at least 1GB of RAM
- Java Runtime Environment (JRE) 1.6 or higher
- Relational Database such as PostgreSQL, MySQL, Oracle, or Derby. See instructions for installing 'Supported Databases' to complete this step.
Eclipse Dependencies
- An Eclipse 3.4.2 base with the following features installed (you can see which features are already installed from Help->About Eclipse Platform->Feature Details)
- org.eclipse.gef and org.eclipse.draw2d
- org.eclipse.datatools.connectivit.oda.feature
- org.eclipse.datatools.enablement.oda.feature
- org.eclipse.birt.chart.runtime
- The easiest solution is the Ganymede Eclipse install Eclipse IDE for Java and Report Developers since it provides the above Eclipse dependencies.
(Unzip the contents of this zip file into a (short) path on you computer to create your Eclipse base).
- OSEE add-ons - Visit external site under the section "Add-On Features"
- From the Eclipse base installed in the previous step, launch the update manager and install the add-ins archived update site (no need to unzip it). For more detail, see step-by-step 'Update Manager Instructions'.
Note: To use OSEE with a database other than Derby, you will need the JDBC Drivers included in the OSEE add-ons distributed from the external location. Such a scheme of distribution is caused by licensing requirements.
Eclipse Installation
OSEE can be installed from within Eclipse using the eclipse update manager. All the user should do is point update manager to the remote or local update site.
To install OSEE:
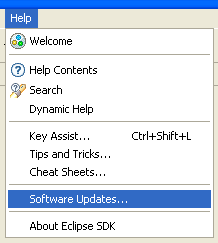
- Start Eclipse and select menu item Help > Software Updates...
- Select the Available Software tab group and click the Add Site... button.
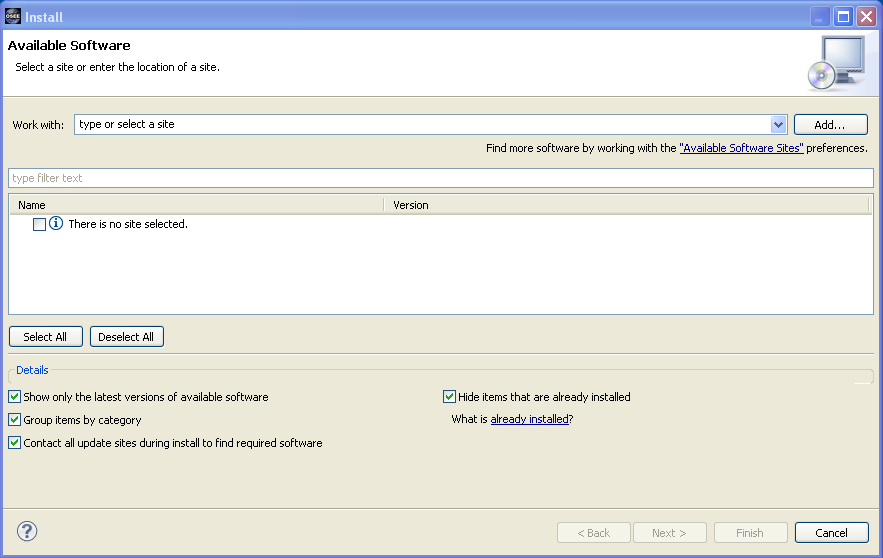
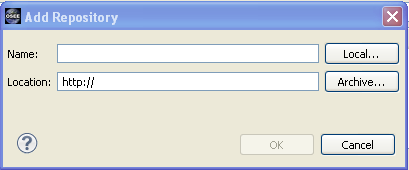
- On the Add Site dialog enter the URL to the Add-On update site. The proper URL can be found on downloads. If the update site is marked as an archived site, you will need to download the archived update site to your local file system, and add the path to the Add-Site dialog by using the Archive button. If the update site is not marked as an archived update site then copy the URL listed in the downloads page directly into the Add-Site dialog.Please note that the use of the software you are about to access may be subject to third party terms and conditions and you are responsible for abiding by such terms and conditions.
- Click on the OK button to store update site information.
- Select the OSEE update site entry and all features listed under its category. Click the Install button.
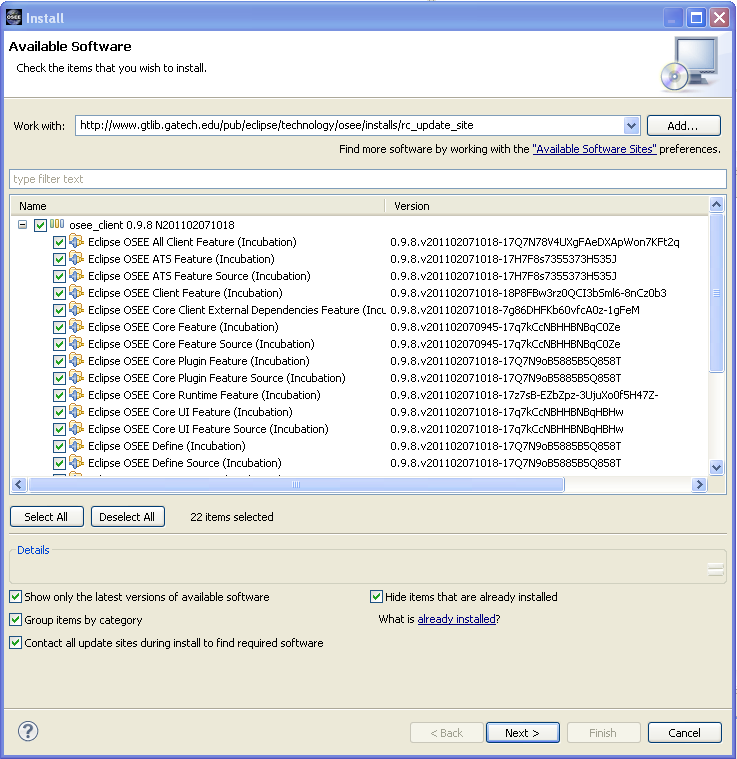
- The update manager calculates dependencies and offers you a list of features to install. Select the needed ones and click the Next button.
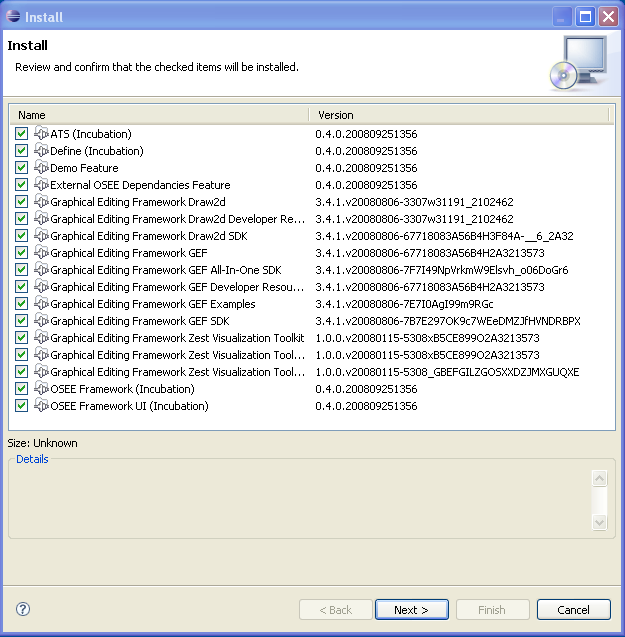
- Accept terms of license agreement and click the Finish button in order to start the download of selected features.

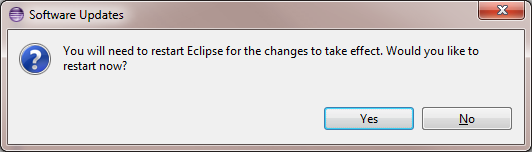
- To apply installation changes click on the No button and shutdown Eclipse. It is important that you don't restart Eclipse until you have completed the database initialization steps below.
- Before you can use OSEE you will need to install a relational database. Follow the instructions at #Supported Databases to complete this step.
- Initialize the database with default OSEE data #Database Initialization
- Setup config.ini and launch eclipse to start using OSEE #Configuration and Launch
- You can find different OSEE perspectives, such as Define and ATS, and views in correspondent dialogs, activated by menu items Window > Open Perspective > Other... and Window > Show View > Other....


 |
 |
Supported Databases
Data created and managed by OSEE is persisted into a data store divided into two sections. A relational database to store type, configuration, and simple content and a remote file system to store binary content.
Before you can use OSEE, you will need to select and install a relational database suited for your needs and identify a file system path for binary content storage. If you are new to OSEE and would like to try it out without installing your own relational database, you can follow the link below for instructions on using OSEE's pre-configured server.
OSEE provides support for the databases listed below.
Alternatively, users may choose to use the pre-configured OSEE Demo server before configuring their own. For launch and configuration instructions visit Configuration and Launch
Derby Installation
COMMING SOON
PostgreSQL Installation
Pre-Requisites
* Ensure you have selected the best database for your needs
Instructions
  1. Download PostgreSQL from http://www.postgresql.org/download
  2. Follow PostgreSQL installation instructions
  3. By default, the PostgreSQL database server is configured to allow only local connections. If remote connections are to be allow, edit postgresql.conf and pg_hba.conf to set the necessary permissions. (To setup an unsecured database instance set listen_address to * in the postgresql.conf file and add the following line to the pg_hba.conf file: host  all  all  0.0.0.0/0  trust)
  4. Configure PostgreSQL for OSEE
        1. Launch pgAdmin (in windows Start->All Programs->PostgreSQL*->pgAdmin III)
        2. Double Click on PostgreSQL Database Server (listed under Servers on the left hand side)
              1. If you are prompted for a password type the password selected during installation (user should be postgres by default)
        3. Create an "osee" user
              1. Right-click on Login Roles (at the bottom of the tree on the left hand side) and select "New Login Role..."
              2. Enter the following in the dialog:
                 Role Name: osee
                 Can login should be checked
                 Password: osee
                 Password (again): osee
                 For Role Priviledges - select the following:
                     Inherits rights from parent roles
                     Superuser
                     Can create database objects
                     Can modify catalog directly
              3. Click 'OK'
              4. You should now have an "osee" user under Login Roles
        4. Expand the Databases item in the tree
              1. Create the OSEE database right-clicking on Databases and selecting "New Database..."
              2. Enter the following in the dialog:
                     Name: OSEE
                     Owner: osee
                     Encoding: UTF-8
              3. Click 'OK'
              4. You should now have an "OSEE" Database under Databases
        5. Click on OSEE and then expand it and expand Schemas
              1. Create the "osee" schema:
                    1. Right click on Schemas and select "New Schema..."
                    2. Enter the following in the dialog:
                           Name: osee
                           Owner: osee
                    3. Click 'OK'
                    4. You should now have an "osee" schema under schemas
              2. The relational database is now configured. Proceed to OSEE Database Initialization
Oracle Installation
COMMING SOON
MySQL Installation
COMMING SOON
Launch Application Server
Pre-requisites
Visit the 'User's Guide' if you need more information about any of the pre-requisites below.
* Database has been installed
Instructions
  1. Execute the launch script for your OS (if running from microdoc: http://osee.microdoc.com/node/2)
  2. Wait until server finishes the startup procedure - Do Not Close The Console
Database Initialization
Pre-requisites
Visit the 'User's Guide' if you need more information about any of the pre-requisites below.
   * Database has been installed
   * Database server is running
   * A file system path has been selected for binary data storage. The system default the user's home directory.
   * An application server is running. See 'Application Server Launch' for more info.
Warning: This process will delete all data from OSEE Data Store. Make sure you are certain before running this process.
Instructions
- Ensure database connection information matches database installation. OSEE is pre-configured to work with a PostgreSQL server running on port 5432. If you need a specialized database connection see the 'Configuring Database Connection' section.
- In a console, launch the database initialization application by entering the following:
-- eclipse -nosplash -application org.eclipse.osee.framework.database.configClient -console
-vmargs -XX:MaxPermSize=256m -Xmx512m -Dosee.application.server=http://localhost:8089
- When prompted select "Y"
- Select 'ATS Configuration'
- Wait for initialization to complete
Launch & Configuration
Before you can launch OSEE, you will need the address of an arbitration server or an application server to access the OSEE data store. If you have questions regarding client/server interactions, visit 'Client/Server Overview'. Pre-requisites
Visit the 'User's Guide' if you need more information about any of the pre-requisites below.
   * Database has been installed
   * Database server is running
   * A file system path has been selected for binary data storage. The system default the user's home directory.
Application Server Launch Instructions
java -Dosee.log.default=INFO -Dorg.osgi.service.http.port=8089 -Dosgi.compatibility.bootdelegation=true -Xmx512m -Dosee.db.connection.id=postgresqlLocalhost -Dequinox.ds.debug=true -jar org.eclipse.osgi_3.4.0.v20080326.jar -console
OSEE Client Launch Instructions
COMING SOON
Concepts
Artifact
The artifact is the base object in OSEE. It represents any data object that is to be stored. Object data is stored in attributes. Artifacts are defined by their Artifact Type. Artifact Types can inherit from one another. All artifacts inherit from Artifact which is similar to the Object class in Java.
Example: a single requirement, a user object, a piece of code (or class), a document
Attributes
An attribute is a key/value pair representing a single data element. Attributes define an artifact's meta-data. Attributes are defined by its attribute type. An attribute type defines classes to handle how an attribute's value will be stored, search, and tagged. In addition, the attribute type defines the attribute value's data type.
The attribute base type is used to convert raw data into a native type or other object. See [#Attribute Base Types] below for a list of the default attribute base types. The attribute's backing data is managed by an attribute data provider which transfers data between client/server or can be extended to server data from outside the OSEE data store.
The default attribute "Name" is required for all Artifacts. Other attribute types can be created and associated with any Artifact Type in the system.
Example: Artifact representing a "User" of an application may have attributes such as "Phone", "Address", "City", etc...
Attribute Base Types
- String
- Word Templated Content
- Word Whole Document
- Date
- Boolean
- Integer
- Floating Point
- Enumeration
Relations
A relation relates two or more artifact instances. A relation is defined by its relation type which specified what artifact type is allowed on the A side, what artifact type is allowed on the B side, and how many artifact instances are allowed on either side of the relation.
Branch
Changes to artifacts, attributes, and relations are managed by a transaction based version control system using fine grained change identification. These changes are managed under branches. By default, OSEE has two system branches:
- System Root Branch - is the parent of all other branches in the system.
- Common Branch - is used to store OSEE configuration information such as users, etc.. The Common Branch is a child of the System Root Branch.
Product data is defined in child branches of the System Root Branch.
A branch goes through the following states during its life-cycle: Created, Modified, Committed, Re-Baselined, Deleted.
Configure a New Project in OSEE
- Create baseline branch
- From the Branch Manager's select parent branch -> open context menu -> select "branch" and enter new branch name
- From the Branch Manager's select new branch -> open context menu -> access control
- Add system administrators with Full Access
- Add Everyone with Read Access
Views and Editors
Branch Manager View
The Branch Manager View, shown by default in the Define Perspective, shows all branches and transactions on each branch managed by OSEE in a hierarchical fashion. By default, OSEE is initialized with two branches. The System Root Branch (visible to OSEE Administrators only) and the Common Branch. The System Root Branch is the base branch for all other branches in the system. The Common branch is used to store system-wide artifacts such as configuration artifacts, users, and user preferences.

|
Toolbar buttons
Toolbar Drop-DownTo display, click on the inverted triangle located on the upper right-hand side of the Branch Manager view.
|
Pop-up Menu
To display, perform a right-click on any branch.
| Command | Description |
|---|---|
| Explore | Opens the Artifact Explorer View for the selected branch. This operation can also be performed by double-clicking on a branch. |
| Change Report | Opens the Change Report View for the selected branch. |
| Merge Manager | Opens the merge manager. This is used to resolve conflicts when committing a working branch back into its parent branch. |
| Branch | Creates a child branch of the selected branch. |
| Commit Into | Commits changes made to a branch into another branch. |
| Delete Branch | Deletes the selected branch from the system by setting the branch state to deleted. (Recoverable) |
| Purge Branch | Purges the selected branch from the system by removing all data from the data store. (Not recoverable) |
| Purge Transaction | Purges the currently selected transaction from its branch. Removes all changes made on the selected transaction. (Not recoverable) |
| Open Associated Artifact | Opens the artifact that was associated with the creation of the selected branch. |
| Set Associated Artifact | Associates an artifact with the currently selected branch. |
| Access Control | Opens the access control dialog. |
| Rename | Allows users to change the branch name. |
| Rename Short Name | Allows users to change the branch short name. |
| Mark as Favorite | Sets/Unsets a branch as a favorite branch. |
| Copy | Places branch information into the clipboard. |
| Open Osee Data Model Editor | Opens a graphical editor of all the artifact, attribute, and relation types in the system. |
| Open Branch Graph | Shows a graphical representation of branches using the currently selected branch as the base branch. |
Artifact Explorer View
The Artifact Explorer view, shown by default in the Define perspective, shows the artifact hierarchy of the selected branch. The artifact hierarchy is derived from the artifact's default hierarchy relation. By default, all branches have a default hierarchy root artifact which is the hierarchy tree's base element.

|
Toolbar buttons
Pop-up MenuTo display, select one or more artifacts and perform a right-click.
|
Operations
Operations that can be performed on an Artifact Explorer.
| Command | Description |
|---|---|
| Cross Branch Drag and Drop | Artifacts can be referenced from other branches by dragging an artifact from one branch and dropping in onto another Artifact Explorer. The outcome will be one of two actions. If the artifact already existed on the branch it will be updated with the source artifacts state data. If the artifact did not exist on the destination branch it will be introduced to that branch. Meaning it will show up in the change report as an introduced artifact. |
| File Document Drag and Drop | Artifacts can be created by dragging and dropping files directly onto the parent artifact. After the drop is performed, the Artifact Import Wizard should open. Select the import method and artifact type to convert file into. This should create a child artifact directly under the artifact where the file was dropped. |
Artifact Editor
The Artifact editor provides specialized features for editing artifacts (this is the default editor for editing attributes and relations). The editor can be opened through Artifact Explorer, by double-clicking on any artifact or right-clicking on an artifact and selecting to Open With "Artifact Editor".
Associated with the editor is an Artifact-specific Outline view, which shows the structure of the active artifact. It is updated as the user edits the artifact.

|
The Artifact Editor is divided into the following sections (some sections can be expanded and collapsed by clicking on the section's title bar).
1. Title Area
2. Artifact Information AreaDisplays the artifact's branch, artifact type, and human readable id. 3. Attributes Section (expandable)Displays attribute types to be edited. Attribute types can be added or deleted by clicking on the appropriate toolbar button located on the upper-right of the attributes section title bar. Note: The following operations follow min/max occurrence rules defined by the attribute's type.
|
4. Relations Section (expandable)
All relations that are defined as being valid for the artifact are shown. Relations can be added by dragging any set of artifacts into the appropriate relation group. Relations can be deleted by right-click "Delete Relation" (removes the link, but not the artifact). Opening relation groups will show all artifacts that are currently related. Double-clicking a related artifact will open it in it's default editor (normally the Artifact Editor).
Pop-up Menu - To display, expand the Relations section, select one or more artifacts, and perform a right-click.
| Command | Description |
|---|---|
| Open | Opens the selected artifacts using the default editor. |
| Open With | Opens a sub-menu listing the available editor's for the selected artifact. |
| Edit | Opens the Artifact for editing. |
| Mass Edit | Opens the Artifact Mass Editor populated with the selected artifacts. |
| View Relation Table | Opens an HTML report of the relation tree. |
| Order Relation | (Future Capability) |
| Delete Relation | Deletes the selected relations. |
| Expand All | Expands all tree nodes containing relations to this artifact. |
| Select All | Selects all tree nodes. |
| Delete Artifact | Deletes the selected artifact and its relation to this artifact. |
5. Details Section (expandable/read-only)
Displays artifact meta-data.
Resource History View
The resource history view allows users to view the detailed changes to an aritfact.

In addition, the view also provides the user with the ability to select and compare artifacts.

Mass Artifact Editor
The Mass Artifact Editor allows the easy view of multiple artifacts along with their attributes. This editor can be viewed by right clicking the Artifact Explorer, the Search Results page, or via ATS action. Single cells can be edited via Alt-Left-Mouse-Click. After editing any number of artifacts shown, the save button persists this data.

See Xviewer for more information
Quick Search View
The Quick Search view allows users to perform searches for information that is contained inside artifacts in a selected branch.

To find all artifacts that contain a particular set of keywords, select Window > Show View > Other... > OSEE > Quick Search to open the view and type your search string in the Enter Search String combo box (or use the pull-down list to select a previously entered search expression).
If the By Id option is selected, only spaces and commas are treated as delimiters. Otherwise, the following special characters are also treated as delimiters:
!"#$%()*+-./:;<>?@[\]^{|}~_
For example:
- When By Id is not selected,
hello.worldwill be translated tohelloandworld. The search will match attributes withhelloandworldkeywords. - When By Id is selected, (
A+ABG7jFm+0BKaVZIxfqOQ,AFABG7jFm+0BKaVZIxfqOQ PX1FH) will be interpreted as 2 GUID(s) and 1 HRID. The search will match artifacts containingA+ABG7jFm+0BKaVZIxfqOQandAFABG7jFm+0BKaVZIxfqOQas its GUID orPX1FHas its HRID.
Finish entering your search options and click Search or press Enter from the combo box to execute the search. The Search view displays the results of your search. Right-click on any item in the Search view to open a context menu that allows you perform various operations on the artifacts such as copy search results to the clipboard or reveal a selected artifact in Artifact Explorer. To open one of the listed artifacts, double-click it or select Open from the context menu.
Sky Walker View
Change Report View
The change report view shows all changes made to a branch.

Toolbar buttons
| Command | Description |
|---|---|
| Refresh | Refreshes the data in the change report view with the latest information. |
| Customize Table | Opens the table customization dialog. This allows users add or hide columns. |
| ATS Bug | Opens an action against the Change Report View. |
Toolbar Drop-Down
To display, click on the inverted triangle located on the upper right-hand side of the Change Report View.
| Command | Description |
|---|---|
| Show Document Order | Switch presentation to show artifacts ordered by their default hierarchy relation. |
Pop-up Menu
To display, perform a right-click on any branch.
| Command | Description |
|---|---|
| Open | Opens the selected artifact using the default editor. |
| Open With | Opens a sub-menu listing the available editor's for this artifact. |
| Reveal in Artifact Explorer | Displays an artifacts location in the Artifact Explorer. |
| Resource History | Opens the Resource History view for the selected artifact. This will display all transactions for this artifact. |
| View Word Change Report | Displays a Word document populated with the branch differences of the selected artifacts. |
| View Viewer Report | Generates a report of the Change Report View content. |
| Copy | Copies the artifact. |
| Revert Artifact | Reverts an artifact. |
| Revert Attribute | Reverts an attribute. |
| Delete Transaction | Deletes a transaction. |
Services
Event Service
OSEE is a client side application that runs off an Oracle database. As with many applications, OSEE caches some of the data it provides to the user. These caches need to be notified that there are updates available. These updates are triggered by an event service that “connects” all OSEE instances and notifies them that changes have been made to cached data.
When your application focus is on any OSEE View, you will notice a gear icon at the bottom of your workbench. When NOT connected to the event service, this icon will show a red slash. When this happens, you should shutdown, restart and accept all OSEE updates. If this does not solve the problem, contact an OSEE Team member for help in resolving the problem.
Attribute Tagging for Quick Search
When an artifact is saved, each attribute contained in the artifact is analyzed to produce a list of tags that are then associated with the artifact. Quick search is a form of keyword based searching which uses tags to perform contextual artifact searches.
For an attribute to be tagged by the system, it must meet the following criteria:
- The attribute's type must specify an Attribute Tagger to be used by the tagging system.
- The attribute must contain valid data.
- The attribute revision must be saved in the database before sending to tagging system.
To produce tags, modified attributes are sent to the OSEE application server where the tagging system processes each attribute using an Attribute Tagger specified by the attribute's type. The Attribute Tagger knows how to interpret the attribute's data and how to extract words from the content. At this point, a word is defined as a sequential set of alphanumeric characters delimited by one or more spaces. As words are parsed, they are sent to the tagging system's word encoder where the following processing takes place:
- The characters in the original word are converted to lower case.
- The lowercase version of the word is encoded and stored in the tagging system.
- The lowercase version of the word is split using punctuation characters as delimiters.
- Words given in inflected form (possessive, plural, etc) are converted into citation form.
- Each word is encoded and stored in the tag system.
When encoding words into tags, the tag encoder uses an algorithm which transforms the word's characters into a bit-packed tag that will fit in a 64-bit integer. The tag will represent up to 12 characters (all that can fit into 64-bits). Longer words will be turned into consecutive tags.
Tag Encoding Examples
| Original | Keywords | Encoding | ||||
|---|---|---|---|---|---|---|
| appendices | appendix | -220858502 | ||||
| battery(ies) | battery | 529513131 | ||||
| alternate/backup |
|
|
Custom Widgets
XViewer - Advanced TreeViewer Widget
EclipseCon 2009 Presentation Slides
Download Zip of Code and Example
Download Instructions]
The purpose of the XViewer is to give the application developer a more advanced and dynamic TreeViewer that has the filtering and sorting the capabilities of a spreadsheet while providing the users the ability to customize their table to suit their current needs and save/restore these customizations for future use by individual or group.
The current XViewer already commited as part of the <a href="http://www.eclipse.org/osee/">Eclipse OSEE Project</a>.
More information is available at <a href="http://www.eclipse.org/osee/documentation/core/xviewer/xviewer.php">OSEE XViewer</a>.
Near term plans to submit this to the Nebula project

Table Customizations
- Provides table customization dialog to allow customization of visible columns, widths and renaming of columns
- Easily reorder columns through drag/drop or table customization
- Provides mechanism to save and load table customizations so users can easily switch between customizations
- Provides mechanism to mark table customizations as individual or global to provide sharing of customizations by users and teams (needs to be backed with shared file system or database)
- Provides mechanism to mark table customization as default customization to display whenever this table is shown
- Provides ability for multiple XViewer tables to be used within the same application, but provide their own columns and customiztions
Sorting
- Sort individual columns (forward or reverse) using data-specific configured sorter for that columns data type
- Perform unlimited multi-column sorting by holding Ctrl key down and selecting other columns. Re-selecting a column while Ctrl is held down will reverse the sort for that column
Filtering
- Quick filter (bottom left) provides for filtering of all visible data by entered keywords
- Alt-left click on column header (or right-click menu) allows for filtering by column. As many column filters can be added and work together.
- Provides simple metrics (bottom status label) to show number of objects loaded, number shown and number selected.
- Status label shows filters and sorters that are currently applied to viewer (bottom status label)
Other Capabilities
- Provides ability to copy rows, columns or individual cells into buffer for pasting into other applications
- Allows for multi-column editing of selected rows/columns
- Provides html rendering of currently visible table data
- Provides comma separated value export to csv file that can be opened in any spreadsheet application
- All the normal capabilities of the existing SWT Tree/TreeViewer have been retained as XViewer is an extension to TreeViewer
Future
- Submitted to Nebula as alternative to existing SWT TreeViewer (already part of eclipse.org/osee project)
- Allow for advanced column filtering by complex expression and "canned list" of already entered items
- Add regular expressions to all filtering capabilities
- Provide easy ability to sum selected rows for selected column
- Provide simple summing/counting of rows/column data
- Provide formulas and functions for advanced summing/counting of data
- Provide graphing and charting of data
- Collaborate with other table/tree solutions to integrate functionality...
Table Customizations

Sorting and Filtering

HTML Report and CSV Export
