Notice: this Wiki will be going read only early in 2024 and edits will no longer be possible. Please see: https://gitlab.eclipse.org/eclipsefdn/helpdesk/-/wikis/Wiki-shutdown-plan for the plan.
Difference between revisions of "Nebula Timeline"
m |
|||
| (One intermediate revision by the same user not shown) | |||
| Line 5: | Line 5: | ||
=Introduction= | =Introduction= | ||
| − | This widget allows | + | This widget allows visualizing time-based events. Events may be distributed to different rows. User-defined cursors allow measuring distance/timings between events. The widget is intended to be used as a JFace viewer. |
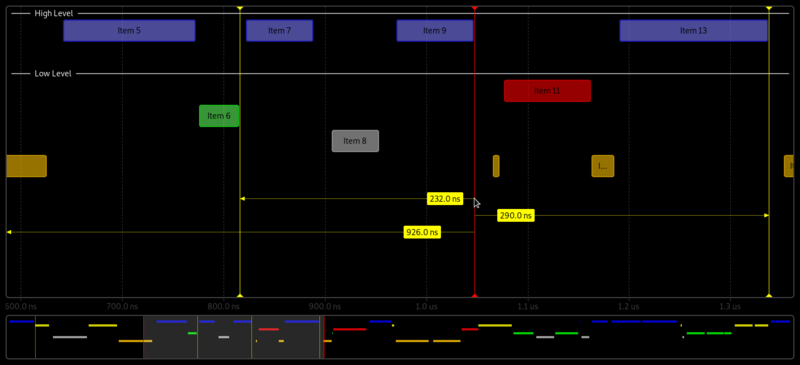
| − | [[File:timeline-example.png]] | + | [[File:timeline-example.png|800px]] |
=Usage= | =Usage= | ||
| − | The timeline widget provides a detail area (top) and an overview area (bottom). The detail area is separated into 1..n tracks, each of them containing 1..n lanes. A lane finally contains events. This allows | + | The timeline widget provides a detail area (top) and an overview area (bottom). The detail area is separated into 1..n tracks, each of them containing 1..n lanes. A lane finally contains events. This allows displaying timely overlapping events (eg the visualization of multiple layers of a network stack). The example image above shows 2 tracks, the first one containing 2 lanes, the 2nd one 4 lanes. |
The UI allows zooming via the mouse wheel and scrolling by either dragging the detail area or by dragging the selected part in the overview area. | The UI allows zooming via the mouse wheel and scrolling by either dragging the detail area or by dragging the selected part in the overview area. | ||
| Line 21: | Line 21: | ||
When multiple cursors are set, hovering over one of them will show the time offset between cursors. Offsets are sorted from smallest to largest. | When multiple cursors are set, hovering over one of them will show the time offset between cursors. Offsets are sorted from smallest to largest. | ||
| − | To delete a cursor simply right click it. | + | To delete a cursor simply right-click it. |
==JFace viewer & provided event model== | ==JFace viewer & provided event model== | ||
| Line 43: | Line 43: | ||
==JFace viewer, ContentProvider, LabelProvider== | ==JFace viewer, ContentProvider, LabelProvider== | ||
| − | You may also use the widget when your data model already exists. Then you need to provide your own ContentProvider implementing [https://github.com/eclipse/nebula/blob/master/widgets/timeline/org.eclipse.nebula.widgets.timeline/src/org/eclipse/nebula/widgets/timeline/jface/ITimelineContentProvider.java ITimelineContentProvider]. Further you need to provide a LabelProvider implementing [https://github.com/eclipse/nebula/blob/master/widgets/timeline/org.eclipse.nebula.widgets.timeline/src/org/eclipse/nebula/widgets/timeline/jface/ITimelineLabelProvider.java ITimelineLabelProvider]. Then use timelineViewer.setInput(...) to set your model root. Remember to refresh() your viewer on model updates. | + | You may also use the widget when your data model already exists. Then you need to provide your own ContentProvider implementing [https://github.com/eclipse/nebula/blob/master/widgets/timeline/org.eclipse.nebula.widgets.timeline/src/org/eclipse/nebula/widgets/timeline/jface/ITimelineContentProvider.java ITimelineContentProvider]. Further, you need to provide a LabelProvider implementing [https://github.com/eclipse/nebula/blob/master/widgets/timeline/org.eclipse.nebula.widgets.timeline/src/org/eclipse/nebula/widgets/timeline/jface/ITimelineLabelProvider.java ITimelineLabelProvider]. Then use timelineViewer.setInput(...) to set your model root. Remember to refresh() your viewer on model updates. |
==Programmatically== | ==Programmatically== | ||
Latest revision as of 08:52, 27 February 2020
Contents
Introduction
This widget allows visualizing time-based events. Events may be distributed to different rows. User-defined cursors allow measuring distance/timings between events. The widget is intended to be used as a JFace viewer.
Usage
The timeline widget provides a detail area (top) and an overview area (bottom). The detail area is separated into 1..n tracks, each of them containing 1..n lanes. A lane finally contains events. This allows displaying timely overlapping events (eg the visualization of multiple layers of a network stack). The example image above shows 2 tracks, the first one containing 2 lanes, the 2nd one 4 lanes.
The UI allows zooming via the mouse wheel and scrolling by either dragging the detail area or by dragging the selected part in the overview area.
A single event can be selected by clicking on it in the detail area.
Cursors can be added by clicking the left mouse button in the detail area anywhere on the background. Cursors can be dragged horizontally and provide snap to grid functionality when close to an event. Make sure that the mouse cursor is vertically located on the same height as the event. When the mouse cursor is below or above the event, snap to grid will not be activated.
When multiple cursors are set, hovering over one of them will show the time offset between cursors. Offsets are sorted from smallest to largest.
To delete a cursor simply right-click it.
JFace viewer & provided event model
This is the simplest form of using the viewer:
int DISPLAY_UPDATE_DELAY = 300; // throttler to update changes in the UI
TimelineViewer timelineViewer = new TimelineViewer(parent, SWT.NULL);
final ITimeline model = (ITimeline) timelineViewer.getInput();
new TimelineDataBinding(timelineViewer, model, DISPLAY_UPDATE_DELAY); // automatically update the viewer on model changes

// populate model
ITrack track = model.createTrack("First track");
ILane lane = track.createLane();
lane.createEvent("Title", "Hover text", startTime, duration, TimeUnit.SECONDS);
...
JFace viewer, ContentProvider, LabelProvider
You may also use the widget when your data model already exists. Then you need to provide your own ContentProvider implementing ITimelineContentProvider. Further, you need to provide a LabelProvider implementing ITimelineLabelProvider. Then use timelineViewer.setInput(...) to set your model root. Remember to refresh() your viewer on model updates.
Programmatically
Finally you may use the bare widget without the MVC concept.
TimelineComposite composite = new TimelineComposite(parent, SWT.NONE);

RootFigure rootFigure = composite.getRootFigure();
TrackFigure trackFigure = rootFigure.createTrackFigure("Track title");
LaneFigure laneFigure = rootFigure.createLaneFigure(trackFigure);

ITimelineEvent event = ITimelineFactory.eINSTANCE.createTimelineEvent();
event.setTitle("My Event");
event.setStartTimestamp(1234);
event.setDuration(10);

rootFigure.createEventFigure(laneFigure, event);
...
Styling
While the widget is not fully customizable, it still allows for some styling. To change the visual representation use setStyleProvider() on the viewer (if you use the JFace approach) or the rootFigure. When customizing a good way to start is to derive your custom style provider from DefaultTimelineStyleProvider.
Example
Working examples for all 3 methods are located in the plugin org.eclipse.nebula.widgets.timeline.snippets.

