Notice: this Wiki will be going read only early in 2024 and edits will no longer be possible. Please see: https://gitlab.eclipse.org/eclipsefdn/helpdesk/-/wikis/Wiki-shutdown-plan for the plan.
Difference between revisions of "Mihini/Run Mihini on an Open Hardware platform"
(→Manually) |
m (→As a service) |
||
| (10 intermediate revisions by 3 users not shown) | |||
| Line 5: | Line 5: | ||
Please bear in mind that <strong>Mihini is still under development</strong>.<br/> | Please bear in mind that <strong>Mihini is still under development</strong>.<br/> | ||
| − | == Step 1 - | + | == Step 1 - Get Mihini == |
| − | + | To get Mihini, you have 3 options : | |
| − | + | ||
| − | + | ||
| − | + | ||
| − | + | *[[Mihini/Build Mihini|Build Mihini]] | |
| + | *[[Mihini/Cross Compilation|Cross Compilation]] | ||
| + | *[[Mihini/Install_Mihini|Install Mihini]] | ||
| − | + | == Step 2 - Start Mihini on your device == | |
| − | + | ||
| − | + | ||
| − | + | ||
| − | + | One of the features of Mihini is to manage the life cycle of your application. In order to do so, applications are run from another program: the <code>Appmon</code>. We need to start it. | |
| − | + | === As a service === | |
| − | + | ||
| − | + | ||
| − | + | ||
| − | + | ||
| − | + | If you have installed Mihini from a <code>.deb</code>, you have an init script to just do what you want to: <code>/etc/init.d/mihini {start|stop|restart|status|purge}</code> | |
| − | + | Or if you have installed Mihini from a <code>.rpm</code> or the AUR (ArchLinux User Repository), you can use <code>systemctl {start|stop|restart|enable|disable}</code> | |
| − | + | ||
| − | + | ||
| − | + | ||
| − | + | ||
| − | + | ||
| − | + | ||
| − | + | ||
| − | + | ||
| − | + | ||
| − | + | ||
| − | + | ||
| − | + | ||
| − | + | ||
| − | + | ||
| − | + | ||
| − | + | ||
| − | + | ||
| − | + | ||
| − | + | ||
| − | + | ||
| − | + | ||
| − | + | ||
| − | + | ||
| − | + | ||
| − | + | ||
| − | + | ||
| − | + | ||
| − | + | ||
| − | + | ||
| − | + | ||
| − | + | ||
| − | + | ||
| − | + | ||
| − | + | ||
| − | + | ||
| − | + | ||
| − | + | ||
| − | + | ||
| − | + | ||
| − | + | ||
| − | + | ||
| − | + | ||
| − | + | ||
| − | + | ||
| − | + | ||
| − | + | ||
| − | + | ||
| − | + | ||
| − | + | ||
| − | + | ||
| − | + | ||
| − | + | ||
=== Manually === | === Manually === | ||
| Line 111: | Line 51: | ||
<source lang="bash"> | <source lang="bash"> | ||
| − | $ sudo killall agent | + | $ sudo killall agent appmon_daemon |
| − | + | ||
</source> | </source> | ||
| − | |||
| − | |||
| − | |||
| − | |||
| − | |||
== Step 3 - Setup Koneki environment == | == Step 3 - Setup Koneki environment == | ||
* Download Lua Development Tools | * Download Lua Development Tools | ||
| − | * Install [http://wiki.eclipse.org/Koneki/LDT/Developer_Area/User_Guides/ | + | * Install [http://wiki.eclipse.org/Koneki/LDT/Developer_Area/User_Guides/User_Guide_1.0#Remote_session Remote Development Support for LDT] |
* Configure the remote target in the Koneki environment | * Configure the remote target in the Koneki environment | ||
** Define your device and configure its <em>"SSH Lua"</em> paths like this (to reach the presented view, open the Views "Remote Systems" and "Properties". In "Properties" toggle ''Show Advanced Properties'' to true, then select "Ssh Lua" from the "Remote Systems" View) [[Image:SshLuaConfiguration.png|center]] | ** Define your device and configure its <em>"SSH Lua"</em> paths like this (to reach the presented view, open the Views "Remote Systems" and "Properties". In "Properties" toggle ''Show Advanced Properties'' to true, then select "Ssh Lua" from the "Remote Systems" View) [[Image:SshLuaConfiguration.png|center]] | ||
| Line 200: | Line 134: | ||
<source lang="lua"> | <source lang="lua"> | ||
> for app, t in pairs(appcon.list()) do | > for app, t in pairs(appcon.list()) do | ||
| − | + | print( app ) | |
| − | + | for field, data in pairs(t) do | |
| − | + | print("\t", field, data) | |
| − | + | end | |
| − | + | end | |
| + | |||
sample | sample | ||
autostart true | autostart true | ||
| Line 213: | Line 148: | ||
We can even check logs: | We can even check logs: | ||
<source lang="bash"> | <source lang="bash"> | ||
| − | $ | + | $ tail -f /var/log/syslog | grep Mihini |
</source> | </source> | ||
<!-- We may show log output. --> | <!-- We may show log output. --> | ||
Revision as of 10:34, 28 June 2013
This page describes a scenario for illustrating the use of Mihini on an Open Hardware Linux-based platform such as BeagleBoard or RaspberryPi.
The goal would be for someone to be able to be only one hour away from taking a bare development board and have it configured to collect data out of the GPIO sensors.
Please bear in mind that Mihini is still under development.
Contents
Step 1 - Get Mihini
To get Mihini, you have 3 options :
Step 2 - Start Mihini on your device
One of the features of Mihini is to manage the life cycle of your application. In order to do so, applications are run from another program: the Appmon. We need to start it.
As a service
If you have installed Mihini from a .deb, you have an init script to just do what you want to: /etc/init.d/mihini {start|stop|restart|status|purge}
Or if you have installed Mihini from a .rpm or the AUR (ArchLinux User Repository), you can use systemctl {start|stop|restart|enable|disable}
Manually
On your device, here a RaspberryPi with user pi.
$ cd  ~/mihini
$ sudo ./bin/appmon_daemon -a /home/pi/mihini/start.sh -w /home/pi/mihini -u pi -g pi -n 5 2>&1 | logger -t Mihini &
Notice: we launched appmon_daemon and mihini with root user rights, and applications managed by appmon_daemon will be launched using user pi that should give sufficient user rights for most of needs.
Possible starting issues The execution of ps aux must show something like the following line to successfully verify that the daemon is running:
root 2360 0.0 0.0 2028 300 pts/0 S+ 09:55 0:00 ./bin/appmon_daemon -a /home/pi/mihini/start.sh -w /home/pi/mihini -u pi -g pi -n 5
If this is not the case this may be due to a missing library. Check with ldd bin/appmon_daemon and ldd bin/agent that all required libraries are resolved. If not, try this code
cd /etc/ld.so.conf.d/
sudo /bin/sh -c 'echo "/home/pi/mihini/lib/" > 01-mihini.conf'
sudo ldconfig
Now the respective ldd commands re-executed should resolve.
Stop Mihini manually
$ sudo killall agent appmon_daemon
Step 3 - Setup Koneki environment
- Download Lua Development Tools
- Install Remote Development Support for LDT
- Configure the remote target in the Koneki environment
- Define your device and configure its "SSH Lua" paths like this (to reach the presented view, open the Views "Remote Systems" and "Properties". In "Properties" toggle Show Advanced Properties to true, then select "Ssh Lua" from the "Remote Systems" View)
- If you want the text version
- Define your device and configure its "SSH Lua" paths like this (to reach the presented view, open the Views "Remote Systems" and "Properties". In "Properties" toggle Show Advanced Properties to true, then select "Ssh Lua" from the "Remote Systems" View)

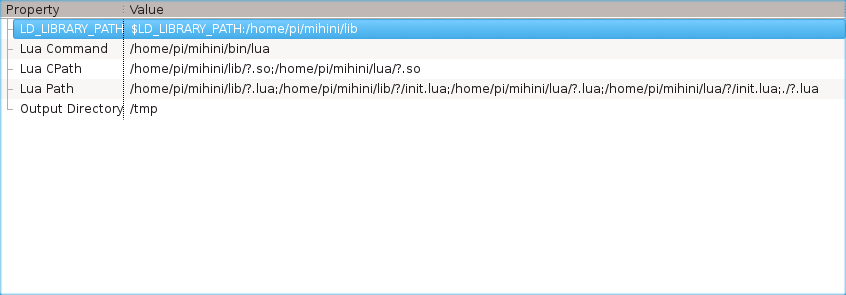
LUA_PATH: /home/pi/mihini/lib/?.lua;/home/pi/mihini/lib/?/init.lua;/home/pi/mihini/lua/?.lua;/home/pi/mihini/lua/?/init.lua;./?.lua
LUA_CPATH: /home/pi/mihini/lib/?.so;/home/pi/mihini/lua/?.so
LD_LIBRARY_PATH: $LD_LIBRARY_PATH:/home/pi/mihini/lib
- Configure the "Mihini execution environment"
- Download the latest Mihini execution environment here
- Setup this Execution Environment in your LDT environment (Preferences > Lua > Execution Environments))
- Create a launch/debug configuration and test your script.
Step 4 - Create your first application
You could blink a LED, use a touch sensor, measure the temperature and available RAM of the board... I decided to keep it simple in this tutorial, my application will simply log :). The file is main.lua.
local log   = require "log"
local sched = require "sched"
local function main()
    log("GENERAL", "INFO", "My first Mihini app is alive :)")
end

sched.run(main)
sched.loop()
To run the above example, select the main.lua file, right-click Run As/Lua Remote Application, it will then be executed on your Raspberry.
Step 5 - Install your application
Manually
All you a have to do in order to enable Mihini to handle you application is:
- Create a launcher
- Provide sources
Create a launcher
Mihini Application container runs executables. To run a Lua application, we need to set some variables beforehand and then lauch your application. In order to do so lets create the proper launcher. In the Mihini world, it is an executable file called run. Here is its content:
#!/bin/sh

# Setting up paths
export LUA_PATH="/home/pi/mihini/lib/?.lua;/home/pi/mihini/lib/?/init.lua;/home/pi/mihini/lua/?.lua;/home/pi/mihini/lua/?/init.lua;./?.lua"
export LUA_CPATH="/home/pi/mihini/lib/?.so;/home/pi/mihini/lua/?.so"
export LD_LIBRARY_PATH="$LD_LIBRARY_PATH:/home/pi/mihini/lib"

# Running app
/home/pi/mihini/bin/lua main.lua
Now the my application folder looks like
$ find raspapp/
raspapp/
raspapp/run
raspapp/main.lua
Install application
First of all, I presume you already have an Appmon Daemon running. You may wonder which way you can interact with Mihini. While starting, Mihini opens a Telnet server on port 2000, it enables you communicate with its runtime. We are about to use it to install an app available at '/tmp/raspapp', which will be named 'sample', this application will benefit from autostart ( the last true parameter ).
$ telnet localhost 2000
Trying 127.0.0.1...
Connected to localhost.
Escape character is '^]'.
Lua interactive shell
> appcon = require 'agent.appcon'
> = appcon.install('sample', '/tmp/raspapp', true)
2013-01-22 13:33:45 APPCON-INFO: Installing application "sample"
= ok
We can check that the application is properly installed
> for app, t in pairs(appcon.list()) do
     print( app )
     for field, data in pairs(t) do
         print("\t", field, data)
     end
end

sample
                autostart       true
                runnable        true
Notice: CTRL-D to quit.
We can even check logs:
$ tail -f /var/log/syslog | grep Mihini
Over the air
One day, it will be possible to install application to your remote system Mihini just from its IP, and even more:
- Use the Koneki tools to create an application package
- Deploy the package on a publically available web server
- Connect to the Mihini console and for a connection to the testing server
MISC. TIP & TRICKS
- You may want to have udev rules so as your USB devices (typically the 3G stick) does not end up having an always changing /dev/ttyUSB<something> file descriptor...
- For a Sierra 3G stick, create a 99-aircard.rules in /etc/udev/rules.d, with the following rules (your ID_VENDOR_ID and ID_MODEL_ID may be different):
SUBSYSTEM=="tty", SUBSYSTEMS=="usb", ENV{ID_VENDOR_ID}=="1199", ENV{ID_MODEL_ID}=="68a3", ENV{ID_USB_INTERFACE_NUM}=="03", SYMLINK+="ttyATConsole0"
SUBSYSTEM=="tty", SUBSYSTEMS=="usb", ENV{ID_VENDOR_ID}=="1199", ENV{ID_MODEL_ID}=="68a3", ENV{ID_USB_INTERFACE_NUM}=="04", SYMLINK+="ttyATConsole1"
- For a serial-USB adapter: http://hintshop.ludvig.co.nz/show/persistent-names-usb-serial-devices/
- Remove Lua comments to save some flash on very tiny devices (could probably be part of the build process btw)
-
find . -type f -name '*.lua' -print0 | xargs -0 sed -i '/^[ \t]*--/d'
-
- Strip binary code, to save flash too
-
find . -type f -name '*.so' -print0 | xargs -0 $STRIP_EXECUTABLE_PATH
-