Notice: this Wiki will be going read only early in 2024 and edits will no longer be possible. Please see: https://gitlab.eclipse.org/eclipsefdn/helpdesk/-/wikis/Wiki-shutdown-plan for the plan.
Difference between revisions of "Mihini/Run Mihini on an Open Hardware platform"
(→Compile Mihini) |
|||
| Line 111: | Line 111: | ||
* Create a launch/debug configuration and test your script | * Create a launch/debug configuration and test your script | ||
| − | = Step 7 - Install your application over the air = | + | = Step 7 - Start Mihini daemon on your device = |
| + | |||
| + | = Step 8 - Install your application over the air = | ||
* Use the Koneki tools to create an application package | * Use the Koneki tools to create an application package | ||
Revision as of 13:26, 11 January 2013
This page describes a scenario for illustrating the use of Mihini on an Open Hardware Linux-based platform such as BeagleBoard or RaspberryPi.
The goal would be for someone to be able to be only one hour away from taking a bare development board and have it configured to collect data out of the GPIO sensors and send this data on a remote server. The application should be updatable over-the-air.
Contents
- 1 Step 1 - Build Mihini
- 2 Step 1 (alternative) - Get a ready-to-use "Mihini for XXX" SD card binary image
- 3 Step 2 - Configure network connection
- 4 Step 3 - Configure Mihini
- 5 Step 4 - Setup Koneki environment
- 6 Step 5 - Create your first application
- 7 Step 6 - Test the application
- 8 Step 7 - Start Mihini daemon on your device
- 9 Step 8 - Install your application over the air
- 10 MISC. TIP & TRICKS
Step 1 - Build Mihini
- Download the sources
- Cross-compile (or compile directly on the target) the Mihini runtime
- TODO at that stage, can we try to create a dpkg? That'd be very useful...
Step 1 (alternative) - Get a ready-to-use "Mihini for XXX" SD card binary image
- Download a ready-to-use .img file and put it on the SD card used on the development board
Step 2 - Configure network connection
3G connection
- apt-get install ppp
- http://mycusthelp.net/SIERRAWIRELESS/_cs/AnswerDetail.aspx?sSessionID=&aid=5#Connecting_using_PPPD
Ethernet connection
- Configure/verifiy that there is Ethernet connection as a fall-back
Step 3 - Configure Mihini
Compile Mihini
First of all you will need prerequisites
sudo apt-get install git build-essential cmake
Now get the sources
cd /tmp/
git clone ssh://host/mihini.git
Then there will be some configuration on agent/agent/defaultconfig.lua.
- Enable the application container
-
appcon.activate = truein defaultconfig.lua
-
- Enable the update manager
-
update.activate = truein defaultconfig.lua
-
- OPTIONAL (but useful :)), enable Lua shell on all network interfaces by adding
-
shell.address = '*'
-
Now you can choose to compile directly on your device or cross compile it then send in to your device of choice. For the following sample a RaspberryPi has been used.
Compiling on device
Move the repository you just cloned to your device ( in my case using scp ). Installed the prerequisites mentioned above on your device and simply run the following in the repository you just copied.
#
# On raspberrypi itself
#
cd mihini/bin
./build.sh
#
# Compiling Lua
#
cd build.default/
make lua
Cross compiling
#
# Cross compiling
#

# Get linaro toolchain
cd /where/you/want/it
git clone https://github.com/raspberrypi/tools.git

# Define path to the arm toolchain you just downloaded
cd /tmp/mihini
vim cmake/toolchain.raspberrypi-linaro.cmake
cd bin/
./build.sh -t raspberrypi-linaro

#
# Compiling Lua
#
cd build.raspberrypi-linaro/
make lua

# Send all this on raspberrypi
scp -r runtime pi@yourPiIp:mihini
Step 4 - Setup Koneki environment
- Download Lua Development Tools
- Install "Mihini target management"
- Define your device and configure its "SSH Lua" paths like this
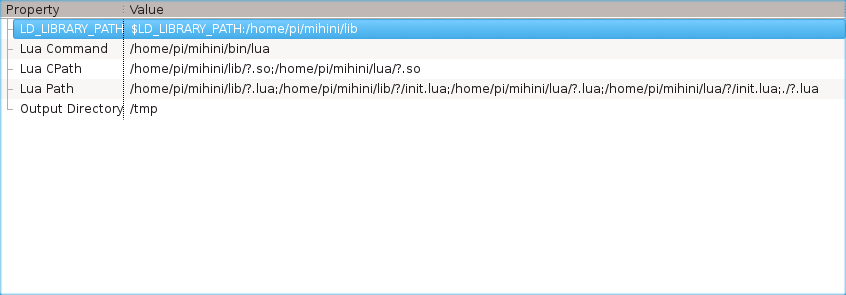
- If you want the text version

LUA_PATH: /home/pi/mihini/lib/?.lua;/home/pi/mihini/lib/?/init.lua;/home/pi/mihini/lua/?.lua;/home/pi/mihini/lua/?/init.lua;./?.lua
LUA_CPATH: /home/pi/mihini/lib/?.so;/home/pi/mihini/lua/?.so
LD_LIBRARY_PATH: $LD_LIBRARY_PATH:/home/pi/mihini/lib
- Configure the "Mihini execution environment" (provides nice autocompletion...)
Step 5 - Create your first application
- TODO (blink a LED, use a touch sensor, measure the temperature and available RAM of the board...)
Step 6 - Test the application
- Configure the remote target in the Koneki environment
- You will need to know the IP address of the target, but you likely know it already :-)
- Create a launch/debug configuration and test your script
Step 7 - Start Mihini daemon on your device
Step 8 - Install your application over the air
- Use the Koneki tools to create an application package
- Deploy the package on a publically available web server
- Connect to the Mihini console and for a connection to the testing server
MISC. TIP & TRICKS
- You may want to have udev rules so as your USB devices (typically the 3G stick) does not end up having an always changing /dev/ttyUSB<something> file descriptor...
- For a Sierra 3G stick, create a 99-aircard.rules in /etc/udev/rules.d, with the following rules (your ID_VENDOR_ID and ID_MODEL_ID may be different):
SUBSYSTEM=="tty", SUBSYSTEMS=="usb", ENV{ID_VENDOR_ID}=="1199", ENV{ID_MODEL_ID}=="68a3", ENV{ID_USB_INTERFACE_NUM}=="03", SYMLINK+="ttyATConsole0"
SUBSYSTEM=="tty", SUBSYSTEMS=="usb", ENV{ID_VENDOR_ID}=="1199", ENV{ID_MODEL_ID}=="68a3", ENV{ID_USB_INTERFACE_NUM}=="04", SYMLINK+="ttyATConsole1"
- For a serial-USB adapter: http://hintshop.ludvig.co.nz/show/persistent-names-usb-serial-devices/
- Below is a template of the defaultconfig.lua that you should use to have most of the important features (appmon, updatemanager, ...) of Mihini enabled
TODO