Notice: this Wiki will be going read only early in 2024 and edits will no longer be possible. Please see: https://gitlab.eclipse.org/eclipsefdn/helpdesk/-/wikis/Wiki-shutdown-plan for the plan.
Linux Tools Project/OProfile/User Guide
{{#eclipseproject:technology.linux-distros}}
Contents
- 1 Overview
- 2 Installation and Set-Up
- 3 Launching A Profile
- 4 OProfile View
- 5 OProfile View
- 6 Example Project
- 7 Troubleshooting
- 7.1 Install Script Errors
- 7.1.1 Error: script must be run as the root user
- 7.1.2 Error: script must be run with pwd in script dir
- 7.1.3 Error: required binaries do not exist, OProfile not installed?
- 7.1.4 Error: /usr/bin/consolehelper does not exist, run install-noconsolehelper.sh instead
- 7.1.5 Error: cannot create opcontrol wrapper in <directory>
- 7.1.6 Error: cannot find opxml binary, required plugin missing
- 7.2 No Samples From A Profile
- 7.3 Log Reader Hangs
- 7.4 Other Errors
- 7.5 Rebuilding opxml
- 7.1 Install Script Errors
Overview
The OProfile plug-in aims to bring the powerful call profiling capabilities of OProfile to Eclipse, in a manner that is easy to use for developers of any level of experience. Inexperienced users can, with one click, determine which parts of their code use the most time. Experienced users of OProfile can perform the same functions they would on the command-line, but with a much richer visualization of the results. For more details on OProfile, visit the homepage here.
Installation and Set-Up
The easiest way to install the OProfile plug-in for Eclipse is through the Software Updates and Add-ons menu. For information on how to use this menu, refer to [this link].
Unlike most Eclipse plug-ins, the Oprofile plug-in requires some configuration after installation. Note that this configuration process takes only a few simple steps, and only needs to be done once.
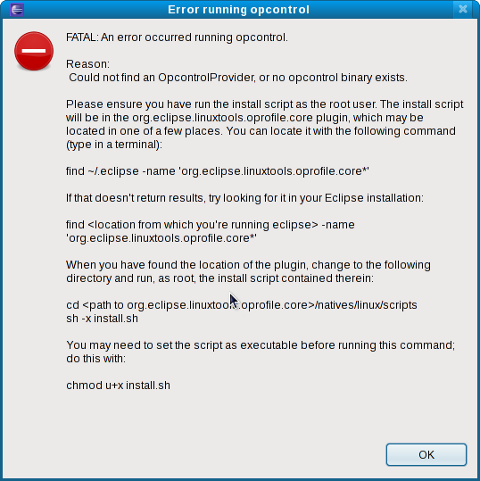
After the plug-in is first installed, performing a profile run with OProfile will bring up a dialog similar to the following:
As the dialog suggests, you must run the supplied install script; this script will allow the OProfile plug-in to perform OProfile tasks as root (since OProfile cannot be run as an unprivileged user). The steps below are the same as the dialog but described in more detail.
Step 1 - Locate the Installation Scripts
Open up a terminal and locate the natives/linux/scripts subdirectory. The install script is located in the org.eclipse.linuxtools.oprofile.core plug-in directory. The location of this plug-in directory depends on how you installed Eclipse:
- If you are using a distro-supplied version of Eclipse and installed the plug-in via the update site, the plug-in directory will most likely be under
~/.eclipse. To find the exact location of the plug-in directory in this case, use the following command:
find ~/.eclipse -name 'org.eclipse.linuxtools.oprofile.core_*'
- Alternatively, if you are using an extracted tarball of Eclipse (i.e. you downloaded a
.tar.gzfrom here), then the plug-in will most likely be in thepluginssub-directory of where you extracted it.
For example, if you extracted the tarball to/home/ksebasti, your Eclipse installation would be in/home/ksebasti/eclipse. In this case, you should use the following command to find the exact location of the plug-in directory:
find /home/ksebasti/eclipse -name 'org.eclipse.linuxtools.oprofile.core_*'
Note: In both cases, the quotes (') and asterisk (*) are necessary.
Sample output will look like this:
$ find /home/ksebasti/eclipse -name 'org.eclipse.linuxtools.oprofile.core_*'/home/ksebasti/eclipse/plugins/org.eclipse.linuxtools.oprofile.core_0.2.0.200904131051
Once you find the plug-in directory, navigate to its natives/linux/scripts subdirectory. Using our previous example:
cd /home/ksebasti/eclipse/plugins/org.eclipse.linuxtools.oprofile.core_0.2.0.200904131051/natives/linux/scripts
The natives/linux/scripts subdirectory contains the installation scripts you will need to run in order to allow OProfile to run as root.
Note that if you are not the root user while performing these commands, you may have to re-execute them as the root user in Step 3.
Step 2 - Choose Which Installation Script To Run
The natives/linux/scripts subdirectory contains two scripts: install.sh and install-noconsolehelper.sh. Both scripts perform sanity checks to ensure OProfile is installed and that opxml, a C++ program required to interface with OProfile, exists and can be run. The difference is in how root authentication with the plug-in is set up.
-
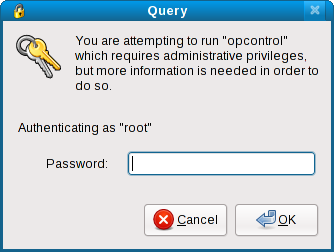
install.shuses the pluggable authentication modules (PAM) mechanism. This is the default and recommended method for root authentication. When an OProfile task is required, you will be presented with this dialog to enter the root password:
-
install-noconsolehelper.shcan be used whenconsolehelperis not present on the system, or if required PAM modules are not on the system. It uses the sudo mechanism and a small wrapper script. The install script will describe the text which should be written in thesudoersfile, then run the commandvisudoto edit it.
Note that thesudoersfile is a sensitive system file and altering it in other ways may lead to system instability. Only users with enough knowledge of running a Linux system should use this method. For these reasons, this method of root authentication is discouraged. However, it may be the only option available to some users and it has been tested to work by developers and users of the plug-in.
Step 3 - Running The Install Script
Once you have selected an install script, log in as root. Assuming you are in the natives/linux/scripts subdirectory of the plug-in directory (as in Step 1 - Locate the Installation Scripts), run your selected install script:
./install.sh
Successful output will look like this:
# ./install.shEclipse-OProfile plugin install successful.
Either install script should be run as the root user since both scripts perform some actions that require elevated privileges. install.sh places files in /etc subdirectories, while install-noconsolehelper.sh runs the command visudo. If you wish to simply run either install script without logging in as root, use:
su -c './install.sh'
This command will run only the install script as the root user, then return control to the regular user. Note that you will still need to enter the root password to make this work. If you receive an error message, refer to the Troubleshooting section.
Step 4 - Restart Eclipse
After running the install script, restart Eclipse using File > Restart.
If you need to uninstall the plug-in, run the uninstall.sh or uninstall-noconsolehelper.sh script before uninstalling it from within Eclipse. These scripts are also located in the natives/linux/scripts subdirectory of the OProfile plug-in directory (i.e. the same directory where the install scripts are found).
Launching A Profile
The purpose of the OProfile plug-in is to provide useful profile information in a user-friendly manner. The first step is to gather this information. The plug-in hooks into the Eclipse and the CDT's launching facilities, hence profiling is no harder than a normal run of your program. The plug-in will start, stop and perform other OProfile tasks in the background as needed, while the binary itself runs as normal. Currently, it is only possible to start profiling when a user binary is run, and stop profiling after the binary has returned. However, there are plans to include a feature to start/stop profiling at arbitrary times in the near future.
One-Click Launch
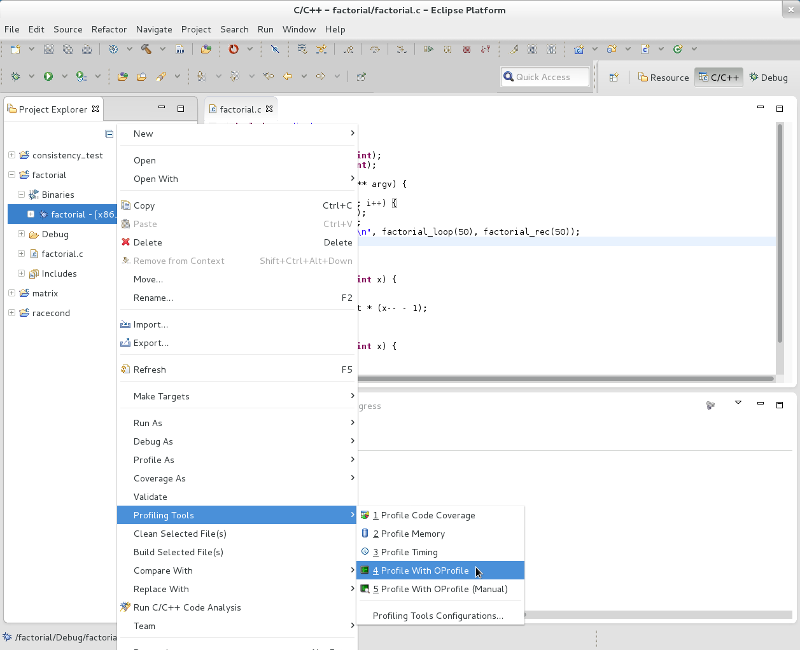
For the majority of users, the most interesting profile is to see where time is spent during execution of the program. A one-click launch feature exists in the plug-in, which will set appropriate defaults for a profile configuration using the execution time event and launch it with no extra user intervention required. Simply right-click on the project, the binary or in an open editor for a source file belonging to that project, navigate to Profile As and click Profile With OProfile to start the launch.
Configurable Profile
OProfile has many options to configure its operation; many of these are exposed via the launch configuration in a user-friendly manner and allows for a more complex profile of your binary. See #Profiling Configuration for details. After configuring these details, simply click the Profile button to launch the profile.
OProfile View
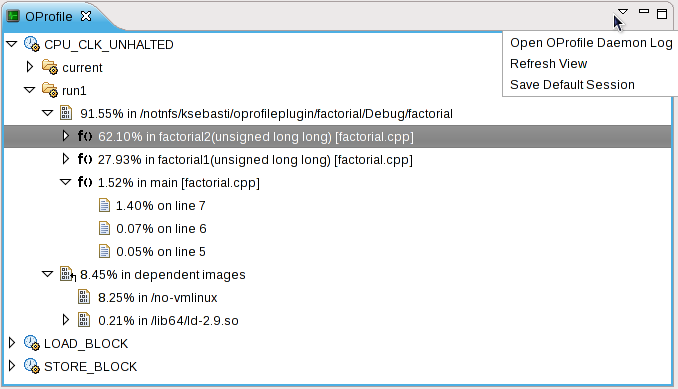
The OProfile view is the central point of interaction of the plug-in with the results of profiling.
Tree Structure
The tree structure shown above describes one or more profiles of one or more events in the following manner:
-
 Events -- the name of the profiling event used by OProfile
If source code is not available, then there may be symbols shown (including source file name) but no samples. This is usually the case with shared libraries. As well, depending on the #Global Settings, there may be no dependent images in a profile.
Note that after Eclipse is restarted, there will be no data shown in the view. Data from past profiles will still be on the system, if not touched otherwise, and can be re-read with the Refresh View menu action (see below).
Features
This section describes the features of the plug-in exposed through the view.
View Tree
- Double-clicking on a
 sample will open the source file in an editor and place the cursor at that line.
- Note this requires that the source code is available and is in the correct directory (as described in the binary's debug info).
View Menu
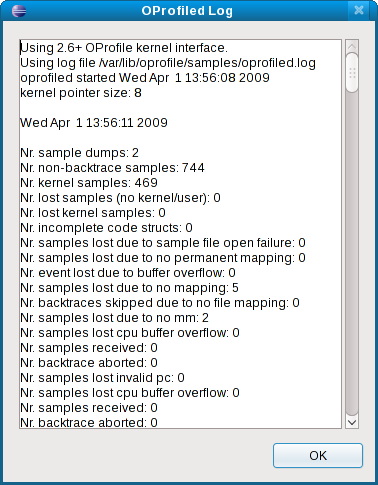
- Open OProfile Daemon Log
- This will launch a dialog showing the contents of the oprofile daemon log (by default in
/var/lib/oprofile/samples/oprofiled.log):
- This will launch a dialog showing the contents of the oprofile daemon log (by default in
- Refresh View
- This will re-read the OProfile data on the system, re-create the internal data model and re-display the profile tree. Useful to display data already on the system without launching a profile (e.g. when Eclipse first starts up).
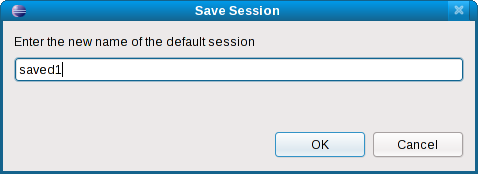
- Save Default Session
- The default session, named
current, is overwritten on each launch of a profile if it is not saved. If you wish to keep the profile for later viewing, this menu action will allow you to save the session to a different name. Note that since the samples are in a system directory, this operation requires the use of OProfile and hence you will be prompted for the root password. The save session dialog is shown below:
- The default session, named
OProfile View
The OProfile view is the central point of interaction of the plug-in with the results of profiling.
Tree Structure
The tree structure shown above describes one or more profiles of one or more events in the following manner:
-
 Events -- the name of the profiling event used by OProfile
If source code is not available, then there may be symbols shown (including source file name) but no samples. This is usually the case with shared libraries. As well, depending on the #Global Settings, there may be no dependent images in a profile.
Note that after Eclipse is restarted, there will be no data shown in the view. Data from past profiles will still be on the system, if not touched otherwise, and can be re-read with the Refresh View menu action (see below).
Features
This section describes the features of the plug-in exposed through the view.
View Tree
- Double-clicking on a
 sample will open the source file in an editor and place the cursor at that line.
- Note this requires that the source code is available and is in the correct directory (as described in the binary's debug info).
View Menu
- Open OProfile Daemon Log
- This will launch a dialog showing the contents of the oprofile daemon log (by default in
/var/lib/oprofile/samples/oprofiled.log):
- This will launch a dialog showing the contents of the oprofile daemon log (by default in
- Refresh View
- This will re-read the OProfile data on the system, re-create the internal data model and re-display the profile tree. Useful to display data already on the system without launching a profile (e.g. when Eclipse first starts up).
- Save Default Session
- The default session, named
current, is overwritten on each launch of a profile if it is not saved. If you wish to keep the profile for later viewing, this menu action will allow you to save the session to a different name. Note that since the samples are in a system directory, this operation requires the use of OProfile and hence you will be prompted for the root password. The save session dialog is shown below:
- The default session, named
Example Project
If you wish to try out any of the above steps with a test project, download the example project used to create the screenshots here. In Eclipse, go to File -> Import -> Existing Projects into Workspace -> Archive File to import the project.
Troubleshooting
Various problems and their solutions are described here. If you encounter a problem not described here, please file a bug.
Install Script Errors
Each of the errors that could occur from the install scripts (install.sh or install-noconsolehelper.sh) are described below and the solutions to fix them.
Error: script must be run as the root user
You must be the root user to run the install script, since it requires touching files in root-owned directories.
Solution: Run the command su - to become the root user, or run the script as the root user with su -c './install.sh'.
Error: script must be run with pwd in script dir
Your current working directory must be the scripts directory; running the script relative from another location will not work.
Solution: Simply follow the steps of #Step 1 - Locate Plug-in Installation Directory to cd into the scripts dir.
Error: required binaries do not exist, OProfile not installed?
The oprofiled and opcontrol binaries are not in their usual directory (/usr/bin). Either they are in a non-standard directory or do not exist.
Solution: If the binaries are on your system (and in your PATH) but not in those directories, you can either remove these checks from the install script or create symlinks in the /usr/bin directory. Or if they are not on your system at all, install OProfile :)
Error: /usr/bin/consolehelper does not exist, run install-noconsolehelper.sh instead
As described in #Step 2 - Choose Which Installation Script To Run, if your system does not have the consolehelper program you must use the other mode of root authentication which makes use of the sudo mechanism.
Solution: Run the install-noconsolehelper.sh script instead.
Error: cannot create opcontrol wrapper in <directory>
The ln command returns that the symlink could not be created. This can occur if scripts is a sub-directory of an NFS mount -- the NFS server will not allow the local root user to create files in the directory.
Solution: Create the symlink yourself as a regular user by running ln -s /usr/bin/consolehelper opcontrol and edit the install.sh script to remove the section for the symlink (the script is fixed in SVN, but not in the 0.2.0 release).
Error: cannot find opxml binary, required plugin missing
This can occur if the native binary opxml is not found. It is required for proper operation of the plug-in.
Solution: If the org.eclipse.linuxtools.oprofile.core.linux.{x86,x86_64,ppc} directories exist (in the Eclipse plugins directory) then see the #Rebuilding opxml section to re-build the binary and put it in the proper directory. Otherwise, re-install the plug-in.
No Samples From A Profile
It is possible that running your program through OProfile will not generate any samples and hence the OProfile view will show no new results. This can be indicative of a problem, or more likely there were no samples gathered for the run of your program. OProfile is a system-wide profiling tool; hence if there are other active processes running on your computer they may overshadow your program (particularly if your program isn't very CPU intensive). This is also very subject to the Event you profile. As well, the results from profiling with OProfile are not deterministic nor consistent -- two subsequent runs may give you very different results, to as much of an extreme as one profile gives no results and another gives many samples.
Solution: there are a few ways you can try to get more samples:
- run your program with a larger input
- halt or kill as many other non-essential processes as possible
- reduce the Count in the #Event Configuration
- launch a profile several times
If you are unsure if your configuration is working correctly, try the profile on the #Example Project.
Log Reader Hangs
If the oprofiled log file is extremely large, the log reader may hang and possibly crash the plug-in. This has occurred when the verbosity option is set to all, which resulted in several hundred MiB of text in the log over the run of a few profiles. If you do require all this data in the log file, do not launch the log reader. Delete or backup the log file before running the log reader again.
Other Errors
Errors may be caused by problems with the native program that bridges OProfile and the plugin, opxml. Running this program manually may reveal the issue. It is in the plugins directory similar to #Step 1 - Locate Plug-in Installation Directory. However, depending on your platform, the location of opxml will be different. Open a terminal and run the command:
uname -m
Depending on the output, locate the following directory in the same manner as #Step 1 - Locate Plug-in Installation Directory, and change into that directory:
Output from uname -m
|
Directory to use in find command
|
Sub-directory to change to |
|---|---|---|
| i386, i468, i568, i686, x86 | org.eclipse.linuxtools.oprofile.core.linux.x86 | os/linux/x86 |
| x86_64 | org.eclipse.linuxtools.oprofile.core.linux.x86_64 | os/linux/x86_64 |
| ppc, ppc64 | org.eclipse.linuxtools.oprofile.core.linux.ppc | os/linux/ppc |
For example, if you were on a 64bit machine, the process would be similar to:
$ find /home/ksebasti/eclipse -name 'org.eclipse.linuxtools.oprofile.core.linux.x86_64_*'/home/ksebasti/eclipse/plugins/org.eclipse.linuxtools.oprofile.core.linux.x86_64_0.2.0.200904201514$ cd /home/ksebasti/eclipse/plugins/org.eclipse.linuxtools.oprofile.core.linux.x86_64_0.2.0.200904201514/os/linux/x86_64
Then run the command:
./opxml info
Check that the paths in the defaults section are correct. If the output is similar the output of the command ophelp, but formatted as XML, then this might not be the problem. However, if running opxml produces an error, it may be the root cause. A common error on some systems is an older version of the C runtime libraries, glibc. See #Rebuilding opxml for a solution to this error.
In any case, if there is an error please look for an existing bug or if one does not exist, file a new bug.
Rebuilding opxml
If running opxml manually returns an error something similar to opxml: /some/path/libc.so.6: version `GLIBC_2.8' not found (required by opxml), then you will need to rebuild the binary by following the steps below. Note: this is rarely necessary and may break an otherwise working installation. Only rebuild opxml if explicitly recommended.
- Follow the exact same steps as #Step 1 - Locate Plug-in Installation Directory, except instead of changing to the
natives/linux/scriptssub-directory, change to thenatives/linux/opxmlsub-directory of the core plugin. In here will be the source files for theopxmlbinary. -
opxmlrequiresmake,g++, the OProfile development libraries and thelibbfdlibraries to build; ensure that these are on your system. For Fedora systems these are themake,gcc-c++,oprofile-develandbinutils-develpackages. For Ubuntu systems, see the #Ubuntu - Extra Requirements section below. - run the command
maketo build the binary - run the command
make installto install the binary into the correct plug-in directory - run the command
make cleanto remove the extra files created during the build process
Ubuntu - Extra Requirements
Ubuntu and other Debian-based systems do not provide the OProfile development libraries in their packaging management system, so we must build them by hand. Fear not, it is not that complicated! The following steps were tested on Ubuntu 8.04 with Eclipse, the CDT, oprofile and all its dependencies are already installed via apt.
- install the packages
binutils-devandlibpopt-dev
sudo apt-get install binutils-dev libpopt-dev
- download the oprofile source
apt-get source oprofile
- unpack the oprofile source tarball
cd oprofile-0.9.3 ; tar -zxf oprofile_0.9.3-1.1ubuntu2.tar.gz
- run the
configuretool
cd oprofile-0.9.3 ; ./configure --without-kernel-support
- compile the required libraries
make
- move the libraries into the include path
sudo mv libutil/op_types.h libop/op_sample_file.h libutil/op_list.h libop/op_events.h libop/op_cpu_type.h libop/op_config.h libdb/odb.h /usr/includesudo mv libop/libop.a libdb/libodb.a /usr/libsudo mv libabi/libabi.a /usr/lib/libopabi.asudo mv libutil/libutil.a /usr/lib/liboputil.asudo mv libutil++/libutil++.a /usr/lib/liboputil++.a
Now the required libraries will be in the proper place for compiling. Continue the steps above in the #Rebuilding opxml section.

