Notice: this Wiki will be going read only early in 2024 and edits will no longer be possible. Please see: https://gitlab.eclipse.org/eclipsefdn/helpdesk/-/wikis/Wiki-shutdown-plan for the plan.
Difference between revisions of "Jetty WTP Plugin/Jetty WTP Dynamic Web Project"
| Line 3: | Line 3: | ||
=== Dynamic Web Project === | === Dynamic Web Project === | ||
| − | == Step 1 == | + | === Step 1 === |
To create a Dynamic WTP Project, go at File/New/Other... and select Web/Dynamic Web Project node : | To create a Dynamic WTP Project, go at File/New/Other... and select Web/Dynamic Web Project node : | ||
| Line 9: | Line 9: | ||
[[Image:Jetty-wtp-project1.jpg]] | [[Image:Jetty-wtp-project1.jpg]] | ||
| − | == Step 2 == | + | === Step 2 === |
[[Image:Jetty-wtp-project2.jpg]] | [[Image:Jetty-wtp-project2.jpg]] | ||
| − | == Step 3 == | + | === Step 3 === |
Click on Finish button, The WTP Dynamic Web Project is created and you can use JAR from the Jetty install with the Jetty v7.0 library which was created : | Click on Finish button, The WTP Dynamic Web Project is created and you can use JAR from the Jetty install with the Jetty v7.0 library which was created : | ||
| Line 19: | Line 19: | ||
[[Image:Jetty-wtp-project3.jpg]] | [[Image:Jetty-wtp-project3.jpg]] | ||
| − | == Step 4 == | + | === Step 4 === |
Create WebContent/index.htm like this : | Create WebContent/index.htm like this : | ||
| Line 37: | Line 37: | ||
[[Image:Jetty-wtp-project4.jpg]] | [[Image:Jetty-wtp-project4.jpg]] | ||
| + | |||
| + | === Step 5 === | ||
<br> Drag and drop the project mywebapp to the launch Jetty v7.0 Server at localhost-config : | <br> Drag and drop the project mywebapp to the launch Jetty v7.0 Server at localhost-config : | ||
[[Image:Jetty-wtp-project5.jpg]] | [[Image:Jetty-wtp-project5.jpg]] | ||
| + | |||
| + | === Step 6 === | ||
<br> You can start/stop the Jetty server : | <br> You can start/stop the Jetty server : | ||
[[Image:Jetty-wtp-project6.jpg]] | [[Image:Jetty-wtp-project6.jpg]] | ||
| + | |||
| + | === Step 7 === | ||
You can start the Jetty server, you will see in the console some Jetty logs : | You can start the Jetty server, you will see in the console some Jetty logs : | ||
| Line 60: | Line 66: | ||
| − | You can notice that | + | You can notice that: |
* Jetty deploy mywebapp by using file mywebapp.xml (which configure org.eclipse.jetty.webapp.WebAppContext and it is generated with the WTP Jetty Adaptor). | * Jetty deploy mywebapp by using file mywebapp.xml (which configure org.eclipse.jetty.webapp.WebAppContext and it is generated with the WTP Jetty Adaptor). | ||
* mywebapp.xml is stored in YOUR_WORKSPACE/.metadata\.plugins\org.eclipse.wst.server.core\tmp0\contextsfolder (your metdata). When you modify the file YOUR_WORKSPACE /mywebapp/index.htm (from your Eclipse project), the WTP Adaptor publish it to the OUR_WORKSPACE/.metadata\.plugins\org.eclipse.wst.server.core\tmp0/wtpwebapps\mywebapp folder. | * mywebapp.xml is stored in YOUR_WORKSPACE/.metadata\.plugins\org.eclipse.wst.server.core\tmp0\contextsfolder (your metdata). When you modify the file YOUR_WORKSPACE /mywebapp/index.htm (from your Eclipse project), the WTP Adaptor publish it to the OUR_WORKSPACE/.metadata\.plugins\org.eclipse.wst.server.core\tmp0/wtpwebapps\mywebapp folder. | ||
| − | * Port used is 8080. If you wish modify the port, please read | + | * Port used is 8080. If you wish modify the port, please read [[Jetty/Jetty WTP Plugin/Jetty WTP Modify Port]] |
| + | |||
| + | === Step 8 === | ||
| Line 70: | Line 78: | ||
[[Image:Jetty-wtp-project8.jpg]] | [[Image:Jetty-wtp-project8.jpg]] | ||
| − | You will see the index.htm content. You can create a Servlet and debug it | + | You will see the index.htm content. You can also create a Servlet and debug it. |
Revision as of 17:07, 17 November 2010
Contents
Dynamic Web Project
Step 1
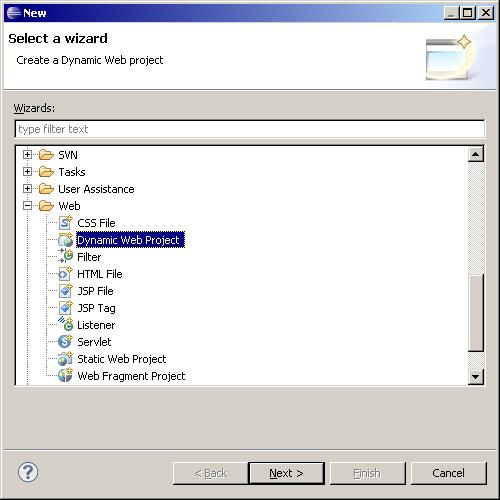
To create a Dynamic WTP Project, go at File/New/Other... and select Web/Dynamic Web Project node :
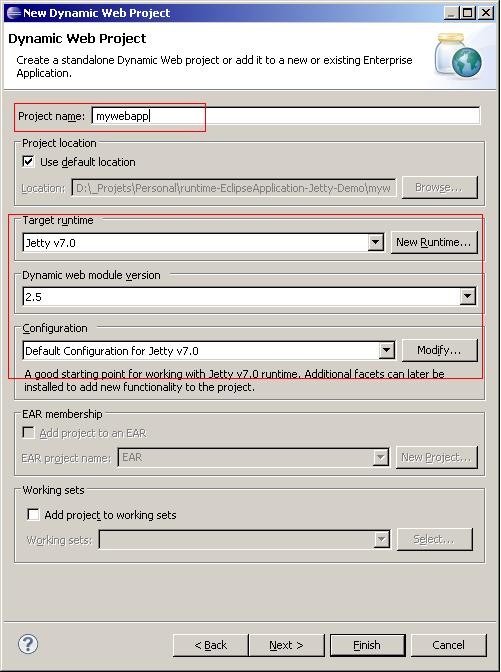
Step 2
Step 3
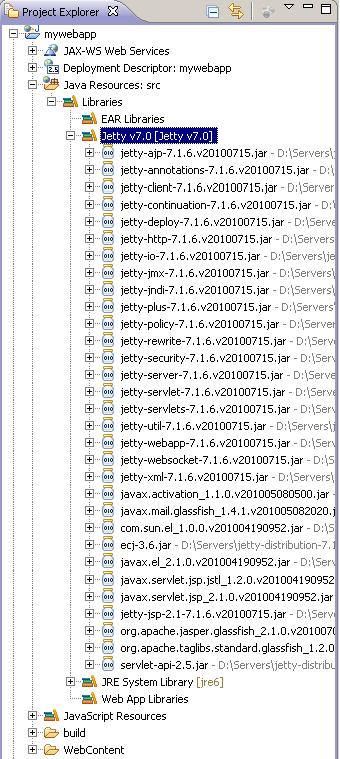
Click on Finish button, The WTP Dynamic Web Project is created and you can use JAR from the Jetty install with the Jetty v7.0 library which was created :
Step 4
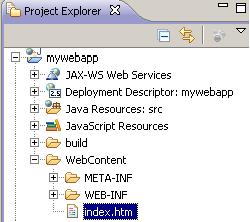
Create WebContent/index.htm like this :
<!DOCTYPE html PUBLIC "-//W3C//DTD HTML 4.01 Transitional//EN" "http://www.w3.org/TR/html4/loose.dtd">
<html>
<head>
<meta http-equiv="Content-Type" content="text/html; charset=ISO-8859-1">
<title>My first WEB Application</title>
</head>
<body>
	My first WEB Application.
</body>
</html>
Step 5
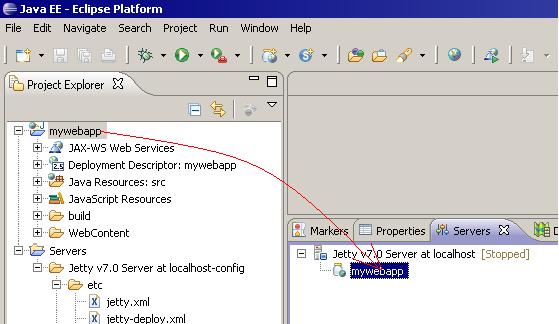
Drag and drop the project mywebapp to the launch Jetty v7.0 Server at localhost-config :
Step 6
You can start/stop the Jetty server :
Step 7
You can start the Jetty server, you will see in the console some Jetty logs :
2010-10-01 08:34:09.390:INFO::jetty-7.1.6.v20100715
2010-10-01 08:34:09.421:INFO::Deployment monitor D:\_Projets\Personal\runtime-EclipseApplication-Jetty-Demo\.metadata\.plugins\org.eclipse.wst.server.core\tmp0\contexts at interval 5
2010-10-01 08:34:09.421:INFO::Deployable added: D:\_Projets\Personal\runtime-EclipseApplication-Jetty-Demo\.metadata\.plugins\org.eclipse.wst.server.core\tmp0\contexts\mywebapp.xml
2010-10-01 08:34:09.734:INFO::Deployment monitor D:\_Projets\Personal\runtime-EclipseApplication-Jetty-Demo\.metadata\.plugins\org.eclipse.wst.server.core\tmp0\webapps at interval 5
2010-10-01 08:34:09.765:INFO::Started SelectChannelConnector@0.0.0.0:8080
You can notice that:
- Jetty deploy mywebapp by using file mywebapp.xml (which configure org.eclipse.jetty.webapp.WebAppContext and it is generated with the WTP Jetty Adaptor).
- mywebapp.xml is stored in YOUR_WORKSPACE/.metadata\.plugins\org.eclipse.wst.server.core\tmp0\contextsfolder (your metdata). When you modify the file YOUR_WORKSPACE /mywebapp/index.htm (from your Eclipse project), the WTP Adaptor publish it to the OUR_WORKSPACE/.metadata\.plugins\org.eclipse.wst.server.core\tmp0/wtpwebapps\mywebapp folder.
- Port used is 8080. If you wish modify the port, please read Jetty/Jetty WTP Plugin/Jetty WTP Modify Port
Step 8
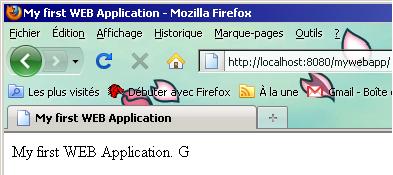
Go at http://localhost:8080/mywebapp/
You will see the index.htm content. You can also create a Servlet and debug it.

