Notice: this Wiki will be going read only early in 2024 and edits will no longer be possible. Please see: https://gitlab.eclipse.org/eclipsefdn/helpdesk/-/wikis/Wiki-shutdown-plan for the plan.
Difference between revisions of "Jetty/Tutorial/Jetty-OSGi SDK"
m |
|||
| (28 intermediate revisions by 2 users not shown) | |||
| Line 1: | Line 1: | ||
| − | {{Jetty | + | {{Jetty Tutorial |
| introduction = | | introduction = | ||
Jetty-OSGi is a packaging of jetty where jetty is run as an OSGi bundle. It supports the deployment of traditional J2EE web-applications and also web-bundles where the web application is contained in a bundle. | Jetty-OSGi is a packaging of jetty where jetty is run as an OSGi bundle. It supports the deployment of traditional J2EE web-applications and also web-bundles where the web application is contained in a bundle. | ||
| − | | | + | | details = |
| − | This tutorial introduces the development and testing of web-bundles in PDE. | + | This tutorial introduces the development and testing of web-bundles in PDE using Target Platforms. |
| + | [[Jetty/Tutorial/EclipseRT-Jetty-Starter-Kit|EclipseRT Jetty Starter Kit]] describes the runtime distribution. | ||
| + | It also describes how to develop against such a runtime with PDE. | ||
| + | |||
| + | == Configure a Target Platform and run a simple Test Unit with PDE == | ||
| − | |||
We will provision a new Target Platform and develop a simple bundle that executes a Testunit. | We will provision a new Target Platform and develop a simple bundle that executes a Testunit. | ||
A Target Platform defines the OSGi environment in which your bundles are compiled and debugged. | A Target Platform defines the OSGi environment in which your bundles are compiled and debugged. | ||
| − | + | ||
| − | + | === Target Platform with JUnit Support === | |
| − | + | Launch Eclipse-SDK-3.6. | |
| + | Define a new Target Platform "EclipseRT-Tutorial" | ||
Open the Preferences and choose the node "Plugins-Development/Target Platform" | Open the Preferences and choose the node "Plugins-Development/Target Platform" | ||
Click on "Add..." and choose the option "Nothing:" start with an empty Target Platform" | Click on "Add..." and choose the option "Nothing:" start with an empty Target Platform" | ||
| + | |||
| + | [[Image:01-JOT-new-target-platform.png|center|Create a new OSGi Project]] | ||
| + | |||
* Name the Target Platform "EclipseRT Tutorial" | * Name the Target Platform "EclipseRT Tutorial" | ||
* Click on Next and choose "Add..." then "Select Software Site" | * Click on Next and choose "Add..." then "Select Software Site" | ||
| + | [[Image:02-JOT-add-software-site.png|center|Name it]] | ||
| + | |||
* Select the "Helios" download site as the source of the features to install in the Target Platform | * Select the "Helios" download site as the source of the features to install in the Target Platform | ||
| − | |||
* Look for the category "Eclipse RT Target Platform" and select the PDE JUnit Support feature. Click on Finish. | * Look for the category "Eclipse RT Target Platform" and select the PDE JUnit Support feature. Click on Finish. | ||
| + | (Currently use: http://download.eclipse.org/jetty/7.1.3.v20100526/repository/) | ||
| + | |||
| + | [[Image:03-JOT-RT-PDE-JUnit-Support.png|center|Select the JUnit Support Feature]] | ||
| + | |||
| + | |||
* Select the new Target Platform as the active platform. | * Select the new Target Platform as the active platform. | ||
| + | [[Image:05-JOT-RT-PDE-JUnit-Support-Activate.png|center|Activate the Target Platform]] | ||
| + | |||
| + | === OSGi bundle with a test unit === | ||
* Create a new OSGI Bundle project: "New Project.../Plugin-Project" | * Create a new OSGI Bundle project: "New Project.../Plugin-Project" | ||
| − | * | + | * Name the project "org.eclipse.jetty.rt.example.test" |
| + | * Choose a pure OSGi bundle. | ||
| + | [[Image:07-JOT-RT-New-Plugin-Project.png|center|Activate the Target Platform]] | ||
| + | |||
| + | |||
* Generate a bundle activator. | * Generate a bundle activator. | ||
* Click on Finish. | * Click on Finish. | ||
| + | [[Image:08-JOT-RT-New-Plugin-Project.png|center|Activate the Target Platform]] | ||
| + | |||
| + | |||
| + | * Open the META-INF/MANIFEST.MF editor and on the tab "Overview, select the checkbox "Activate this plugin when one of its classes is loaded" | ||
| + | [[Image:11-JOT-Lazy-Activation-Policy.png|center|Lazy Activation policy]] | ||
| + | |||
* Open the META-INF/MANIFEST.MF editor and choose the tab "dependencies" | * Open the META-INF/MANIFEST.MF editor and choose the tab "dependencies" | ||
* In the "Imported packages" section, click on "Add..." and select the package "org.junit" | * In the "Imported packages" section, click on "Add..." and select the package "org.junit" | ||
| − | + | [[Image:09-JOT-Import-JUnit.png|center|Lazy Activation policy]] | |
| + | |||
| + | |||
* Create a new class ActivatorTest | * Create a new class ActivatorTest | ||
* Make a method that will be run by JUnit to test that the activator is started: | * Make a method that will be run by JUnit to test that the activator is started: | ||
| Line 44: | Line 72: | ||
} | } | ||
</source> | </source> | ||
| − | + | * Right-click on the Activator-Test Class and choose "Run as .../JUnit Plugin Test" | |
| + | * The test should pass | ||
| + | [[Image:12-JOT-Run-Testunit.png|center|Lazy Activation policy]] | ||
| + | [[Media:Org.eclipse.rt.example.test-1.0.0.qualifier.zip|Archive for this project]] | ||
| + | == Setup Jetty and a first Web-bundle == | ||
| − | == | + | === Setup Jetty Target Component === |
| − | + | * Choose Preferences and Edit the "EclipseRT Tutorial" target platform definition | |
| − | [[Image: | + | * Select the Helios site and choose "Edit" |
| + | * Add the "Jetty Target Component" feature to the list of features provisioned | ||
| + | [[Image:13-JOT-Target-Platform-add-jetty.png|center|Lazy Activation policy]] | ||
| − | Create a | + | === Create a first web-bundle === |
| − | + | Create a new OSGi bundle. Name it "org.eclipse.jetty.example.webapp" | |
| − | + | ||
| − | + | If you have installed the Jetty tooling feature, click next until you can choose a template. Everything will be generated. | |
| − | + | ||
| − | + | ||
| − | + | If you are creating the bundle with the jetty template you will need to add to the MANIFEST.MF: | |
| − | < | + | * The import-package: <source lang="text">Import-Package: javax.servlet;version="2.5.0", |
| − | + | javax.servlet.http;version="2.5.0"</source> | |
| + | * A new line that defines the context path for the web-application: <source lang="text">Web-ContextPath: /test</source> | ||
| + | It should look like this: | ||
| + | <source lang="text"> | ||
| + | Manifest-Version: 1.0 | ||
| + | Bundle-ManifestVersion: 2 | ||
| + | Bundle-Name: Webapp | ||
| + | Bundle-SymbolicName: org.eclipse.jetty.example.webapp | ||
| + | Bundle-Version: 1.0.0.qualifier | ||
| + | Bundle-Activator: org.eclipse.jetty.example.webapp.Activator | ||
| + | Import-Package: org.osgi.framework;version="1.3.0", | ||
| + | javax.servlet;version="2.5.0", | ||
| + | javax.servlet.http;version="2.5.0" | ||
| + | Bundle-RequiredExecutionEnvironment: JavaSE-1.6 | ||
| + | Web-ContextPath: /test | ||
| + | </source> | ||
| − | + | * Now create a new file WEB-INF/web.xml at the root of the project. | |
| − | + | And define a simple servlet-mapping: | |
| − | + | ||
| − | + | <source lang="xml"> | |
| − | + | <?xml version="1.0" encoding="ISO-8859-1"?> | |
| + | <web-app | ||
| + | xmlns="http://java.sun.com/xml/ns/javaee" | ||
| + | xmlns:xsi="http://www.w3.org/2001/XMLSchema-instance" | ||
| + | xsi:schemaLocation="http://java.sun.com/xml/ns/javaee http://java.sun.com/xml/ns/javaee/web-app_2_5.xsd" | ||
| + | version="2.5"> | ||
| + | |||
| + | <display-name>Hello Webapp</display-name> | ||
| + | <servlet> | ||
| + | <servlet-name>theservlet</servlet-name> | ||
| + | <servlet-class>org.eclipse.jetty.example.webapp.Servlet</servlet-class> | ||
| + | <load-on-startup>1</load-on-startup> | ||
| + | </servlet> | ||
| + | <servlet-mapping> | ||
| + | <servlet-name>theservlet</servlet-name> | ||
| + | <url-pattern>/*</url-pattern> | ||
| + | </servlet-mapping> | ||
| + | |||
| + | </web-app> | ||
| + | </source> | ||
| − | + | * Create a org.eclipse.jetty.example.webapp.Servlet class | |
| − | + | <source lang="java"> | |
| − | < | + | package org.eclipse.jetty.example.webapp; |
| − | + | import java.io.IOException; | |
| − | + | ||
| − | + | import javax.servlet.ServletConfig; | |
| − | + | import javax.servlet.ServletException; | |
| + | import javax.servlet.http.HttpServlet; | ||
| + | import javax.servlet.http.HttpServletRequest; | ||
| + | import javax.servlet.http.HttpServletResponse; | ||
| + | |||
| + | /** A simple servlet */ | ||
| + | public class Servlet extends HttpServlet { | ||
| + | private static final long serialVersionUID = 1L; | ||
| + | |||
| + | public void init(ServletConfig config) throws ServletException { | ||
| + | System.err.println("Initializing the servlet");; | ||
| + | } | ||
| + | protected void doGet(HttpServletRequest req, HttpServletResponse resp) | ||
| + | throws ServletException, IOException { | ||
| + | System.err.println("DO GET!"); | ||
| + | resp.getWriter().write("Howdy!"); | ||
| + | } | ||
| + | } | ||
| + | </source> | ||
=== Launch configuration === | === Launch configuration === | ||
| + | slf4j/logback are bundled by default. | ||
| + | Some extra steps are necessary to prevent all logs from appearing on the console. | ||
| − | + | Create a new file logback.xml at the root of the web-bundle project and paste this configuration: | |
| − | + | <source lang="xml"> | |
| − | + | <?xml version="1.0" encoding="UTF-8" ?> | |
| − | + | <configuration> | |
| − | + | <appender name="STDOUT" class="ch.qos.logback.core.ConsoleAppender"> | |
| − | + | <encoder> | |
| + | <pattern>%-4relative [%thread] %-5level %class - %msg%n</pattern> | ||
| + | </encoder> | ||
| + | </appender> | ||
| + | <root> | ||
| + | <level value="error" /> | ||
| + | <appender-ref ref="STDOUT" /> | ||
| + | </root> | ||
| + | </configuration> | ||
| + | </source> | ||
| − | + | Now Create a new OSGi launch configuration: | |
| − | + | Select the menu "Run/Run Configuration..." and choose the node "OSGi". | |
| + | Create a new configuration; choose the "Arguments" tab and add to the VM arguments area: | ||
| + | <source lang="text"> -Dlogback.configurationFile=${workspace_loc:org.eclipse.jetty.example.webapp}/logback.xml</source> | ||
| + | [[Image:15-JOT-OSGi-Launch-configuration.png|center|Lazy Activation policy]] | ||
| − | |||
| + | Now click on "Run". | ||
| − | + | Open a browser and navigate to http://localhost:8080/test | |
| − | + | It will display "Howdy" | |
| − | + | ||
| − | + | ||
| − | + | ||
| − | + | === Notes: where is the jetty server configured === | |
| + | jetty-osgi looks for ${jetty.home}/etc/jetty.xml for its configuration. | ||
| + | When it can't find it defaults to the one embedded inside itself. | ||
| + | For example: /rt-tutorial-workspace/.metadata/.plugins/org.eclipse.pde.core/.bundle_pool/plugins/org.eclipse.jetty.osgi.boot_7.1.3.v20100526/jettyhome | ||
| − | + | It is possible to set the system property jetty.home and point it to a different setup or to edit the jetty.xml file located there. | |
| − | + | == Automated test for the servlet == | |
| − | + | Add to the test bundle the following imports: | |
| − | + | <source lang="text"> | |
| − | + | Manifest-Version: 1.0 | |
| + | Bundle-ManifestVersion: 2 | ||
| + | Bundle-Name: Test | ||
| + | Bundle-SymbolicName: org.eclipse.jetty.rt.example.test | ||
| + | Bundle-Version: 1.0.0.qualifier | ||
| + | Bundle-Activator: org.eclipse.jetty.rt.example.test.Activator | ||
| + | Import-Package: org.eclipse.jetty, | ||
| + | org.eclipse.jetty.client, | ||
| + | org.eclipse.jetty.http, | ||
| + | org.eclipse.jetty.util, | ||
| + | org.eclipse.jetty.util.component, | ||
| + | org.junit;version="4.8.1", | ||
| + | org.osgi.framework;version="1.3.0" | ||
| + | Bundle-RequiredExecutionEnvironment: J2SE-1.5 | ||
| + | Bundle-ActivationPolicy: lazy | ||
| + | </source> | ||
| − | |||
| − | + | Create the ServletTest class: | |
| + | <source lang="java"> | ||
| + | package org.eclipse.jetty.rt.example.test; | ||
| − | + | import org.eclipse.jetty.client.*; | |
| − | + | import org.eclipse.jetty.util.Attributes; | |
| − | + | import org.eclipse.jetty.http.HttpBuffers; | |
| − | + | import org.eclipse.jetty.util.component.AbstractLifeCycle; | |
| − | + | import org.eclipse.jetty.http.HttpMethods; | |
| − | + | import org.eclipse.jetty.http.HttpStatus; | |
| + | import org.junit.Assert; | ||
| + | import org.junit.Before; | ||
| + | import org.junit.Test; | ||
| + | import org.osgi.framework.Bundle; | ||
| + | import org.osgi.framework.BundleException; | ||
| + | import org.osgi.framework.FrameworkUtil; | ||
| + | |||
| + | /** | ||
| + | * | ||
| + | */ | ||
| + | public class ServletTest { | ||
| + | |||
| + | private HttpClient _client; | ||
| + | |||
| + | protected void startClient() throws Exception { | ||
| + | _client = new HttpClient(); | ||
| + | _client.setConnectorType(HttpClient.CONNECTOR_SELECT_CHANNEL); | ||
| + | _client.start(); | ||
| + | } | ||
| + | |||
| + | protected void stopClient() throws Exception { | ||
| + | if (_client != null) { | ||
| + | _client.stop(); | ||
| + | _client = null; | ||
| + | } | ||
| + | } | ||
| + | |||
| + | /** | ||
| + | * Make sure the webapp is started before this test is run. | ||
| + | * Could be done via the Launch Configuration | ||
| + | */ | ||
| + | @Before public void setup() { | ||
| + | Bundle testBundle = FrameworkUtil.getBundle(ServletTest.class); | ||
| + | for (Bundle b : testBundle.getBundleContext().getBundles()) { | ||
| + | if (b.getSymbolicName().equals("org.eclipse.jetty.osgi.boot") | ||
| + | || b.getSymbolicName().equals("org.eclipse.jetty.example.webapp")) { | ||
| + | try { | ||
| + | System.err.println("Found " + b.getSymbolicName()); | ||
| + | b.start(); | ||
| + | } catch (BundleException e) { | ||
| + | Assert.fail("Unable to start the necessary bundles"); | ||
| + | } | ||
| + | } | ||
| + | } | ||
| + | //TODO: put in a lifecycle listener | ||
| + | synchronized (Thread.currentThread()) { | ||
| + | try { | ||
| + | Thread.currentThread().wait(1000); | ||
| + | } catch (Throwable e) { | ||
| + | e.printStackTrace(); | ||
| + | } | ||
| + | } | ||
| + | } | ||
| + | |||
| + | @Test public void testGet() throws Exception { | ||
| + | startClient(); | ||
| + | |||
| + | ContentExchange getExchange = new ContentExchange(); | ||
| + | getExchange.setURL("http://localhost:8080/test/"); | ||
| + | getExchange.setMethod(HttpMethods.GET); | ||
| + | |||
| + | _client.send(getExchange); | ||
| + | int state = getExchange.waitForDone(); | ||
| + | |||
| + | String content = ""; | ||
| + | int responseStatus = getExchange.getResponseStatus(); | ||
| + | if (responseStatus == HttpStatus.OK_200) { | ||
| + | content = getExchange.getResponseContent(); | ||
| + | } | ||
| + | System.err.println("Got the content: " + content); | ||
| + | stopClient(); | ||
| + | |||
| + | Assert.assertEquals(HttpStatus.OK_200, responseStatus); | ||
| + | Assert.assertEquals("Howdy!", content); | ||
| + | } | ||
| + | |||
| + | } | ||
| + | </source> | ||
| − | + | [[Media:Org.eclipse.rt.example.webapp-1.0.0.qualifier.zip|Archive of the web-bundle and the webtest bundles]] | |
| − | + | ||
| − | + | ||
| − | + | == EclipseRT Jetty Starter Kit == | |
| + | EclipseRT Jetty Starter is a downloadable distribution of jetty for production environment. | ||
| + | It is based on p2 and configured out of the box to be managed by p2. For example to upgrade an installation or install other runtime features, one could use the p2 admin UI or the osgi console where p2 defines the provisioning commands. | ||
| + | For development purpose the familiar dropins folder is supported. | ||
| + | The Starter Kit is bundled with the platform specific equinox launchers. It can be launched directly in java though. | ||
| + | PDE supports importing an eclipse installation as a Target Platform. | ||
| − | + | It is detailed here: [[Jetty/Tutorial/EclipseRT-Jetty-Starter-Kit|EclipseRT Jetty Starter Kit]] | |
| − | + | ||
| − | + | ||
| − | |||
| − | |||
| − | | more = [[Jetty/Feature/Jetty_OSGi|Jetty-OSGi]], | + | | more = [[Jetty/Feature/Jetty_OSGi|Jetty-OSGi]], [[Jetty/Tutorial/EclipseRT-Jetty-Starter-Kit|EclipseRT Jetty Starter Kit]], RFC66, PDE |
| − | + | ||
| − | + | ||
| category = [[Category:Jetty]] [[Category:OSGi]] | | category = [[Category:Jetty]] [[Category:OSGi]] | ||
}} | }} | ||
Revision as of 14:06, 8 September 2011
Contents
Introduction
Jetty-OSGi is a packaging of jetty where jetty is run as an OSGi bundle. It supports the deployment of traditional J2EE web-applications and also web-bundles where the web application is contained in a bundle.
Details
This tutorial introduces the development and testing of web-bundles in PDE using Target Platforms. EclipseRT Jetty Starter Kit describes the runtime distribution. It also describes how to develop against such a runtime with PDE.
Configure a Target Platform and run a simple Test Unit with PDE
We will provision a new Target Platform and develop a simple bundle that executes a Testunit. A Target Platform defines the OSGi environment in which your bundles are compiled and debugged.
Target Platform with JUnit Support
Launch Eclipse-SDK-3.6. Define a new Target Platform "EclipseRT-Tutorial" Open the Preferences and choose the node "Plugins-Development/Target Platform" Click on "Add..." and choose the option "Nothing:" start with an empty Target Platform"

- Name the Target Platform "EclipseRT Tutorial"
- Click on Next and choose "Add..." then "Select Software Site"

- Select the "Helios" download site as the source of the features to install in the Target Platform
- Look for the category "Eclipse RT Target Platform" and select the PDE JUnit Support feature. Click on Finish.
(Currently use: http://download.eclipse.org/jetty/7.1.3.v20100526/repository/)

- Select the new Target Platform as the active platform.

OSGi bundle with a test unit
- Create a new OSGI Bundle project: "New Project.../Plugin-Project"
- Name the project "org.eclipse.jetty.rt.example.test"
- Choose a pure OSGi bundle.

- Generate a bundle activator.
- Click on Finish.

- Open the META-INF/MANIFEST.MF editor and on the tab "Overview, select the checkbox "Activate this plugin when one of its classes is loaded"

- Open the META-INF/MANIFEST.MF editor and choose the tab "dependencies"
- In the "Imported packages" section, click on "Add..." and select the package "org.junit"

- Create a new class ActivatorTest
- Make a method that will be run by JUnit to test that the activator is started:
package org.eclipse.jetty.rt.example.test;

import org.junit.Assert;
import org.junit.Test;

/**
 * Tests that the activator was indeed loaded
 */
public class ActivatorTest {
	@Test public void testActivator() throws Exception {
		Assert.assertNotNull("The activator was not started", Activator.getContext());
	}
}
- Right-click on the Activator-Test Class and choose "Run as .../JUnit Plugin Test"
- The test should pass

Setup Jetty and a first Web-bundle
Setup Jetty Target Component
- Choose Preferences and Edit the "EclipseRT Tutorial" target platform definition
- Select the Helios site and choose "Edit"
- Add the "Jetty Target Component" feature to the list of features provisioned

Create a first web-bundle
Create a new OSGi bundle. Name it "org.eclipse.jetty.example.webapp"
If you have installed the Jetty tooling feature, click next until you can choose a template. Everything will be generated.
If you are creating the bundle with the jetty template you will need to add to the MANIFEST.MF:
- The import-package:
Import-Package: javax.servlet;version="2.5.0",
 javax.servlet.http;version="2.5.0"
- A new line that defines the context path for the web-application:
Web-ContextPath: /test
It should look like this:
Manifest-Version: 1.0
Bundle-ManifestVersion: 2
Bundle-Name: Webapp
Bundle-SymbolicName: org.eclipse.jetty.example.webapp
Bundle-Version: 1.0.0.qualifier
Bundle-Activator: org.eclipse.jetty.example.webapp.Activator
Import-Package: org.osgi.framework;version="1.3.0",
 javax.servlet;version="2.5.0",
 javax.servlet.http;version="2.5.0"
Bundle-RequiredExecutionEnvironment: JavaSE-1.6
Web-ContextPath: /test
- Now create a new file WEB-INF/web.xml at the root of the project.
And define a simple servlet-mapping:
<?xml version="1.0" encoding="ISO-8859-1"?>
<web-app
   xmlns="http://java.sun.com/xml/ns/javaee"
   xmlns:xsi="http://www.w3.org/2001/XMLSchema-instance"
   xsi:schemaLocation="http://java.sun.com/xml/ns/javaee http://java.sun.com/xml/ns/javaee/web-app_2_5.xsd"
   version="2.5">

   <display-name>Hello Webapp</display-name>
   <servlet>
        <servlet-name>theservlet</servlet-name>
        <servlet-class>org.eclipse.jetty.example.webapp.Servlet</servlet-class>
        <load-on-startup>1</load-on-startup>
    </servlet>
    <servlet-mapping>
        <servlet-name>theservlet</servlet-name>
        <url-pattern>/*</url-pattern>
    </servlet-mapping>

</web-app>
- Create a org.eclipse.jetty.example.webapp.Servlet class
package org.eclipse.jetty.example.webapp;

import java.io.IOException;

import javax.servlet.ServletConfig;
import javax.servlet.ServletException;
import javax.servlet.http.HttpServlet;
import javax.servlet.http.HttpServletRequest;
import javax.servlet.http.HttpServletResponse;

/** A simple servlet */
public class Servlet extends HttpServlet {
	private static final long serialVersionUID = 1L;

	public void init(ServletConfig config) throws ServletException {
		System.err.println("Initializing the servlet");;
	}
	protected void doGet(HttpServletRequest req, HttpServletResponse resp)
			throws ServletException, IOException {
		System.err.println("DO GET!");
		resp.getWriter().write("Howdy!");
	}
}
Launch configuration
slf4j/logback are bundled by default. Some extra steps are necessary to prevent all logs from appearing on the console.
Create a new file logback.xml at the root of the web-bundle project and paste this configuration:
<?xml version="1.0" encoding="UTF-8" ?>
<configuration>
	<appender name="STDOUT" class="ch.qos.logback.core.ConsoleAppender">
		<encoder>
			<pattern>%-4relative [%thread] %-5level %class - %msg%n</pattern>
		</encoder>
	</appender>
	<root>
		<level value="error" />
		<appender-ref ref="STDOUT" />
	</root>
</configuration>
Now Create a new OSGi launch configuration: Select the menu "Run/Run Configuration..." and choose the node "OSGi". Create a new configuration; choose the "Arguments" tab and add to the VM arguments area:
-Dlogback.configurationFile=${workspace_loc:org.eclipse.jetty.example.webapp}/logback.xml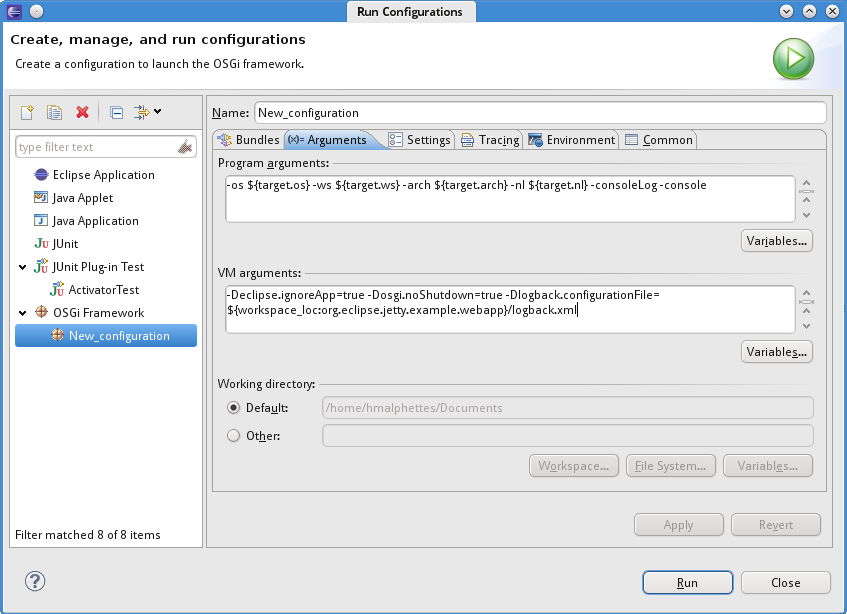
Now click on "Run".Open a browser and navigate to http://localhost:8080/test It will display "Howdy"
Notes: where is the jetty server configured
jetty-osgi looks for ${jetty.home}/etc/jetty.xml for its configuration. When it can't find it defaults to the one embedded inside itself. For example: /rt-tutorial-workspace/.metadata/.plugins/org.eclipse.pde.core/.bundle_pool/plugins/org.eclipse.jetty.osgi.boot_7.1.3.v20100526/jettyhome
It is possible to set the system property jetty.home and point it to a different setup or to edit the jetty.xml file located there.
Automated test for the servlet
Add to the test bundle the following imports:
Manifest-Version: 1.0
Bundle-ManifestVersion: 2
Bundle-Name: Test
Bundle-SymbolicName: org.eclipse.jetty.rt.example.test
Bundle-Version: 1.0.0.qualifier
Bundle-Activator: org.eclipse.jetty.rt.example.test.Activator
Import-Package: org.eclipse.jetty,
 org.eclipse.jetty.client,
 org.eclipse.jetty.http,
 org.eclipse.jetty.util,
 org.eclipse.jetty.util.component,
 org.junit;version="4.8.1",
 org.osgi.framework;version="1.3.0"
Bundle-RequiredExecutionEnvironment: J2SE-1.5
Bundle-ActivationPolicy: lazy
Create the ServletTest class:package org.eclipse.jetty.rt.example.test; import org.eclipse.jetty.client.*; import org.eclipse.jetty.util.Attributes; import org.eclipse.jetty.http.HttpBuffers; import org.eclipse.jetty.util.component.AbstractLifeCycle; import org.eclipse.jetty.http.HttpMethods; import org.eclipse.jetty.http.HttpStatus; import org.junit.Assert; import org.junit.Before; import org.junit.Test; import org.osgi.framework.Bundle; import org.osgi.framework.BundleException; import org.osgi.framework.FrameworkUtil; /** * */ public class ServletTest { private HttpClient _client; protected void startClient() throws Exception { _client = new HttpClient(); _client.setConnectorType(HttpClient.CONNECTOR_SELECT_CHANNEL); _client.start(); } protected void stopClient() throws Exception { if (_client != null) { _client.stop(); _client = null; } } /** * Make sure the webapp is started before this test is run. * Could be done via the Launch Configuration */ @Before public void setup() { Bundle testBundle = FrameworkUtil.getBundle(ServletTest.class); for (Bundle b : testBundle.getBundleContext().getBundles()) { if (b.getSymbolicName().equals("org.eclipse.jetty.osgi.boot") || b.getSymbolicName().equals("org.eclipse.jetty.example.webapp")) { try { System.err.println("Found " + b.getSymbolicName()); b.start(); } catch (BundleException e) { Assert.fail("Unable to start the necessary bundles"); } } } //TODO: put in a lifecycle listener synchronized (Thread.currentThread()) { try { Thread.currentThread().wait(1000); } catch (Throwable e) { e.printStackTrace(); } } } @Test public void testGet() throws Exception { startClient(); ContentExchange getExchange = new ContentExchange(); getExchange.setURL("http://localhost:8080/test/"); getExchange.setMethod(HttpMethods.GET); _client.send(getExchange); int state = getExchange.waitForDone(); String content = ""; int responseStatus = getExchange.getResponseStatus(); if (responseStatus == HttpStatus.OK_200) { content = getExchange.getResponseContent(); } System.err.println("Got the content: " + content); stopClient(); Assert.assertEquals(HttpStatus.OK_200, responseStatus); Assert.assertEquals("Howdy!", content); } }
Archive of the web-bundle and the webtest bundles
EclipseRT Jetty Starter Kit
EclipseRT Jetty Starter is a downloadable distribution of jetty for production environment. It is based on p2 and configured out of the box to be managed by p2. For example to upgrade an installation or install other runtime features, one could use the p2 admin UI or the osgi console where p2 defines the provisioning commands. For development purpose the familiar dropins folder is supported.
The Starter Kit is bundled with the platform specific equinox launchers. It can be launched directly in java though. PDE supports importing an eclipse installation as a Target Platform.
It is detailed here: EclipseRT Jetty Starter Kit
Additional Resources
Jetty-OSGi, EclipseRT Jetty Starter Kit, RFC66, PDE
- A new line that defines the context path for the web-application:
